
IPC Version | XX.7.0.68 | Update | 2018.12.19 |
IPC Version | XX.8.0.1 | Update | 2022.4.20 |
1.What is NAS?
NAS(Network-Attached Storage) is dedicated file storage that enables multiple users and heterogeneous client devices to retrieve data from centralized disk capacity. Users on a local area network (LAN) access the shared storage via a standard Ethernet connection.
Advantages of using NAS:
The key benefits of network-attached storage are mainly speed and convenience. Instead of a hard drive connecting to your computer, NAS connects to your wireless router-enabling multiple users from multiple devices to access the files on the network.
A NAS storage appliance is a computing device that can be attached anywhere on the network, primarily to store files. NAS solutions are nothing more than dedicated file servers.
Disadvantages of using NAS:
NAS appliances share the network with their computing counterparts and hence the NAS solution consumes more bandwidth from the network. Also, the performance of the NAS will depend upon the amount of bandwidth available.
2.How to create NAS ?
The two ways which Milesight Network Cameras supported are NFS and SMB/CIFS.
2.1 NFS
2.1.1 Physical NAS
If you have a physical NAS , take Synology as an example, you need to configure as follow.
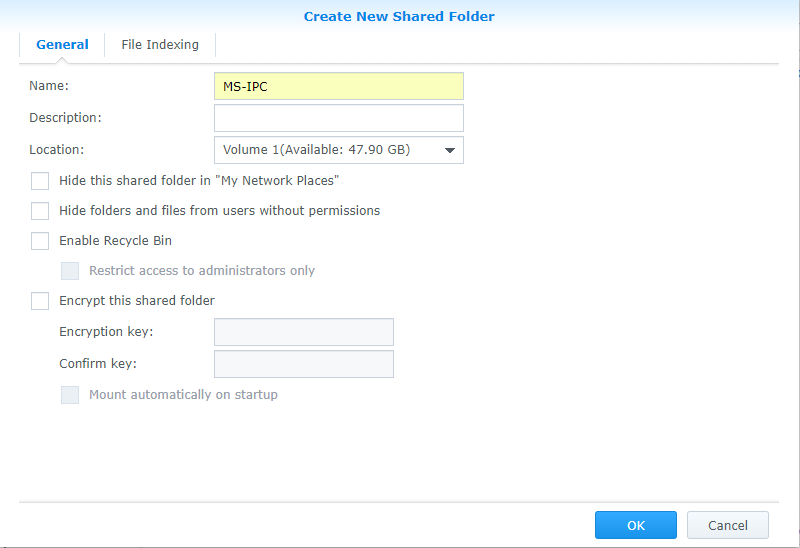
Create a shared folder
Go to “Control Panel”→ “Shared Panel”→ “Create”.
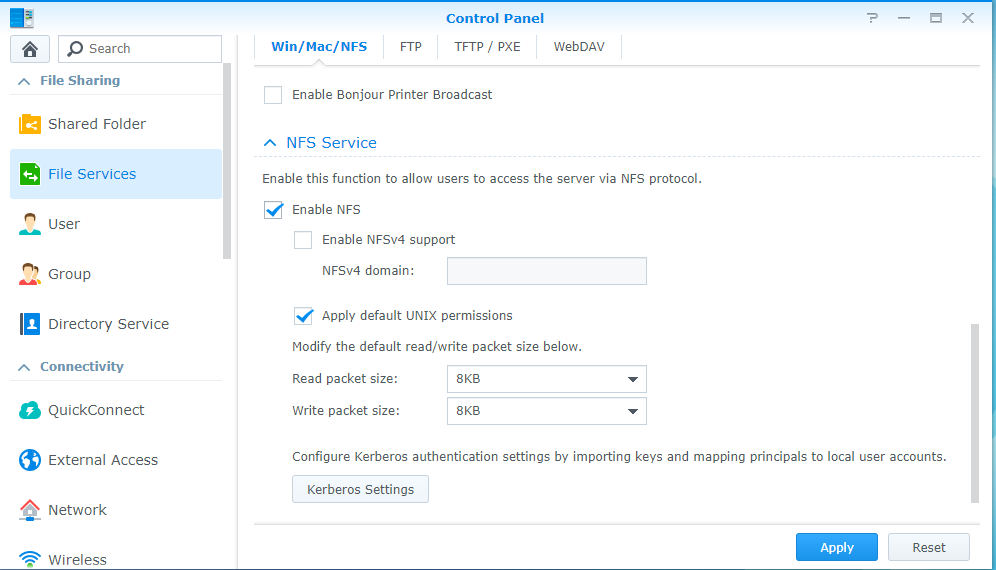
Enable NFS Service and give NFS permission to the Network Camera
Go to “Control Panel”→ “File Services”→ “Win/Mac/NFS”
Go to “Shared Folder”→ “Edit”→ “NFS Permissions"
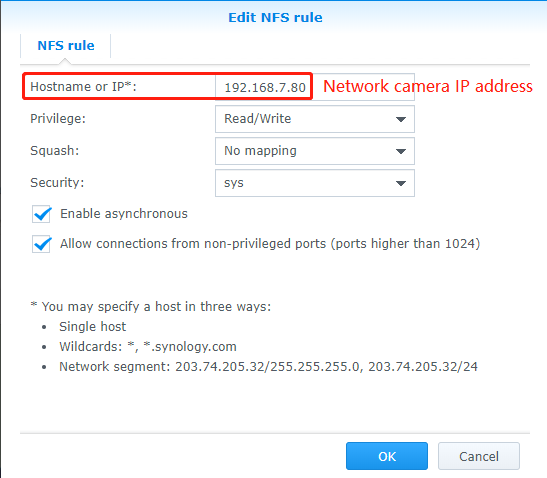
Note: Enable “Allow connection from non-privileged ports(ports higher than 1024)
2.1.2 Non-Physical NAS
If you do not have a physical NAS, you can create a NAS in Linux, take Ubuntu as a example.
Note: The version of the Ubuntu i used to test is 18.04
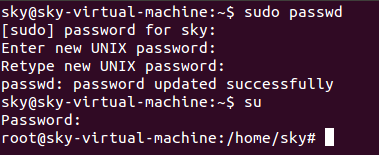
Create a root user
# sudo passwd
# su
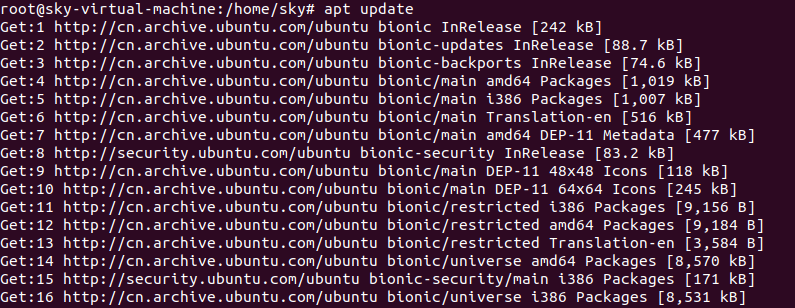
System update
# apt update
Set up Static IP
For different versions of Ubuntu, the way to set a static IP address is different and unable to explain the setup method for all versions here, so please search for how to modify the static IP address for your Ubuntu version
Install NFS
# apt-get install nfs-kernel-server

Create Shared projects
# cd /home/sky
# mkdir nfs_shared (Note: You can create the folder in different path as you want.)
# chmod 777 -R nfs_shared

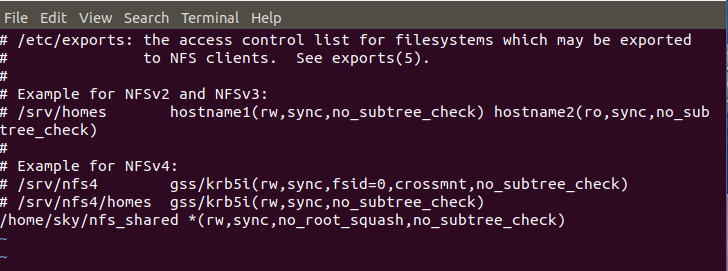
Modify the NFS configuration file
# vi /etc/exports

Insert content
# /home/sky/nfs_shared *(rw,sync,no_root_squash,no_subtree_check)
Start the service
# service portmap restart
# service nfs-kernel-server restart

2.2 SMB/CIFS
2.2.1 Physical NAS
If you have a physical NAS , take Synology as an example, you need to configure as follow.
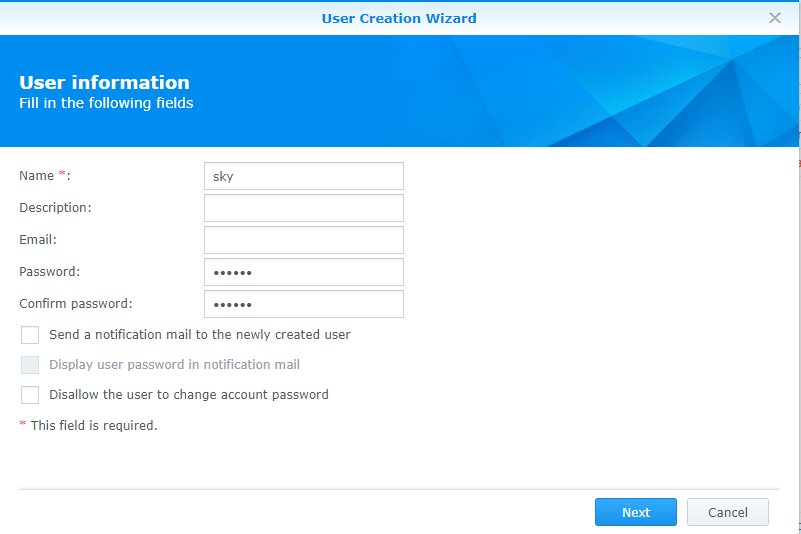
Create a user
Now NAS has only two users, admin and guest who have the highest privilege. Do not use the admin user as the user to access the daily files if there is no special case. Therefore, you need to create other users.
Go to “Control Panel”→ “User”→ “Create”.
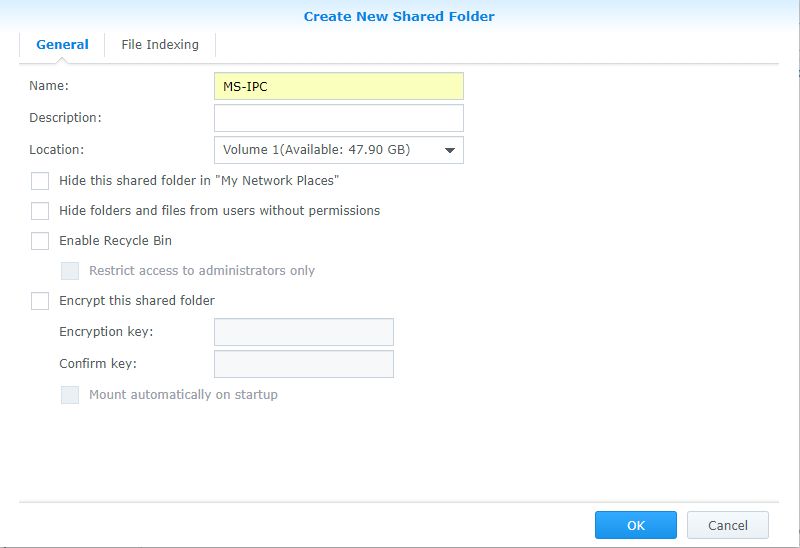
Create a shared folder
Go to “Control Panel”→ “Shared Panel”→ “Create”.
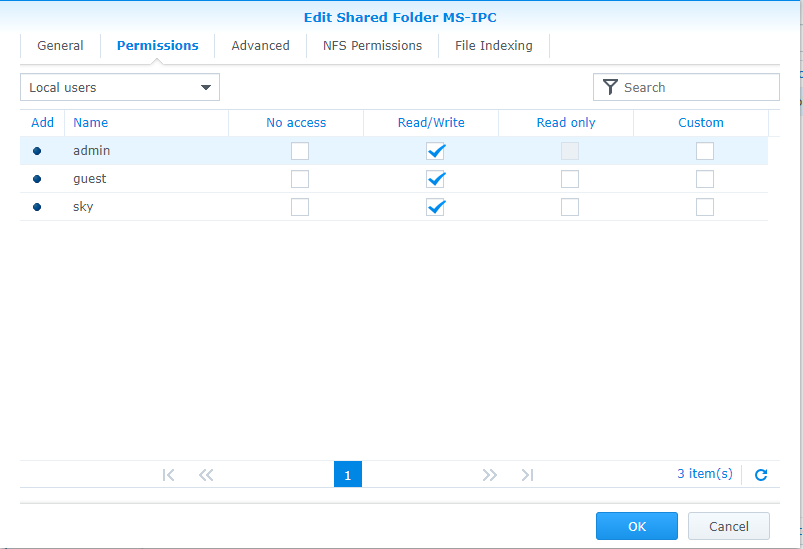
Setting permissions: “Shared Panel”→ “Edit”→ “Permissions”.
2.2.2 Non-Physical NAS
If you do not have a physical NAS, there are two ways to create a NAS if you want to add NAS by SMB/CIFS.
On PC side
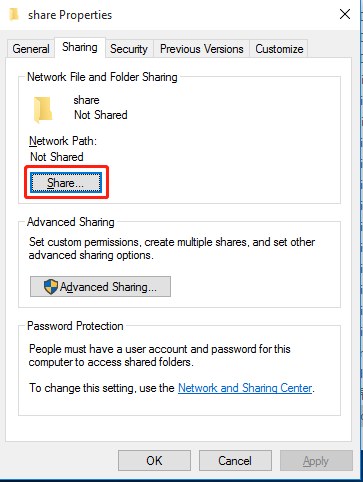
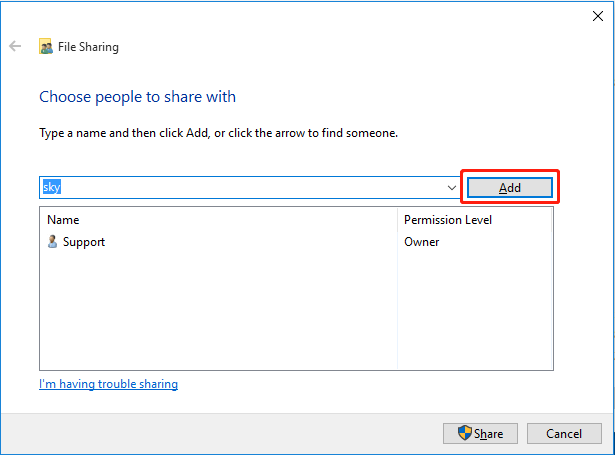
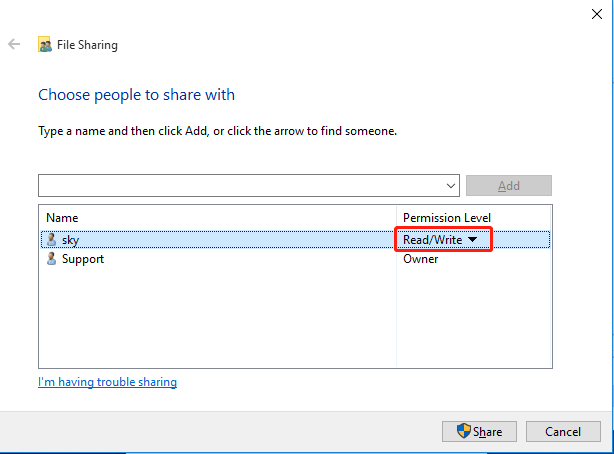
Select shared users and give permissions
Select the folder you want to share → “Properties”→ “Sharing”.
|
|
On Linux (take Ubuntu as an example)
Note: The version of the Ubuntu i used to test is 18.04
Create a root user
1.# sudo passwd
2.# su
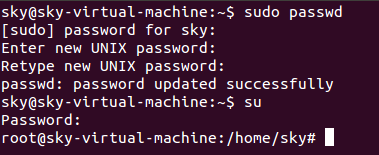
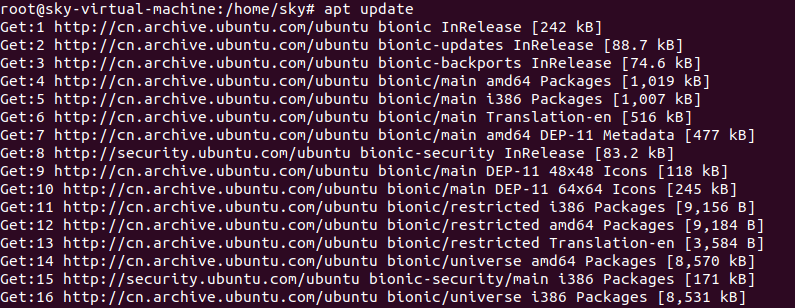
System update
# apt update
Set up Static IP address:
For different versions of Ubuntu, the way to set a static IP address is different and unable to explain the setup method for all versions here, so please search for how to modify the static IP address for your Ubuntu version
Install Samba
#apt-get install samba

Create Shared projects
# mkdir /home/share (Note: You can create the folder in different path as you want)
# chmod 777 /home/share


Modify the Samba configuration file
# vi /etc/samba/smb.conf

Insert content at the end
# [share]
Path=/home/share
available=yes
browseable=yes
public=yes
writeable=yes
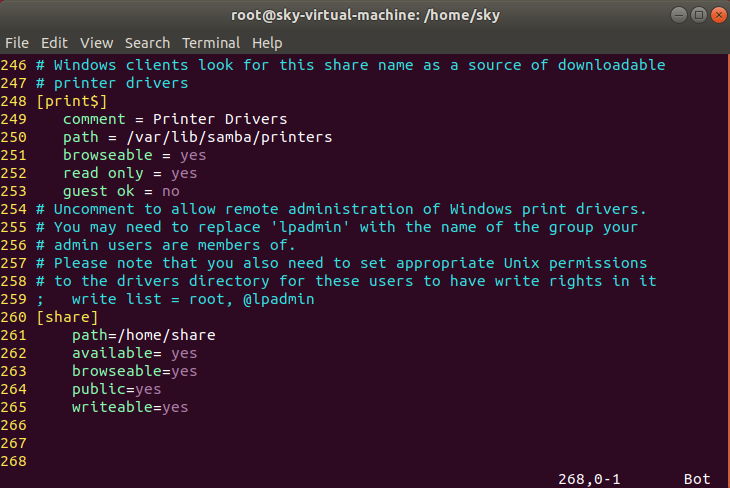
Note: The file path you need to fill in on camera side is the Folder in parentheses [...] , like share as shown above picture. You also can change the Folder name as you want.
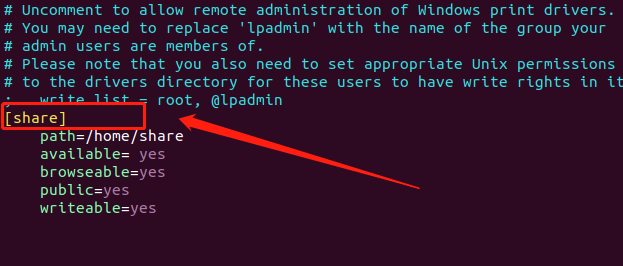
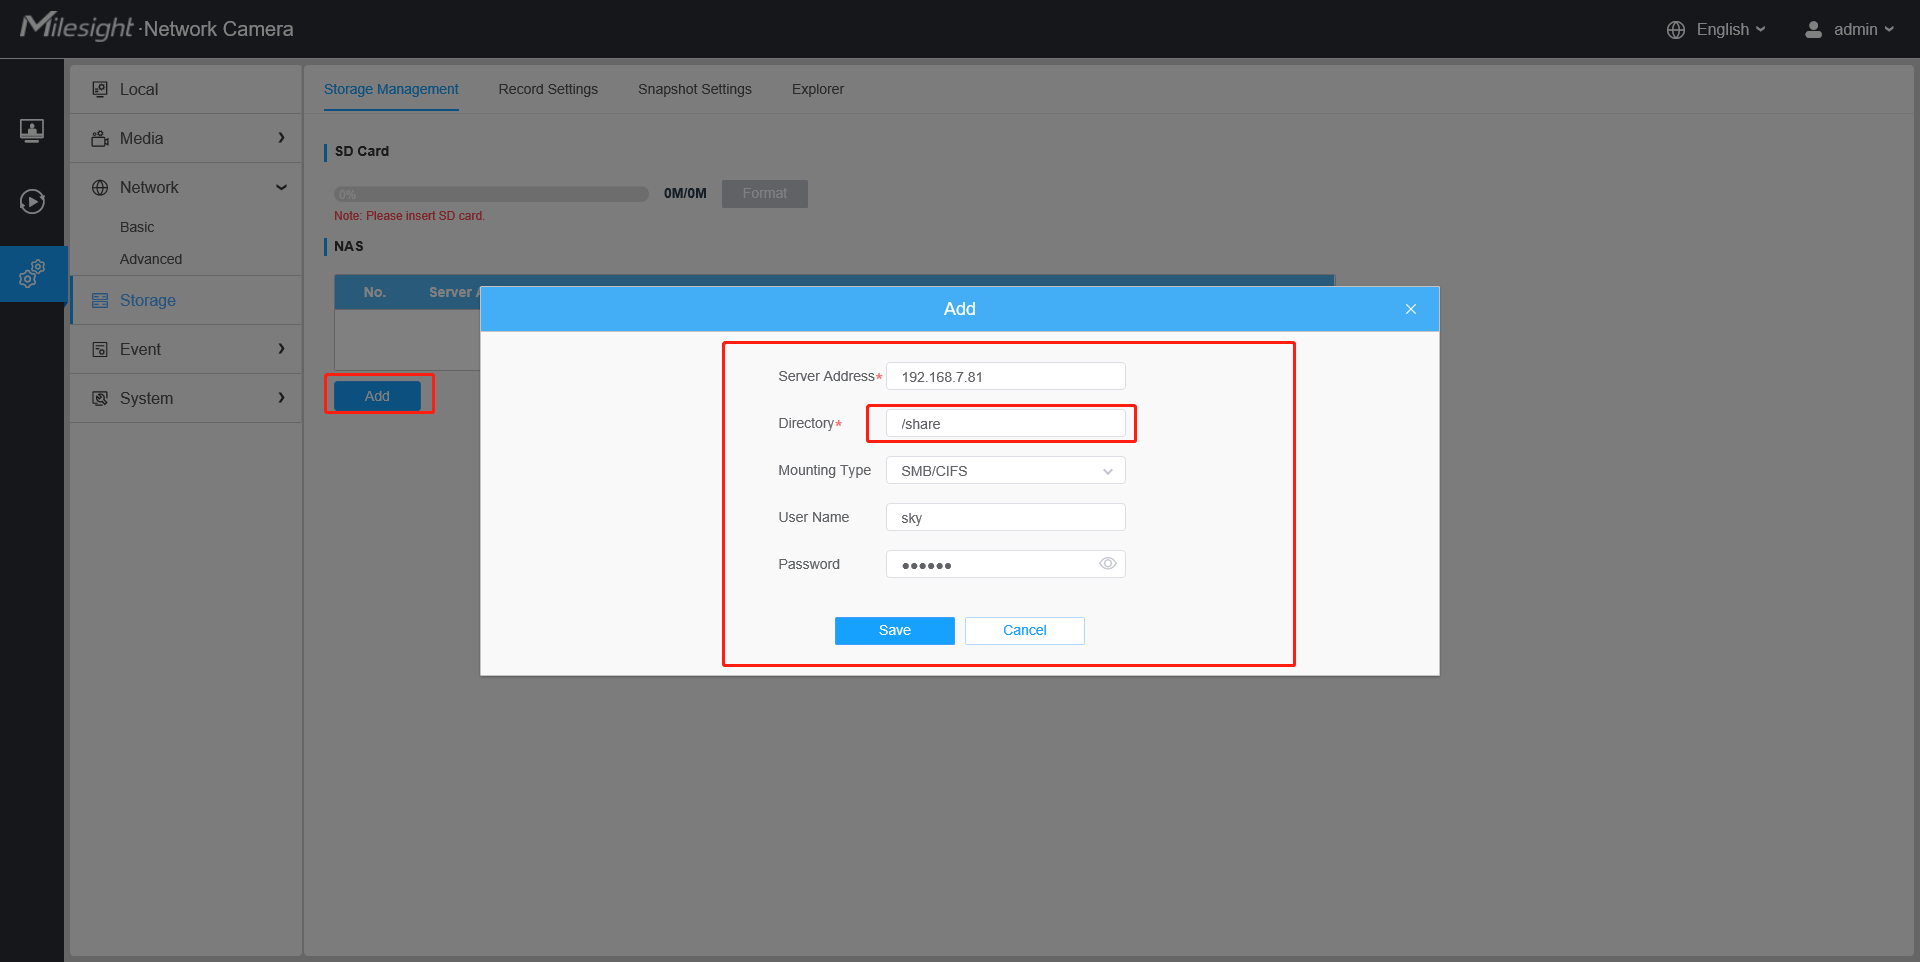
Add and enable Samba user
#smbpasswd -a sky
#smbpasswd -e sky

Start the service
# service smbd restart

3.How to add NAS to Milesight Network Camera?
3.1 NFS
Go to “Storage”→“Storage Management”, and input some information about the NAS.
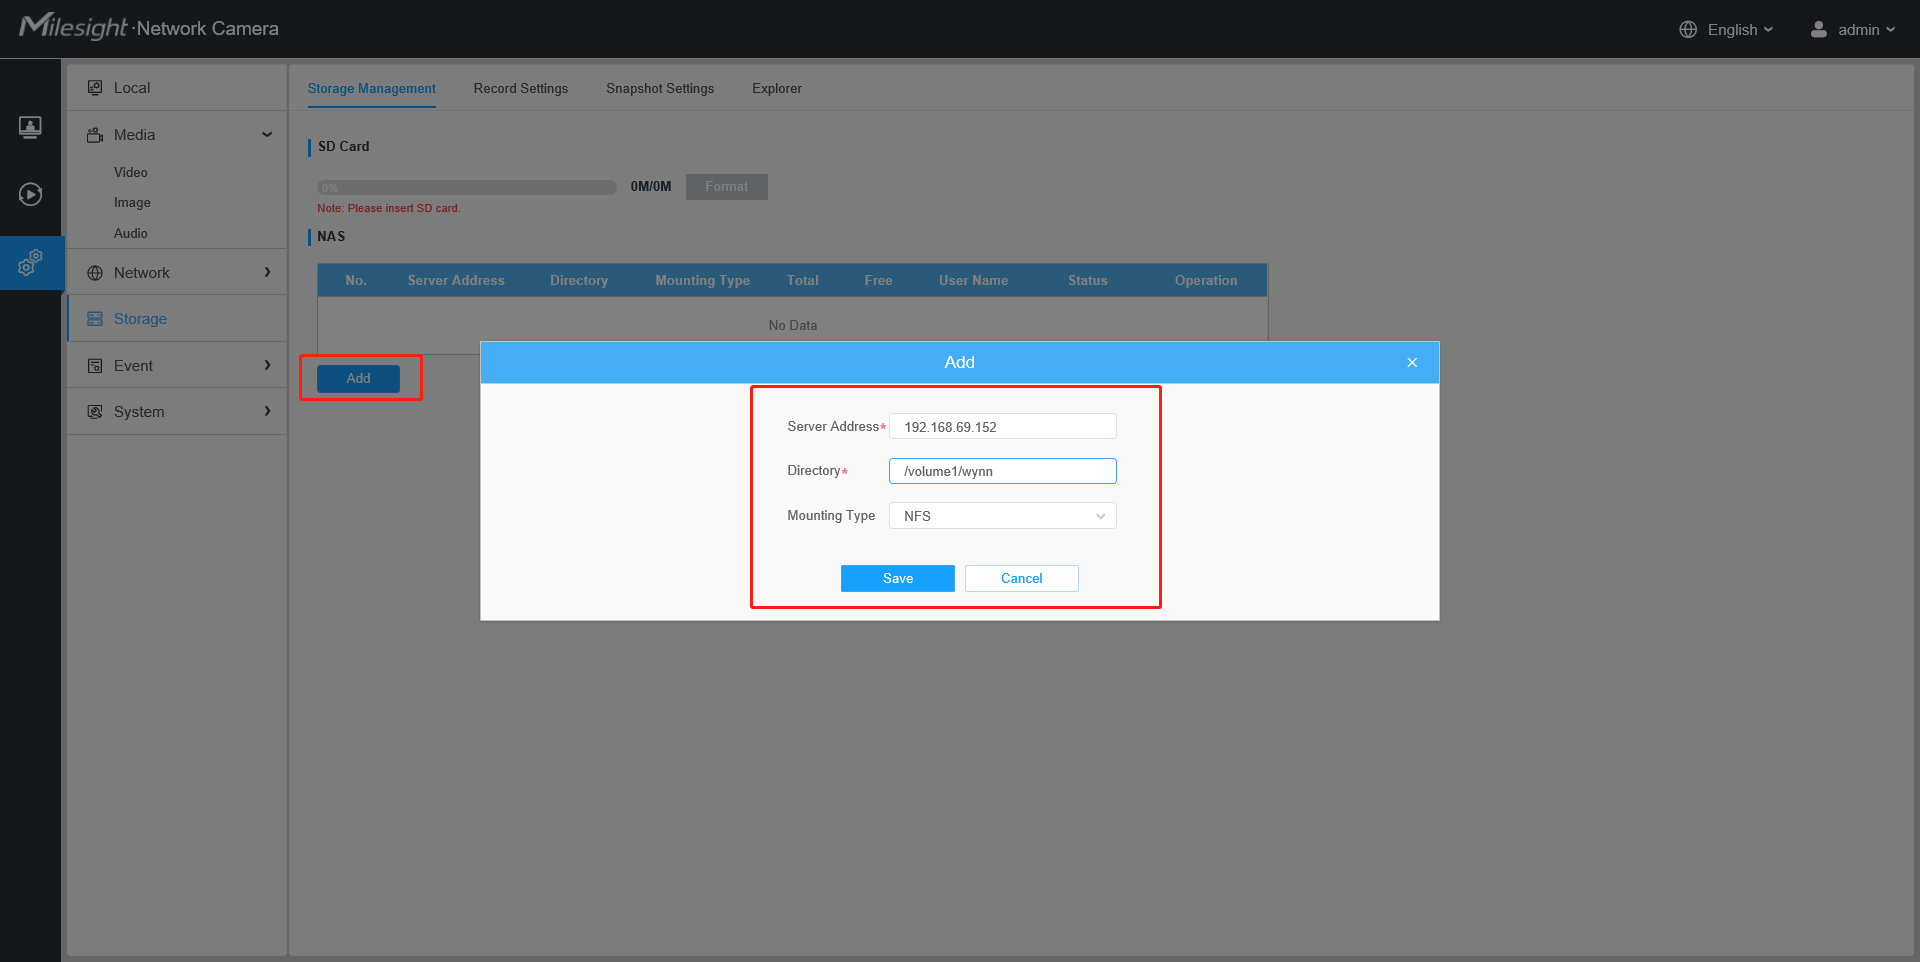
Make sure the Status is “Online”.

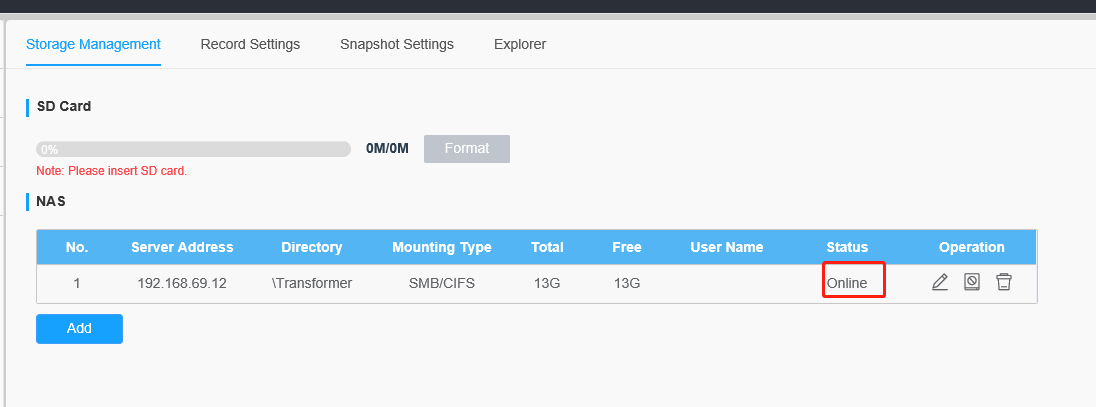
Note: If the Status is “Unformatted”,please click the button to format the NAS.

3.2 SMB/CIFS
1. Go to “Storage”→“Storage Management”, and input some information about the NAS.
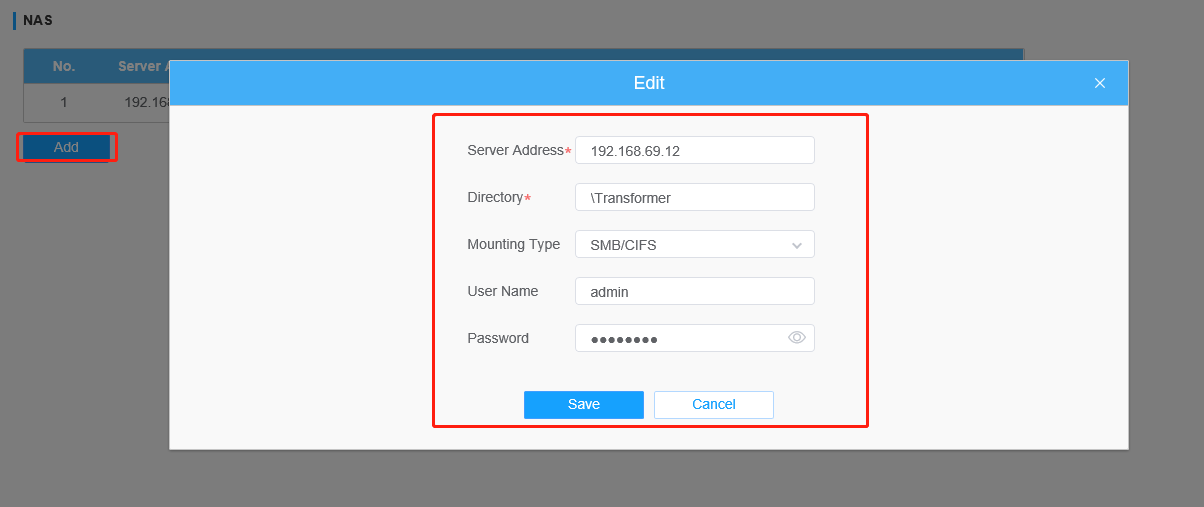
2.Make sure the Status is “Online”.
4.How to use NAS on Milesight Network cameras?
After NAS setting, you can use it in Events. Take Motion Detection as an example.
Setting the Motion region and schedule first, then enable “Save Into Storage” ,choose the file format and save the setting.
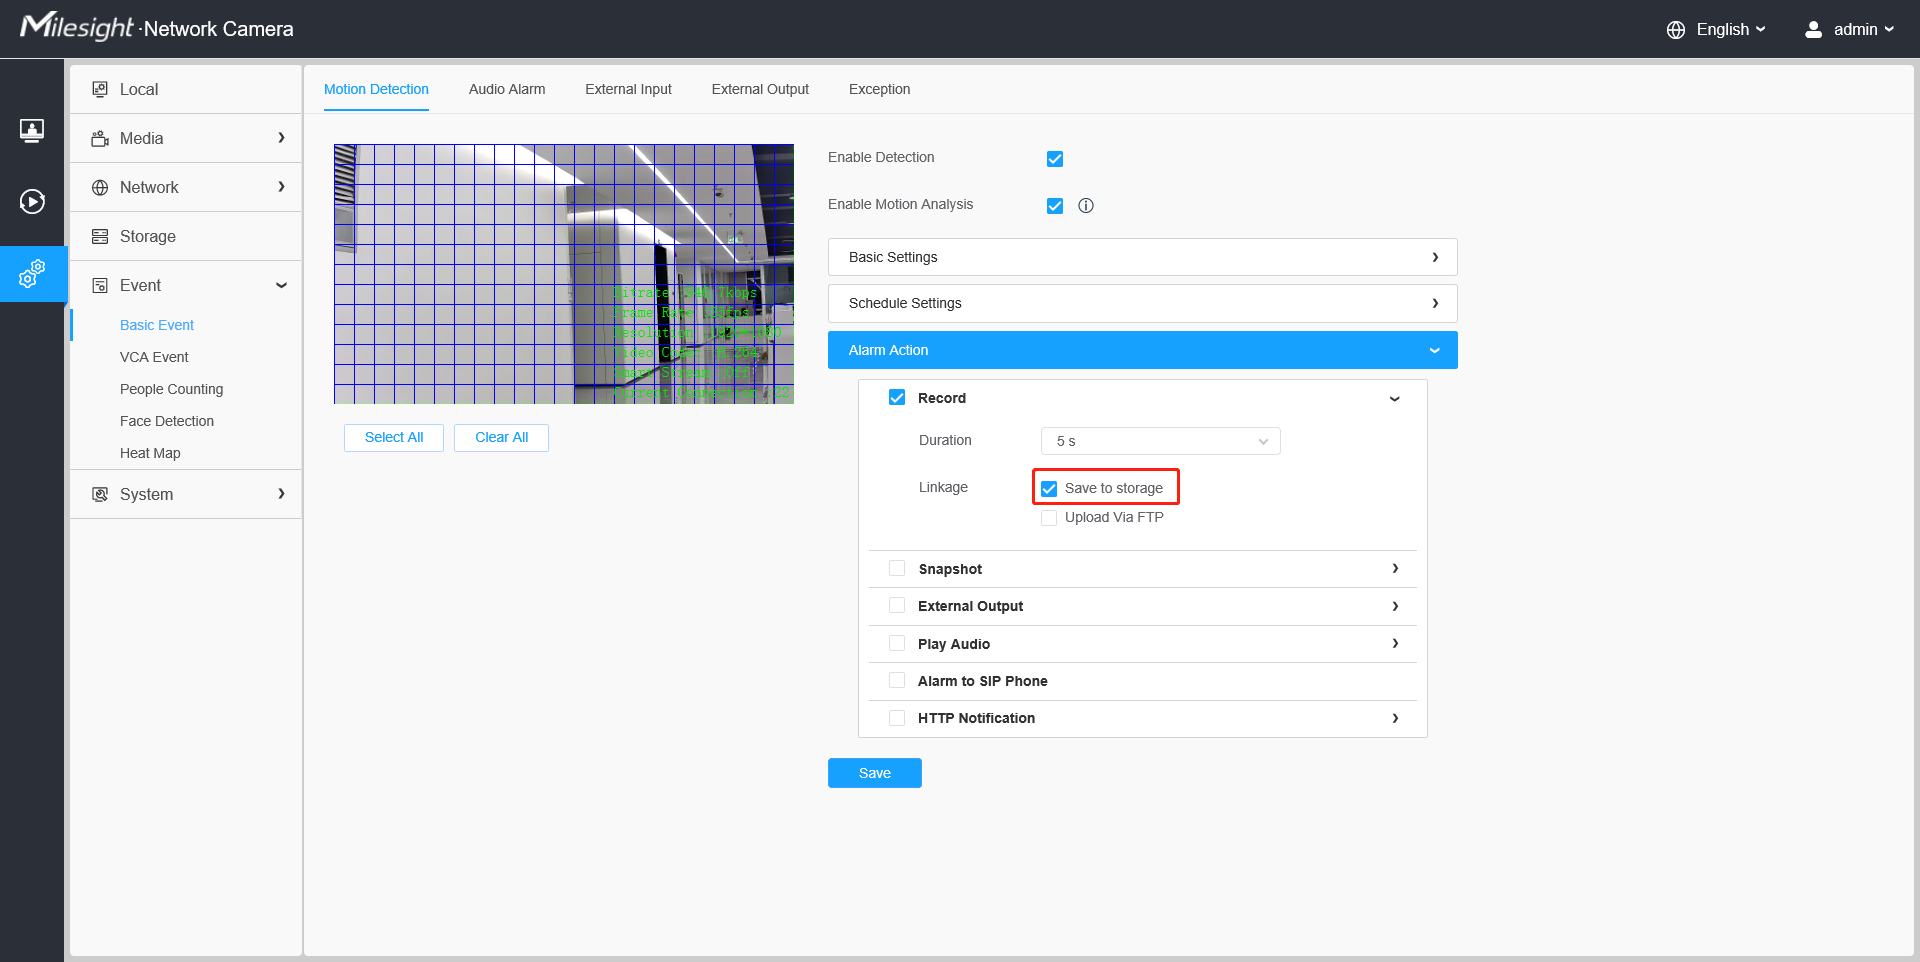
Note: In the case of having both SD card and NAS, the file will be saved to NAS first when enable “Save into Storage”.
——————END——————