
1. Introduction
The rapid development of security industry calls for the need of a more intelligent video monitoring.For the reason that a massive amount of video is being recorded, but hardly ever being reviewed, it is ordinary to miss suspicious behaviors. To avoid such events and activities being missed, Milesight propounds intelligent Milesight Video Content Analysis(VCA). Embedded in network cameras, Milesight now has a complete VCA Solution, realizing 8 VCA functions via Network Cameras, NVR and CMS.
2. What is Video Content Analysis?
Video Content Analysis(VCA), also referred to Intelligent Video Analysis (IVA), is the capability of automatically analyzing video to detect and determine temporal and spatial events. The algorithms can be implemented as software on general purpose machines or as hardware in specialized video processing units. It automatically performs an analysis of captured video, and automatically uses the resultant data. This technical capability is used in a wide range of fields including entertainment, health-care, retail, automotive, transport, home automation, safety and security.
3. Milesight Video Content Analysis
Milesight VCA provides advanced video analysis for Milesight network cameras, NVR and CMS. It enhances the performance of network cameras through 10 detection modes, enabling the comprehensive surveillance function and quicker response of the whole VCA solution to different monitoring scenes. In addition, Milesight Network Cameras, NVR and CMS all support independent function settings for convenient user experience. The Milesight VCA solution ensures that video surveillance is more accurate and cost-effective.
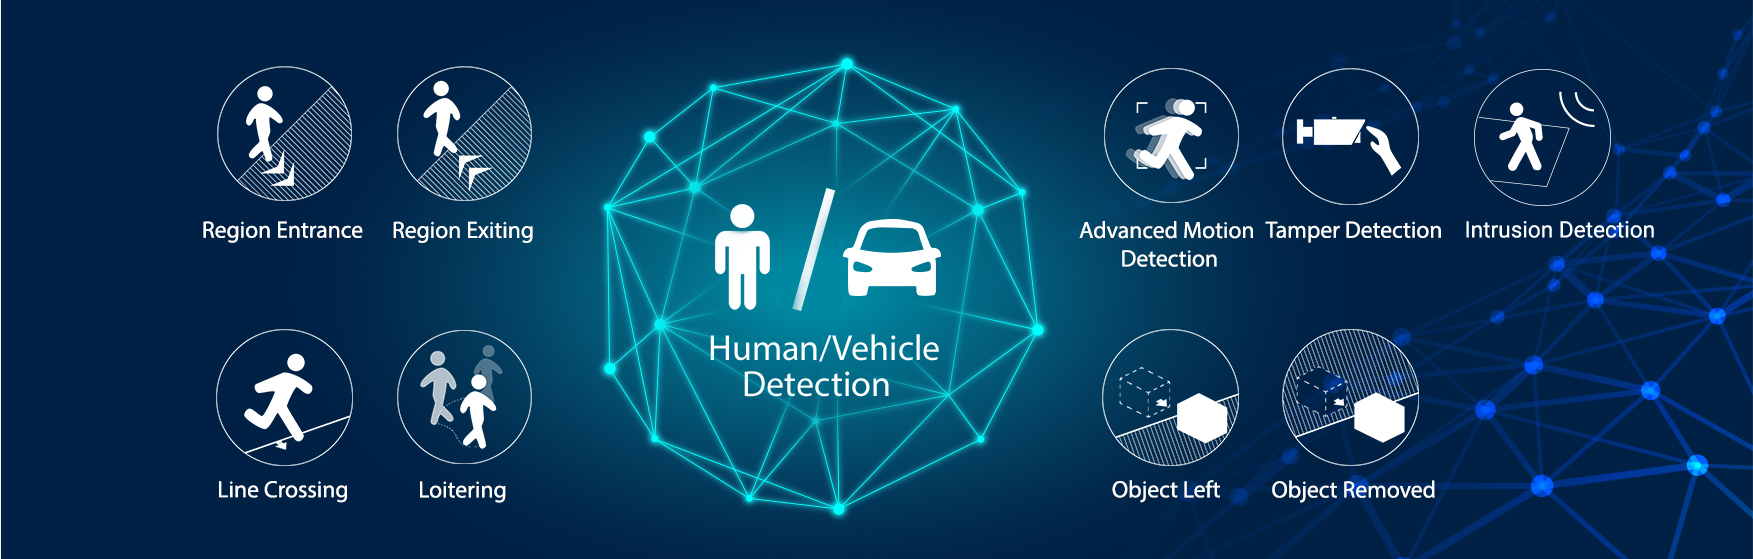
Figure 3-1 Milesight Video Content Analysis
4. How to set VCA function with Milesight Network Cameras
4.1 Intrusion Detection
What is Intrusion Detection
Intrusion detection is used to protect a specific area from potential threats of intrusion by suspicious people or vehicles. Whether it is an intrusion from outside the region or a sudden appearance within the region, an alarm action will be triggered.
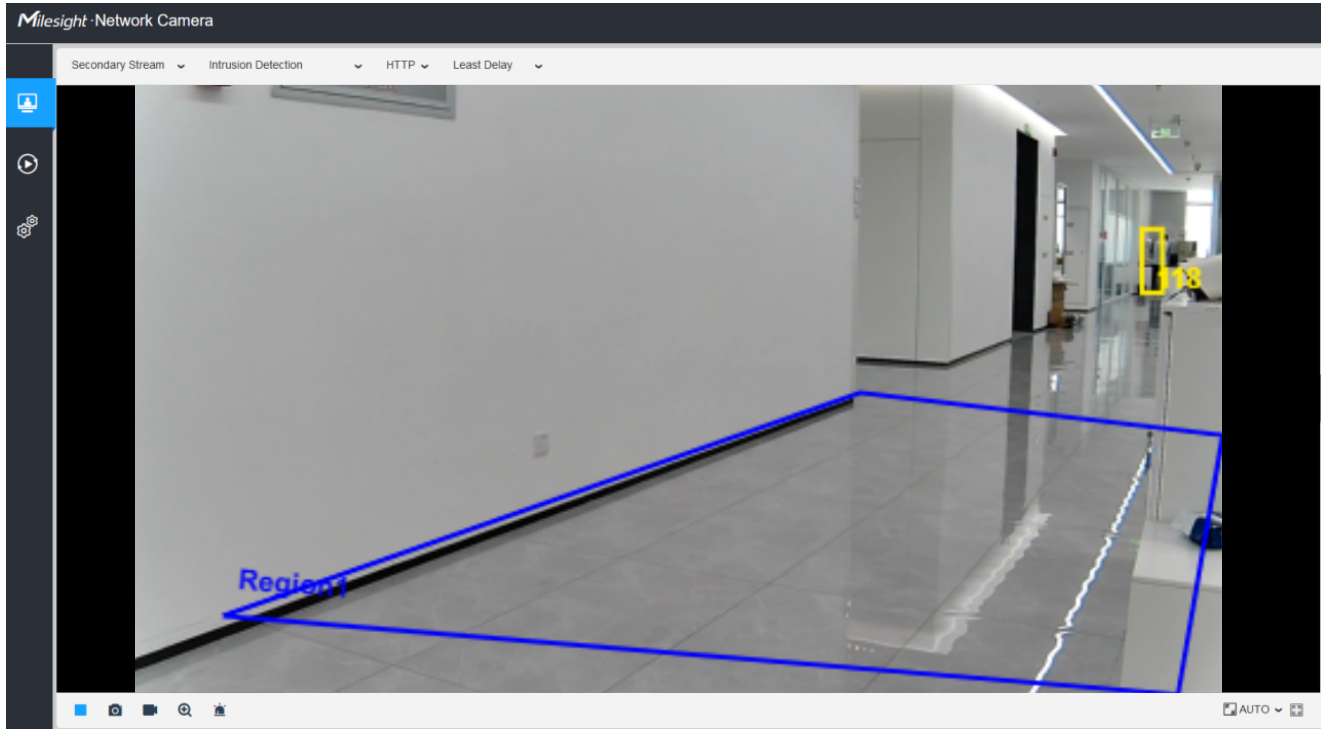
Figure 4-1 Intrusion Detection
If you enable Detection Object(Human/Vehicle), the selected regions will display in red when the alarm is triggered.
|
|
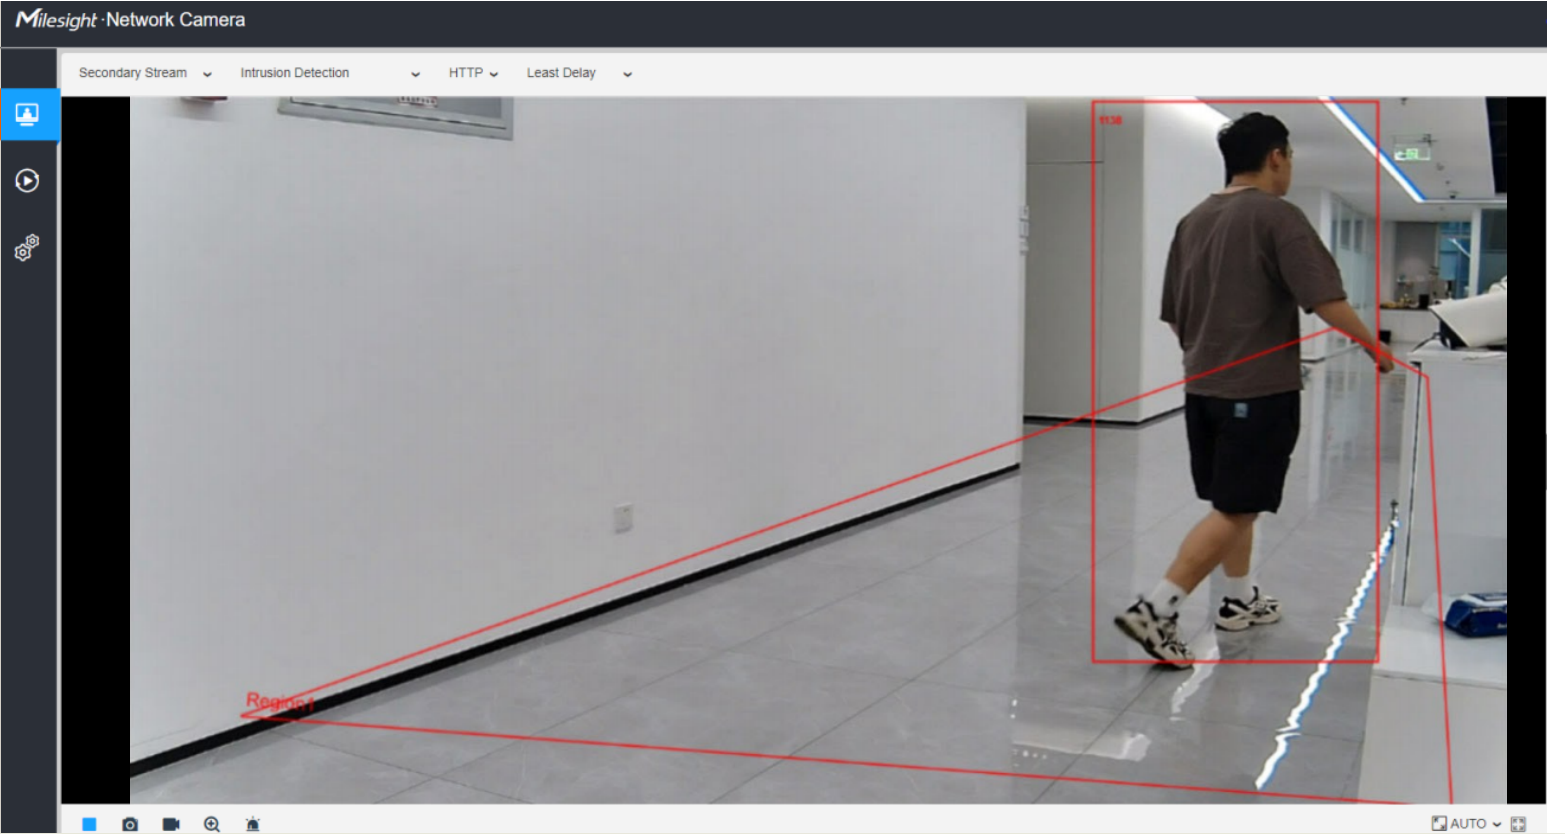
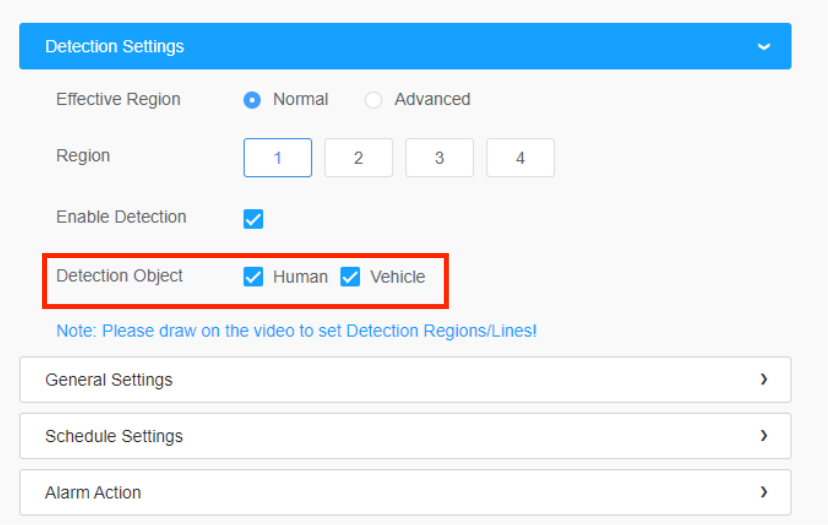
Figure 4-2 Intrusion Detection Trigger
How to set Intrusion Detection
Step 1: Enable Intrusion Detection and draw a region by clicking the mouse. Any object entering into the region will trigger an alarm. (You can set the maximum 4 pieces of regions.)
|
|
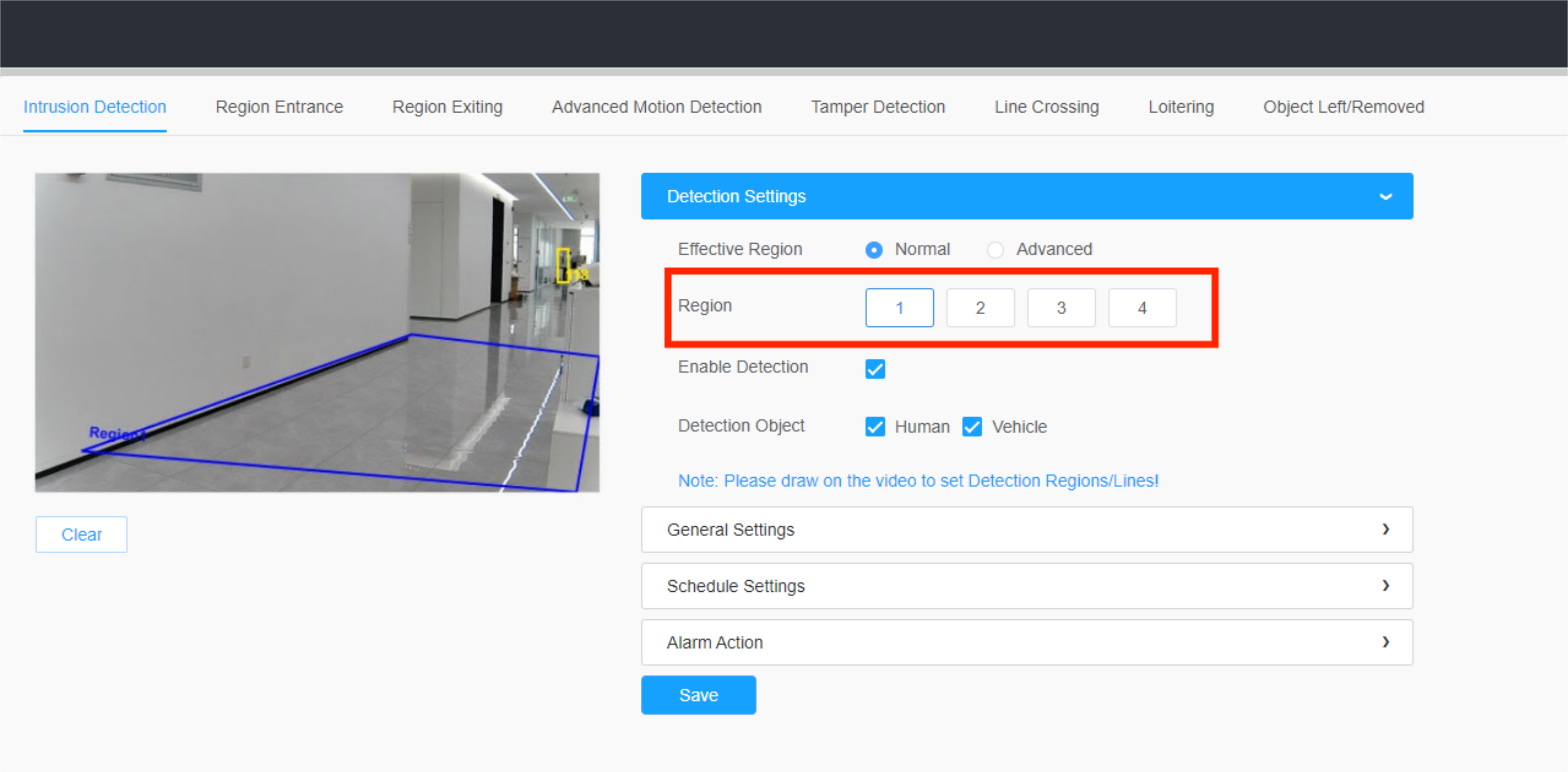
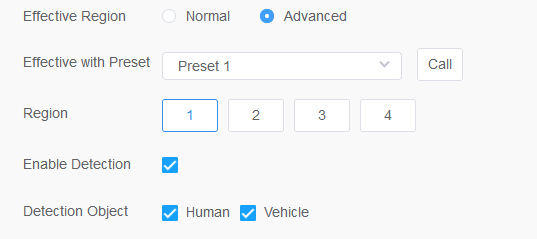
Figure 4-3 Intrusion Detection settings page
Kindly Note:
If your camera is a PTZ camera, there are two types of Effective Region you can select:
1.Normal is effective for all detection areas.
2.Advanced will work in specific fields of view and require setting a preset position.
Step 2: Set triggering interval for intrusion,detecting sensitivity, object size filter and trigger mode.
Min.Intrusion Duration: You can set the triggering interval for intrusion in Min.Intrusion Duration.
Object Size Filter: You can define whether an object is big enough for triggering the alarm when enter into the selected region.
Trigger Mode:Select the desired trigger logic mode, including General Mode and Bottom Mode:
General Mode: The alarm is triggered when the object's body roughly enters the
detection area.
Bottom Mode: The alarm will be triggered as soon as the bottom of the object enters
the detection area.
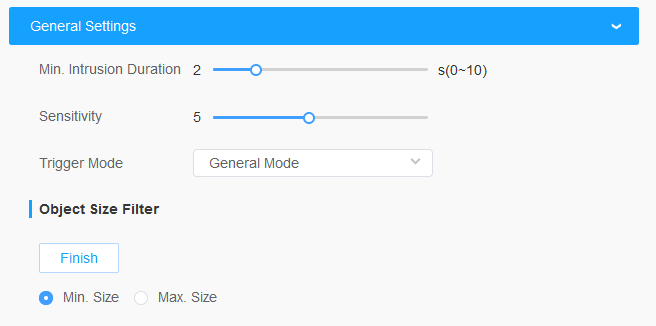
Figure 4-4 Intrusion Detection General settings
Step 3: Set detection schedule, you can set the schedule in the “Schedule Settings”.And
then click [Save] or [Reset] after all done. You can also copy the settings to other
channels.
|
|
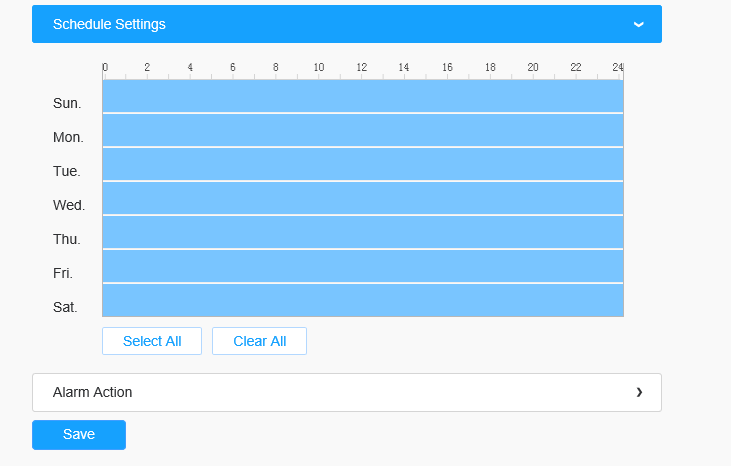
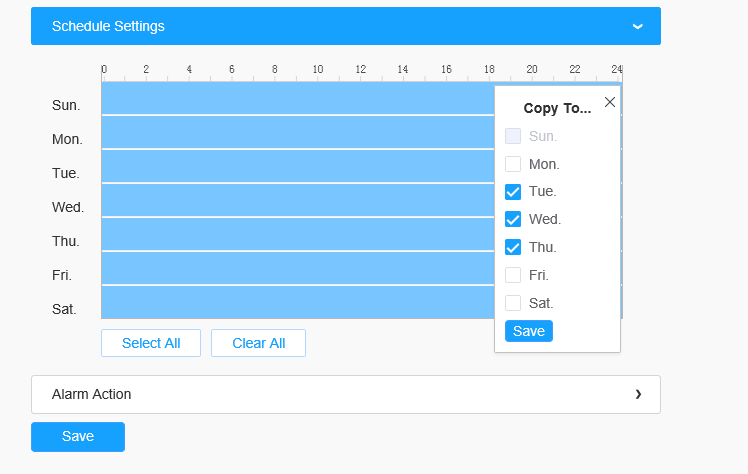
Figure 4-5 Schedule Settings
Step 4: Set alarm action.
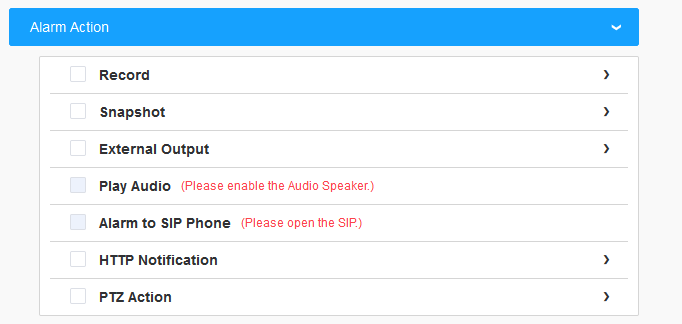
Figure 4-6 Alarm Action
Table 1 Description of the buttons
Parameters | Function Introduction |
Save to Storage | Save alarm recording files into SD Card or NAS |
Upload Via FTP | Upload the recording files via FTP |
Send Email | Upload the files via Email |
External Output | If the camera is equipped with External Output, you can enable the action after configuring the trigger duration |
Play Audio | If the camera equips with Speaker, you can enable the action after configuring the audio speaker |
Alarm to SIP Phone | Support to call the SIP phone after enable the SIP function. |
HTTP Notification | Support to pop up the alarm news to specified HTTP URL. |
White LED | When the alarm triggered, White LED will turn on to warning the detected objects. |
PTZ Action | There are five PTZ action enable to select: PTZ motion: When the motion alarm is triggered, PTZ Motion enables the camera to pivot to the triggered position and zoom in. Call Present/Call Patrol/Call Pattern: When the alarm action is triggered, Preset, Patrol, or Pattern will be called. PTZ Auto Tracking: Camera will automatically track objects and trigger an alarm if objects enter the selected regions. |
Step 5: Set alarm settings.
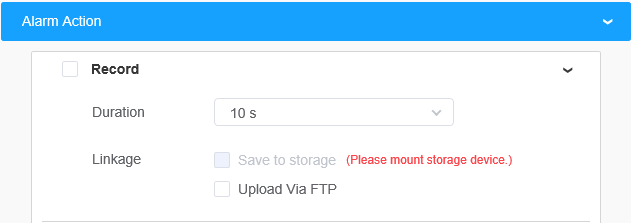
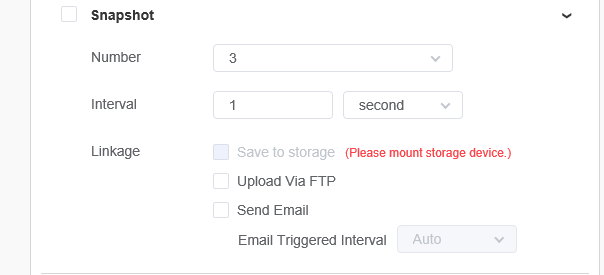

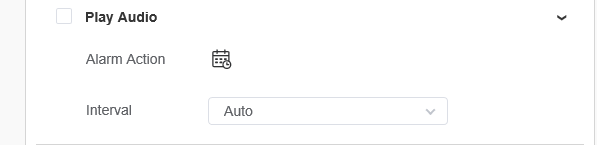
Figure 4-7 Alarm Settings
Table 2 Description of the buttons
Parameters | Function Introduction |
Record Video Sections | Six different periods are available(5, 10, 15, 20, 25, 30 sec) |
Snapshot | The number of snapshot, 1~5 |
Snapshot Interval | It cannot be edited unless you choose more than 1 to Snapshot |
External Output Action Time | Length of time an alarm lasts. It cannot be edited unless you enable the External Output on the Alarm Action firstly. |
Audio Action Settings | Set the audio schedule to trigger different audio files and action times in different time, which is corresponded to alarm action. |
Play Audio Interval | Auto/ 10 seconds/ 30 seconds/ 1 minute/ 5 minutes/ 10 minutes are available. |
4.2 Region Entrance
What is Region Entrance
Region entrance helps to protect a special area from potential threat of suspicious person’s or object’s entrance. An alarm will be triggered when objects enter the selected regions by enabling region entrance.
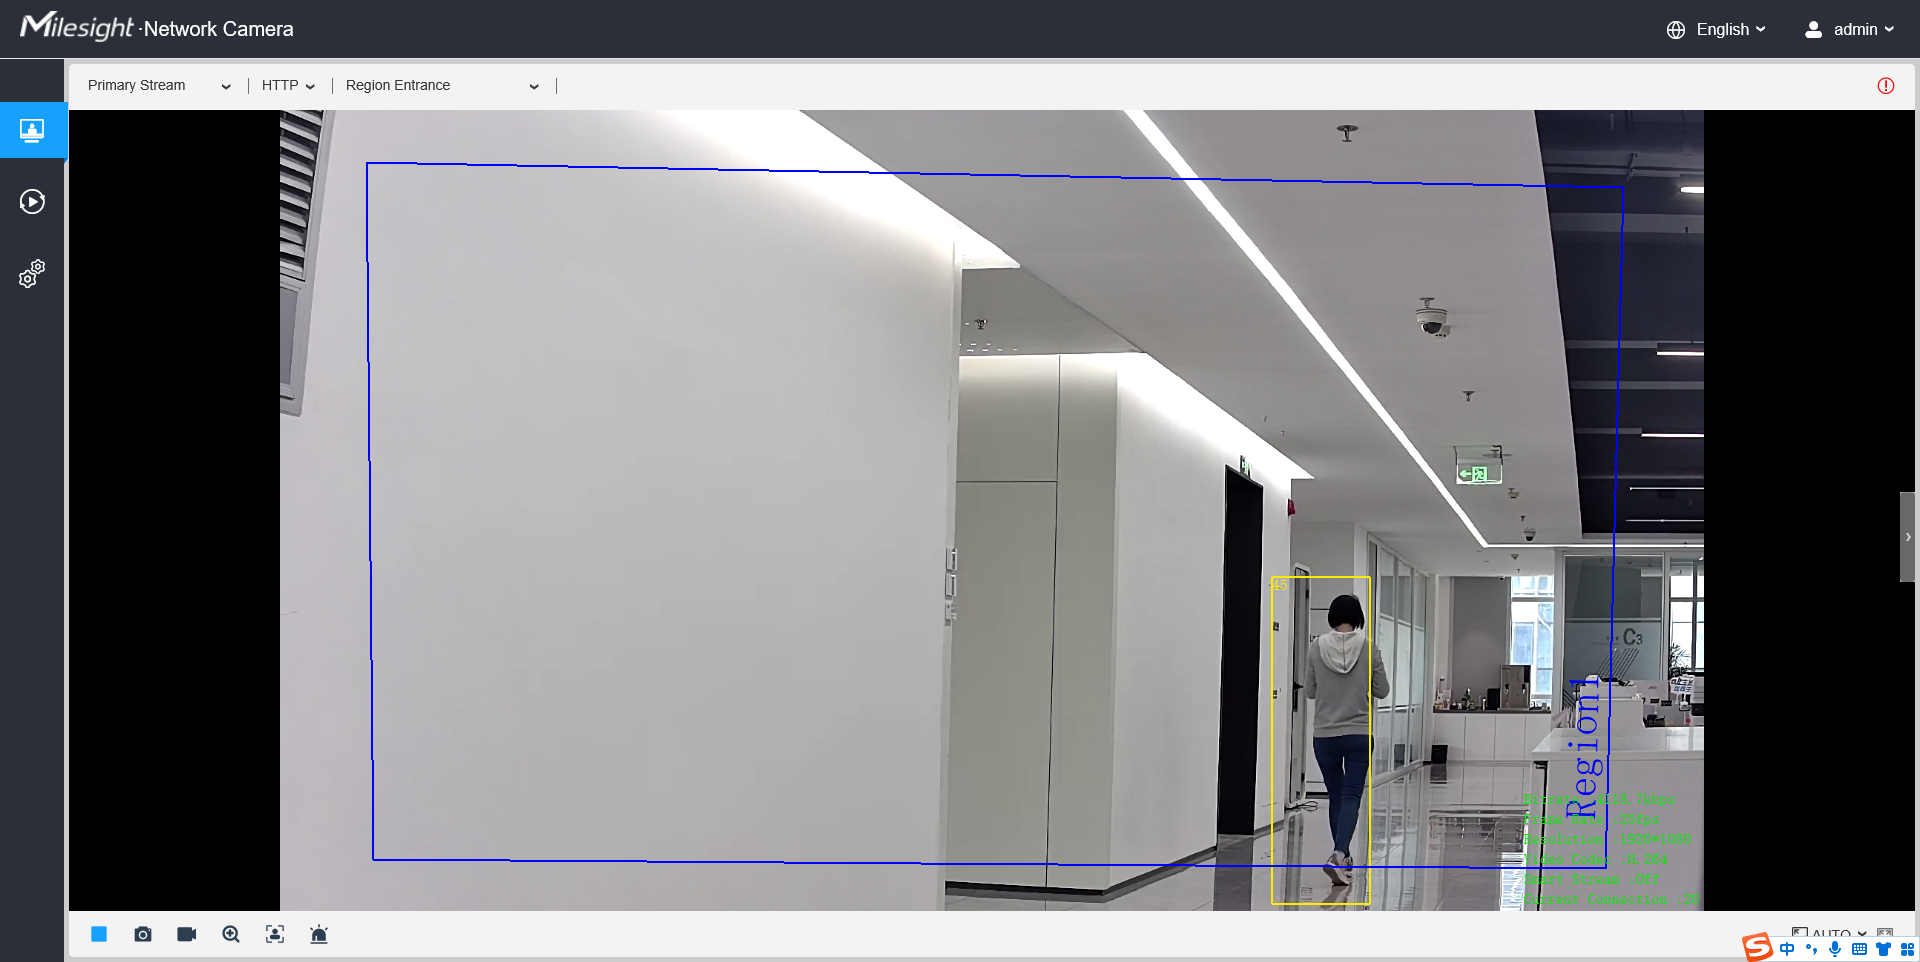
Figure 4-8 Region Entrance
If you enable Detection Object(Human/Vehicle), the selected regions will display in red when the alarm is triggered.
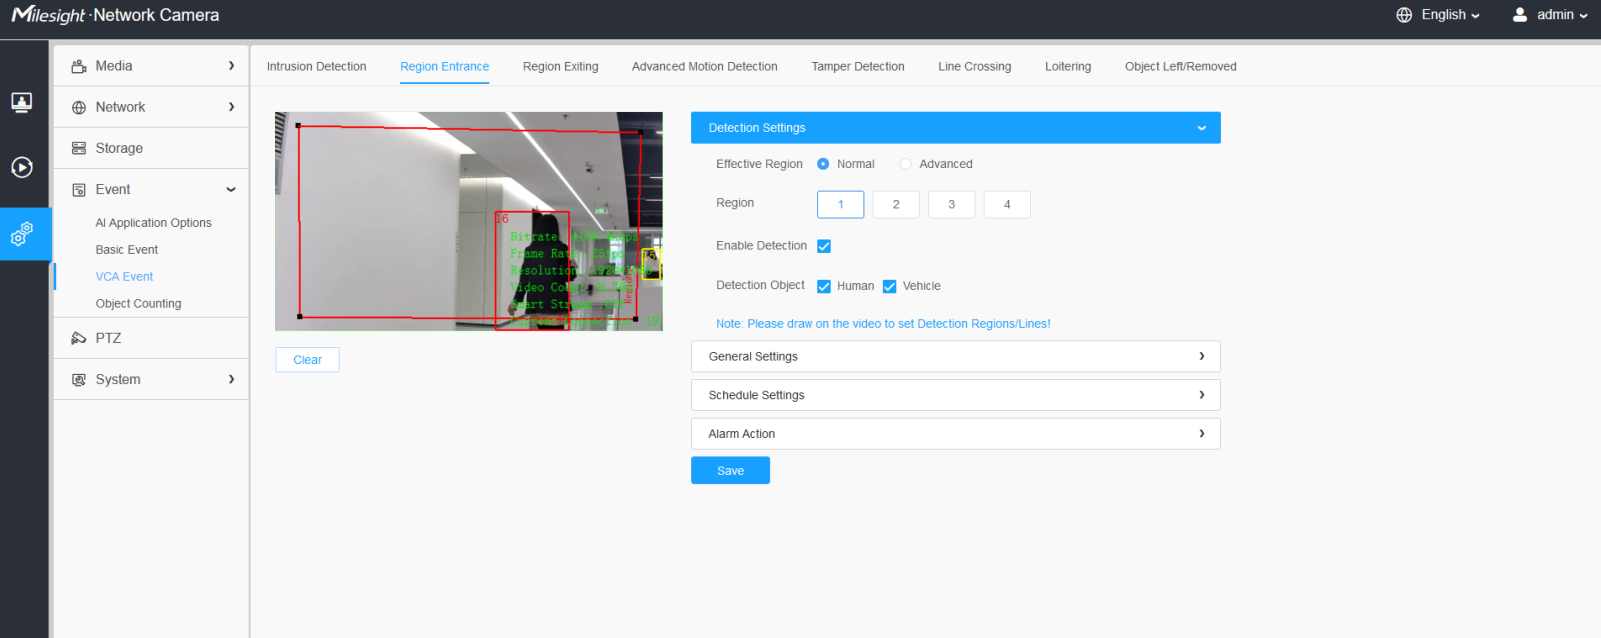
Figure 4-9 Region Entrance Trigger
How to set Region Entrance with Milesight Network Cameras
Enable region entrance detection and draw a region by clicking the mouse. Any object entering into the region will trigger an alarm. (You can set the maximum 4 pieces of regions.)
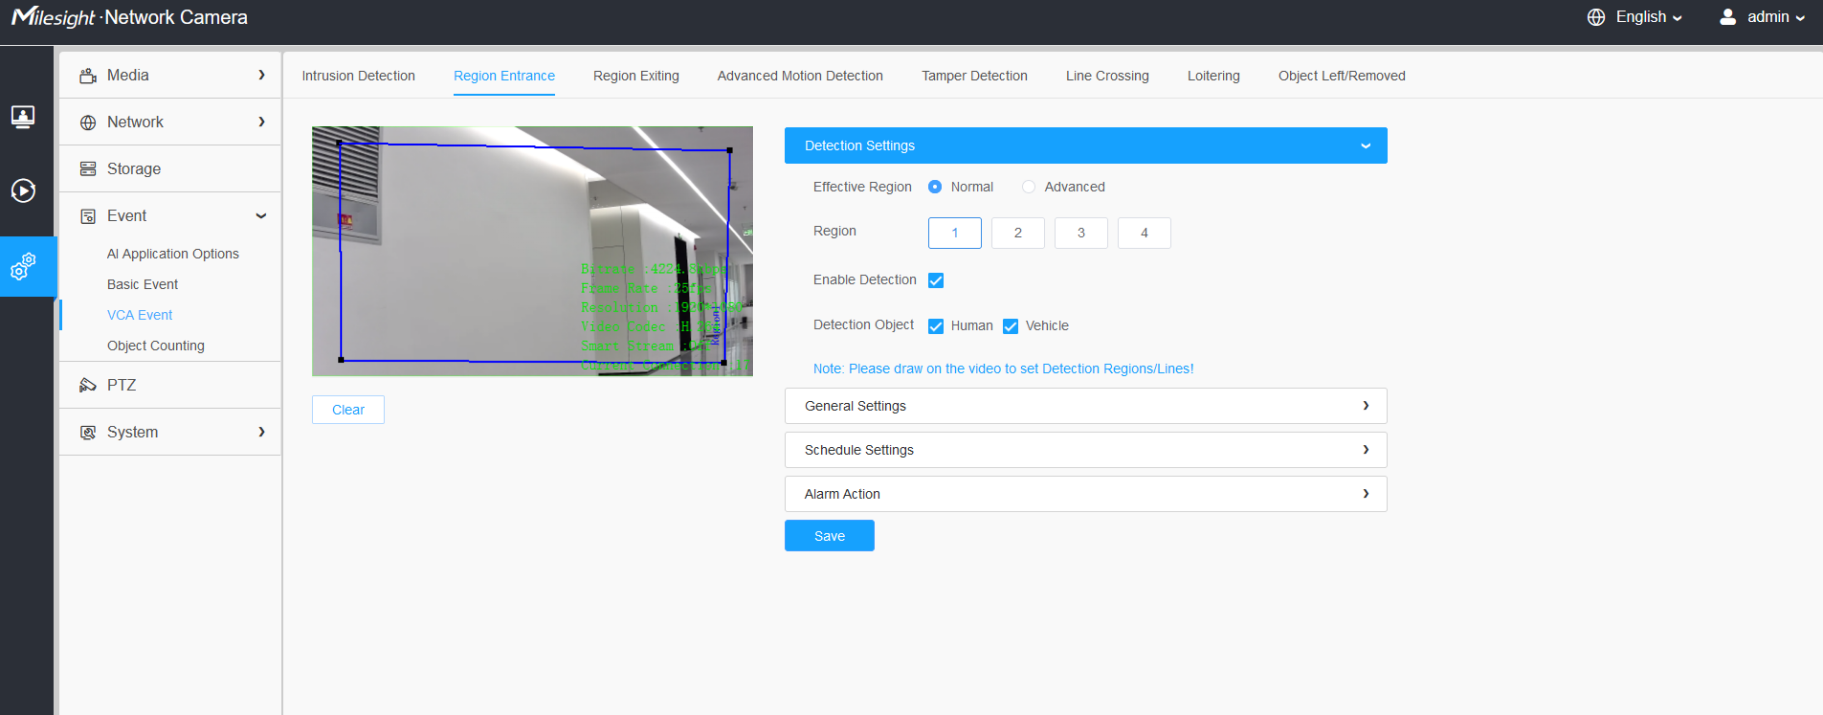
Figure 4-10 Region Entrance settings page
4.3 Region Exiting
What is Region Exiting
Region exiting is to make sure that any person or object won't exit the area that is being monitored. Any exiting of people or objects will trigger an alarm.
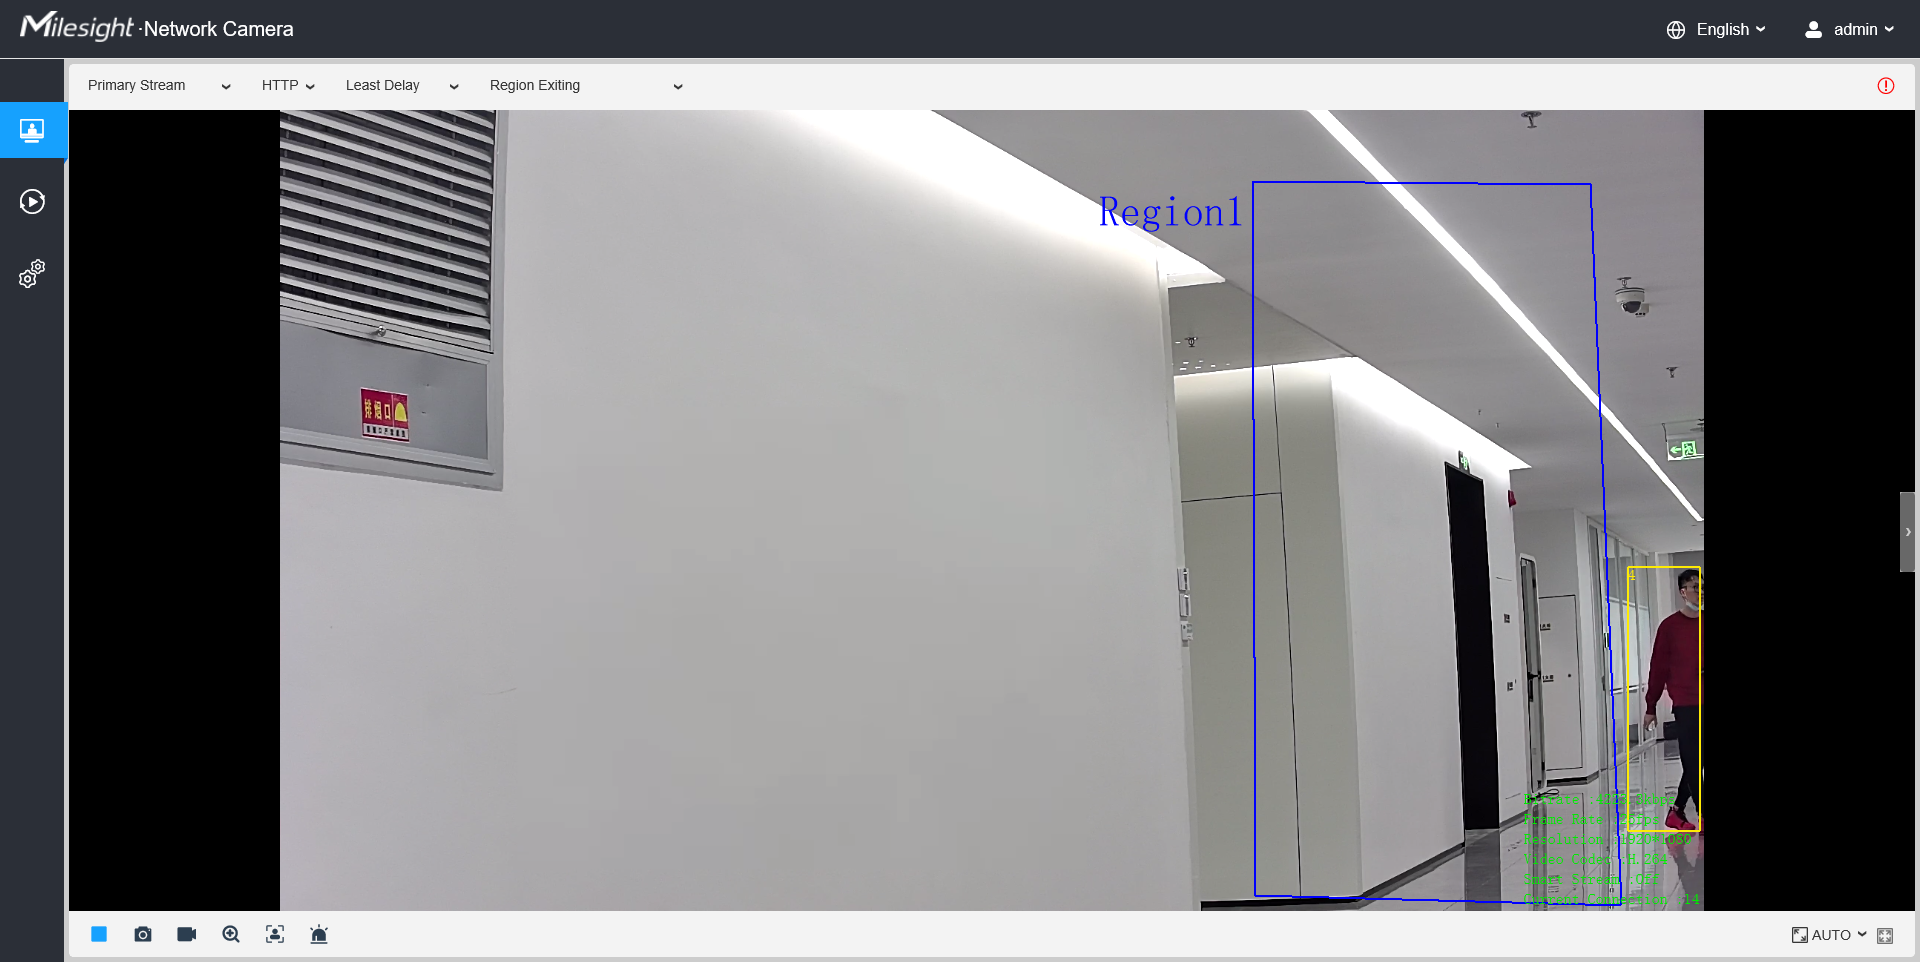
Figure 4-11 Region Exiting
If you enable Detection Object(Human/Vehicle), the selected regions will display in red when the alarm is triggered.
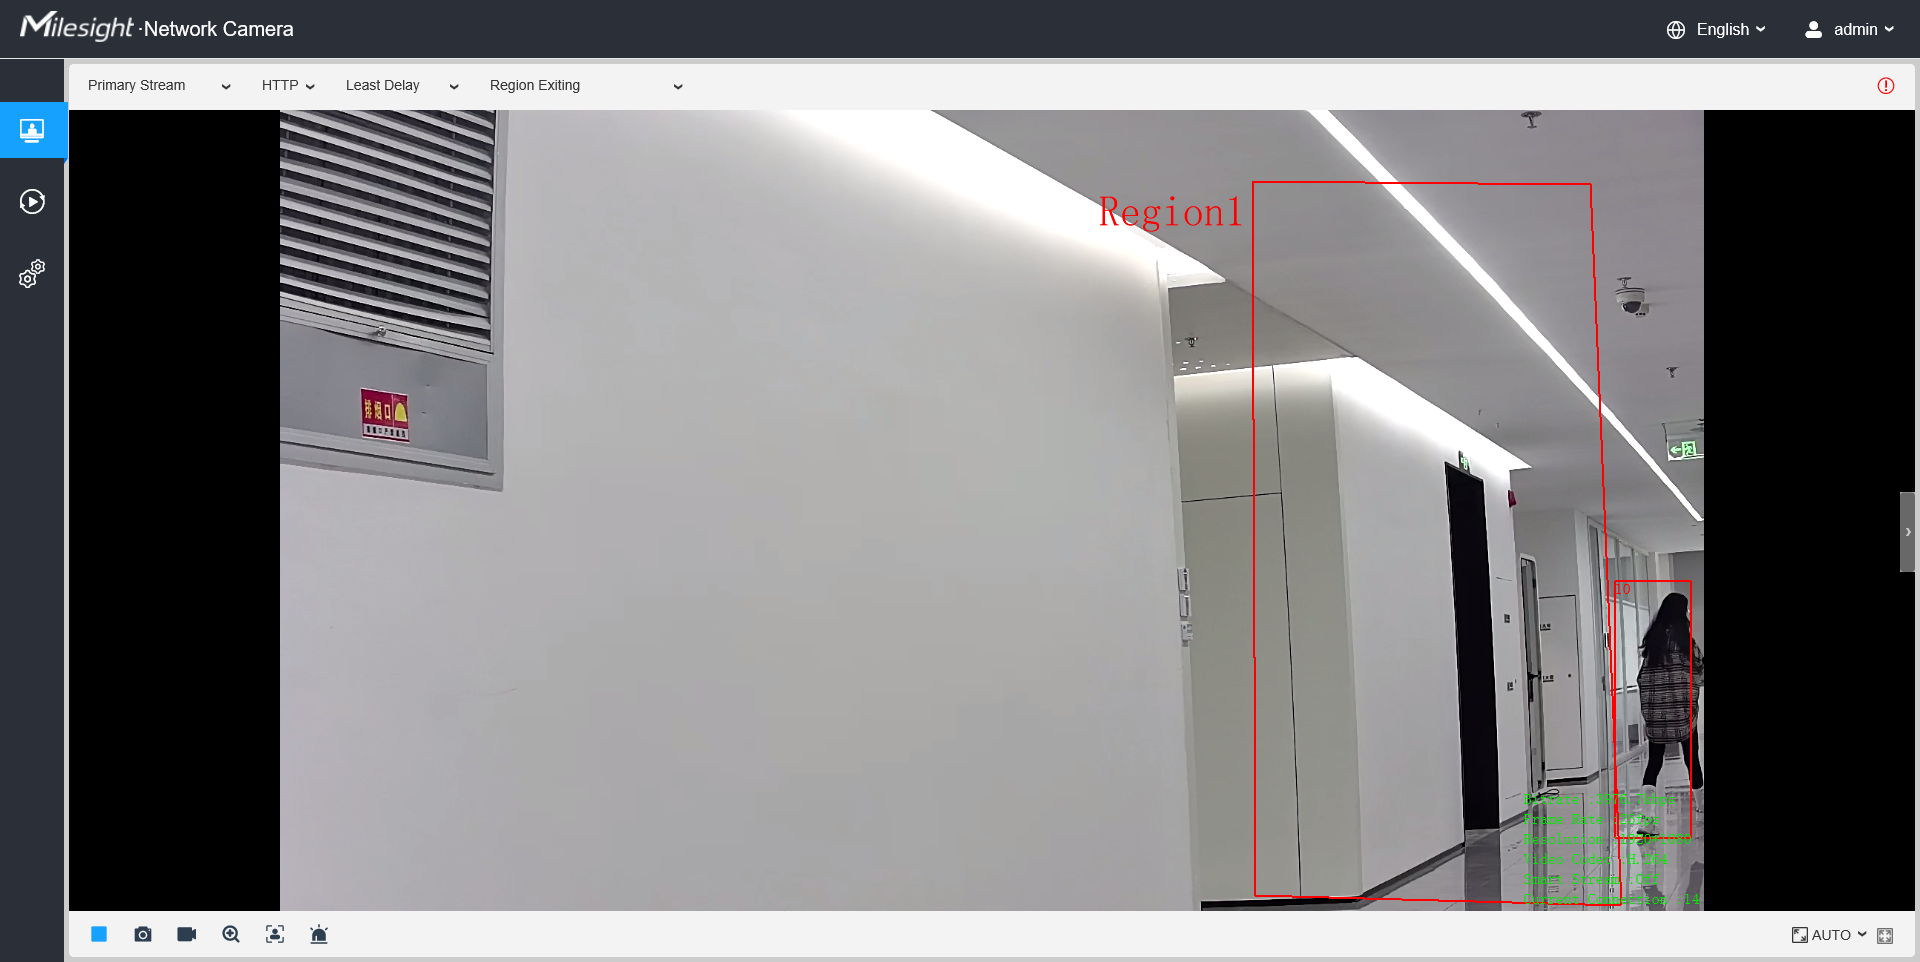
Figure 4-12 Region Exiting Trigger
How to set Region Exiting
Enable region entrance detection and draw a region by clicking the mouse. Any object entering into the region will trigger an alarm. (You can set the maximum 4 pieces of regions.)
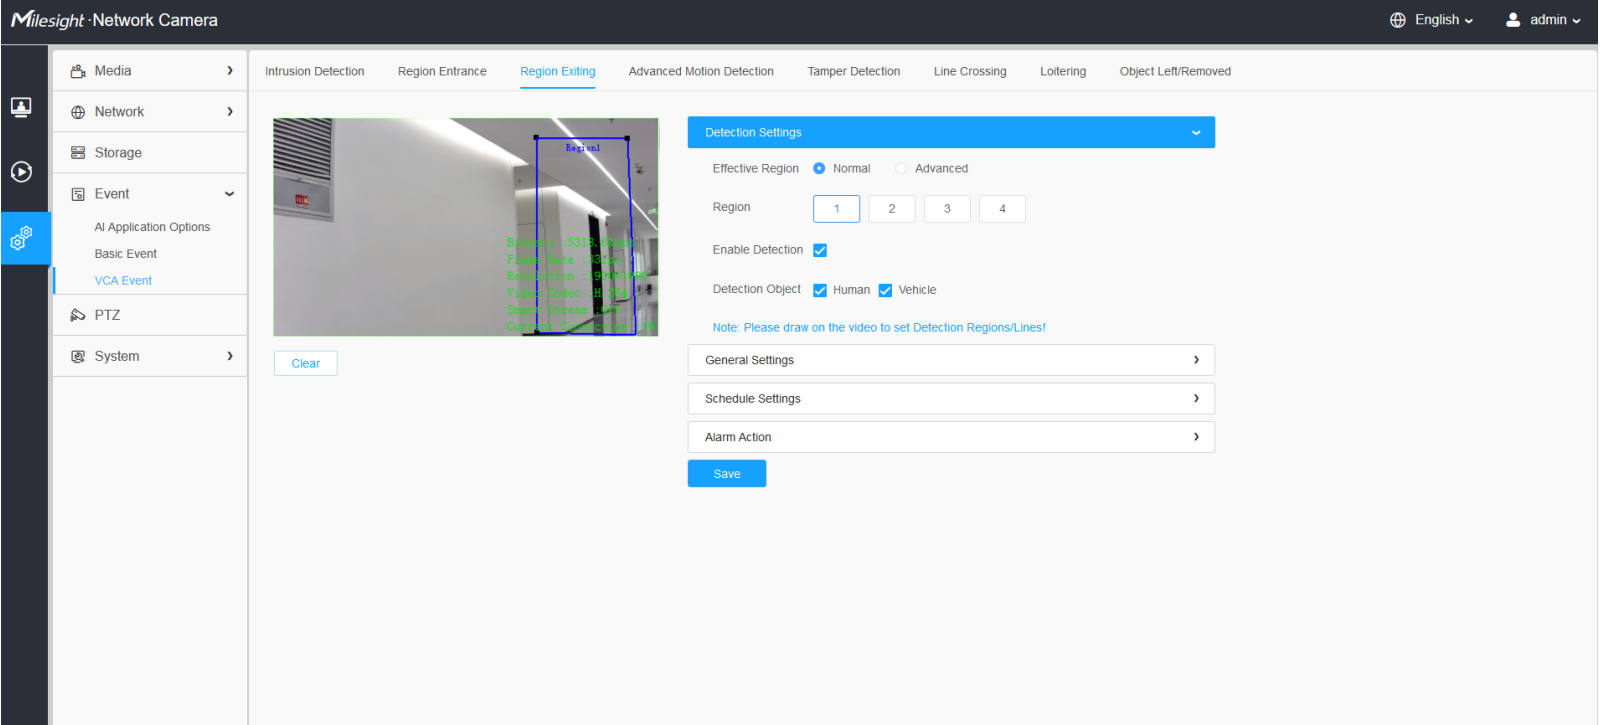
Figure 4-13 Region Exiting settings page
4.4 Advanced Motion Detection
What is Advanced Motion Detection
Different from traditional motion detection, Milesight advanced motion detection is a really intelligent one which can filter out “noise” such as lighting changes, natural tree movements, etc. When an object moves in the selected area, it will trigger an alarm.
|
|
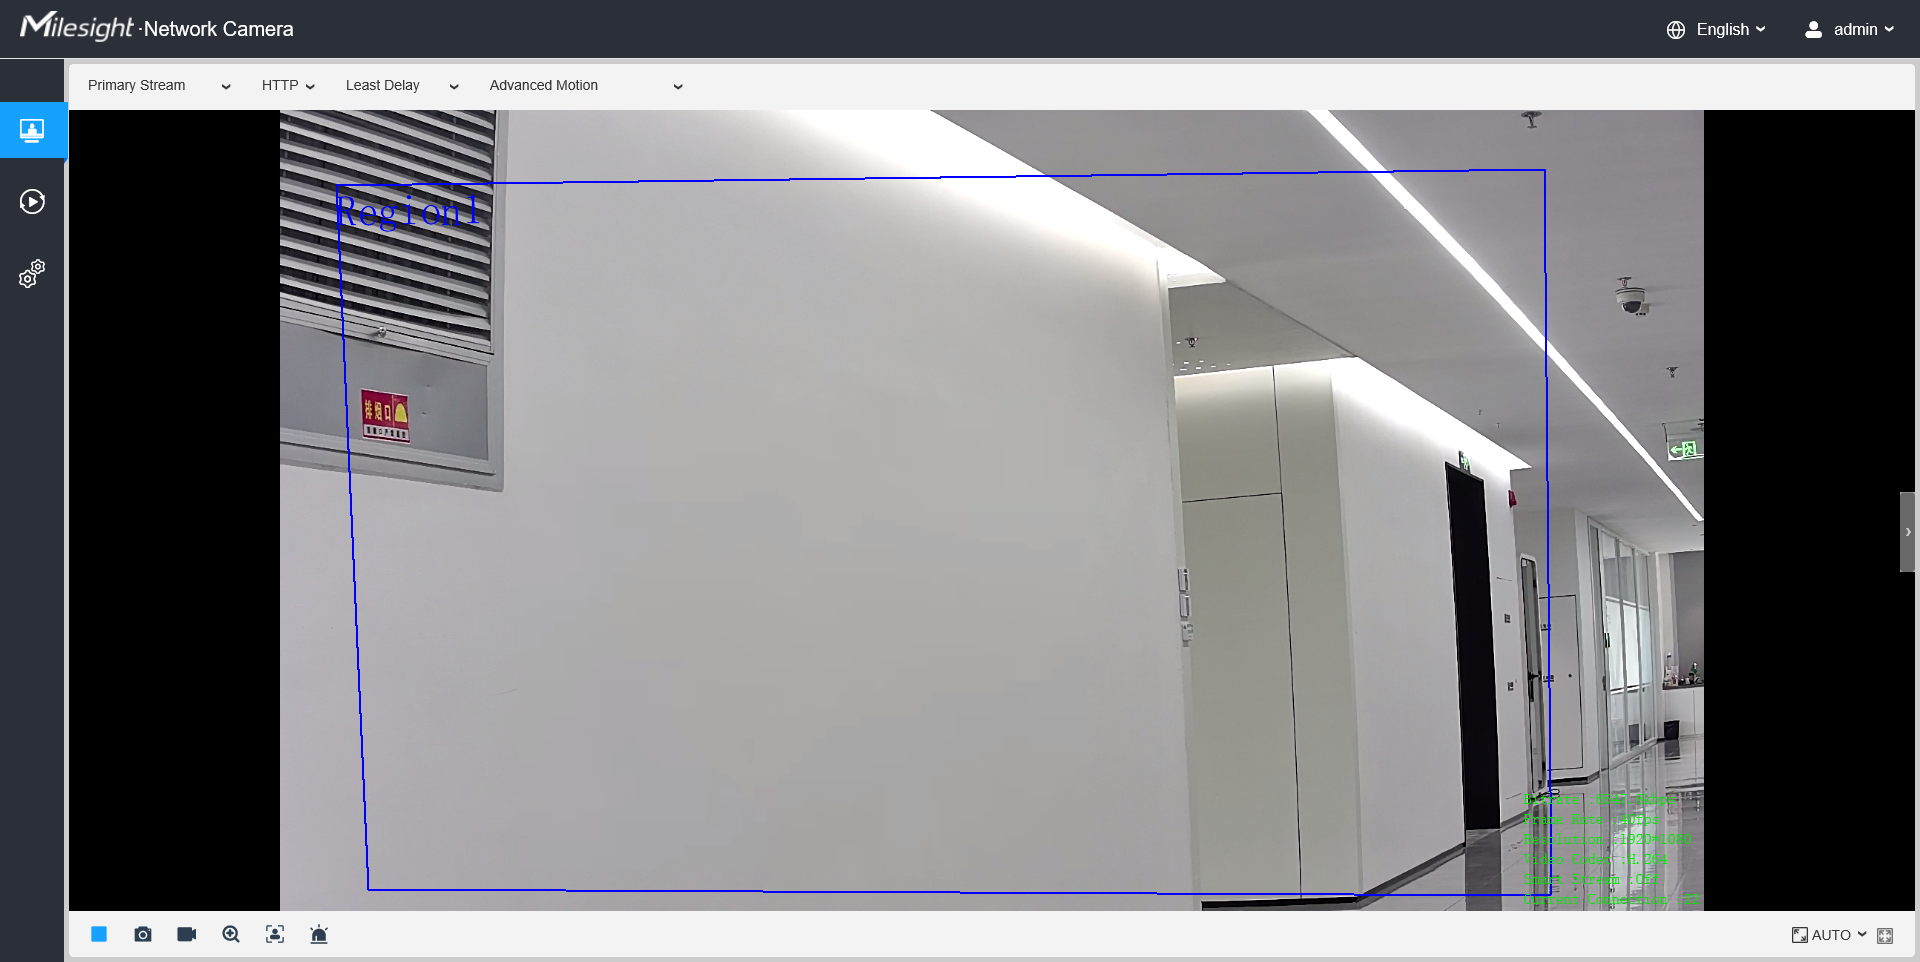
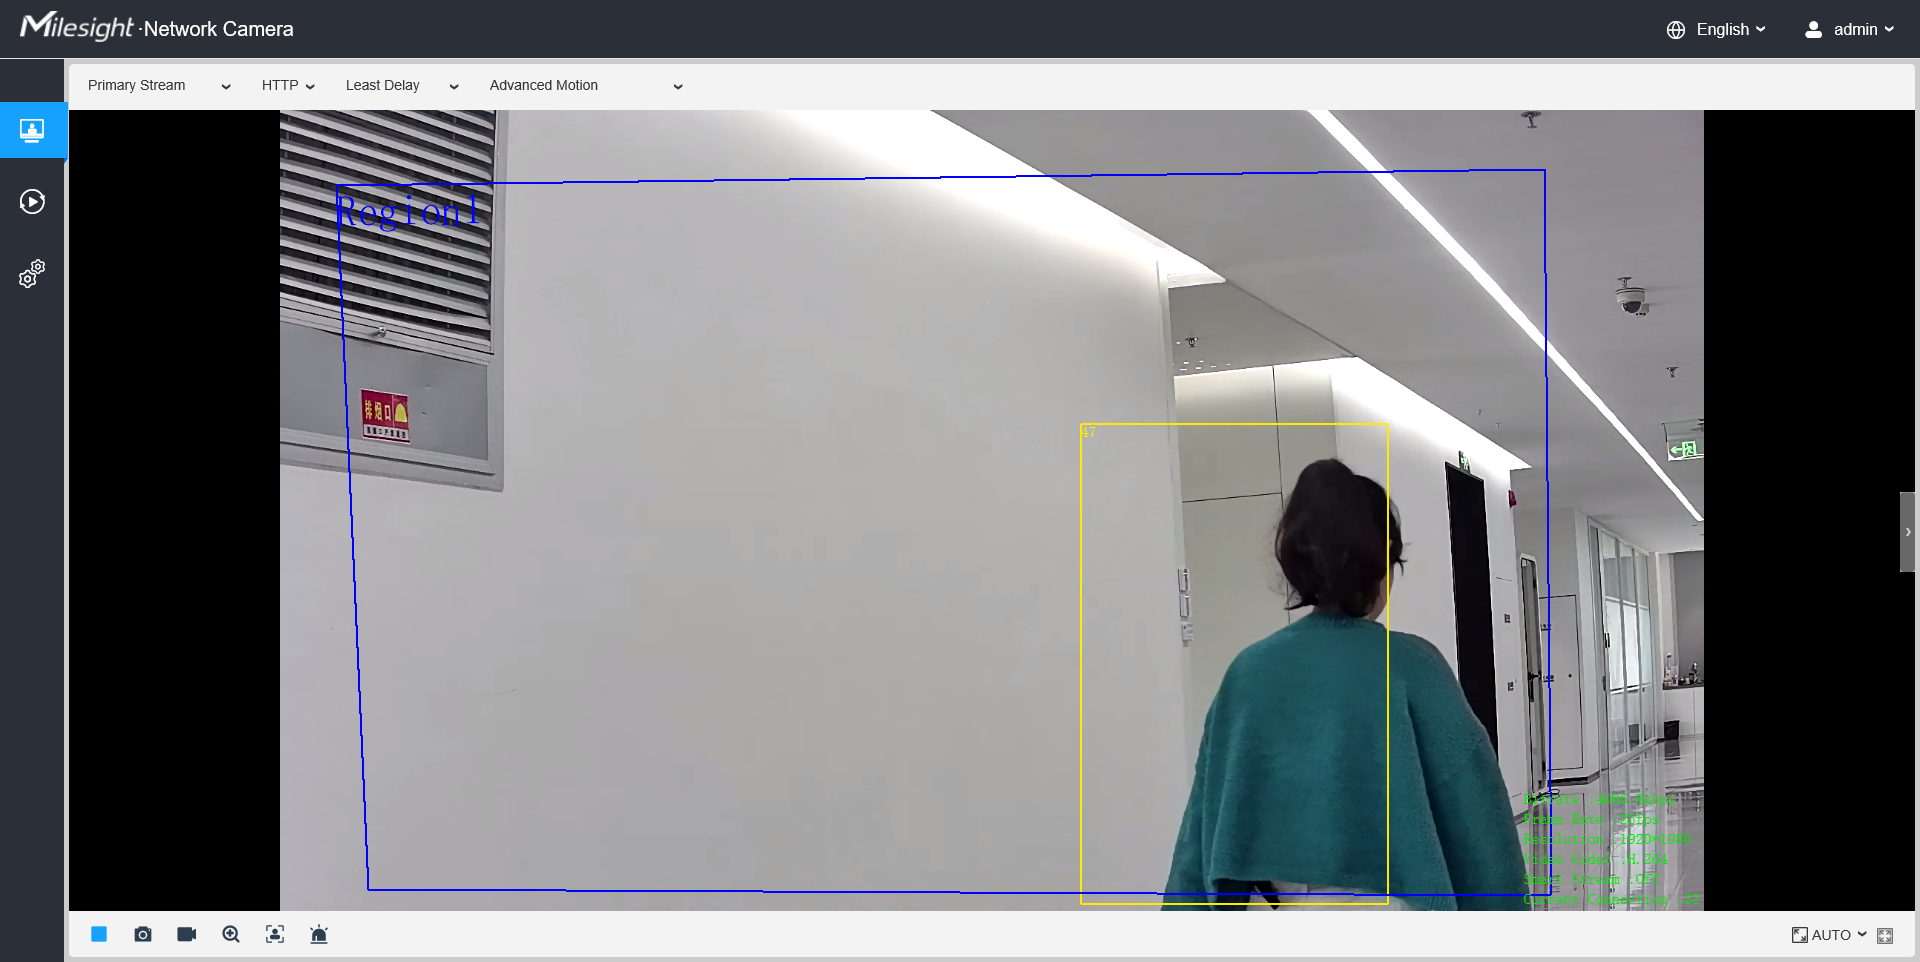
Figure 4-14 Advanced Motion Detection
How to set Advanced Motion Detection
Enable advanced motion detection and draw a region by clicking the mouse. (You can set the maximum 4 pieces of regions.).The sensitivity can be configured to detect various movements according to different requirements. When the level of sensitivity is low, slight movement won’t trigger the alarm. You can also set the “Ignore Short-Lived Motion”, its range is 1s-5s.
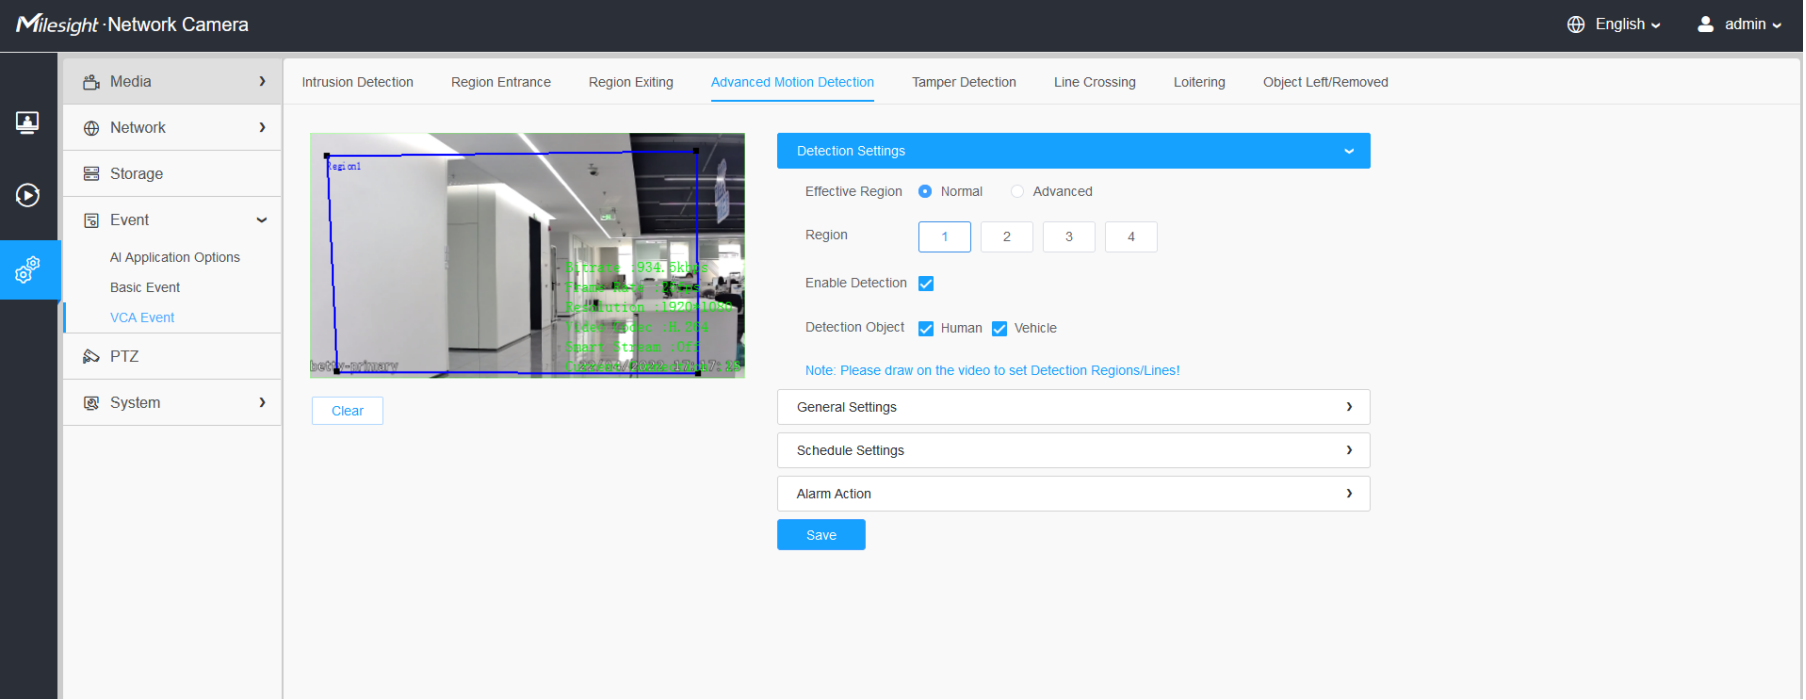
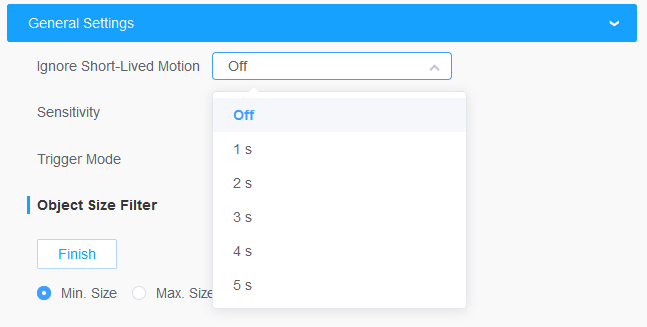
Figure 4-15 Advanced Motion Detection Settings page
4.5 Tamper Detection
What is Tamper Detection
Tamper Detection is used to detect possible tampering like the camera being obstructed or moved or defocused. This functionality alerts security staff immediately when any above-mentioned actions occur.
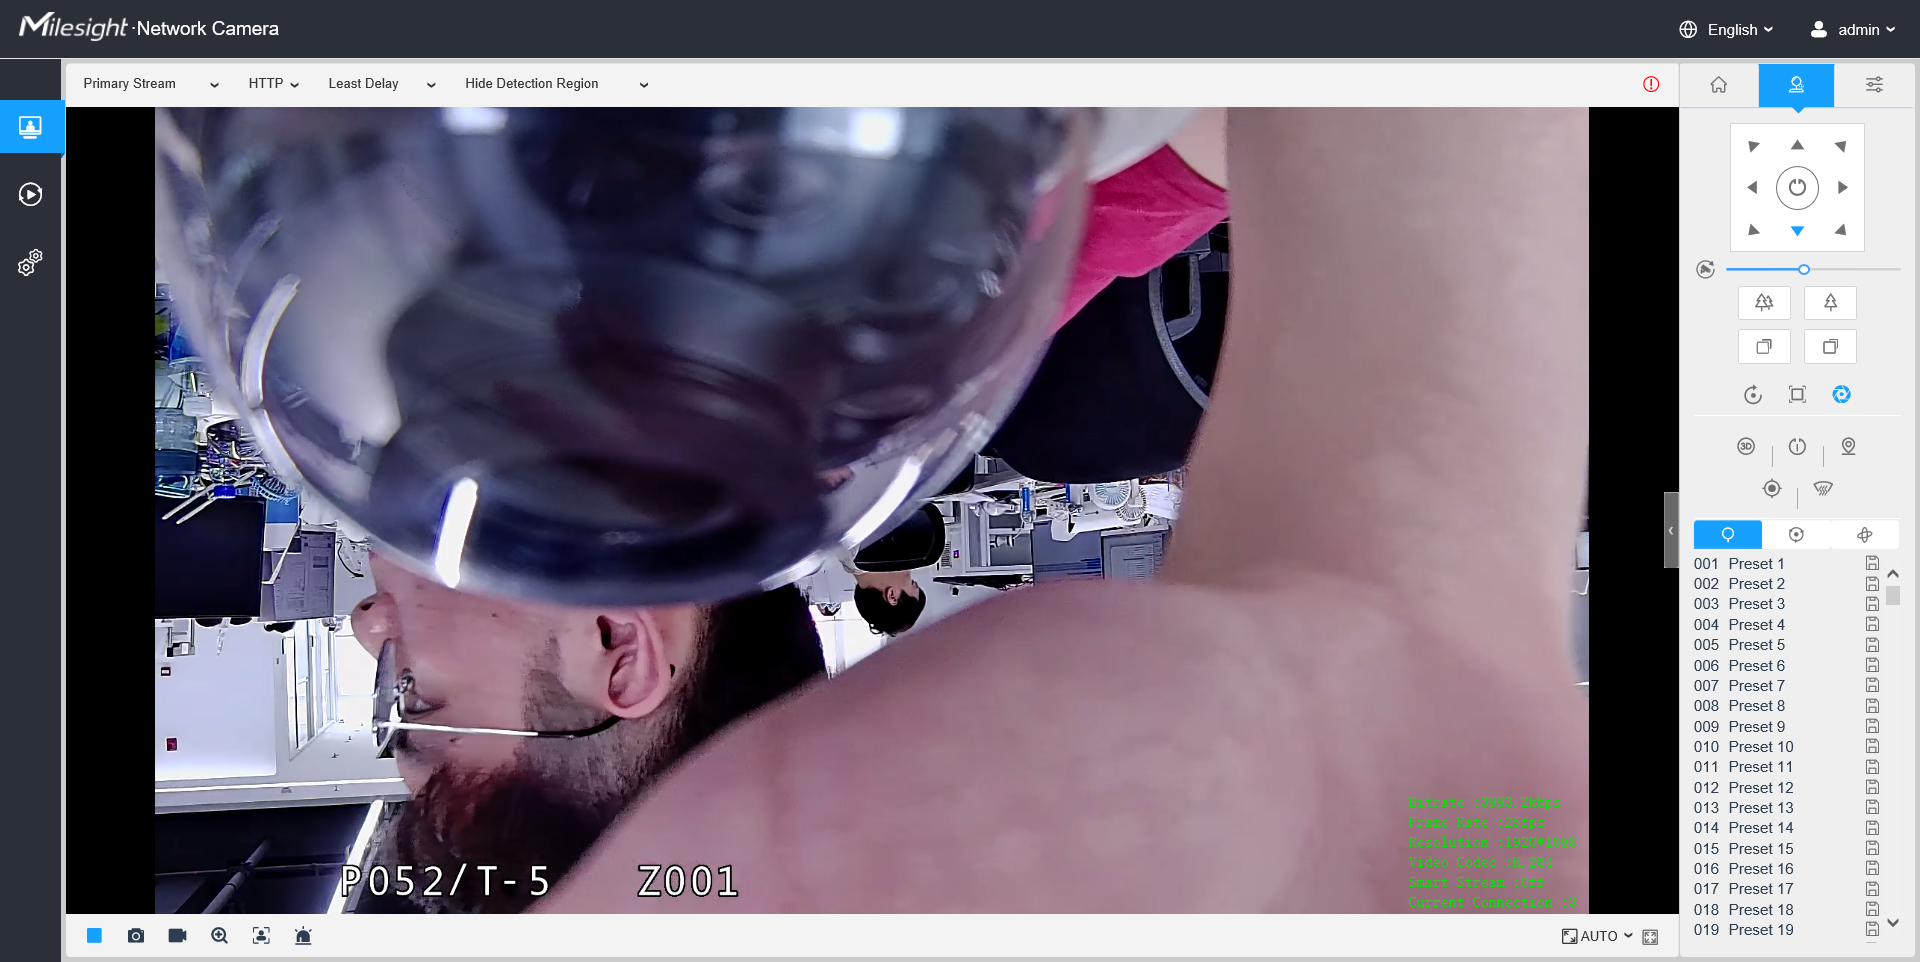
Figure 4-16 Tamper Detection
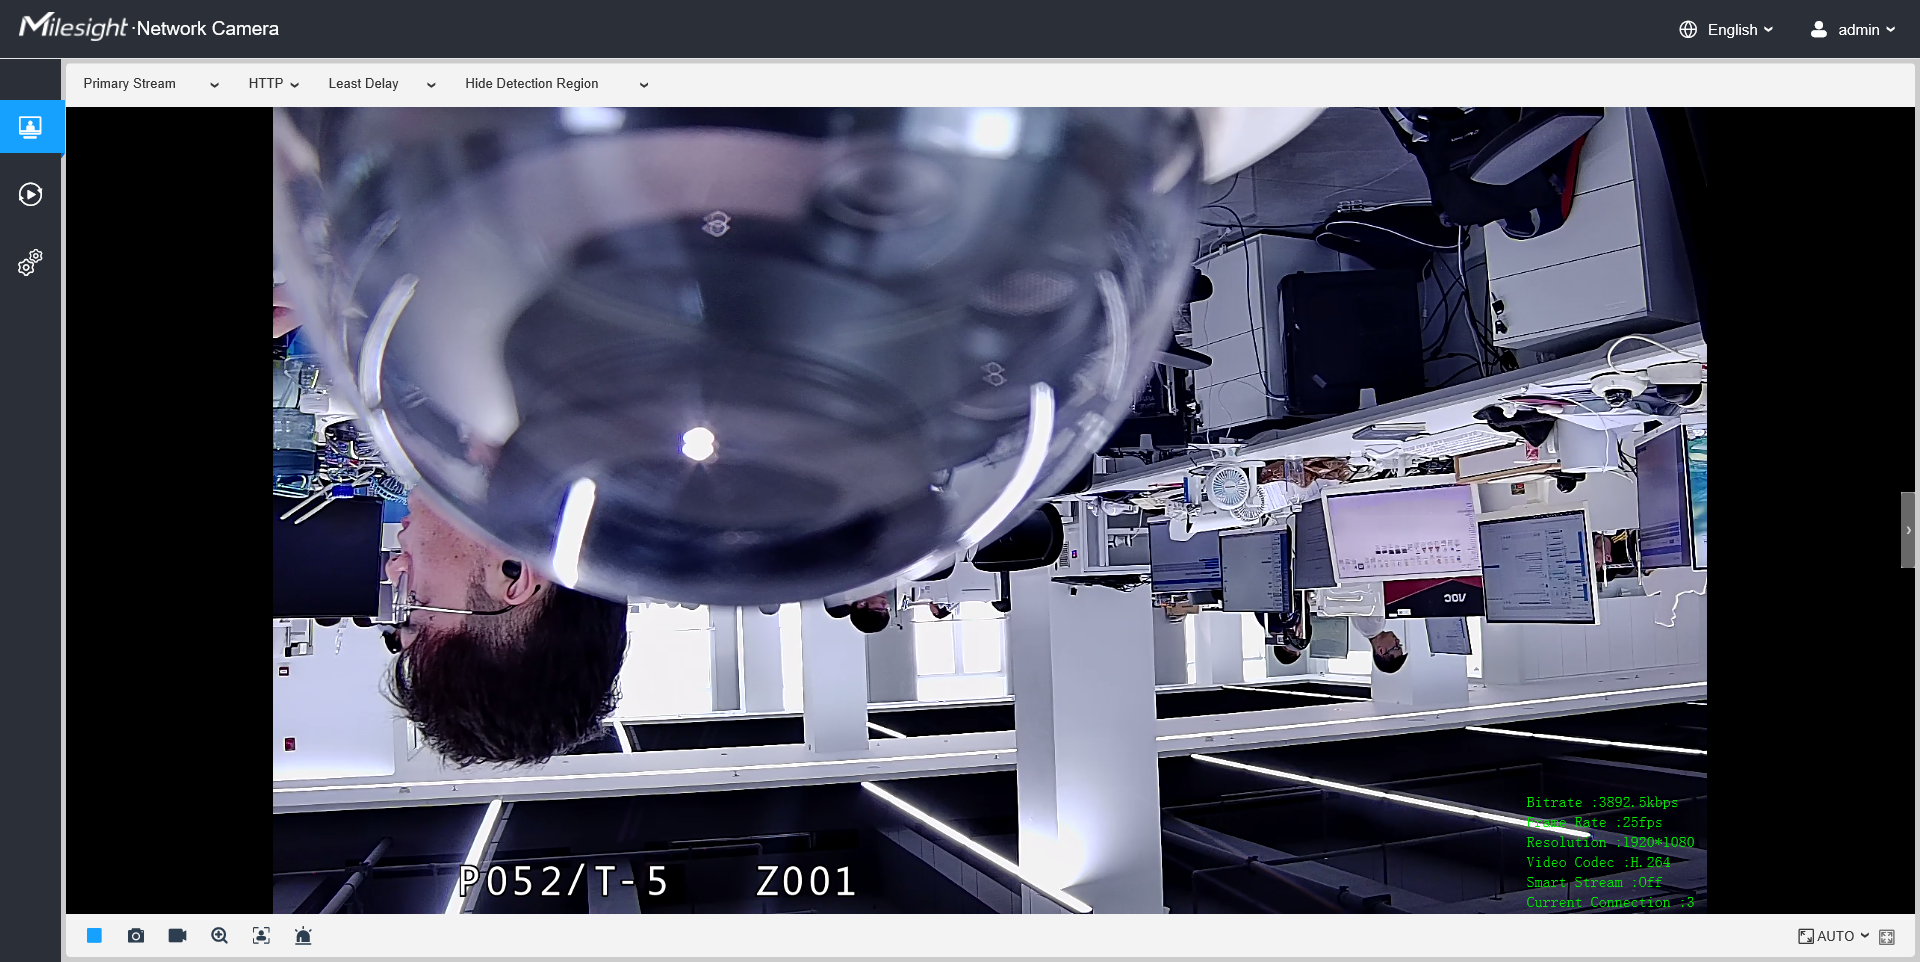
Figure 4-17 Tamper Detection
Note: Version 61.8.0.4-r6 or above, our Tamper Detection has been moved to Basic Event and not in VCA.
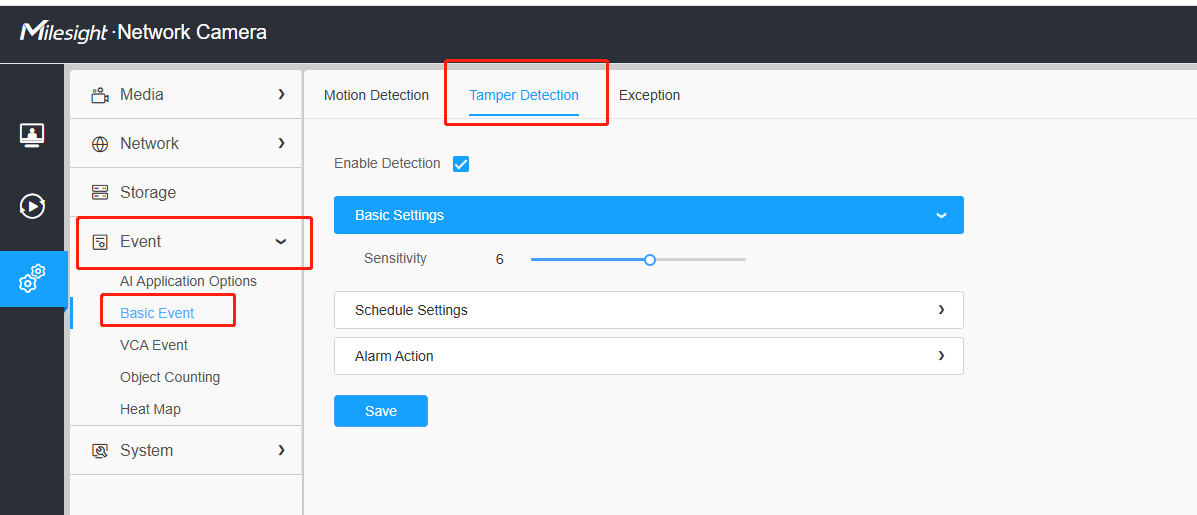
How to set Tamper Detection
Enable tamper detection. According to the sensitivity, alarm will be triggered when disrupted camera operations happen.
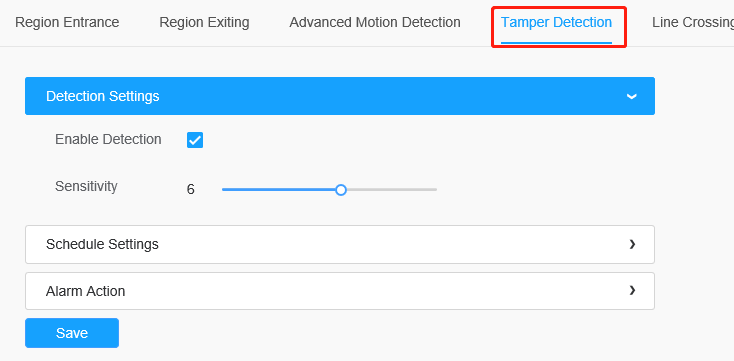
Figure 4-18 Tamper Detection Settings page
4.6 Line Crossing
What is Line Crossing
Milesight line crossing detection is designed to work in most indoor and outdoor environment. An event will be triggered every time when the camera detects objects crossing a defined virtual line. It is especially suitable for general monitoring of entrance and exit points in low-traffic areas, detecting objects such as people and vehicles that cross the defined virtual line.
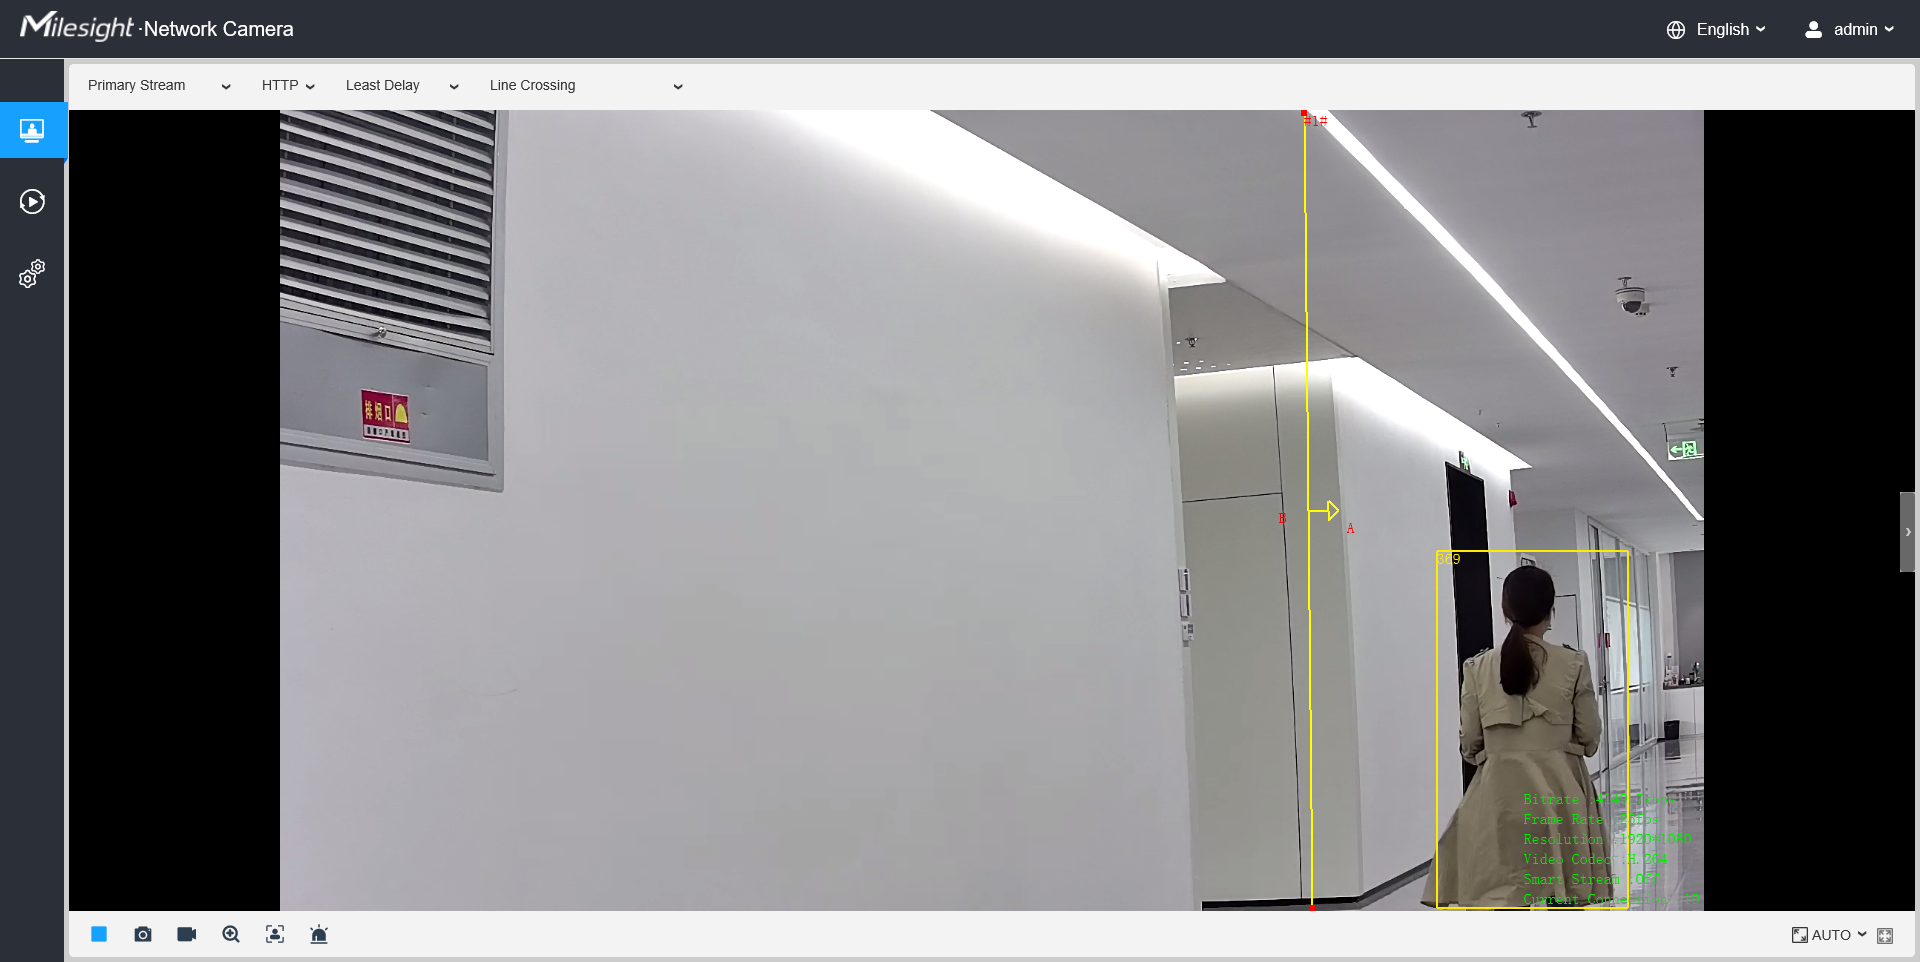
Figure 4-19 Line Crossing
How to set Line Crossing
Enable line crossing detection. Click the mouse to draw a line in the monitoring view. (You can set the maximum 4 lines.) Milesight allows to set up to four lines at a time. There are three direction modes to choose for triggering alarm. “A→B” means when there is any object crossing the line from the “A” side to the “B” side, the alarm will be triggered. “B→A” vice versa.“A B” means that the alarm will be triggered when objects cross line from either side.
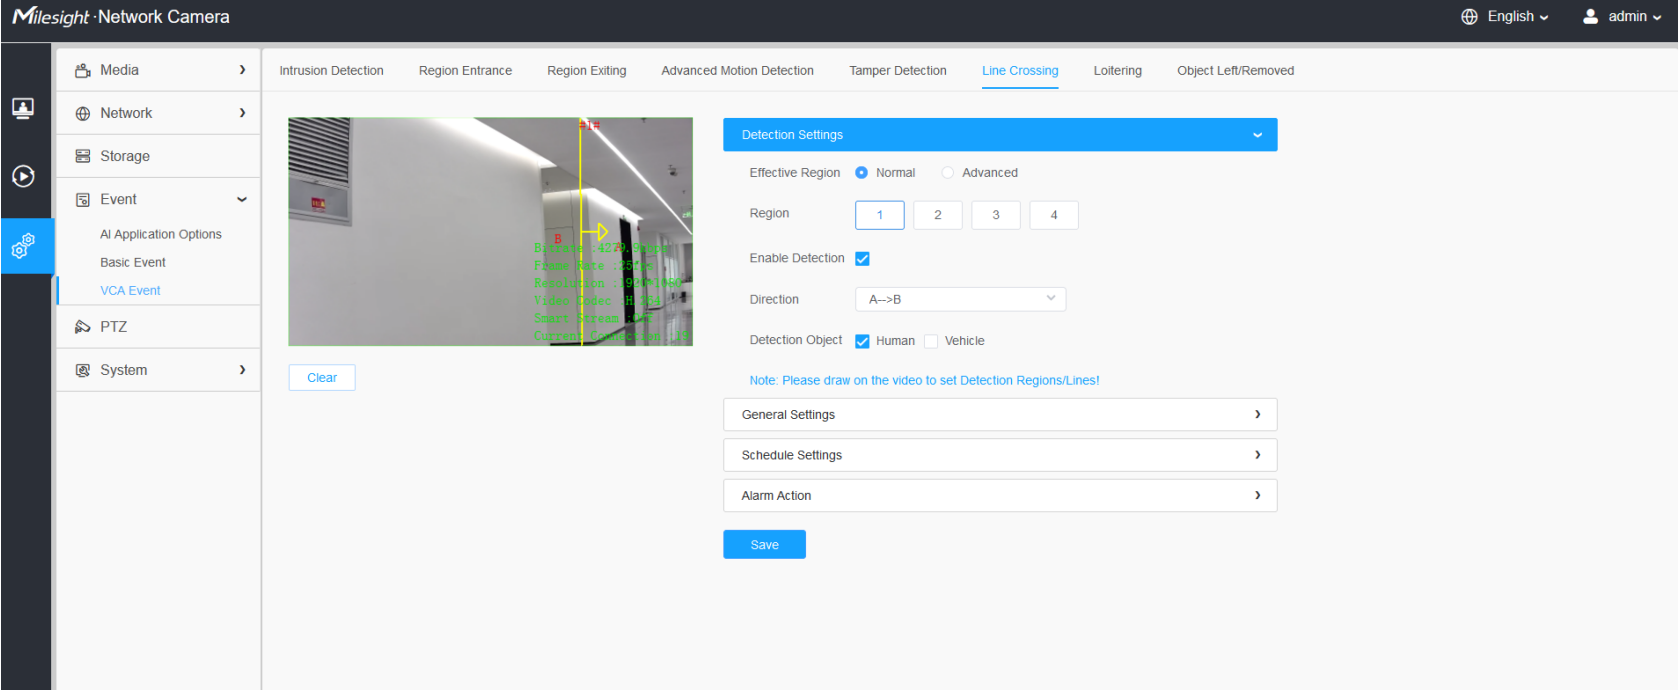
Figure 4-20 Line Crossing Settings page
4.7 Loitering
What is Loitering
When objects are loitering in a defined area for a specific period of time, it would trigger an alarm. Illegal activities towards the places like retail stores and banks would be nipped in the bud thanks to this function.
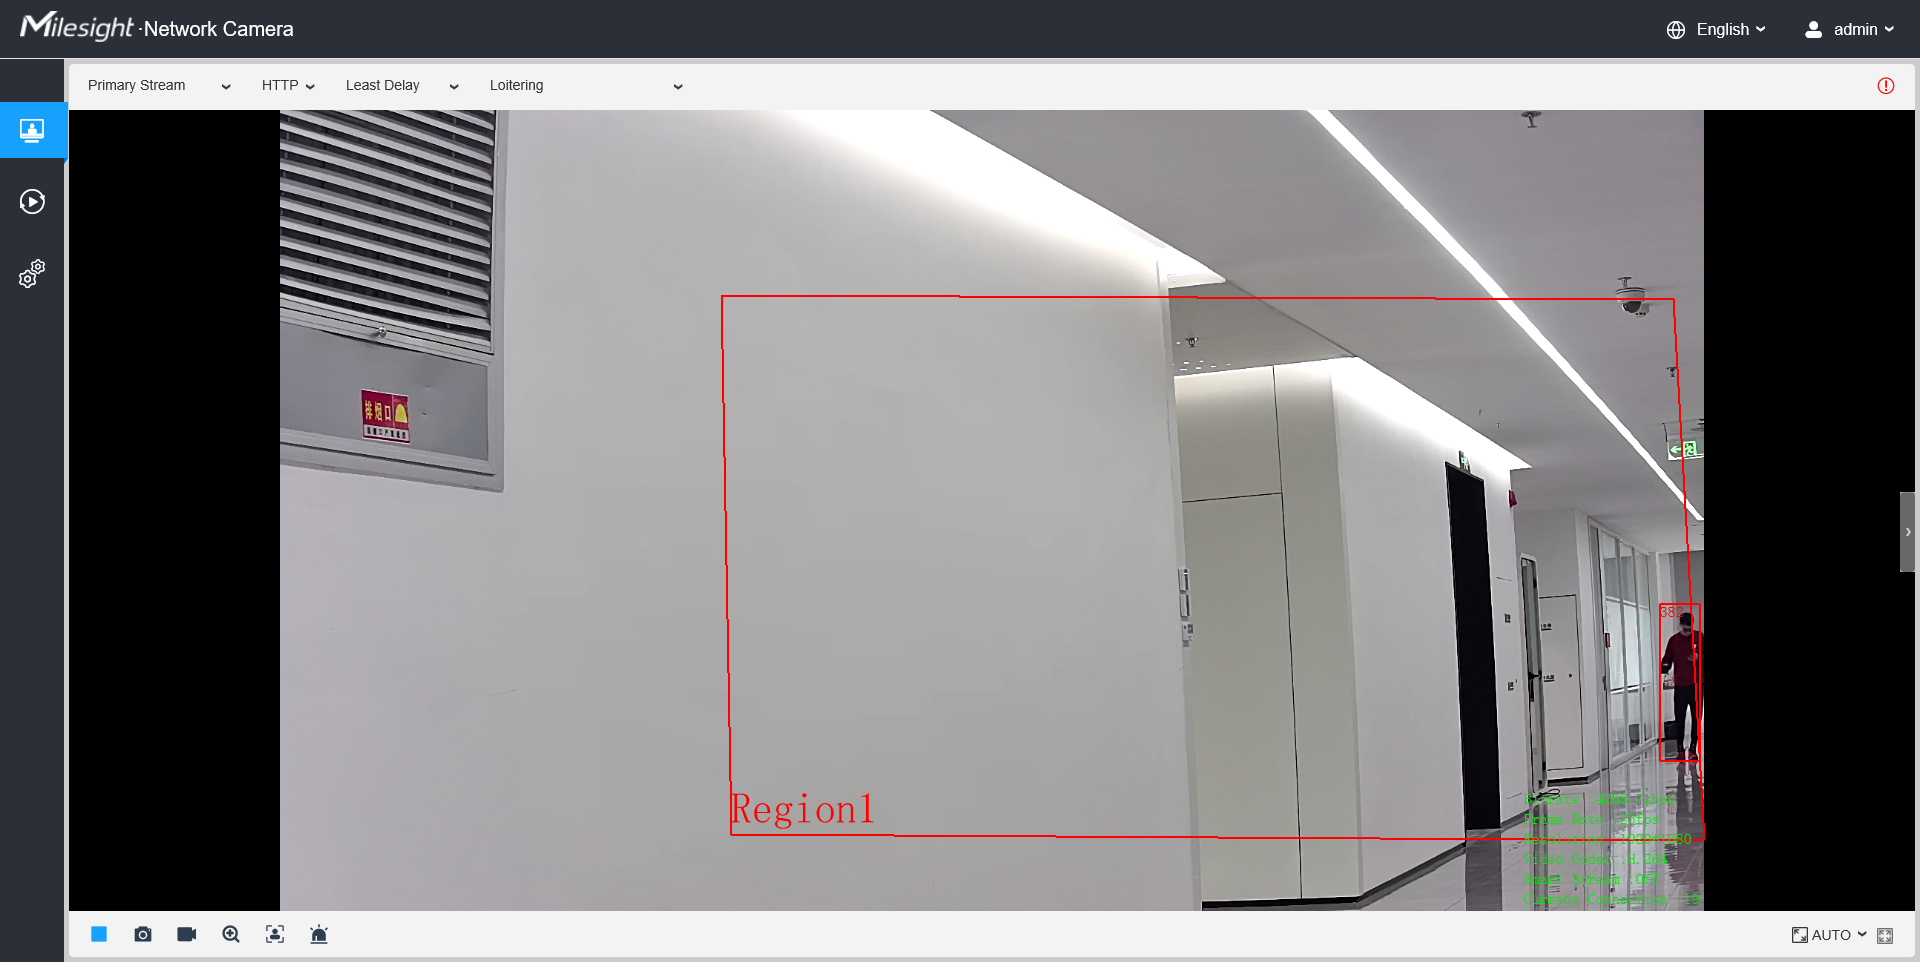
Figure 4-21 Loitering
How to set Loitering
Enable loitering detection and draw an area in the view. (You can set the maximum 4 pieces of loitering regions.)After setting minimum loitering time from 3s to 1800s, any object loiters in the selected area over the minimum loitering time will trigger the alarm. Also Milesight loitering allows to set “Object Size”. Only the object bigger than the set size will trigger the alarm.
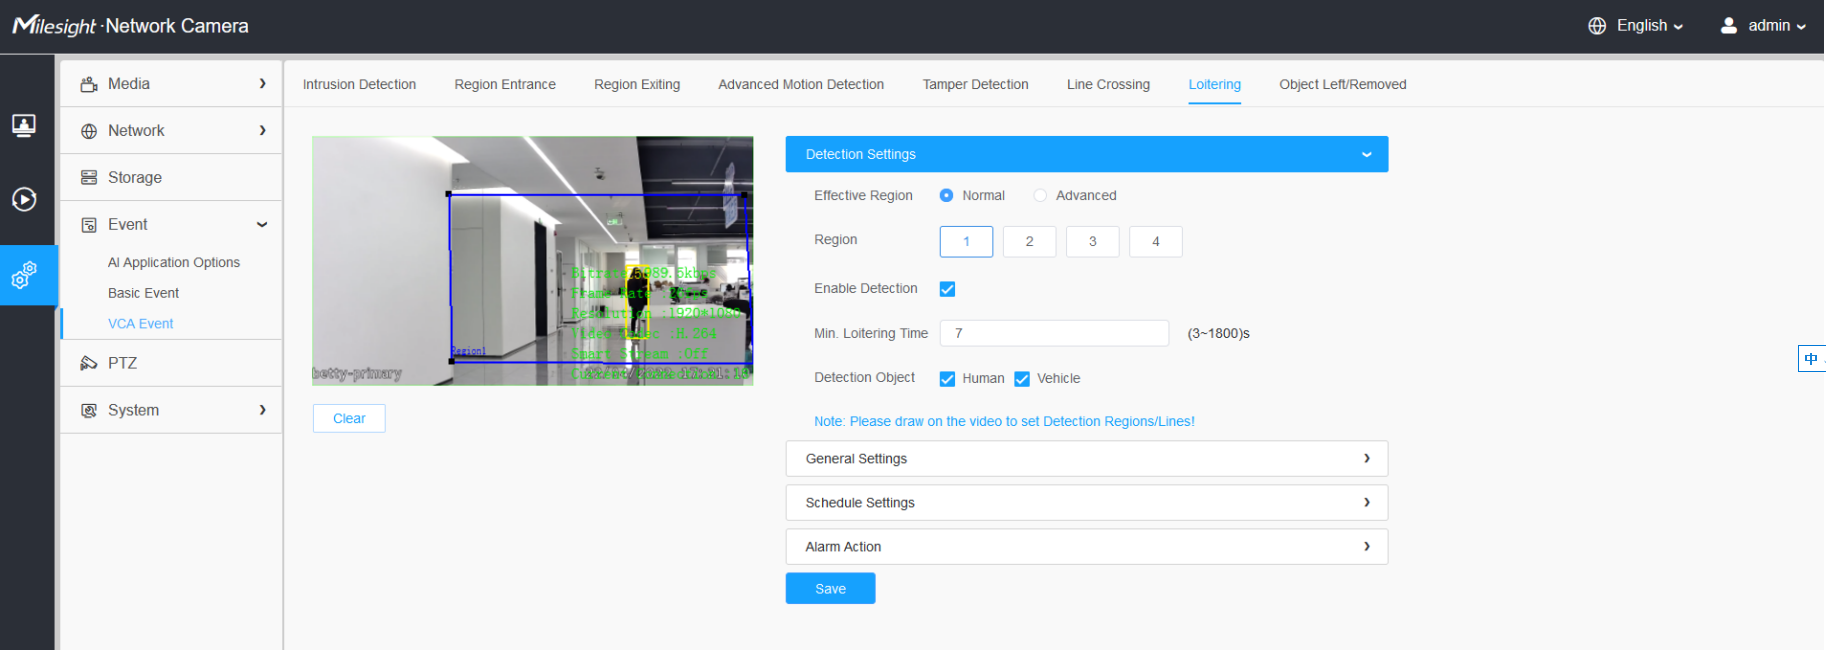
Figure 4-22 Loitering Settings page
4.8 Object Left
What is Object Left
Object Left is used for checking whether there is something left in the selected area. If there is object left in the pre-defined area, an alarm will trigger.
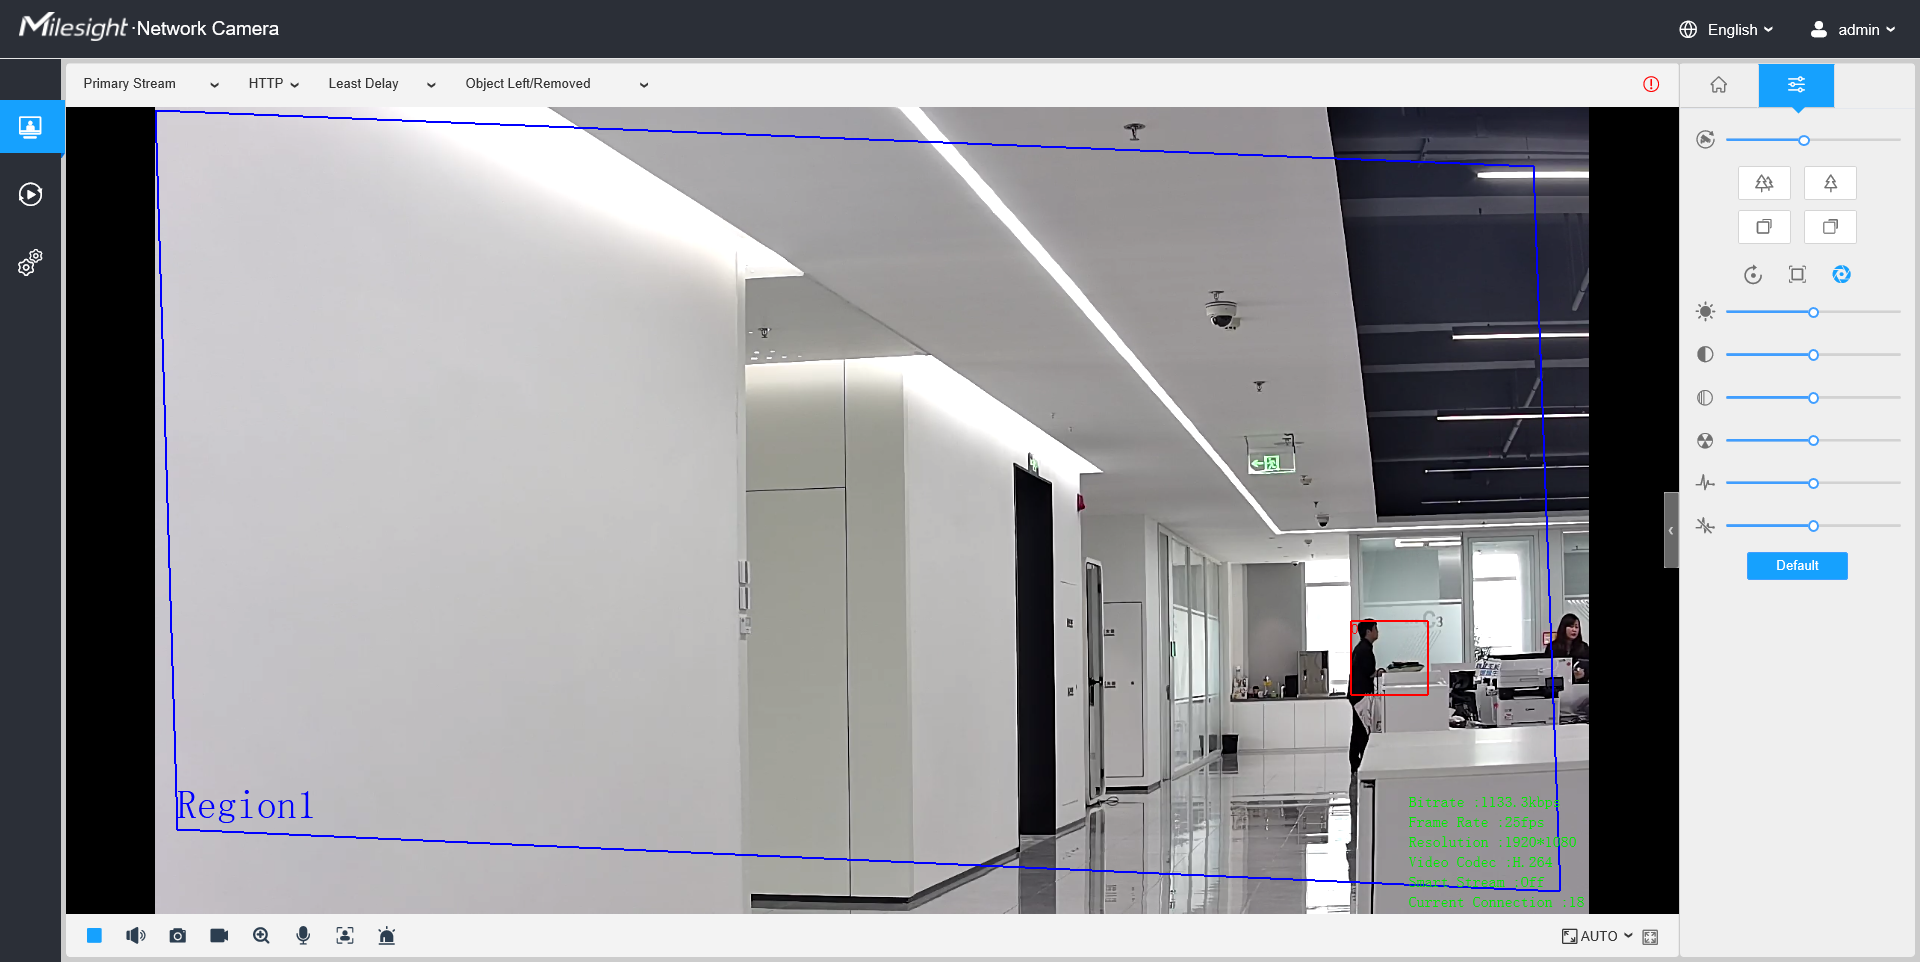
Figure 4-23 Object Left
How to set Object Left
Enable object left detection and set minimum time, then draw a region by clicking the mouse. Any object left in the region over the minimum time will trigger an alarm.You can set the maximum 4 object left regions, the sensitivity and object size filter can be set in the “General Settings”.
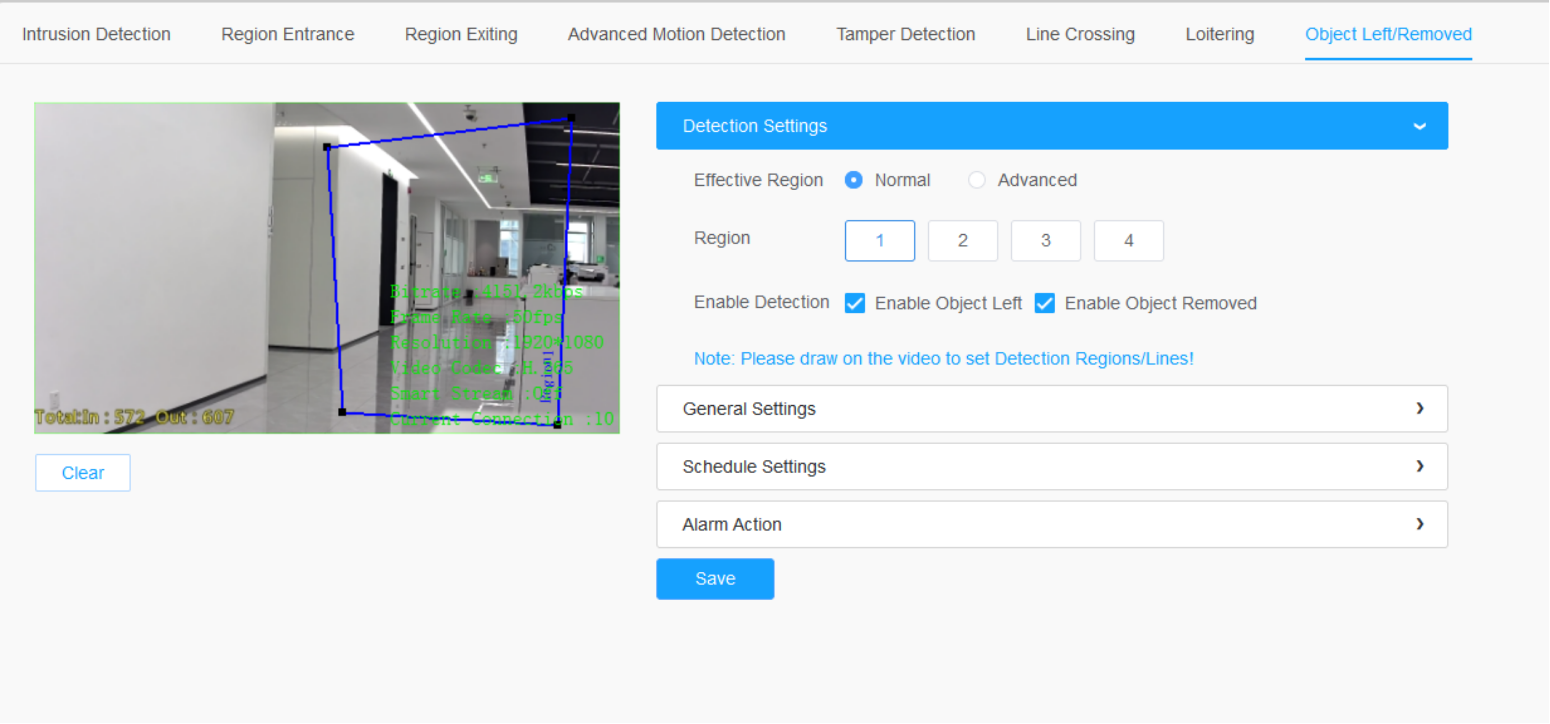
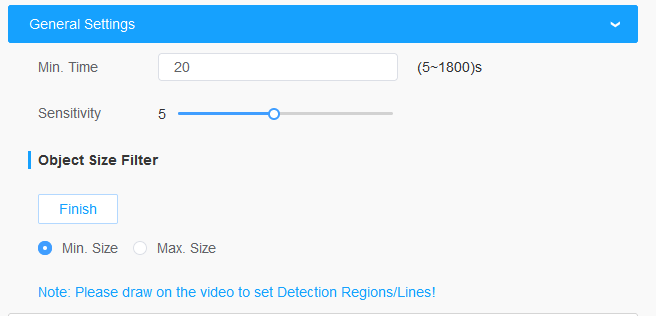
Figure 4-24 Object Left Settings page
4.9 Object Removed
What is Object Removed
Object Removed is used to secure objects’ safety. When there is an object removed from a pre-defined region, it will detect and prompt an alarm. You can set the maximum 4 object left regions, the sensitivity and object size filter can be set in the “General Settings”.
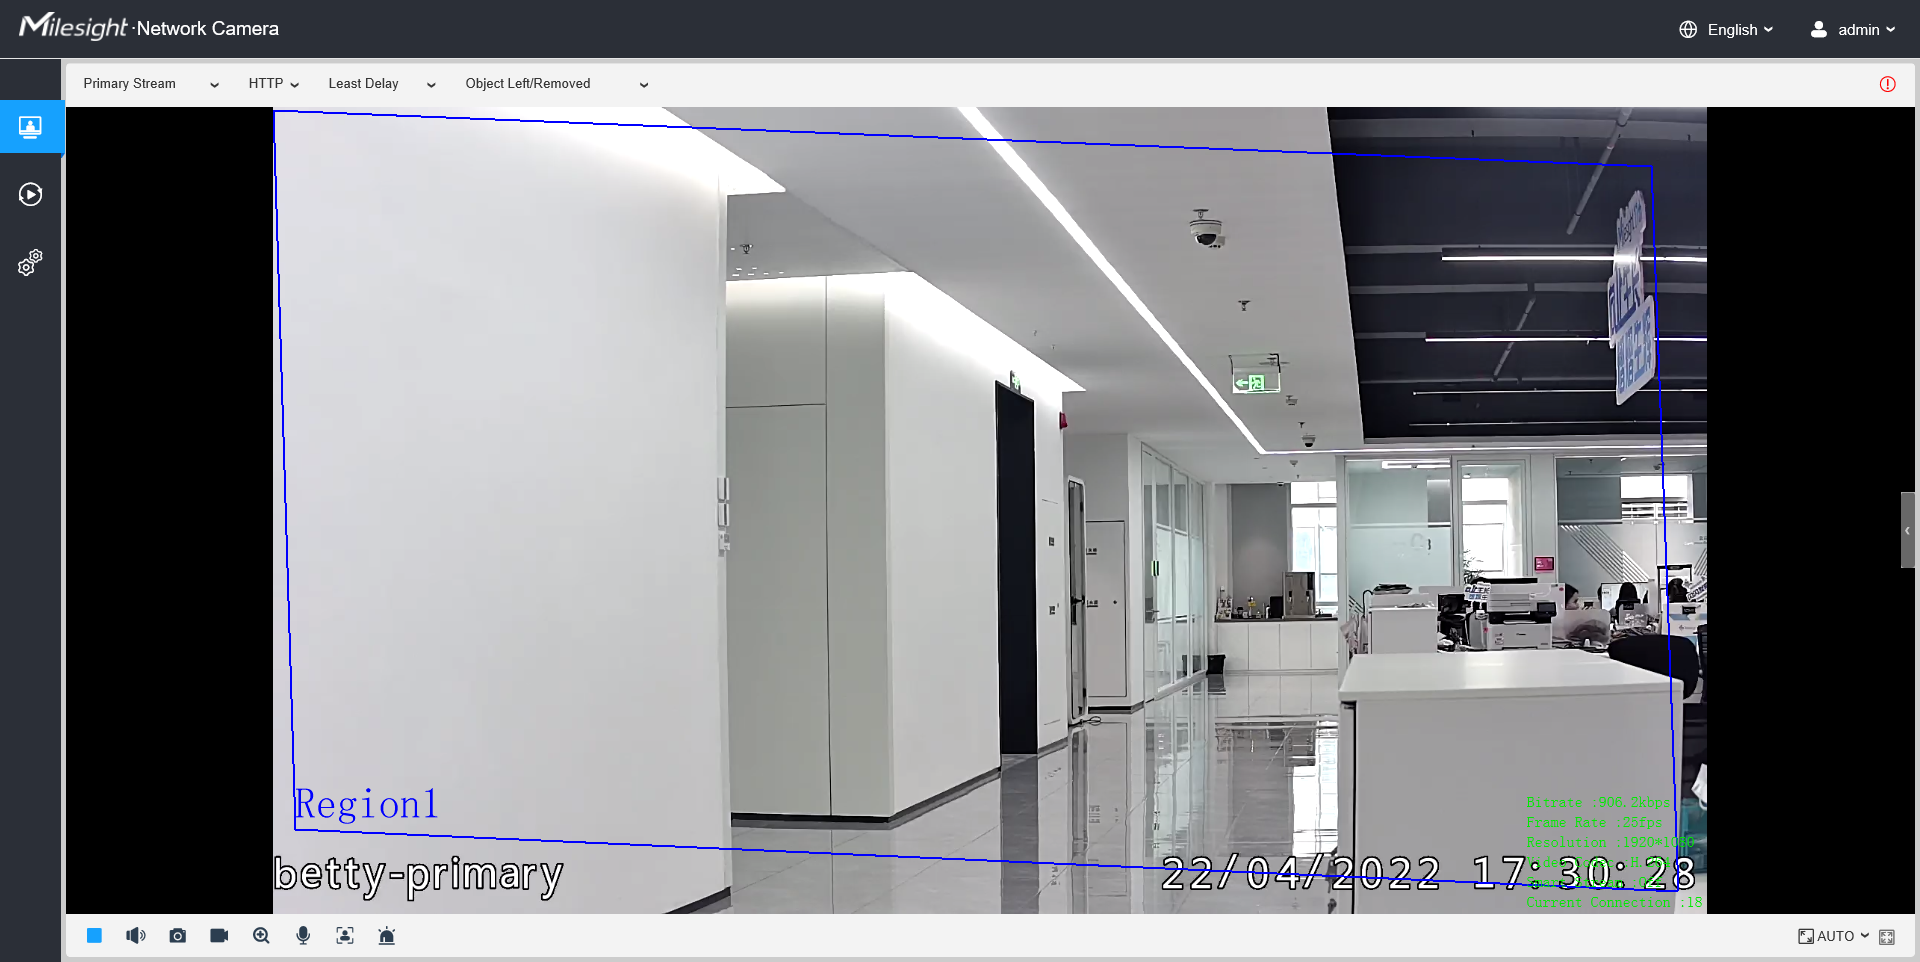
Figure 4-25 Object Removed
How to set Object Removed
Enable object removed detection and set minimum time, then draw a region by clicking the mouse. Any object removed in the region over the minimum time will trigger an alarm.
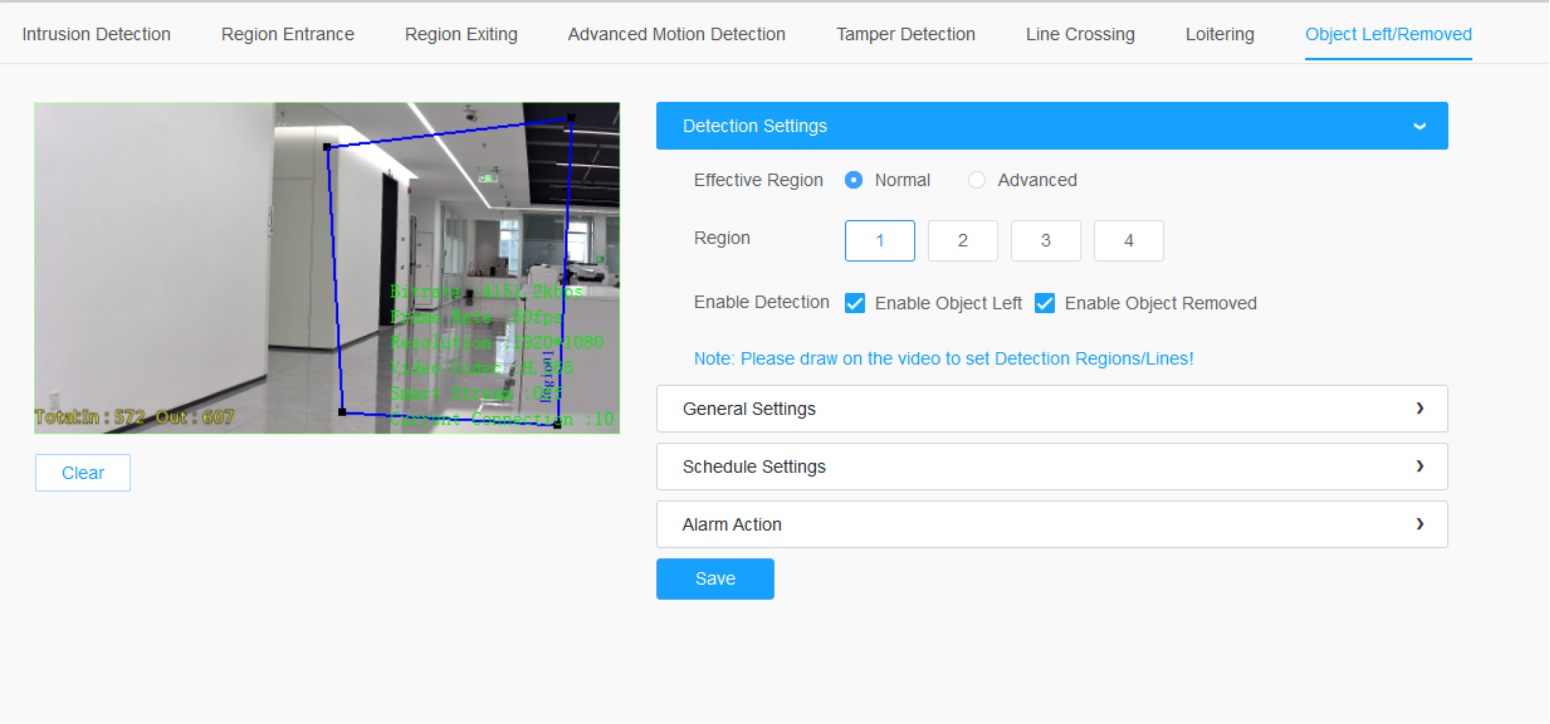
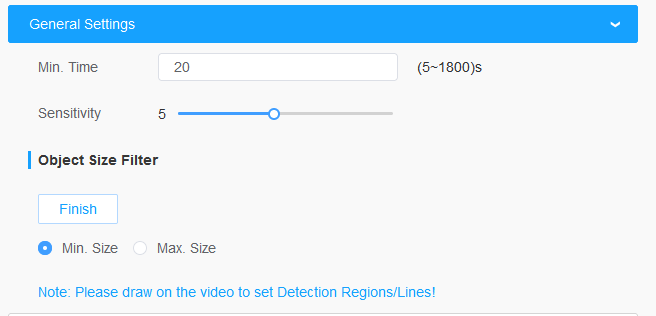
Figure 4-26 Object Removed Settings page
Viewing angle is significant for better Milesight VCA performance. Also, the suitable installation position guarantees best application of these smart detection.
5. How to set VCA function with Milesight NVR
Smart Event uses Milesight Video Content Analysis technology which is applied in a wide range of domains including entertainment, health-care, retail, automotive, transport, home automation, safety and security. Milesight VCA provides advanced, accurate smart video analysis for Milesight network cameras. It enhances the performance of network cameras through 8 detection modes which are divided into basic function and advanced function, enabling the comprehensive surveillance function and quicker response of cameras to different monitoring scenes.
5.1 Region Entrance
Region entrance helps to protect a specific area from potential threat of suspicious person’s or object’s entrance. An alarm will be triggered when objects enter the selected regions by enabling region entrance.
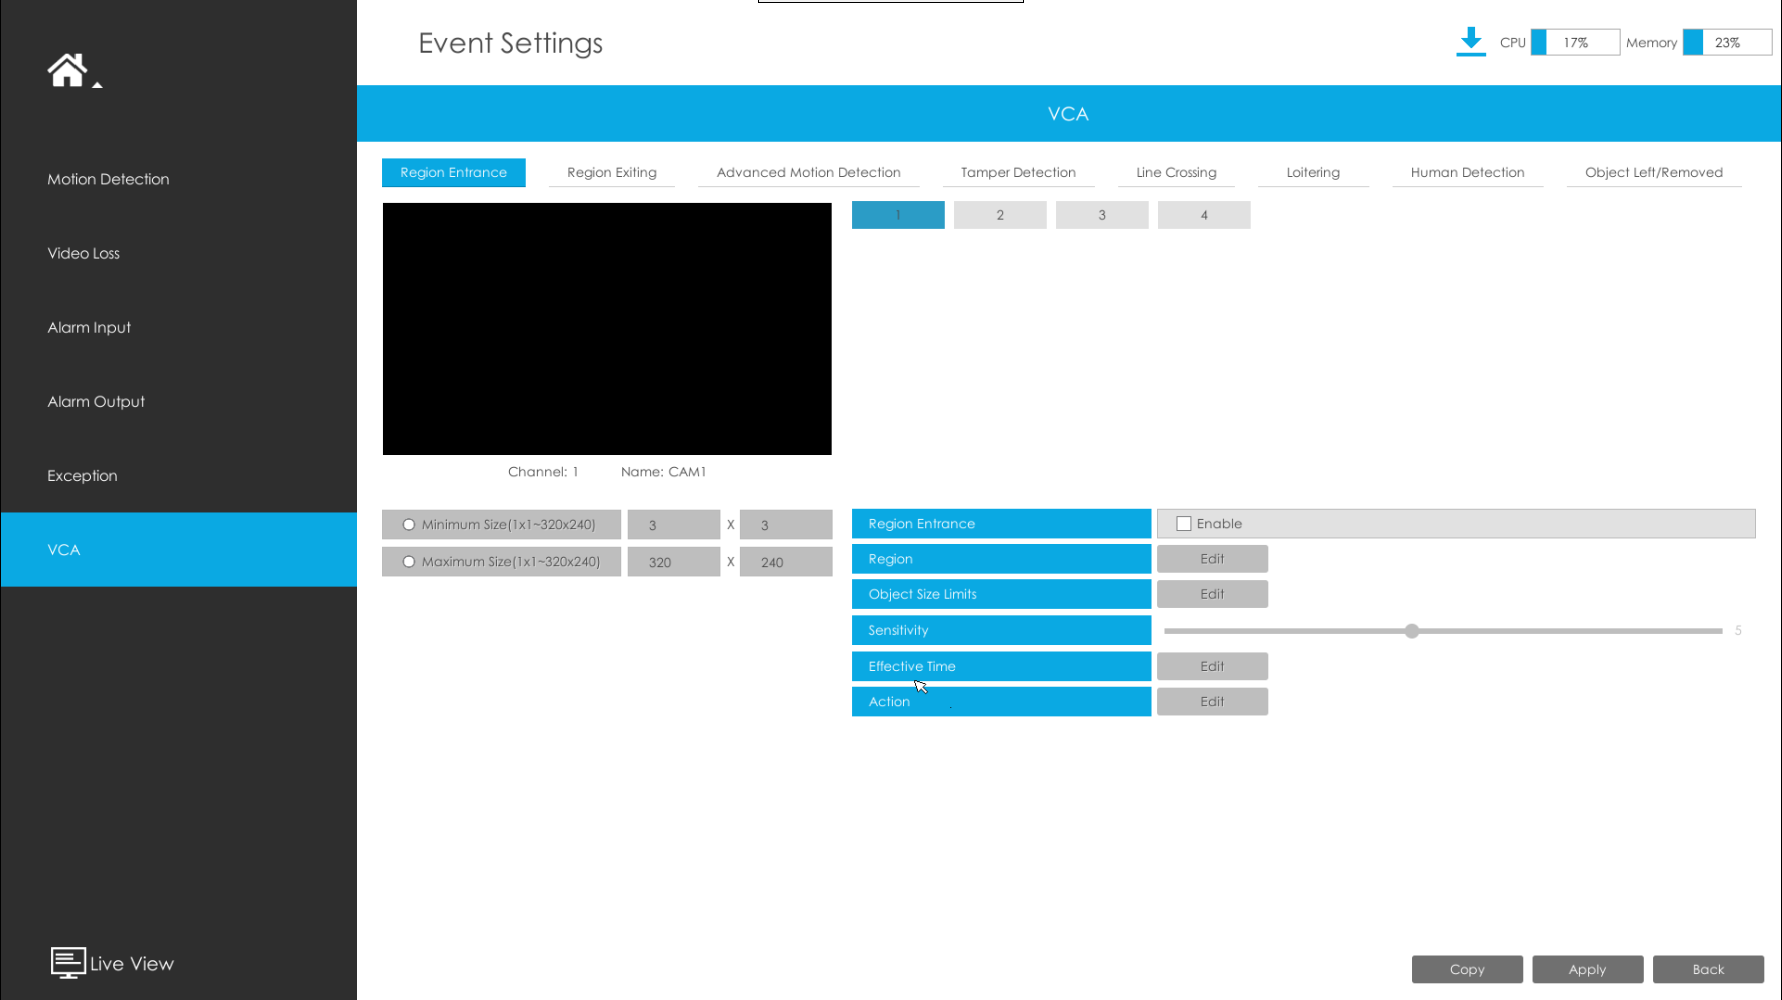
Figure 5-1 Region Entrance Settings page
Step 1: Select channel and enable Region Entrance.

Figure 5-2 Region Entrance
Step 2: Set entrance detection region and size.
You can select an area by dragging the mouse to set the trigger area, and this area will be synchronized to camera. Also, you can set or clear all set regions by directly clicking "Set All” and “Clear All”.
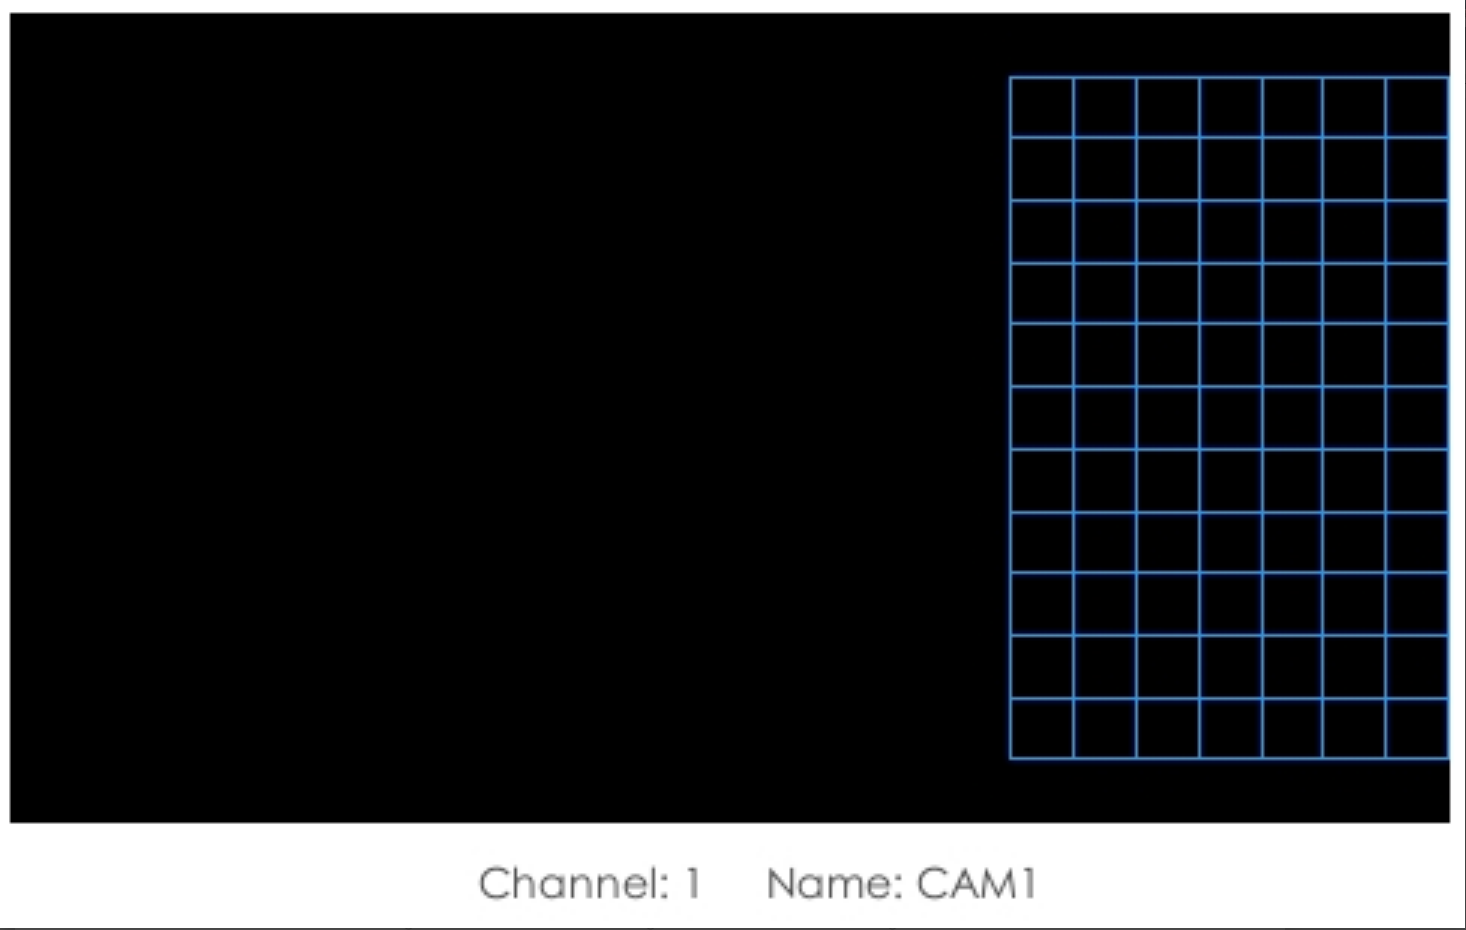
Figure 5-3 Set Entrance Detection region
Milesight VCA provides the primary setting for the whole VCA functions.
Minimum Size:Is the setting to decide whether an object is big enough to trigger other settings. The frame you draw on the screen means that only if the object size is bigger than the frame, the settings for other VCA functions will take effect.
Maximum Size:Is opposite to “Minimum Size”, only if the object size is smaller than the
frame, the settings for other VCA functions will take effect.
Step 3: Set Effective Time of region entrance by clicking "Edit".NVR receives the alarm when effective time has been set. It will be more convenient by clicking "Select All" or "Clear All" to set or clear all time settings.
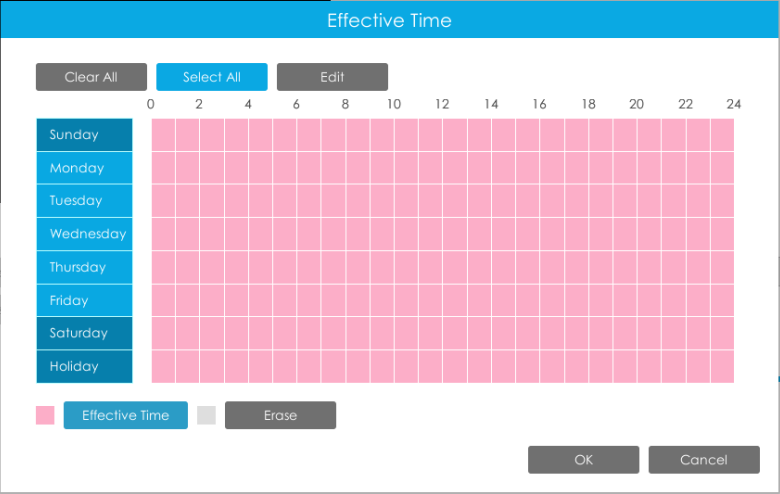
Figure 5-4 Effective Time
Step 4: Set Action for region entrance alarm by clicking “Edit”.
[ Audible Warning ]: NVR will trigger an audible beep when region entrance is detected.
The user can set effective schedule in two ways as below:
①:Select the operation type: Audible or Erase. Then drag a square on the time table for time setting.It will be more convenient by clicking “Select All" or "Clear All" to set or clear all time settings.
②:Click “Edit” to edit record effective time manually.
[ Triggered Interval ]: The effective interval between two actions when events are triggered.
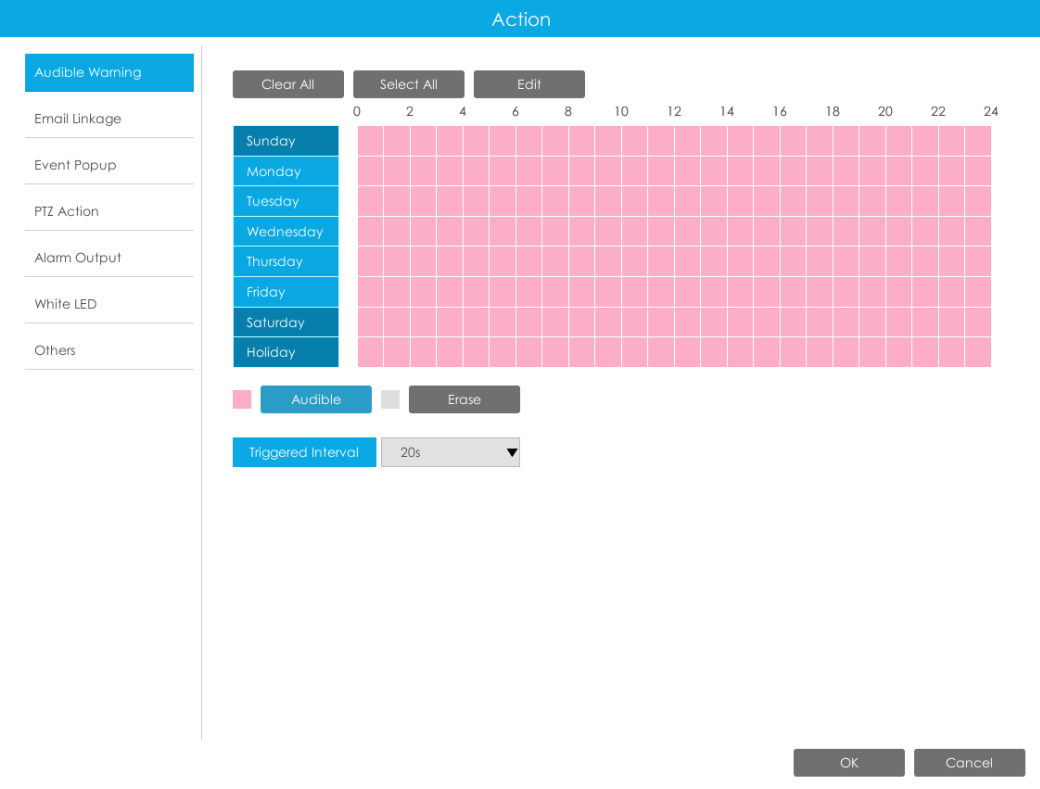
Figure 5-5 Audible Warning
[ Email Linkage ]: NVR will send an email to the address you set before.
The user can set effective schedule in two ways as below:
①:Select the operation type, Email or Erase. Then drag a square on the time table for time setting.It will be more convenient by clicking “Select All" or "Clear All" to set or clear all time settings.
②:Click “Edit” to edit record effective time manually.
[ Triggered Interval ]: The effective interval between two actions when events are triggered.
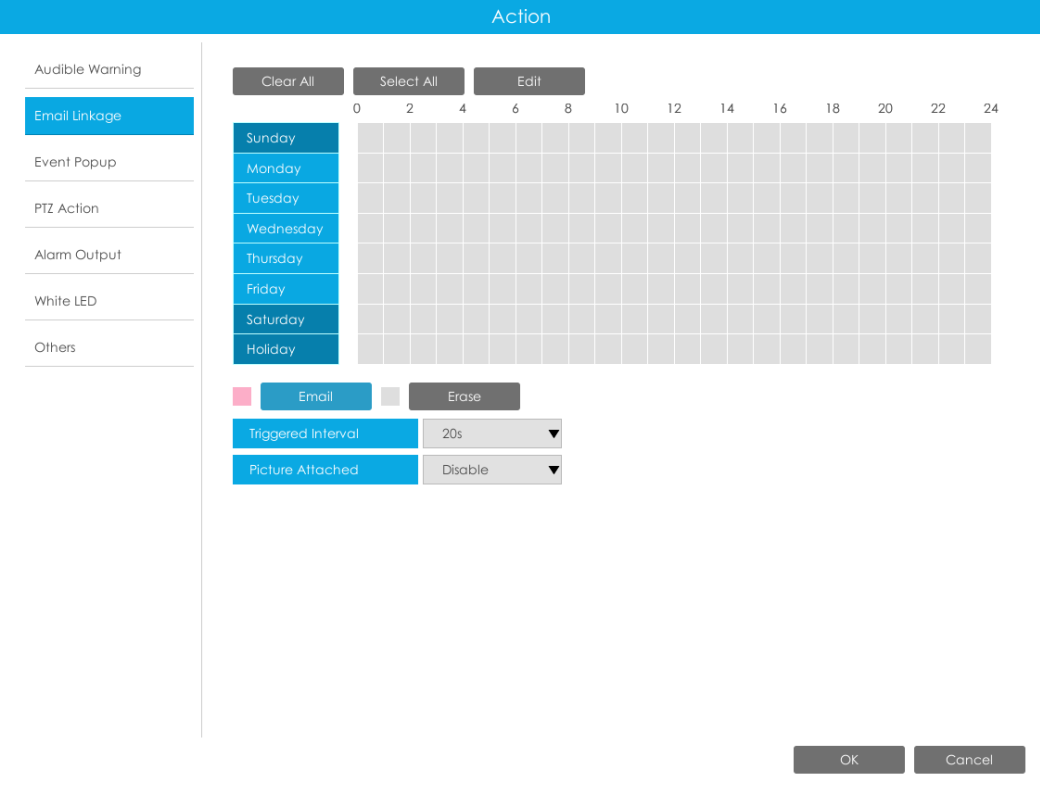
Figure 5-6 Email Linkage
[ Event Popup ]: Trigger alarm screen pop up to full screen when alarm is triggered.
You can set display duration time of all triggered channel in ‘Settings’->’General’->’Event Popup Duration Time’. Then triggered channel will be shown one by one as duration time.
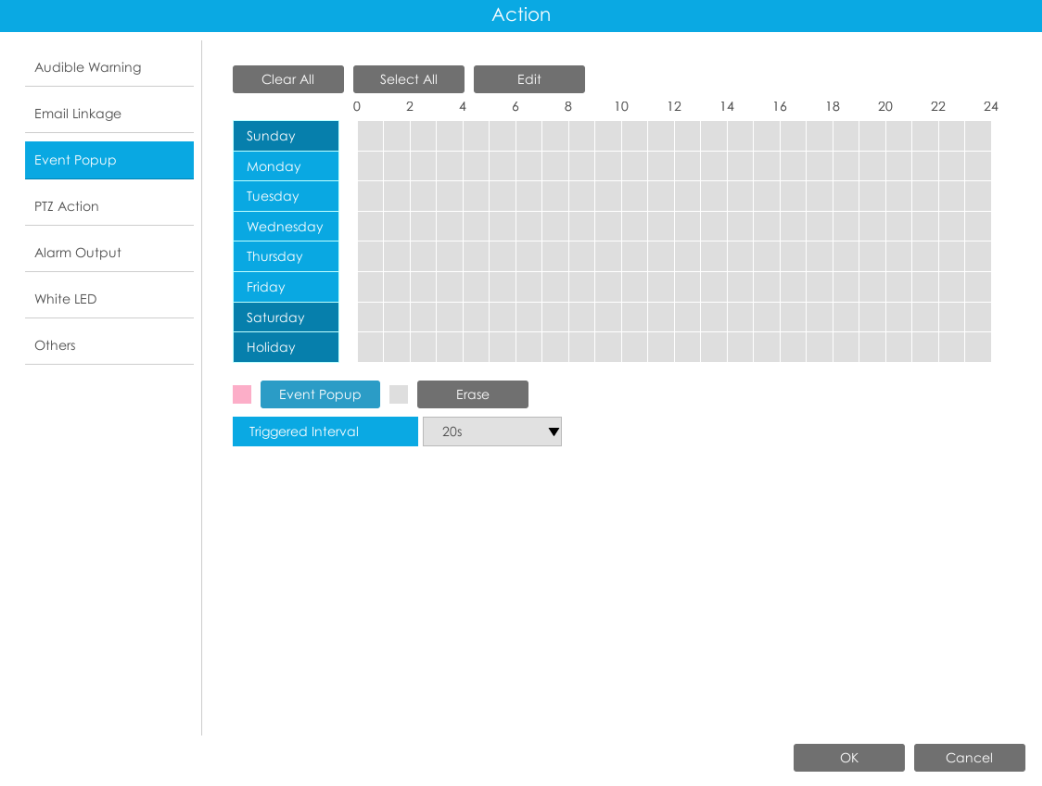
Figure 5-7 Event Popup
[ PTZ Action]: Trigger PTZ action when alarm is triggered. PTZ action includes Preset and Patrol.
The user can set effective schedule in two ways as below:
①:Select the operation type: PTZ or Erase. Then drag a square on the time table for time setting. It will be more convenient by clicking “Select All" or "Clear All" to set or clear all time settings.
②:Click “Edit” to edit record effective time manually.
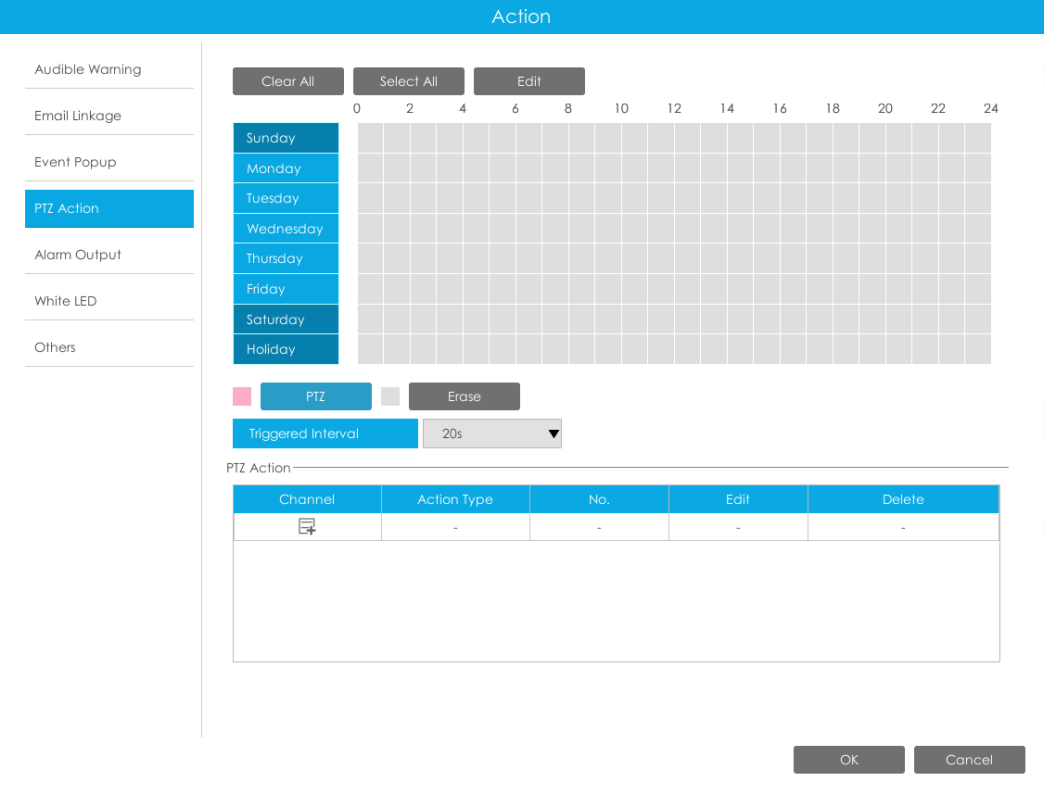
Figure 5-8 PTZ Action
[ Alarm Output ]: Trigger alarm output when alarm is triggered.
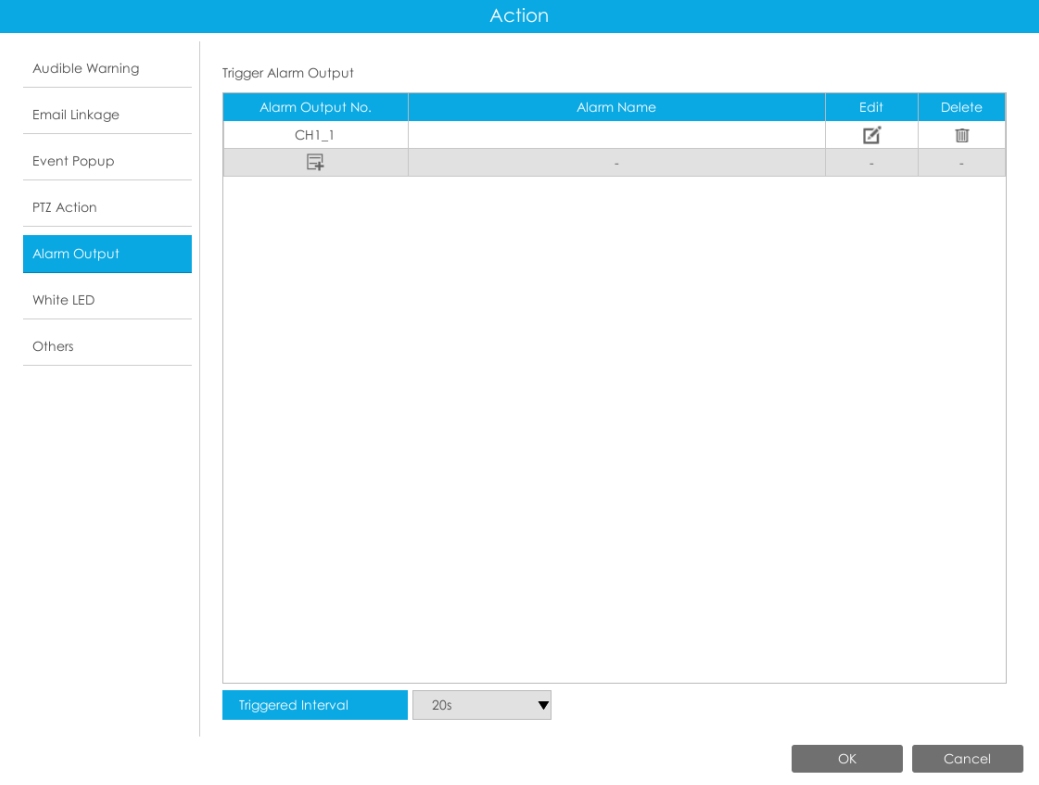
Figure 5-9 Alarm Output
[ White LED ]: Triggered White LED when alarm is triggered.
The user can set effective schedule in two ways as below:
①:Select the operation type: White LED or Erase. Then drag a square on the time table for time setting.It will be more convenient by clicking “Select All" or "Clear All" to set or clear all time settings.
②:Click “Edit” to edit record effective time manually.
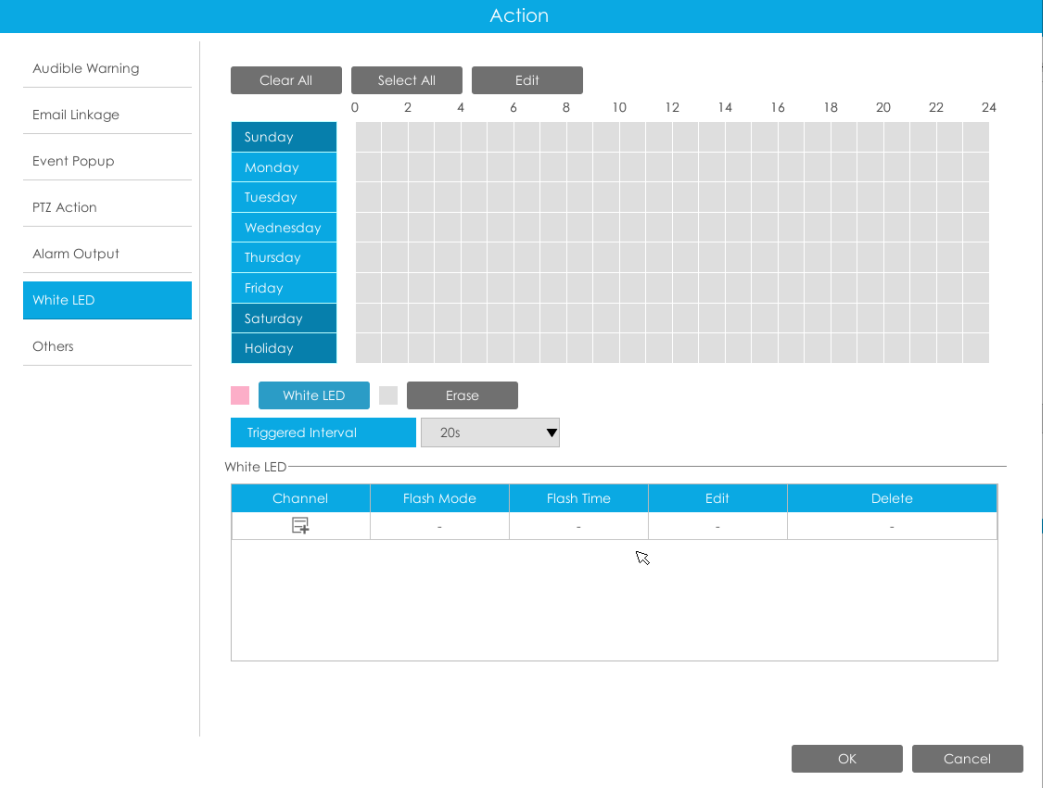
Figure 5-10 White LED
[ Others ]: Trigger other channels record when alarm is triggered.
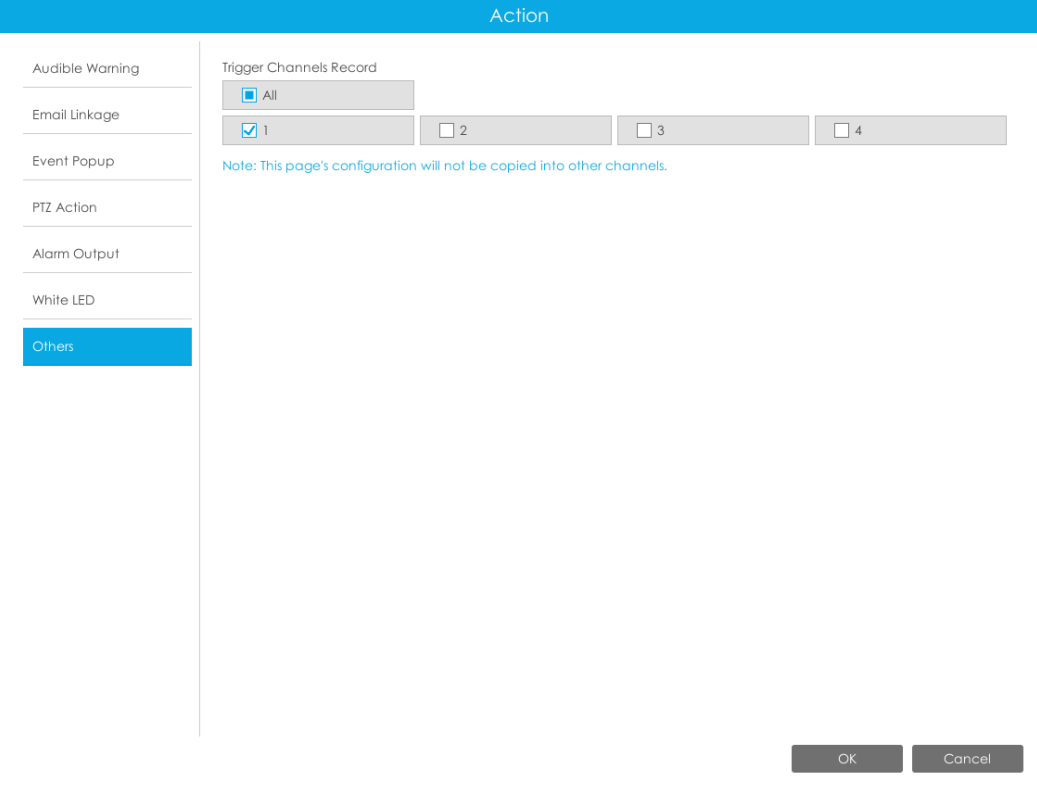
Figure 5-11 Others
5.2 Region Exiting
Region exiting is to make sure that any person or object won't exit the area that is being monitored. Any exit of people or objects will trigger an alarm.
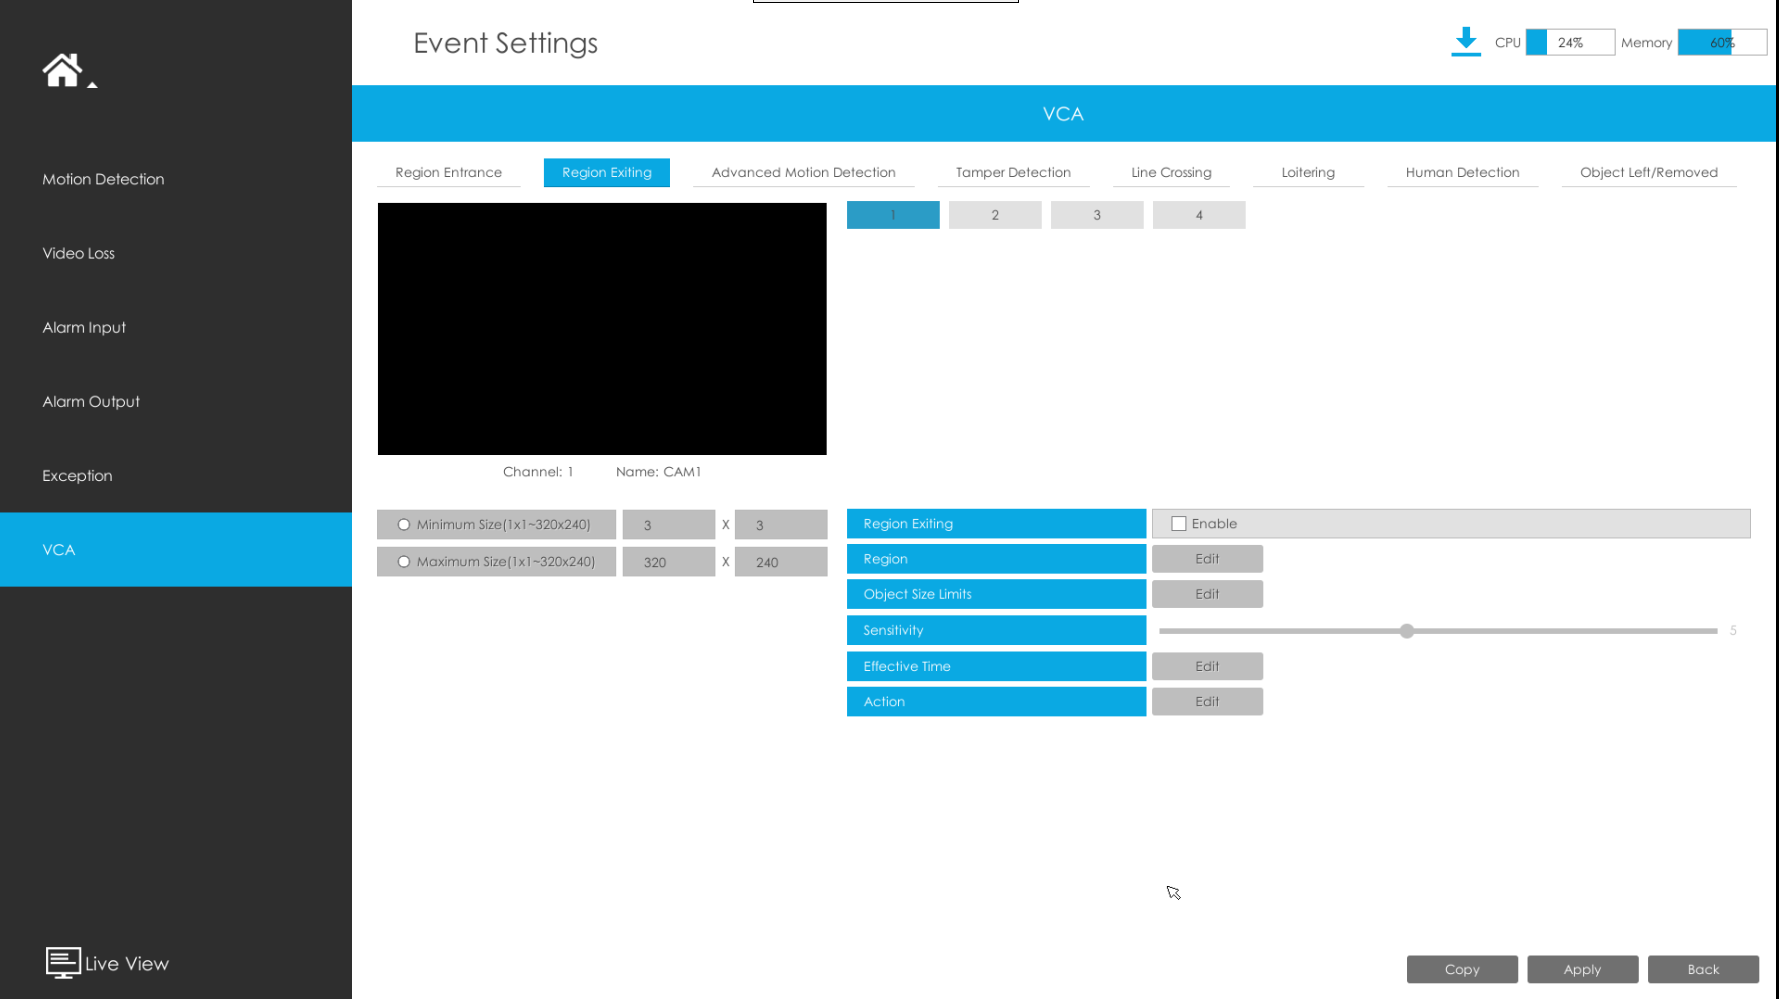
Figure 5-12 Region Exiting Settings page
Select channel and enable Region Exiting.

Figure 5-13 Region Exiting
Kindly Note
Please refer to the Region Entrance section for the specific setting in this chapter.
5.3 Advanced Motion Detection
Different from traditional motion detection, Milesight advanced motion detection can filter out “noise” such as lighting changes, natural tree movements, etc. When an object moves to the selected area, it will trigger alarm.
Step 1: Select channel and enable Advanced Motion Detection.
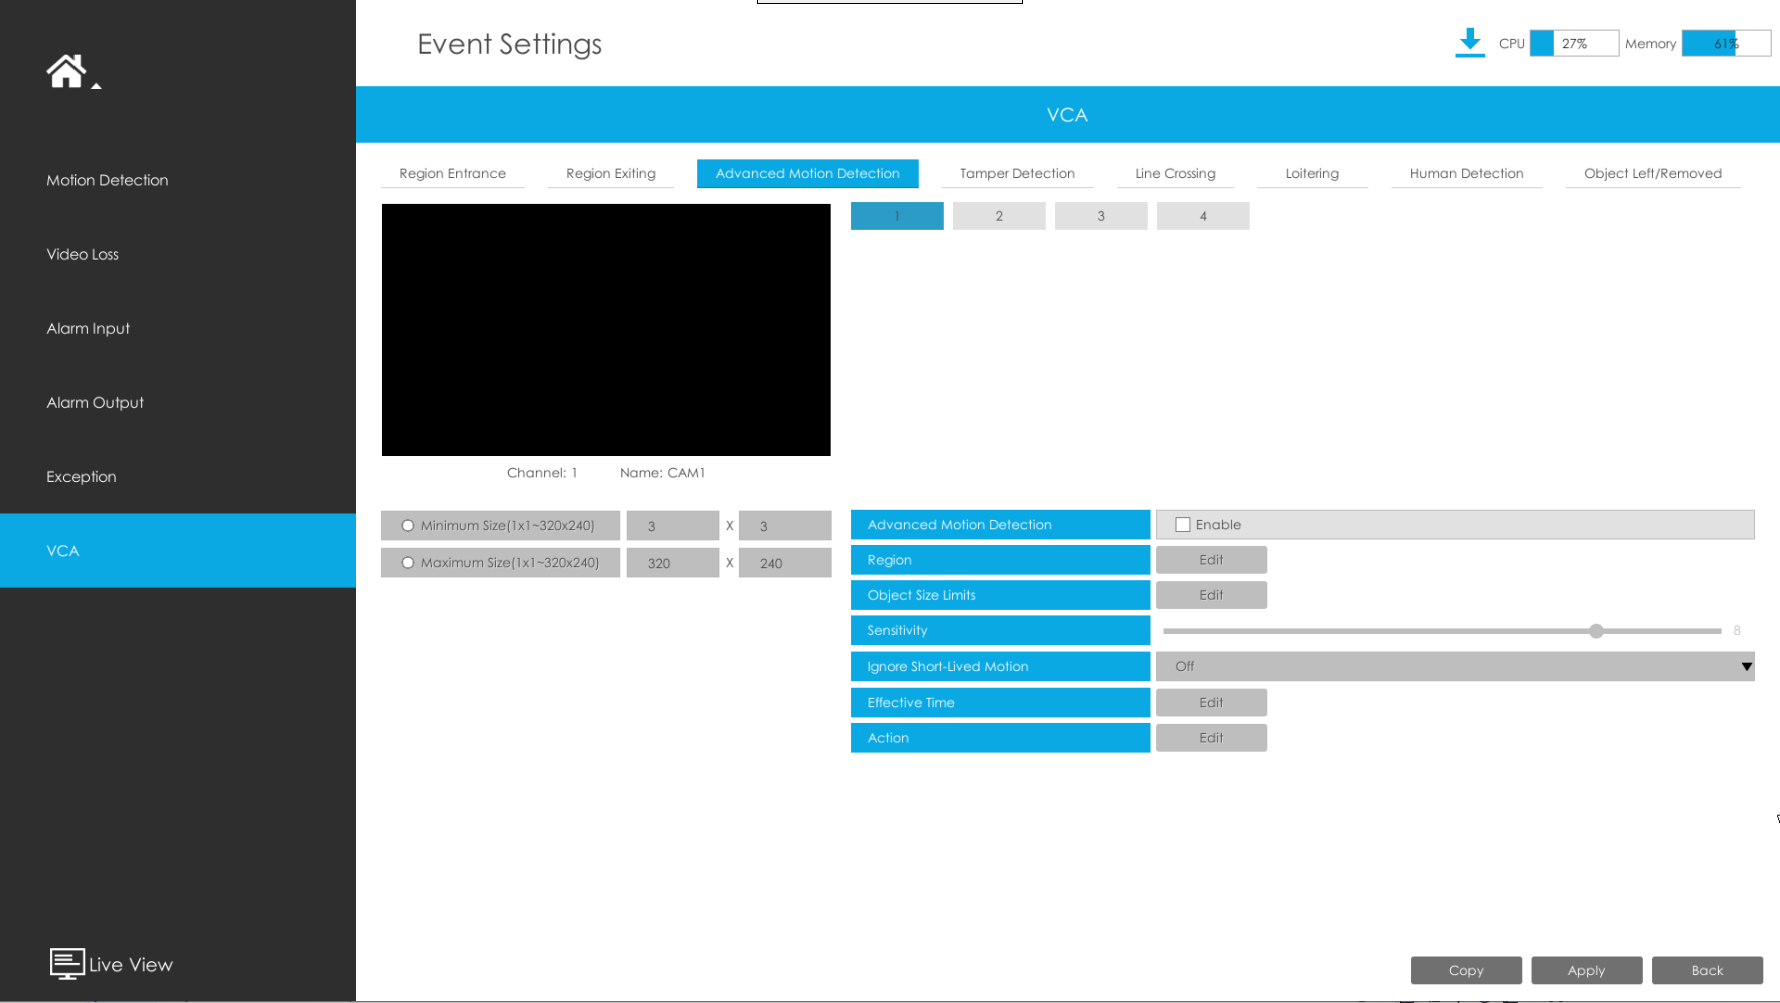
Figure 5-14 Advanced Motion Detection Settings page
Step 2: Set Sensitivity.
The sensitivity can be configured to detect various movements according to different requirements. When the level of sensitivity is low, slight movement won’t trigger the alarm.

Figure 5-15 Sensitivity
Kindly Note
Please refer to the Region Entrance section for the specific setting in this chapter.
5.4 Tamper Detection
Tamper Detection is used to detect possible tampering like the camera being unfocused, obstructed or moved. This functionality alerts security staff immediately when any above-mentioned actions occur.
Step 1: Select channel and enable Tamper Detection.
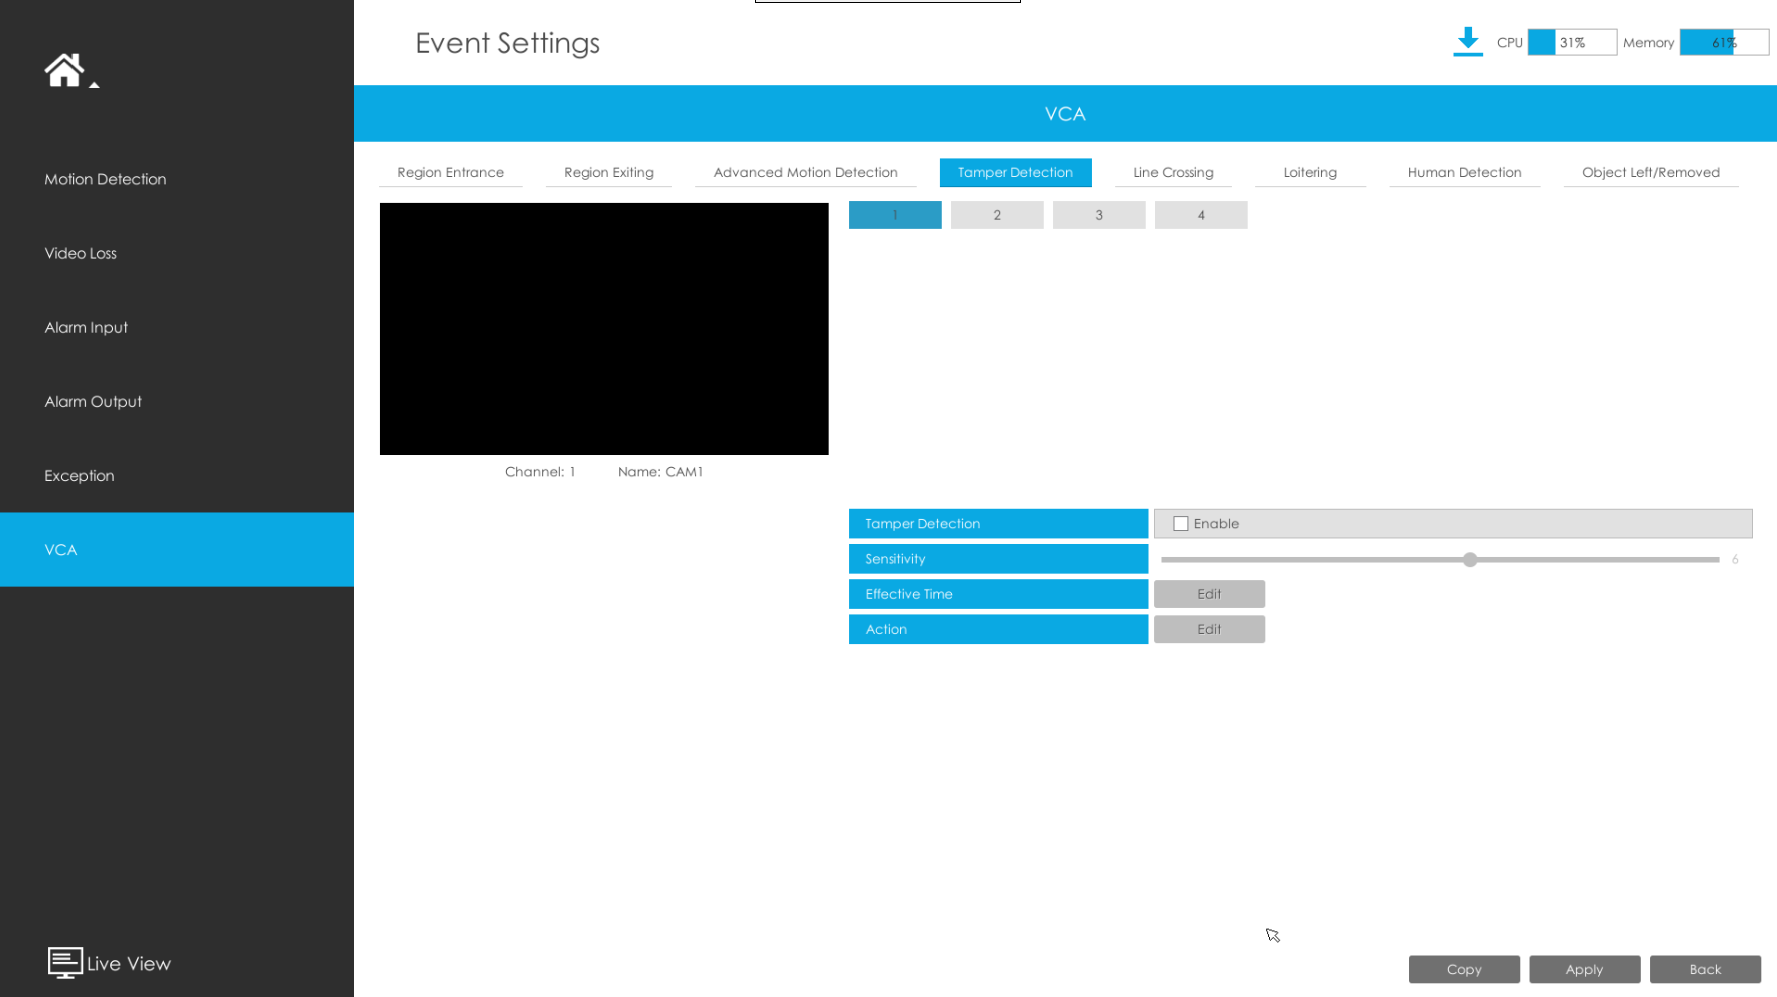
Figure 5-16 Tamper Detection Settings page
Step 2: Set Sensitivity.
The sensitivity can be configured to detect various movements according to different requirements. When the level of sensitivity is low, slight movement won’t trigger the alarm.

Figure 5-17 Sensitivity
Kindly Note
Please refer to the Region Entrance section for the specific setting in this chapter.
5.5 Line Crossing
Line Crossing detection is designed to work in most indoor and outdoor environment. An event will be triggered every time when the camera detects objects crossing a defined virtual line.
Settings steps are shown as follows:
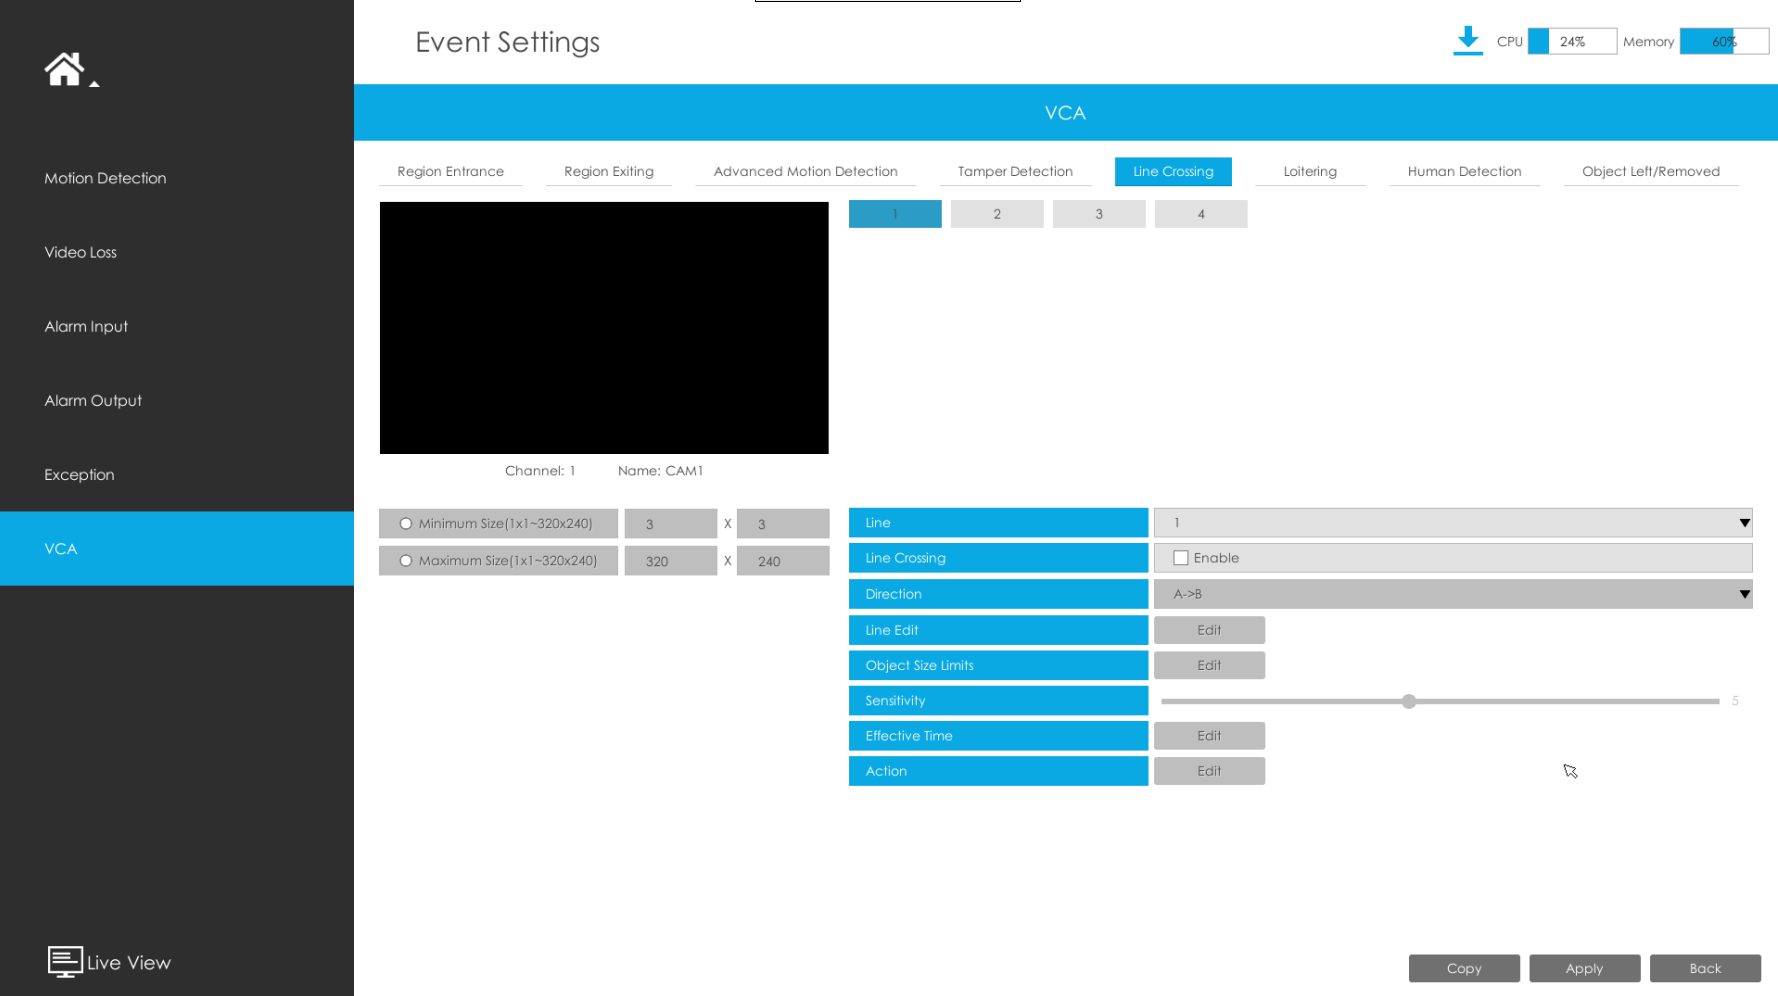
Figure 5-18 Line Crossing Settings page
Step 1: Select channel and enable Line Crossing.

Figure 5-19 Line Crossing
Step 2: Choose detection line number and set its direction.
It allows to set up to four lines at a time. There are three direction modes to choose for triggering alarm. “A→B” means when there is any object crossing the line from the “A” side to the “B” side, the alarm will be triggered. “B→A” vice versa. “A ↔ B” means that the alarm will be triggered when objects cross line from either side.

Figure 5-20 Line Crossing
Step 3: Draw detection lines.
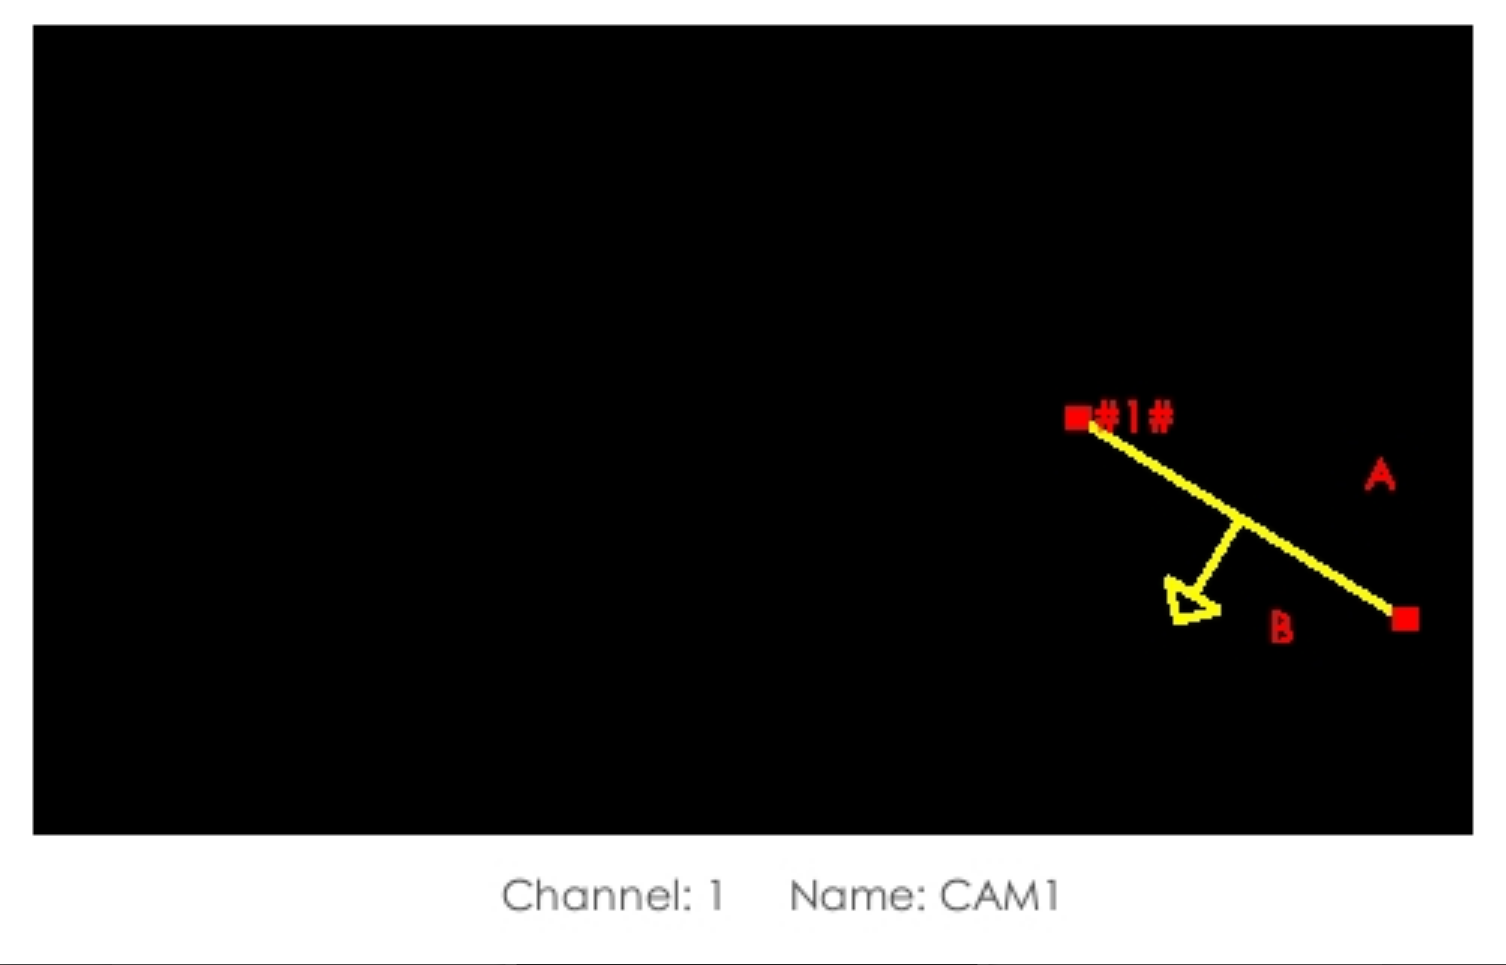
Figure 5-21 Draw Detection Lines
Kindly Note
Please refer to the Region Entrance section for the specific setting in this chapter.
5.6 Loitering
When objects are loitering in a defined area for a specific period of time, it would trigger an alarm.
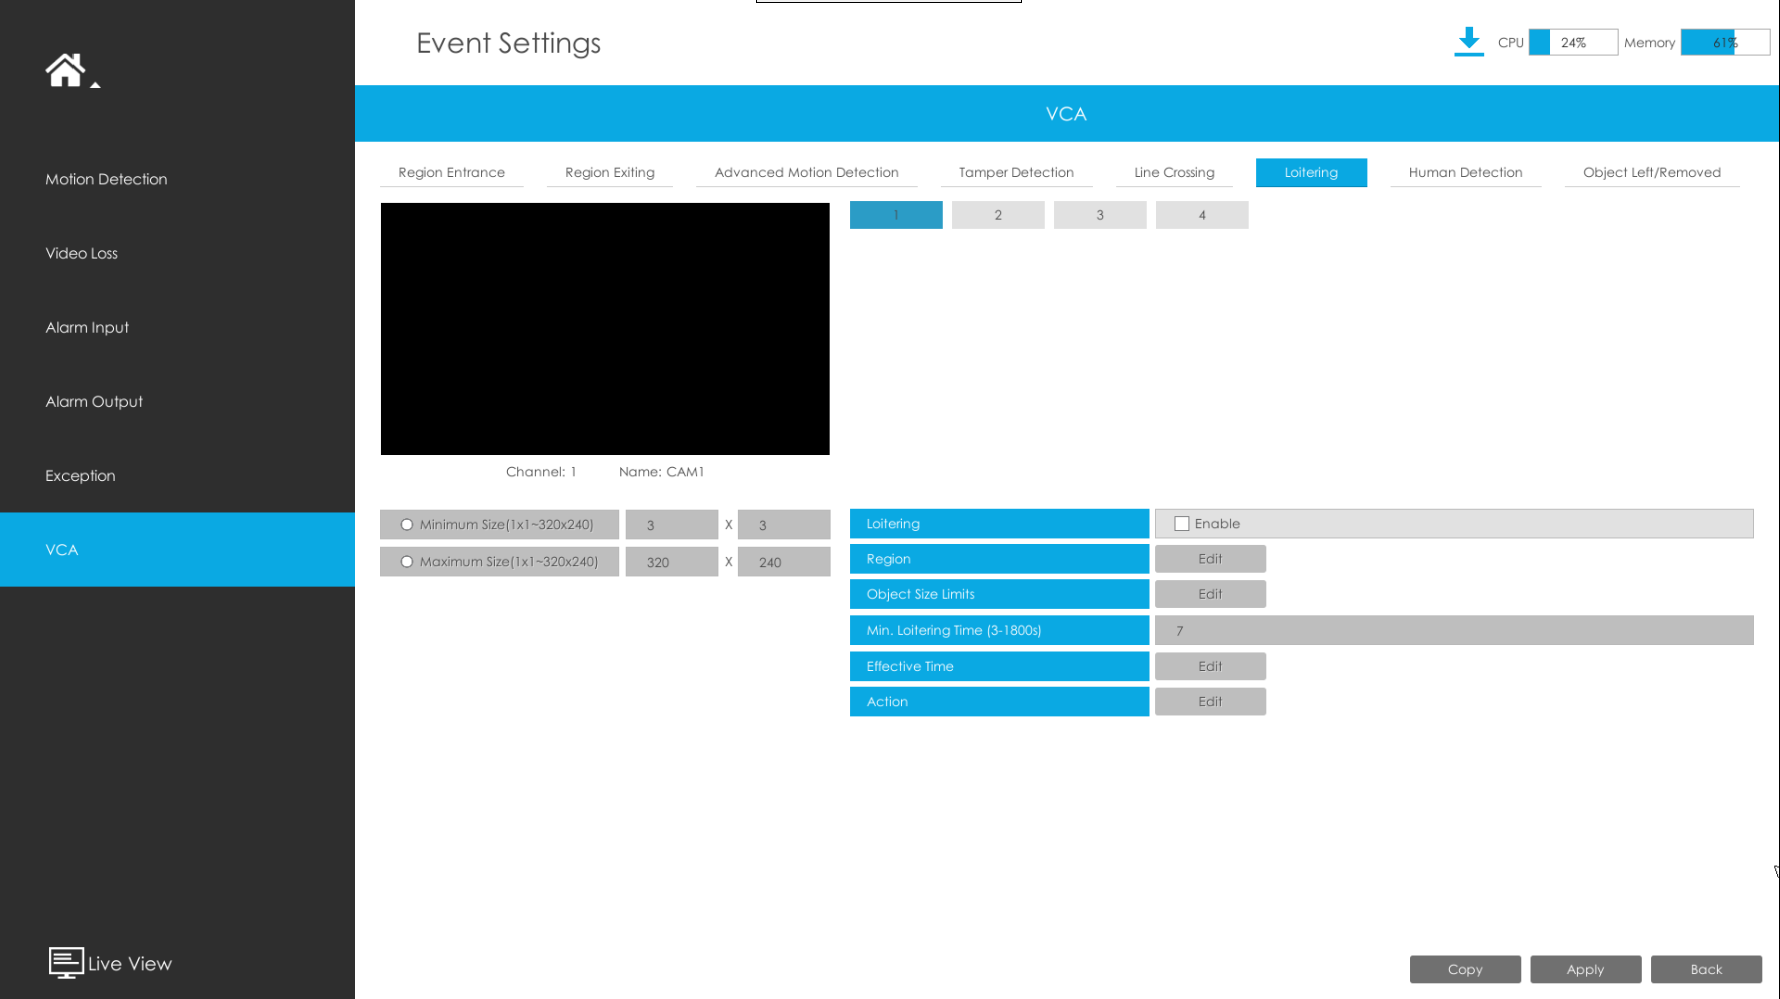
Figure 5-22 Loitering Settings page
Step 1: Select channel and enable Loitering.

Figure 5-23 Loitering
Step 2: Set Min. Loitering Time and Object Size.
After setting minimum loitering time from 3s to 1800s, any objects loitering in the selected area over the minimum loitering time will trigger the alarm. Also Milesight loitering allows to set “Object Size”. Only the object bigger than the set size will trigger the alarm.

Figure 5-24 Loitering
Kindly Note
Please refer to the Region Entrance section for the specific setting in this chapter.
5.7 Human Detection
Human detection is used for figuring out whether an object is a human or not. Please noted it is only available in non-AI camera series (MS-CXXXX-XB). After our AI camera series VCA support the identification of human and vehicle attributes, this feature was removed.
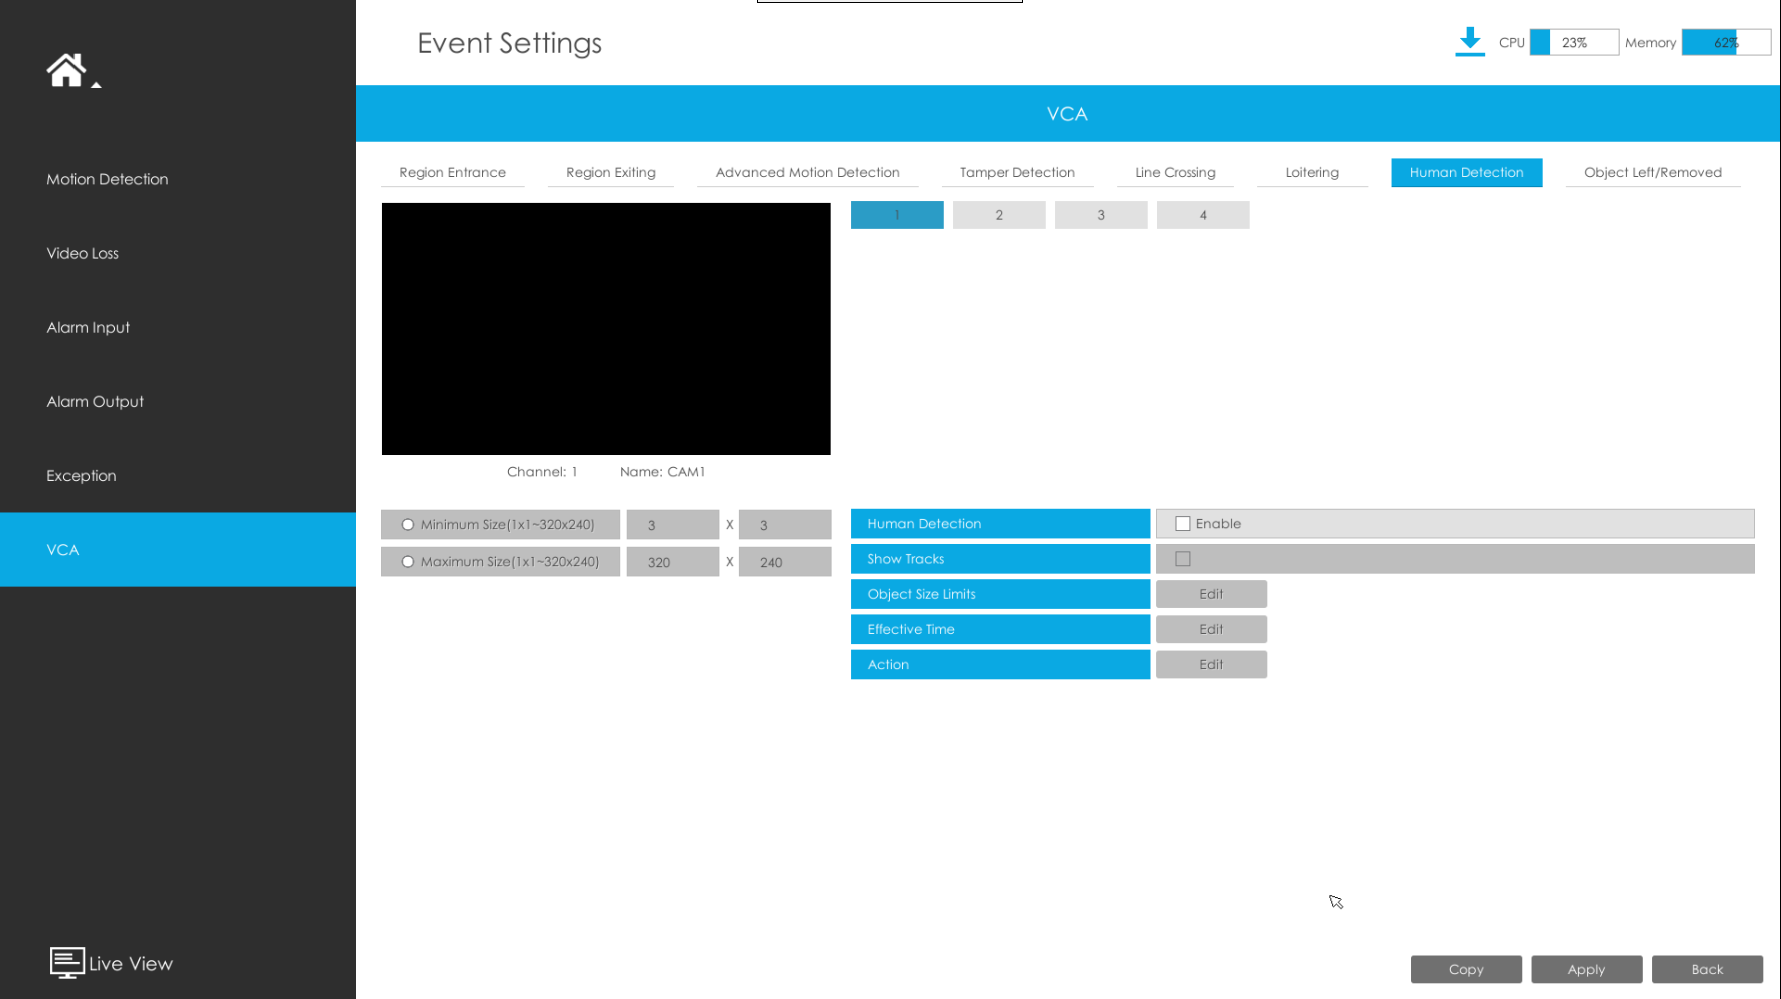
Figure 5-25 Human Detection Settings page
Step 1: Select channel and enable Human Detection.

Figure 5-26 Human Detection
Step 2: Enable Show Tracks or not.

Figure 5-27 Show Tracks
Kindly Note
Please refer to the Region Entrance section for the specific setting in this chapter.
5.8 Object Left
Object Left is used for checking whether there is something left in the selected area. If there is object left in the pre-defined area, an alarm will trigger.
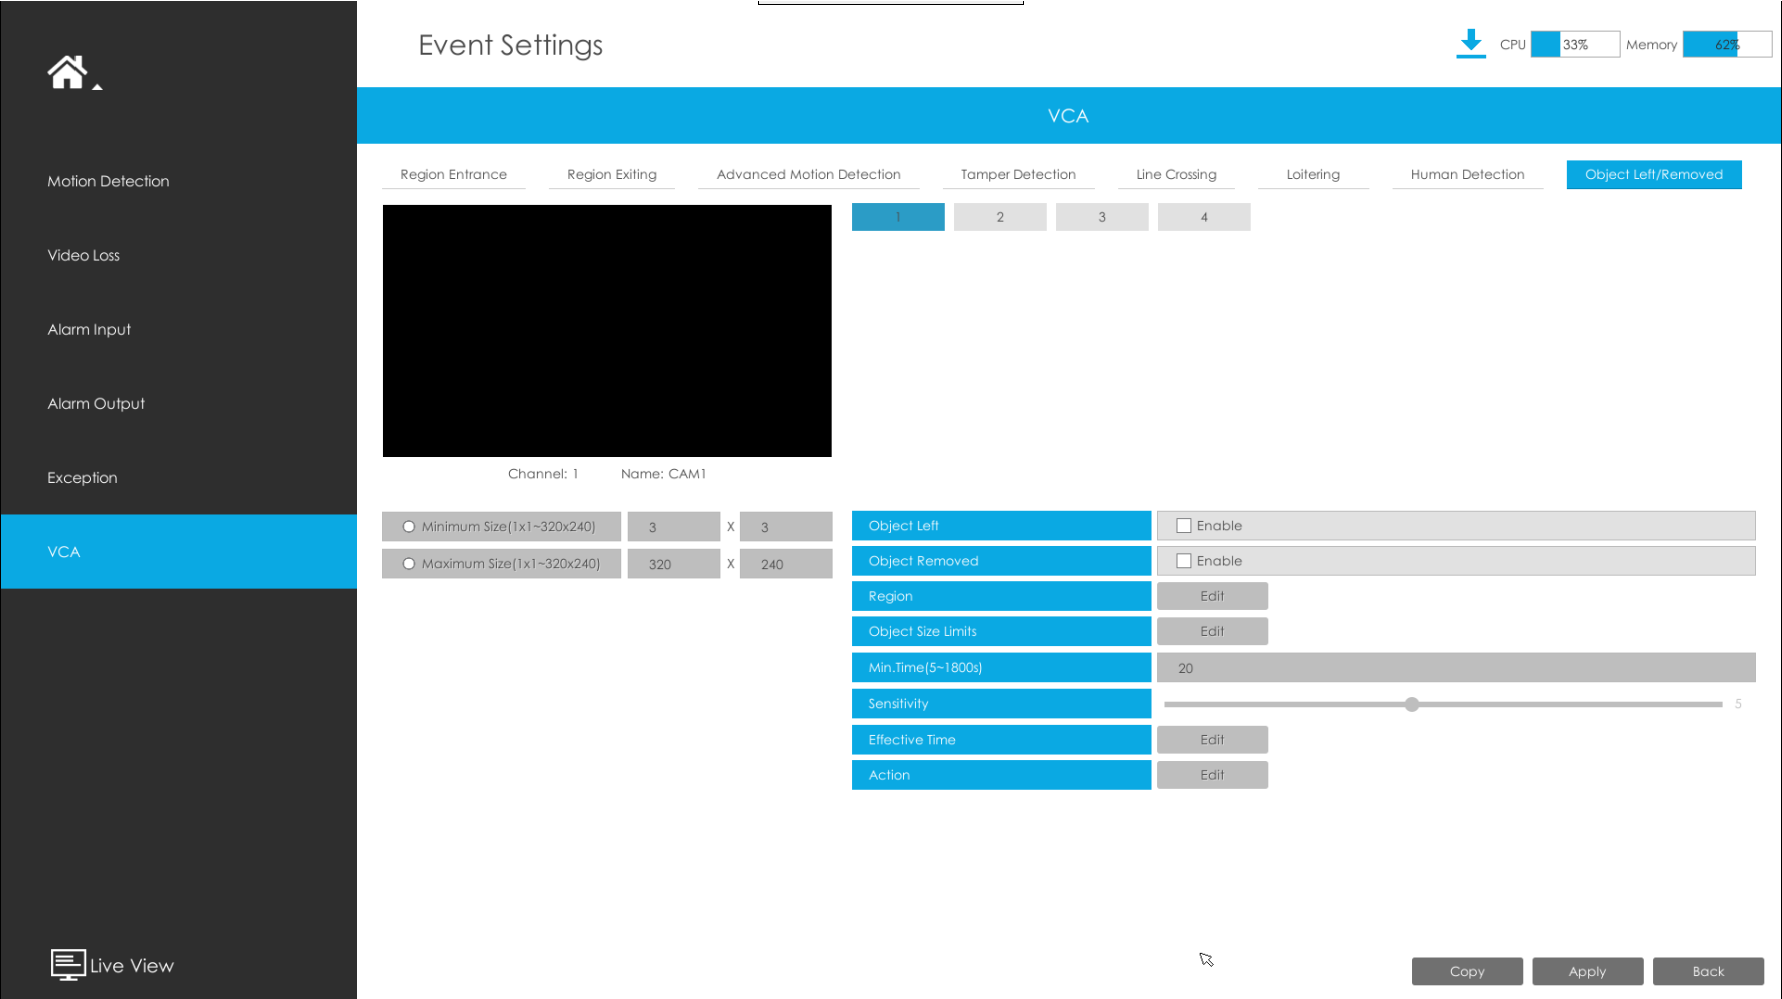
Figure 5-32 Object Left Settings page
Step 1: Select channel and enable Object Left.

Figure 5-33 Object Left
Step 2: Set Min. Time.
After setting minimum time from 3s to 1800s, any objects are left in the selected area over the minimum time will trigger the alarm.

Figure 5-34 Object Left
Kindly Note
Please refer to the Region Entrance section for the specific setting in this chapter.
5.9 Object Removed
Object Removed is used to secure objects’ safety. When there is an object removed from a pre-defined region, it will detect and prompt an alarm.
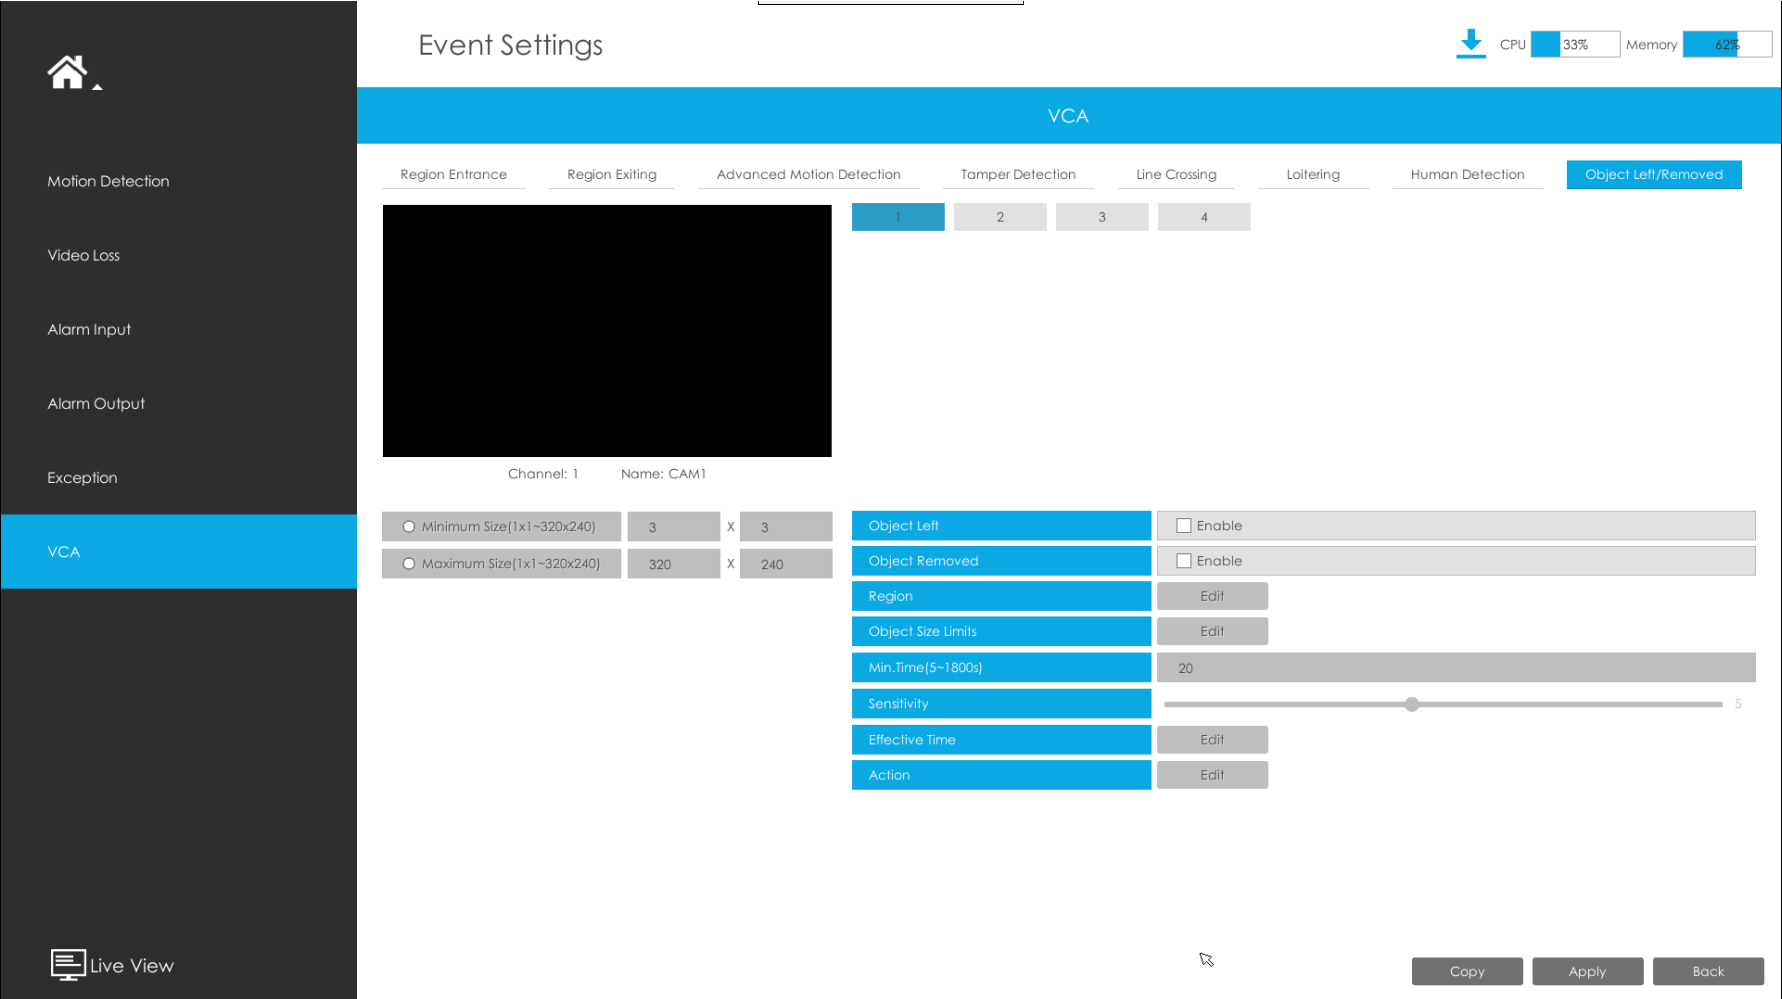
Figure 5-35 Object Removed Settings page
Step 1: Select channel and enable Object Removed.

Figure 5-36 Object Removed
Step 2: Set Min. Time.
After setting minimum time fto 1800s, any objects are removed from the selected area over the minimum time will trigger the alarm.

Figure 5-37 Object Removed
Kindly Note
Please refer to the Region Entrance section for the specific setting in this chapter.
Kindly Note
In order to facilitate to receive the alarm information directly. We also provide the pop up function with M-Sight Pro App in mobile phone.
Step 1: Check the checkbox to enable the “Push Message Enable”(Figure 5-39).
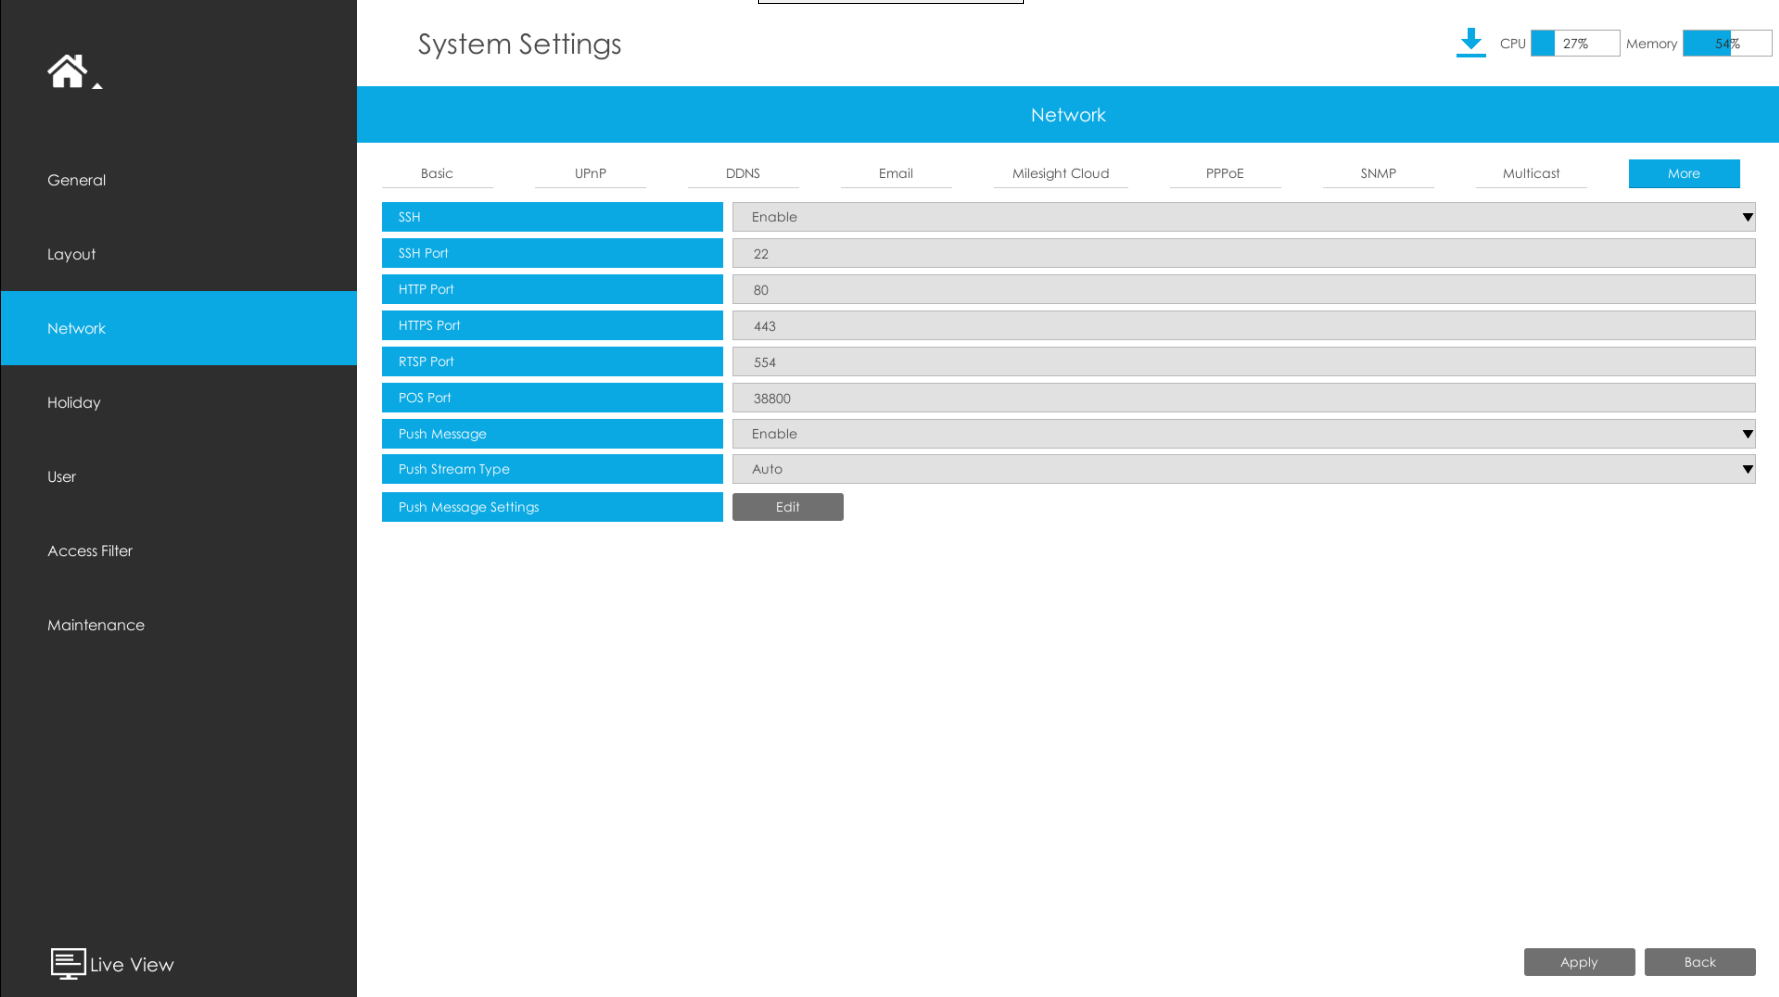
Figure 5-39
Step 2: Check the “Edit ”button to select the Push Type. And then click [OK] after all done.(Figure 5-40).
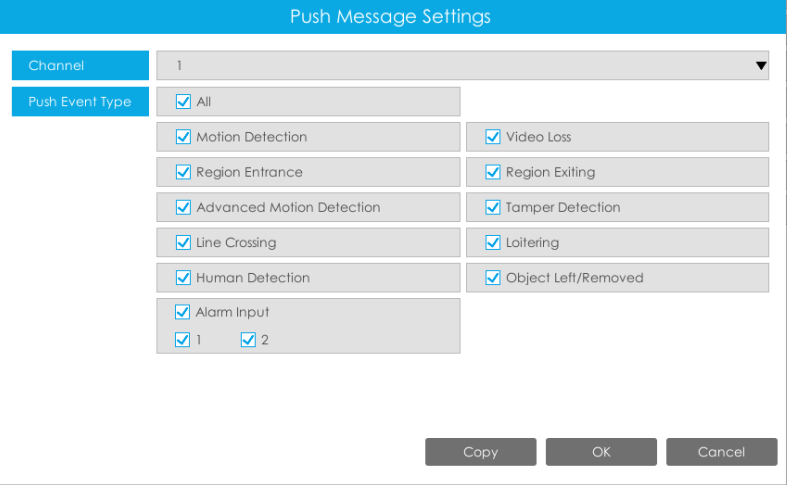
Figure 5-40
Step 3: Enable the Alarm Push of the device in the Alarm Message page with M-sight Pro after finishing general settings in NVR side as shown below(Figure 5-41 ):
|
|
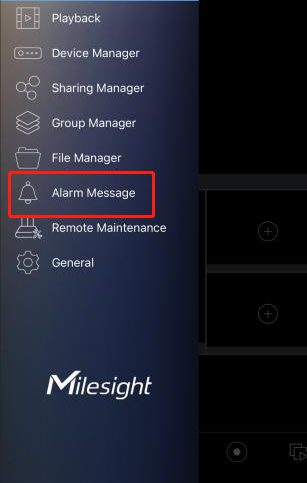
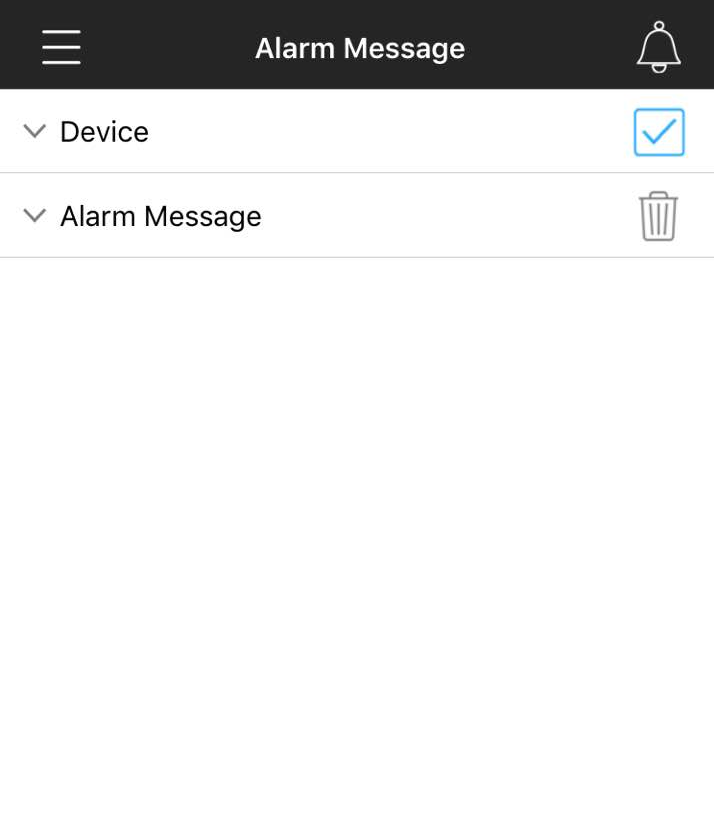
Figure 5-41
Step 4: When all settings done, the device will automatically push alarms to mobile phones when the corresponding events trigger alarms.
Please refer to specific documentation for the way of adding devices to M-sight Pro App.
6. How to set VCA function with Milesight CMS
The VCA page is as below:
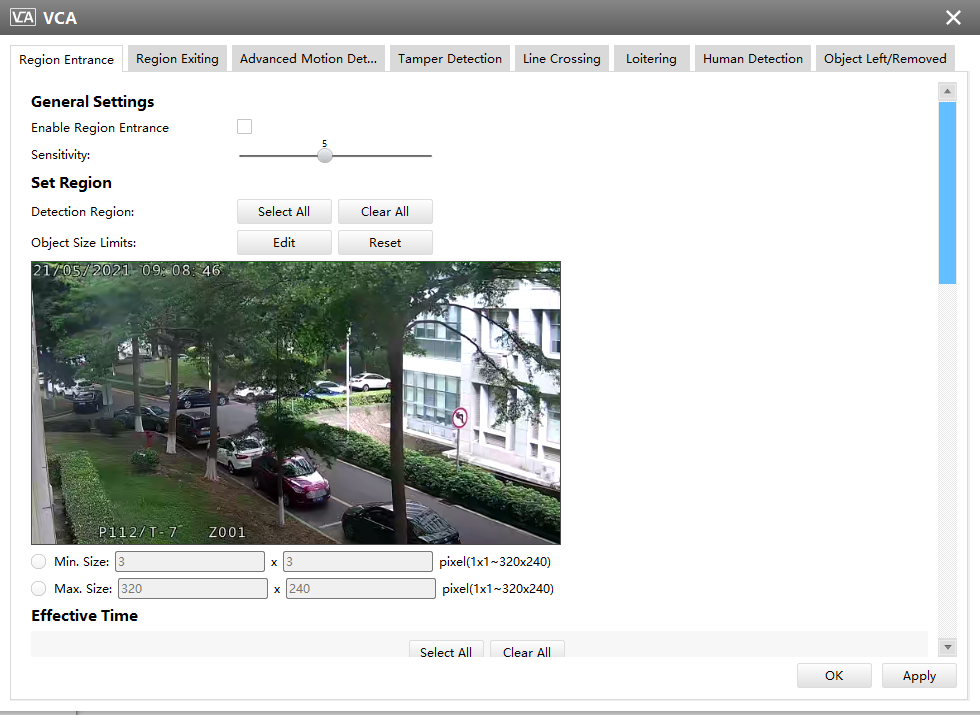
Figure 6-1 VCA page
Here are nine options for VCA-General Settings page [Region Entrance] [Region Exiting] [Advanced Motion Detection] [Tamper Detection] [Line Crossing] [Loitering] [Human Detection] [People Counting] [Object Left/Removed] that you can select. Besides, you can choose the [Settings] to do some basic setup.
Step1: Check the checkbox to enable the VCA that you choose. You can draw the interested area or click the Select All button[Select All] to select all areas interested.
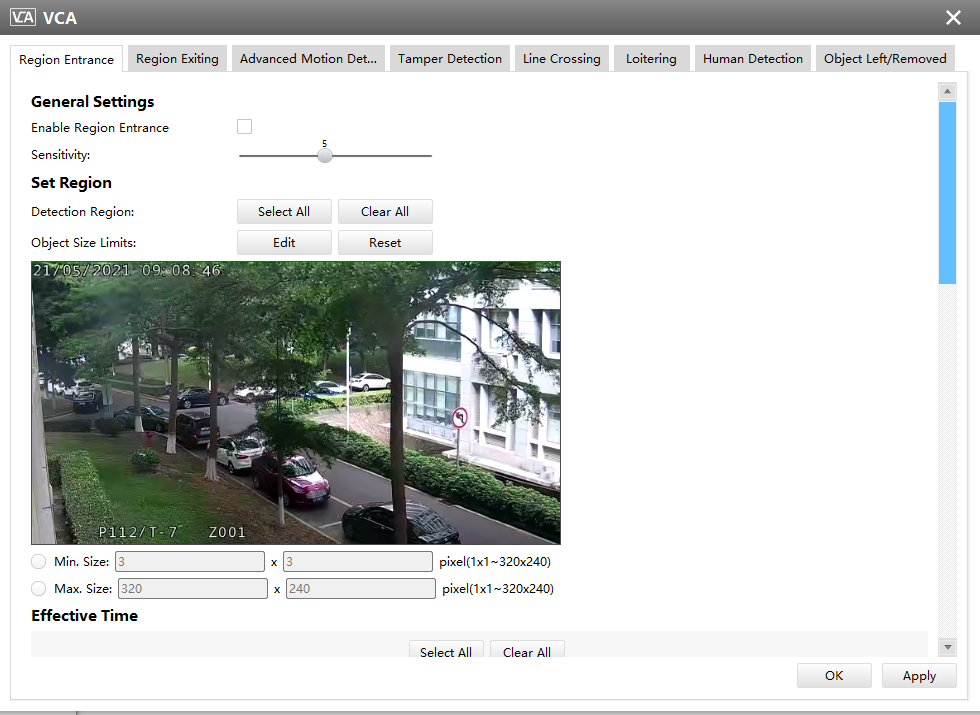
Figure 6-2 General Settings
Step2: After finishing general settings you can draw the schedule in the Action Settings page. And then click [OK] or [Apply] after all done.
Kindly Note
For the firmware of Network Camera, V4x.7.0.74 or above, supporting the VCA function by default. For the firmware which below V4x.7.0.74, please upgrade the Network Camera to V4x.7.0.74 or above.
7. Advantages of Milesight Video Content Analysis
Detect suspicious activities immediately
Provide pro-active operation
Reduce workload for the staff
Automatically analyze surveillance video in real-time
Independent function settings in Network Cameras, NVR and CMS
VCA solution ensures that video surveillance more accurate and cost-effective
8. Conclusion
With Milesight VCA solution the operator can pre-define situation detection which reduce a lot of workload. And the intelligent monitoring application is general as well as specialized for different industries, creating new end user benefits and opening up new business possibilities.
——————END——————