
NVR Version | 7x.9.0.12 or above | Update | 2021.9.3 |
M-Sight Pro Version | 3.1.0.5 or above |
1. Introduction
Milesight Cloud Management is designed for managing Milesight Devices. You can log into Milesight Cloud from web and other handhold devices.
Milesight Cloud provides a way to bind the devices with Cloud account, which allows users to get the device list by logging into Cloud account in different clients. Instead of adding all the devices piece by piece, it’s a more convenient way to manage devices.
It's easy to use. You can register an Cloud account and login into it, add devices by register code or scan the register QR code, and then you can preview the added devices in M-Sight pro. Other features are as follows:
• Support sharing devices with other accounts.
• Support transferring devices to another account.
• Support grouping devices.
• Other functions.
Note:
For now, only NVRs can be added to Cloud account.
2. Preparation
It's necessary to upgrade NVR and M-sight Pro to latest versions, which are 3.1.0.5 or above for M-Sight Pro, 7x.9.0.12 or above for NVR.
Here are the links:
13. Sight Pro 3.1.0.5(iOS)
14.
M-Sight Pro 3.1.0.5(Android)
NVR:https://www.milesight.com/support/resources/firmware#network-video-recorder
Milesight Cloud Website http://m-sight.milesight.com
3. Milesight Cloud Web Configuration
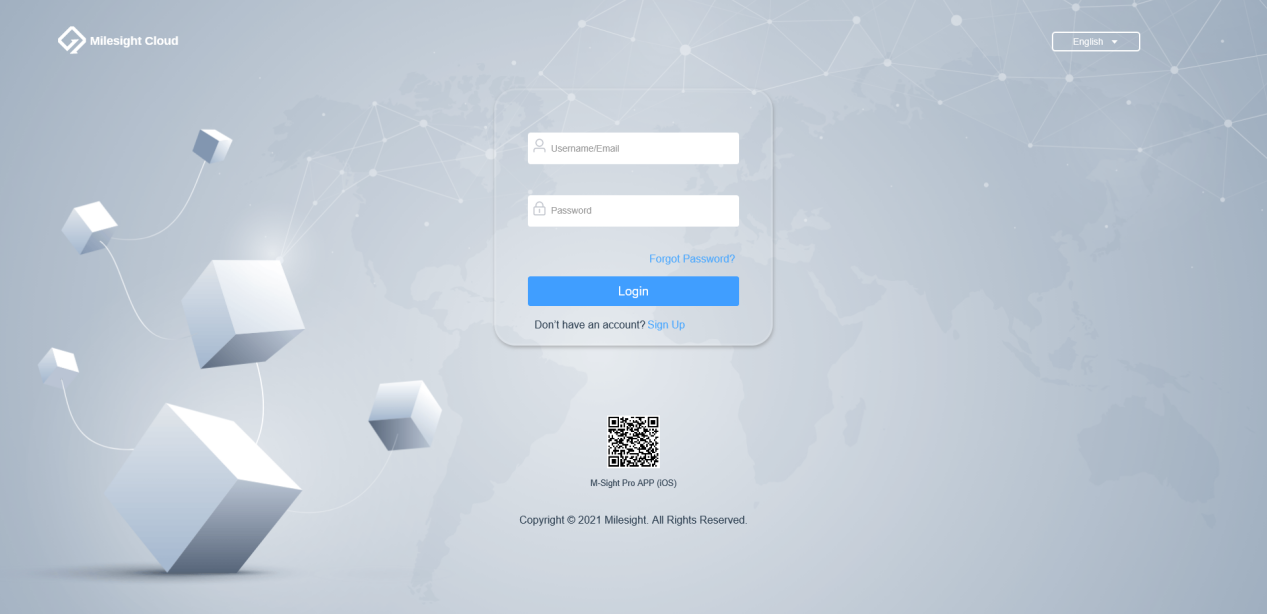
In Milesight Cloud web page, we provide Account Registration, Add Device, Share Device, Transfer Device and other practical functions.
3.1 Cloud Account
You need to register a Cloud Account to use Cloud function.
3.1.1 Create Account
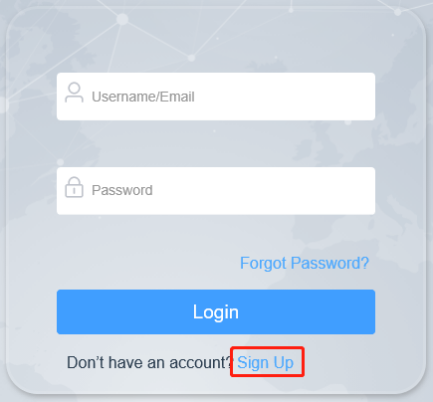
Step 1:
Click Sign Up.
Step 2:
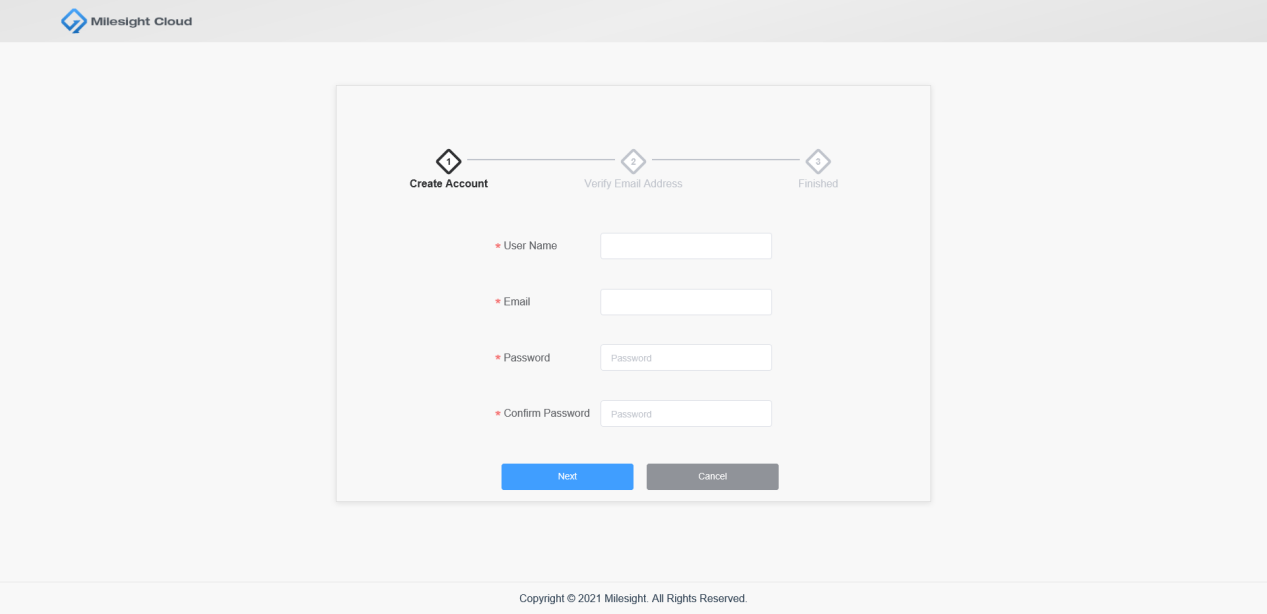
The registration interface will be displayed, input the required information and click Next.
Note:
• The username and Email cannot be the same with other accounts.
• The password must contain at least one number, one uppercase letter and one lowercase letter.
• The password must between 8-32 characters.
Step 3:
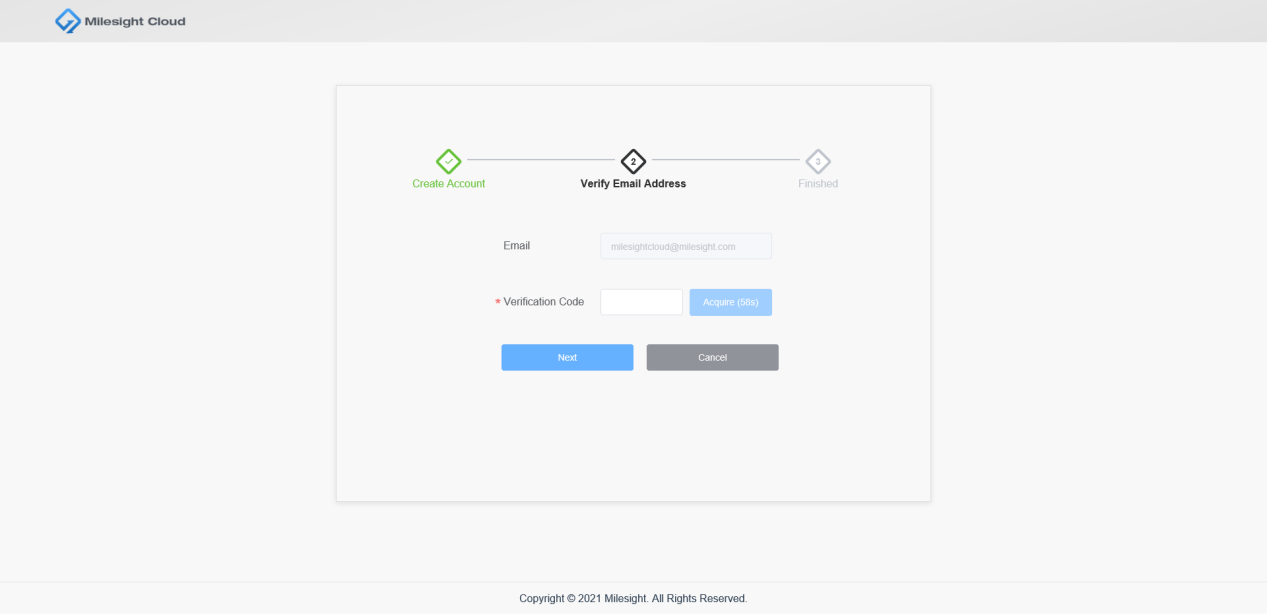
A verification code from Milesight Cloud will be sent to your email box, please check your email and input the verification code.
Note:
Can’t receive the verification code?
• Please check the Email address you filled is correct or not.
• Click theAcquirebutton and try again. There might be a delay, please wait a moment.
Step 4:
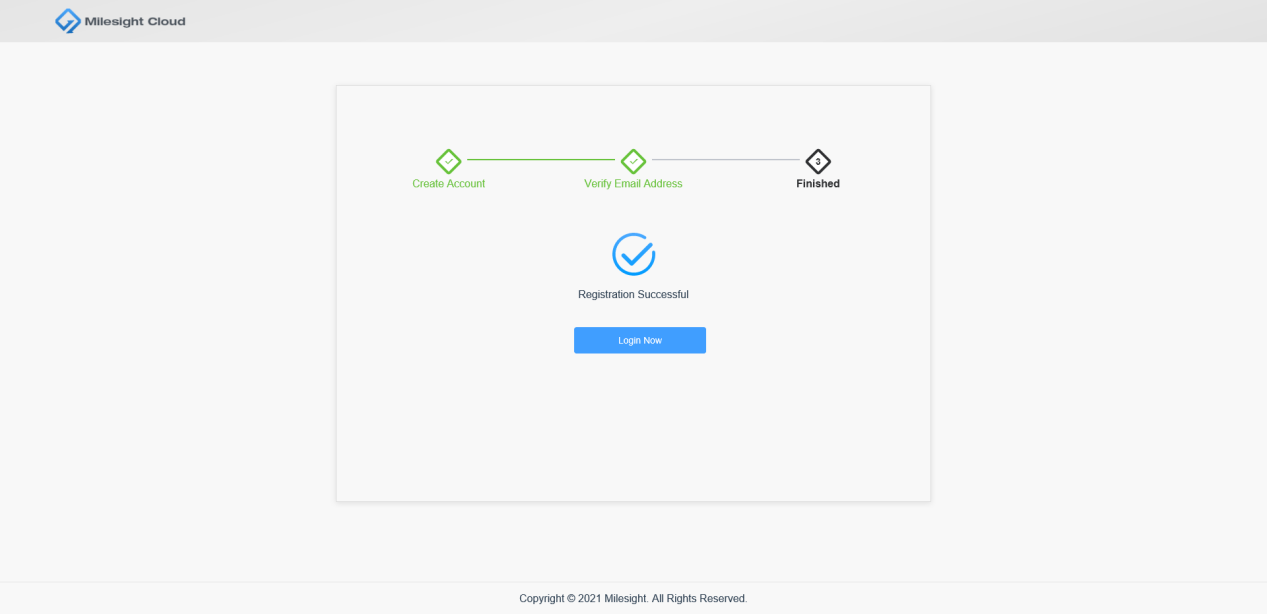
Click Next to finish the Registration.
3.1.2 Reset Password
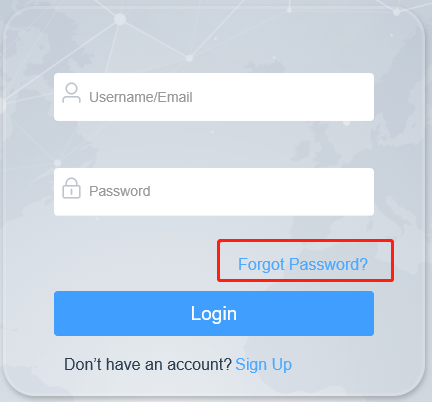
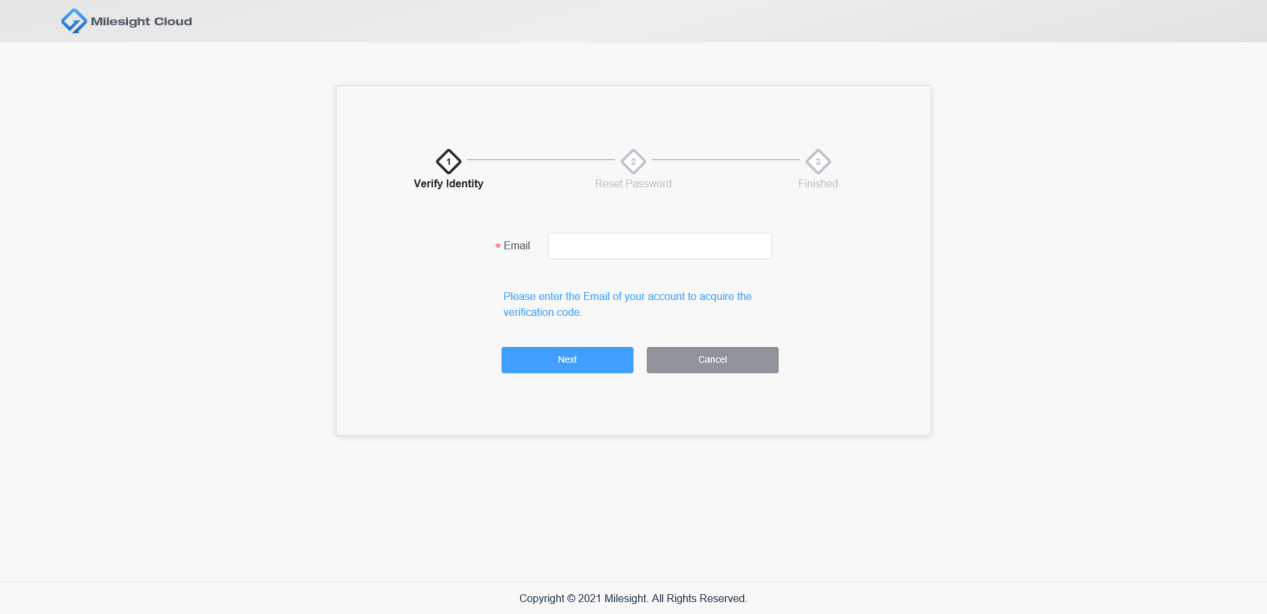
Assuming you forgot your password, you can click the Forgot Password to reset your password.
Enter the Email of your account to retrieve your password.
Click Next and a verification code will be sent to your email box which is valid within 30 minutes, after 30 minutes the verification code will expire and you need to get a new one.
3.1.3 Edit Account Information
Step 1:
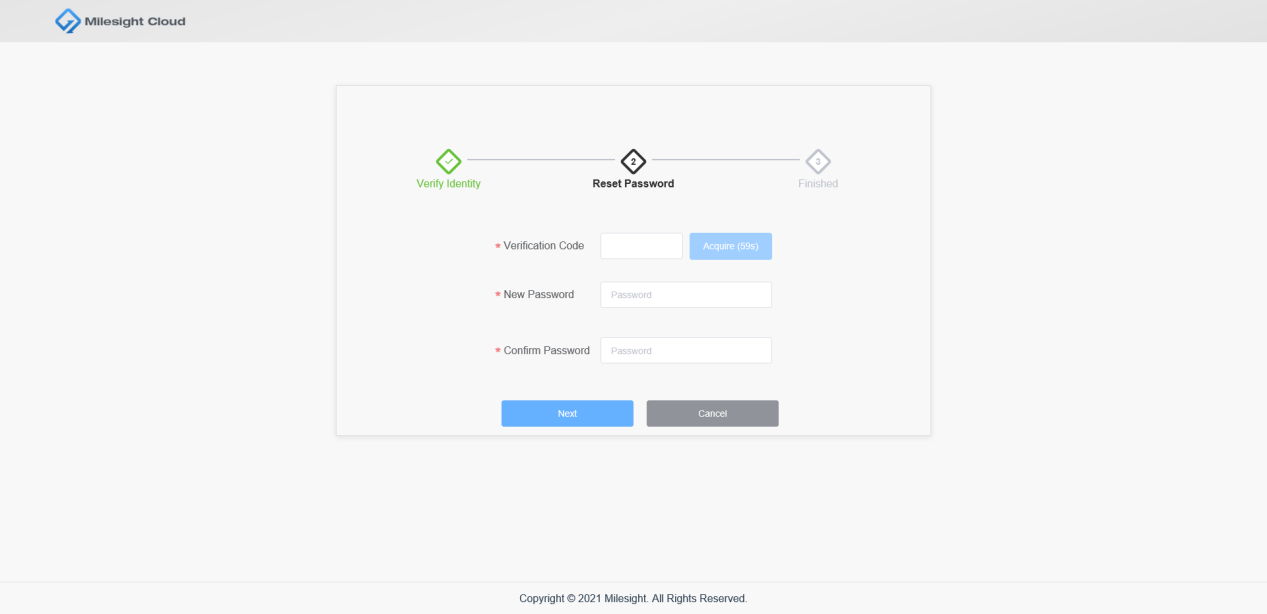
Enter new password and click Next to reset your password.
Step 2:
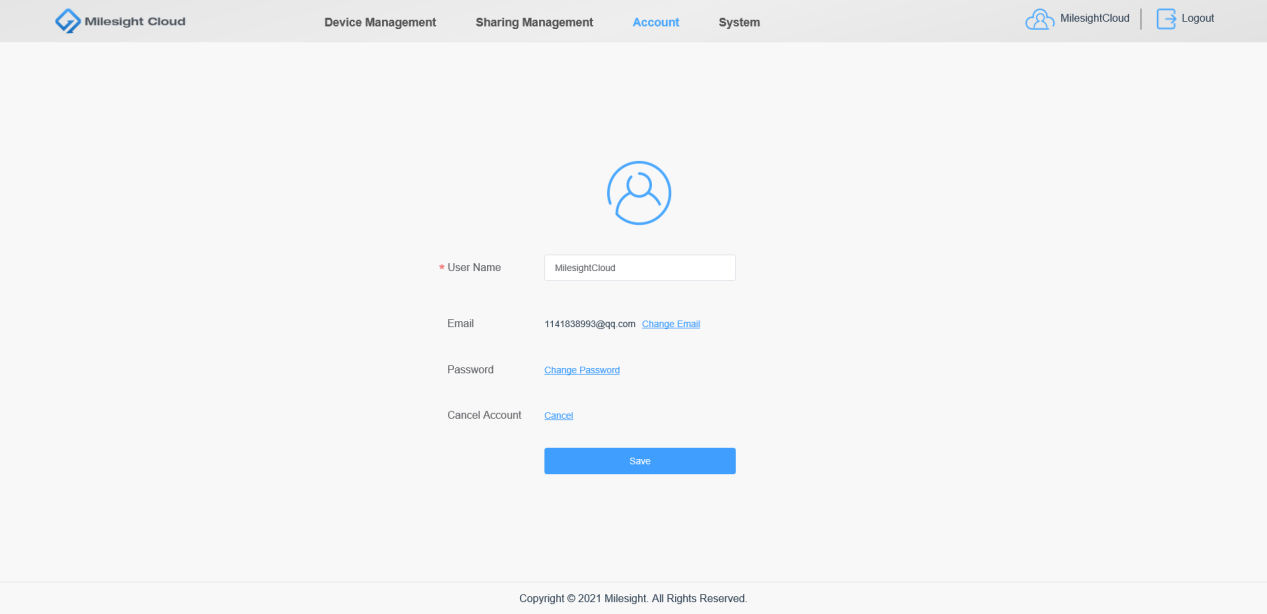
You can change your username, Email address and password after logging into your account in Account interface.
Step 3:
You can also cancel your account, but make sure that all devices are deleted from your account before you cancel the account.
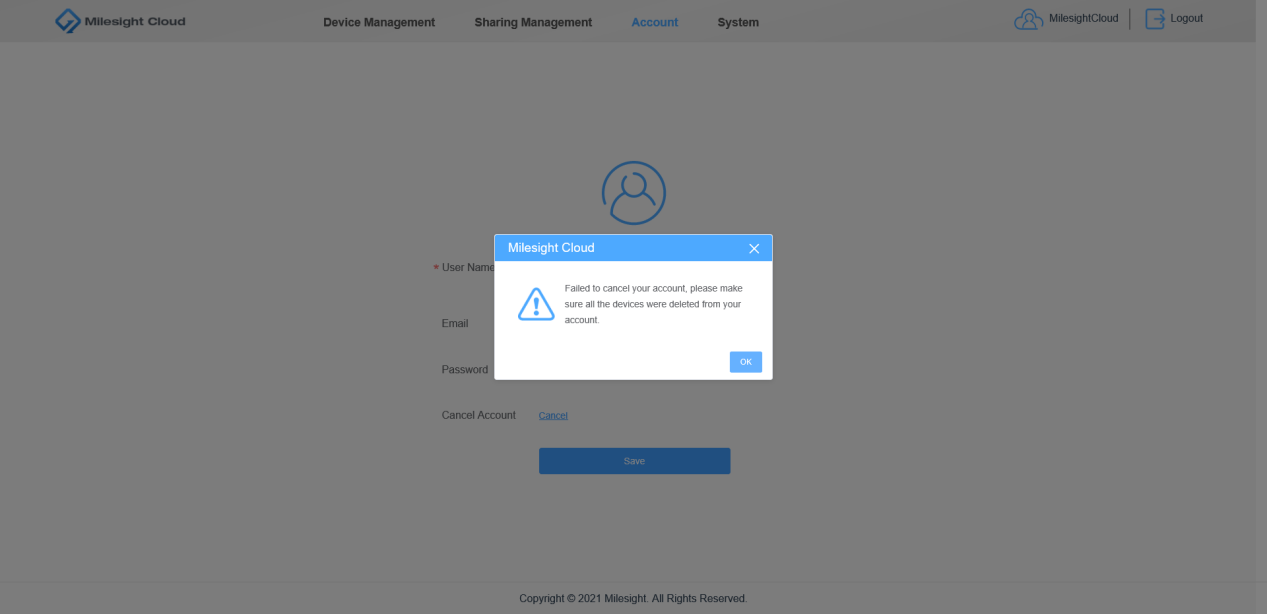
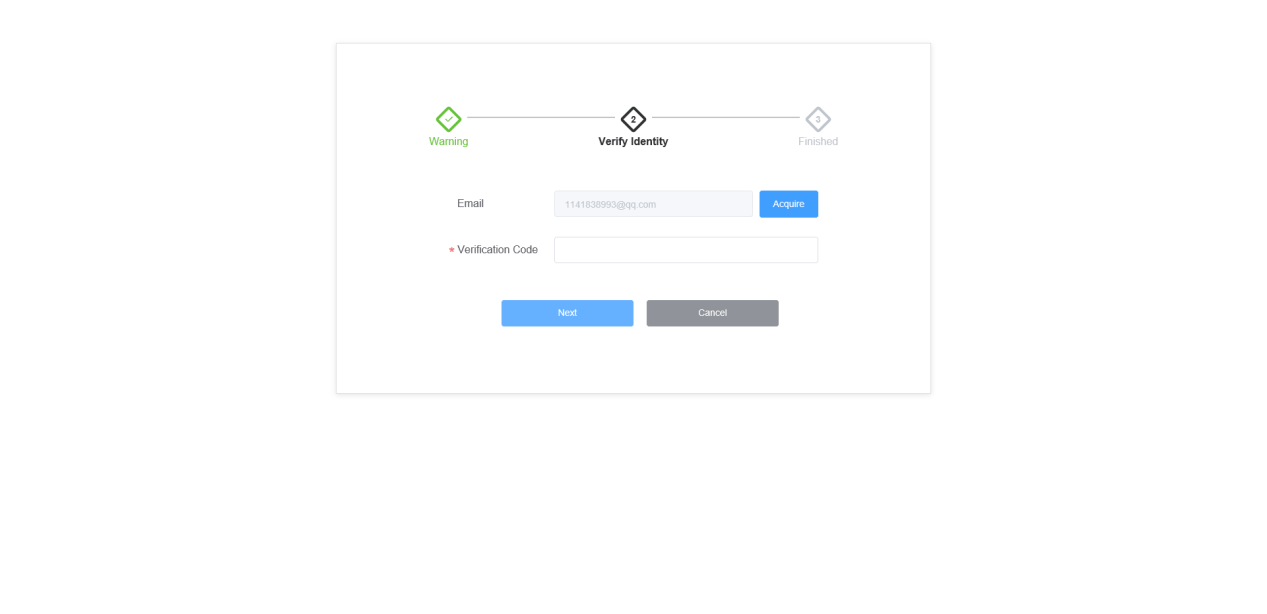
To ensure the security of the account, you need to verify your identification to use this function.
Fill in the verification code and click Next to finish the cancellation.
Note:
The cancellation can not be undone. Once your account is canceled, you will be logged out and won’t be able to access your account.
3.2 Device Management
In Device Management interface, you can add device, delete device, edit device and operate other related functions like sharing and transferring devices.
3.2.1 Device
Step1: Add devices
Click

button to add devices.
Input the required information as picture shows below:
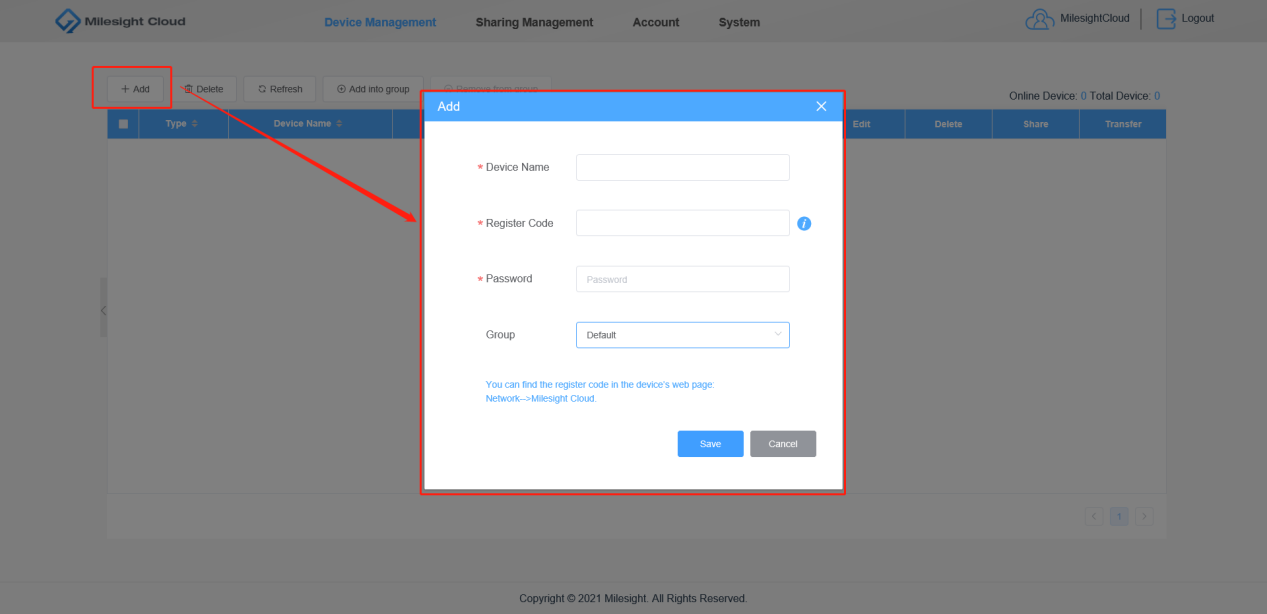
• You can find the register code in the interface of device: Network-->Milesight Cloud.
• Milesight Cloud support adding up to 10 devices for now. (Not includes the ones that shared from other accounts.)
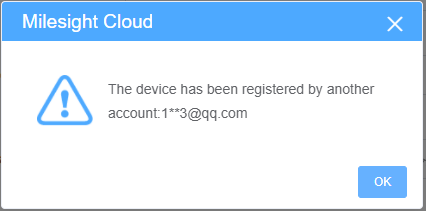
• Each device can be bound to only one account.There will be a prompt to remind thedevice’s current account.
Note:
If you failed to add device, possible reasons are as follows:
Step 2: Other operations
Click
to delete selected devices.
Click
to refresh the device list.
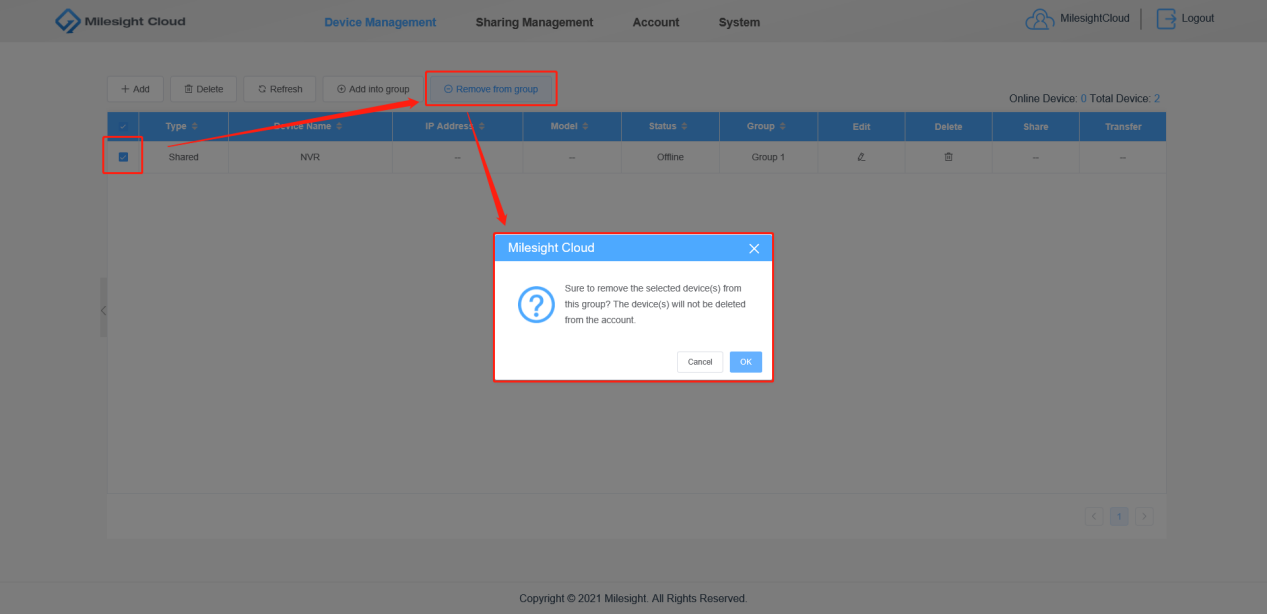
Click
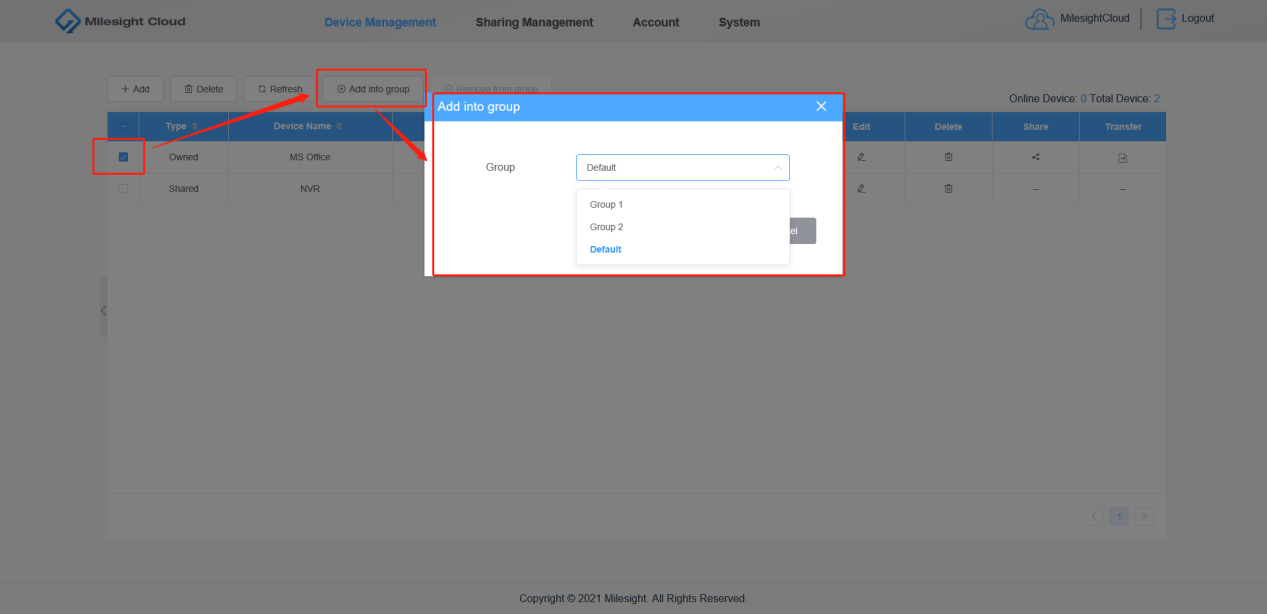
to add selected devices into another group. Each device can only exist in one group.
Click
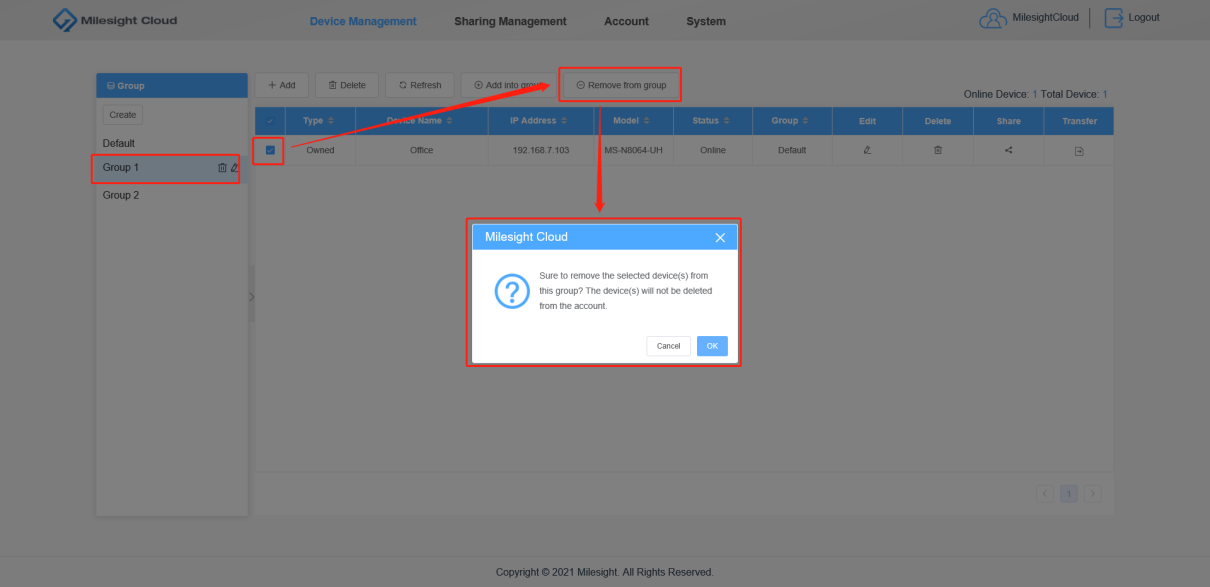
to remove selected devices from current group. The device wouldn’t be deleted from account.
3.2.2 Group
You can group devices and play video by group in M-Sight Pro, which is a faster way to preview all the devices of one monitor area.
Step 1:
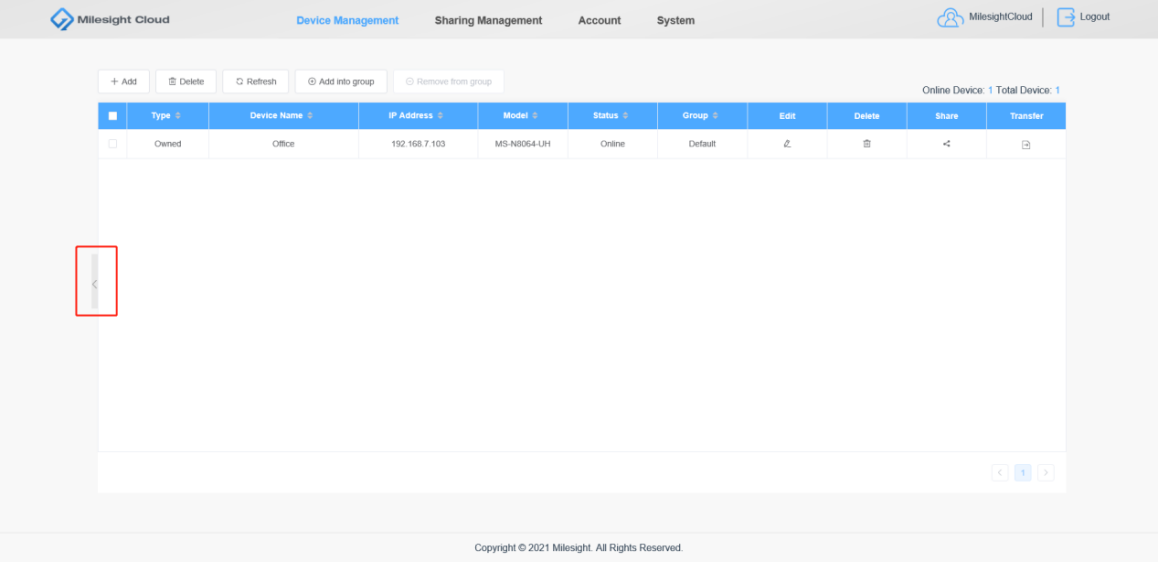
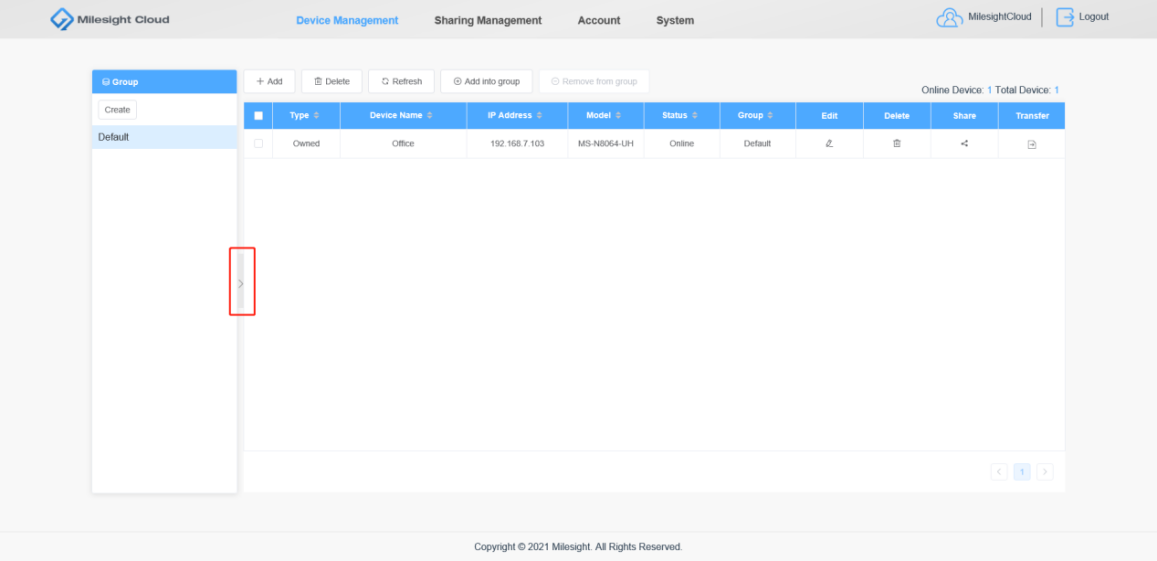
Click the icon to expand/fold group list. Select a group and the list will show devices of this group.
Step 2:
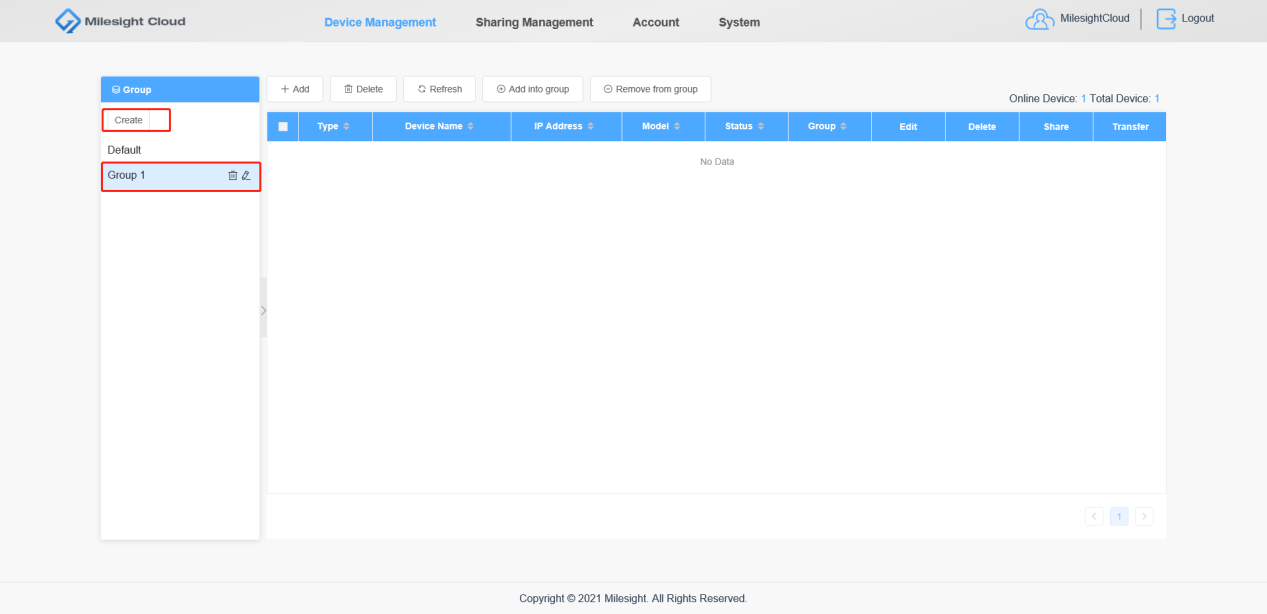
Click Create to create groups.
Step 3:
Click

to delete selected group. The devices of this group will not be deleted from the account.
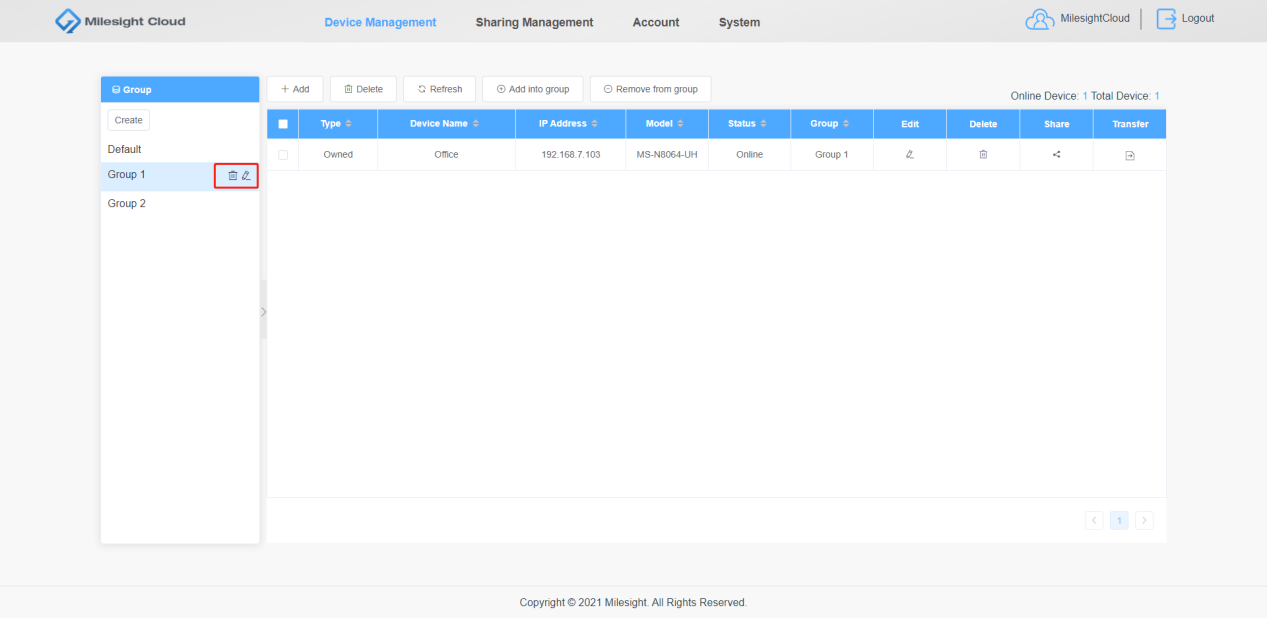
Step 4:
Click

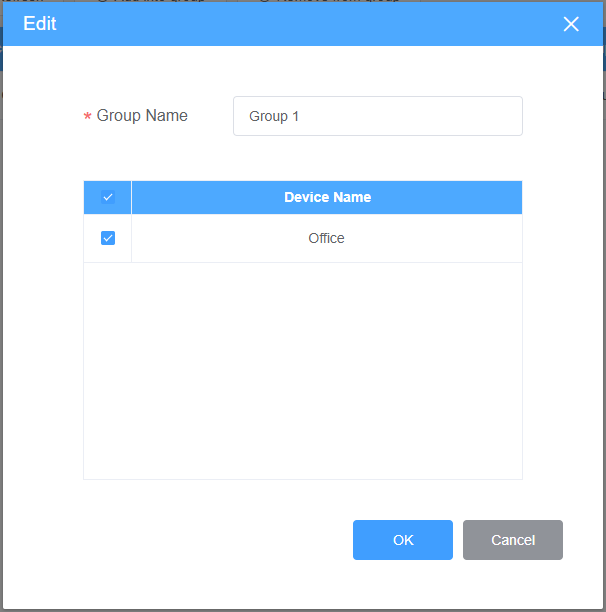
to edit selected group including group name and group device.
Check/uncheck the checkbox of device and click OK to add/remove the device into this group.
Also you can select devices and click |
| button to remove selected devices. |
3.3 Operations
Due to each device can only be bound to one account, in some cases you can choose to share or transfer devices to your colleagues or families.
3.3.1 Sharing Devices
Step 1:
Click

button;
As the owner of the device, you can set permissions and expiration time when sharing devices. Each device can be shared up to 5 accounts.
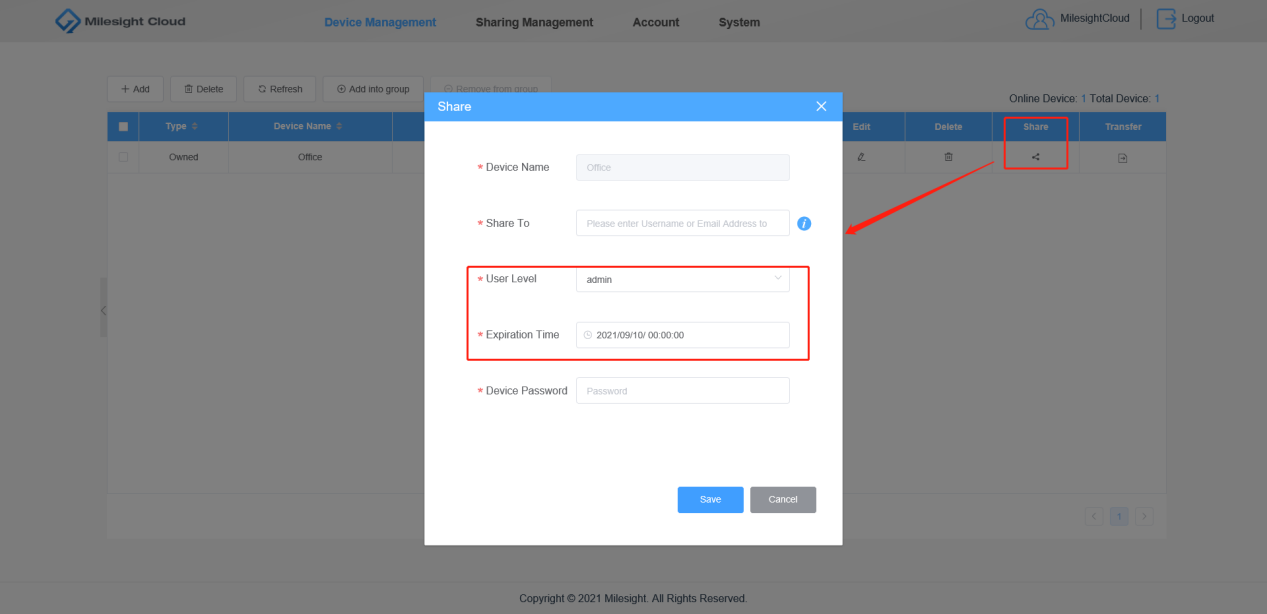
• Shared To: Input the Email address or username to share with.
• User Level: Click to select the user level, you can set user in the interface of device: Settings-->User.
|
|
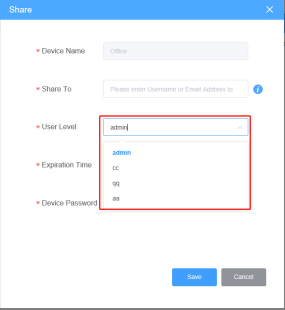
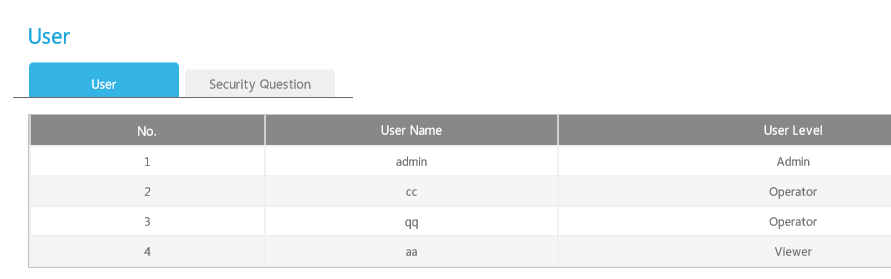
• Expiration Time: The default expiration time is 1 month, and the device will be deleted from the other’s account automatically when time is up, .
Step 2:
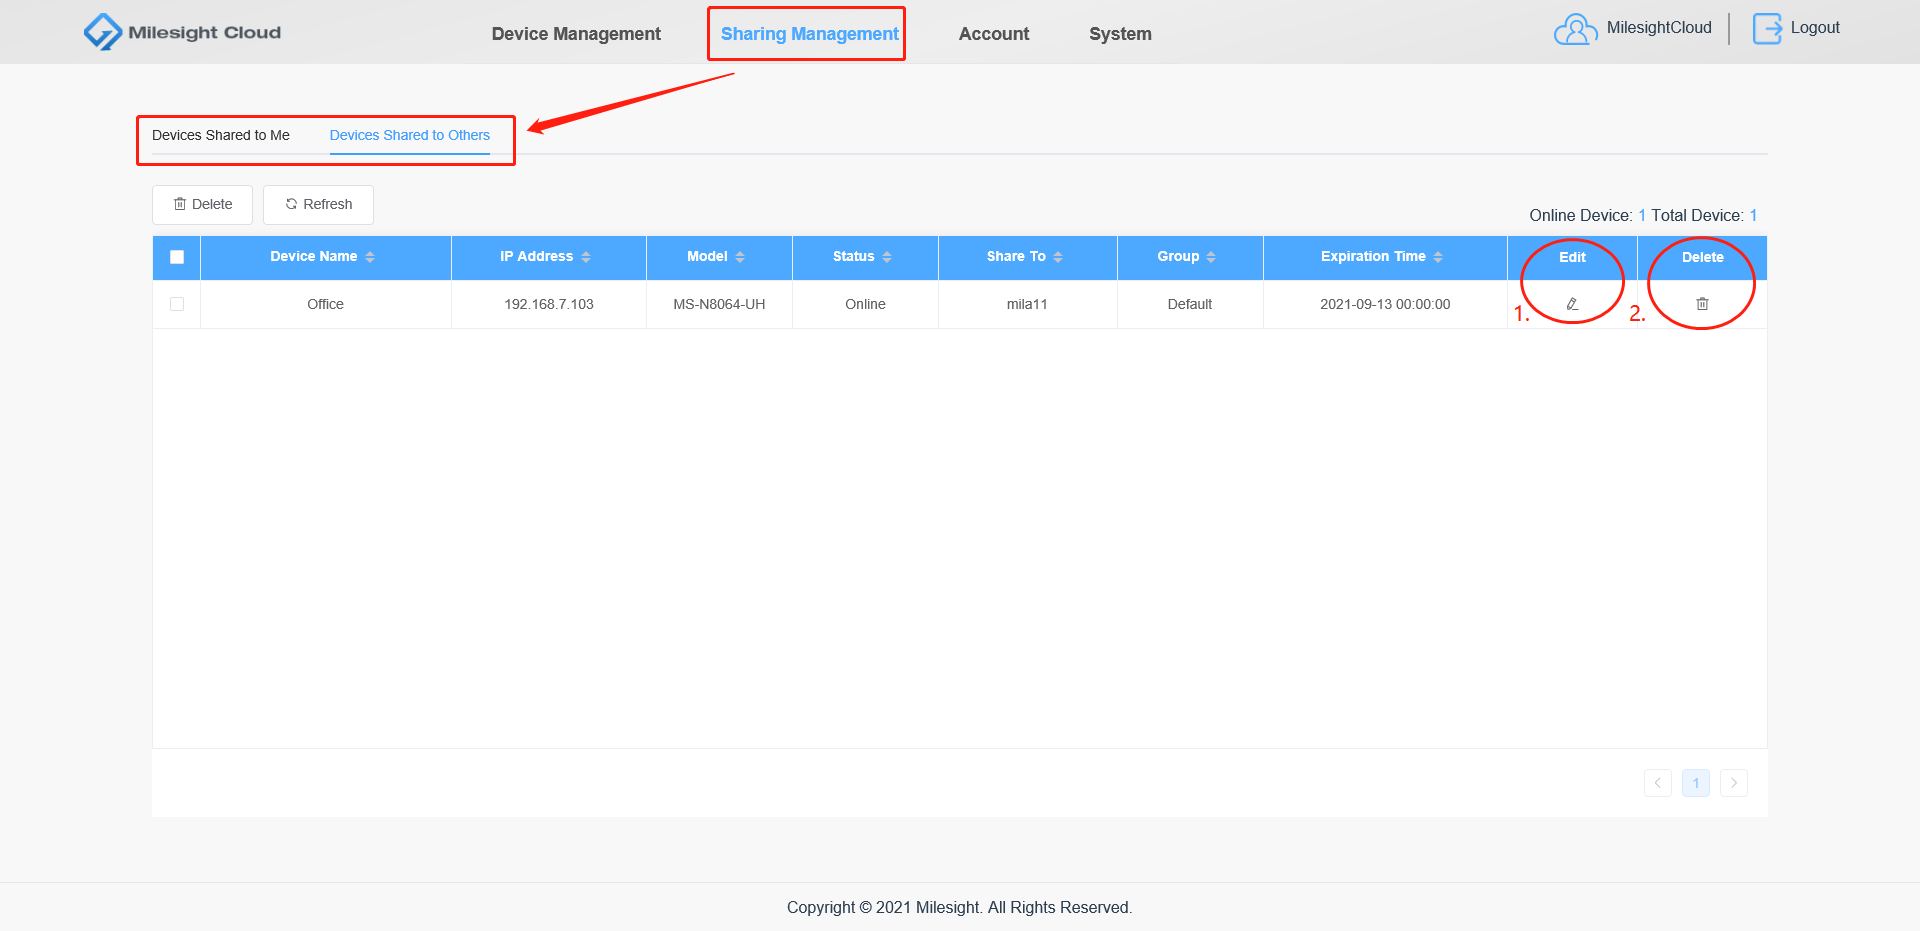
You can check all the sharing information including devices shared to others and devices shared from others in Sharing Management.
• Click

to edit the sharing information
• Also you can stop sharing devices by clicking |
| The device will be deleted automatically from the other’s account. |

Note:
If you failed to share your devices, possible reasons are as follows:
• The username or Email address you filled is wrong.
• The other side’s device number has reached 10.
3.3.2 Transferring Devices
Different from sharing device, the devices will be deleted from your account if they are transferred to others.
Step 1:
Click

button;
To ensure the security of the account, you need to verify your identification to use this function.
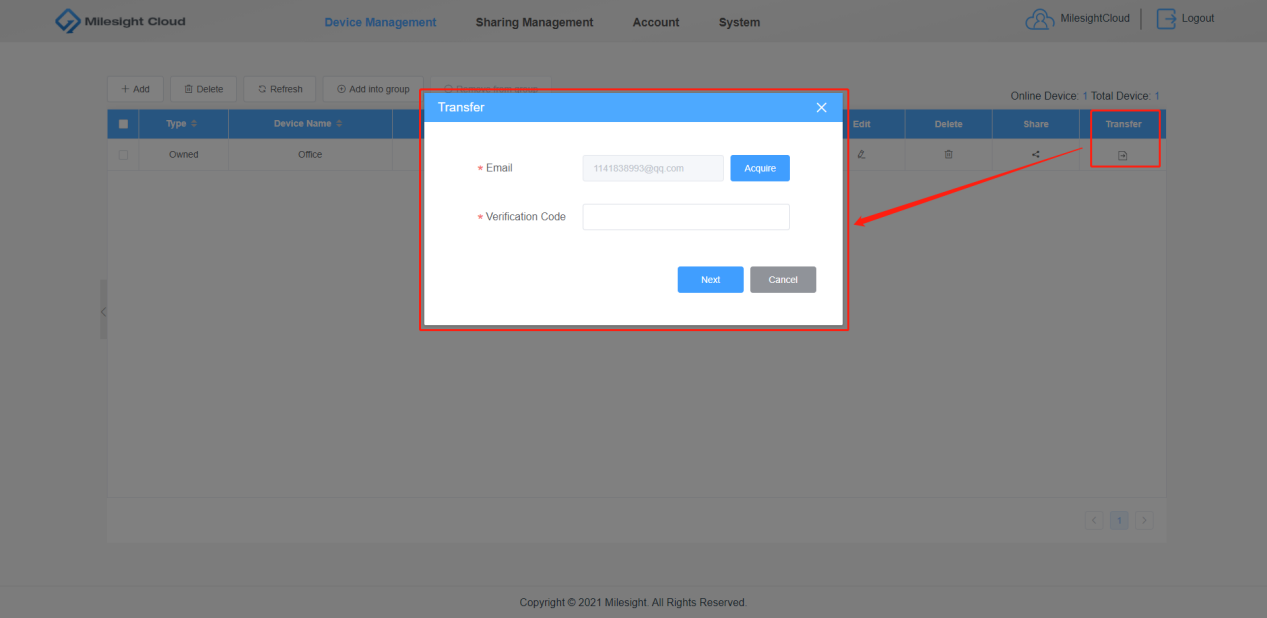
Step 2:
Input both username and Email address to transfer device
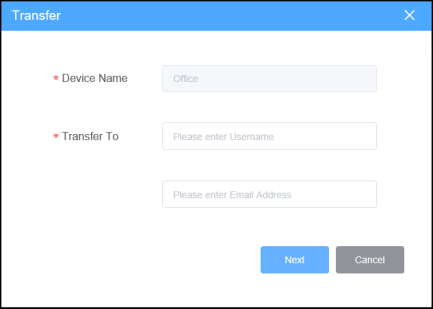
Step 3:
The other side will receive a notification Email to inform that the account has received a device.

Note:
If you failed to transfer your devices, possible reasons are as follows:
• The username or Email address you filled is wrong.
• The other side’s device number has reached 10.
• The device you want to transfer is being shared.
3.3.3 Logs
In System interface, you can search and export the logs as needed.
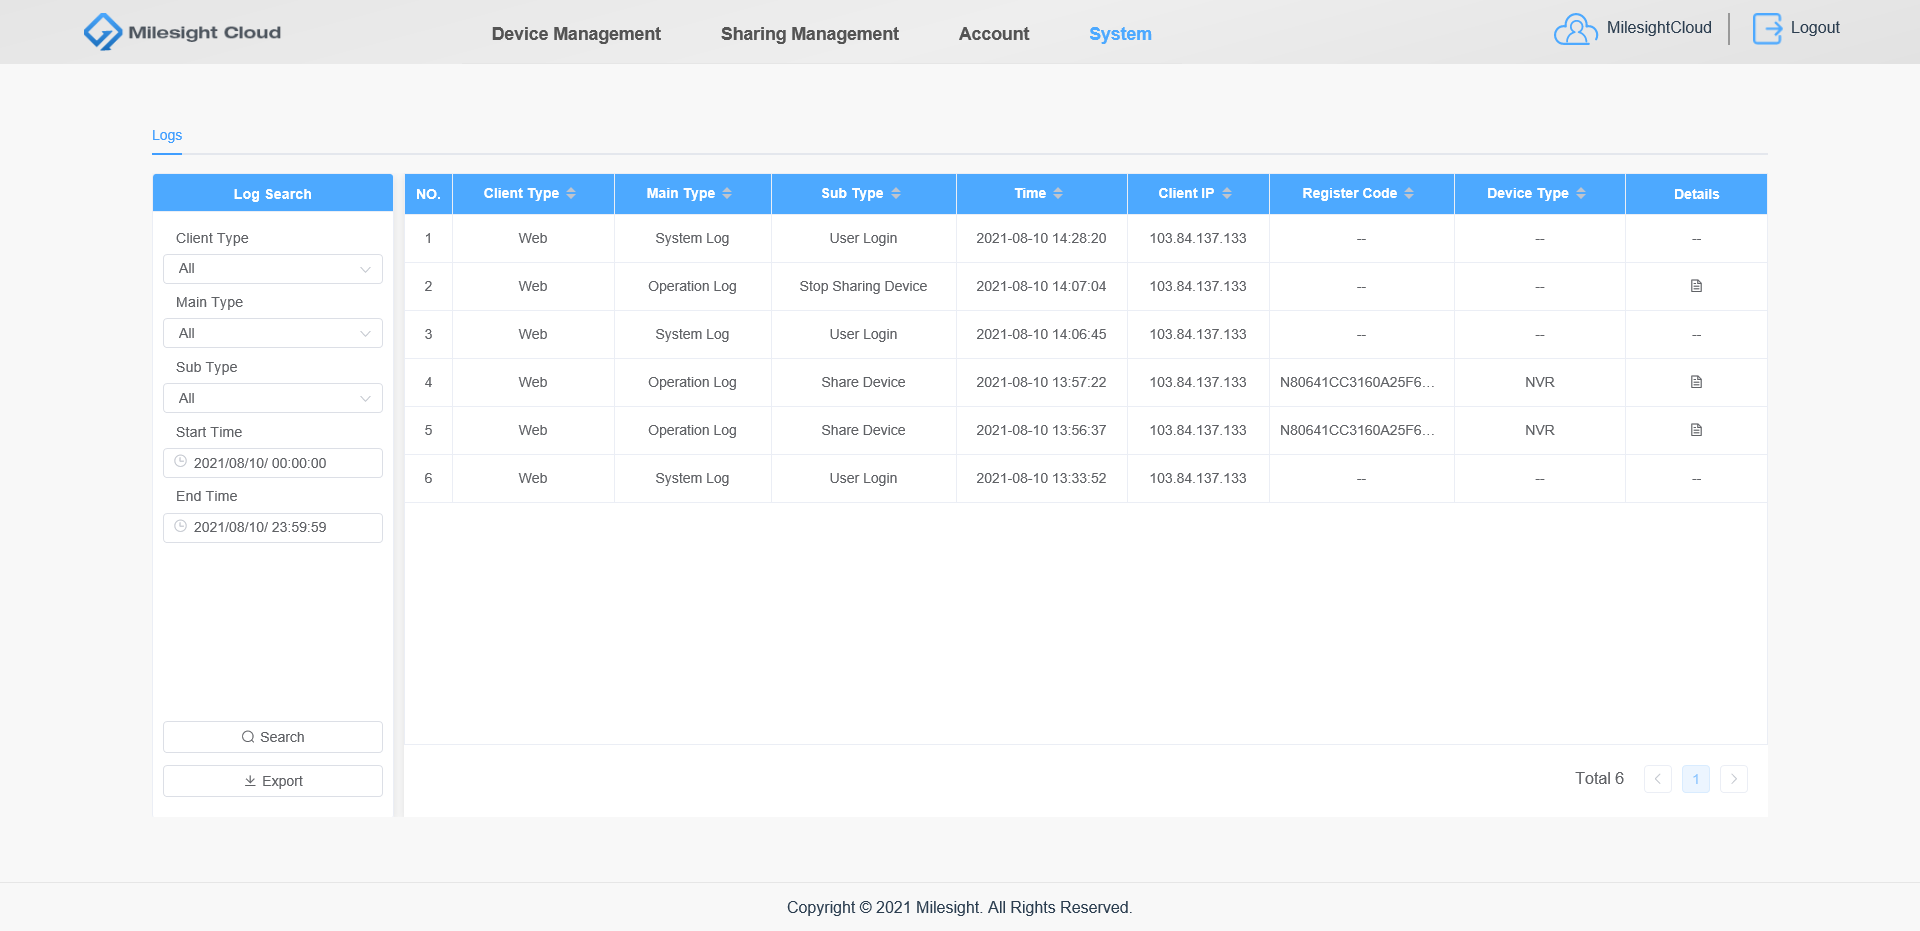
4. M-Sight Pro Configuration
What we implement in Cloud web page also implement in M-Sight Pro correspondingly. Most importantly, you can preview the Cloud devices in M-Sight Pro which is not available in website.
4.1 Cloud Account
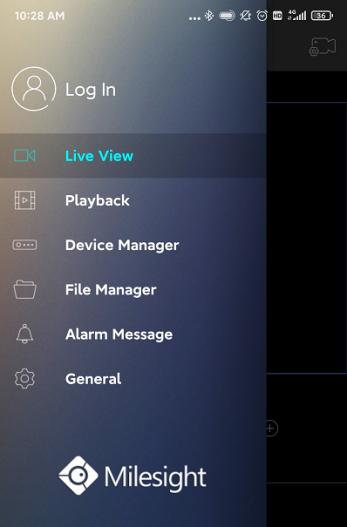
Input your username and password to log into Cloud account.
Or click the icon |
| to go to Live View interface without logging in. |

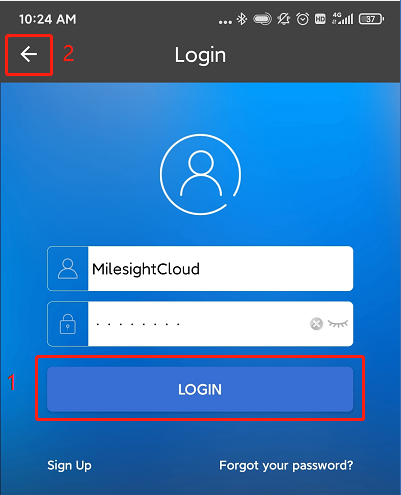
Note:
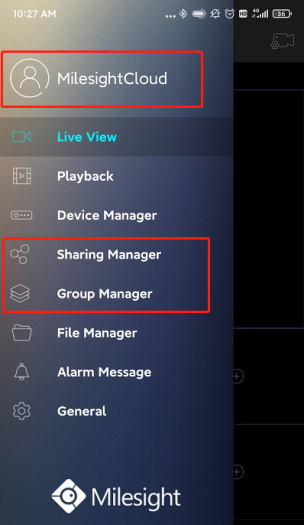
You can use former functions without logging in, but Cloud related functions must be used after logging into your account.
|
|
4.2 Device Management
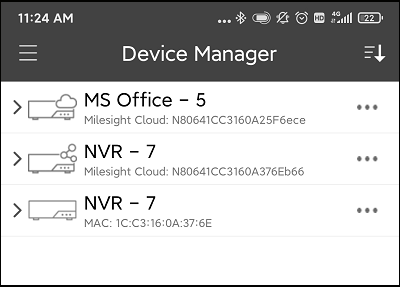
There are 3 kinds of devices:
Icon | Device Type | ||
| Device of Cloud account. Only displayed after logging into your account. | ||
| Device shared from other account. Only displayed after logging into your account. | ||
| Device of local network. Displayed whether you are logged in or not. |


Step 1:
Go to Device Manager interface:
Add device by Milesight Cloud. You can choose to manually enter Registration Code or Scan QR Code to bind the device.
|
|
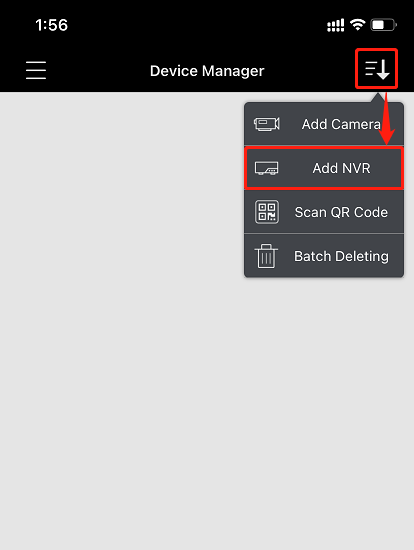
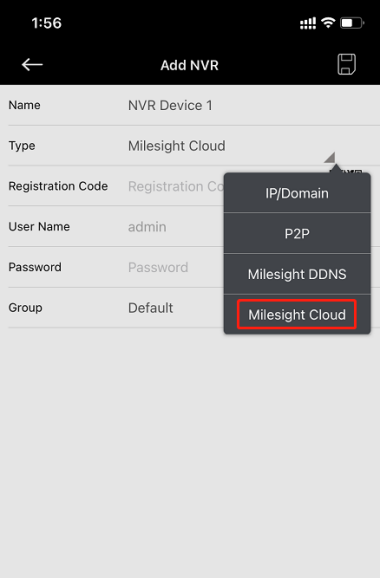
Enter Registration Code manually
|
|
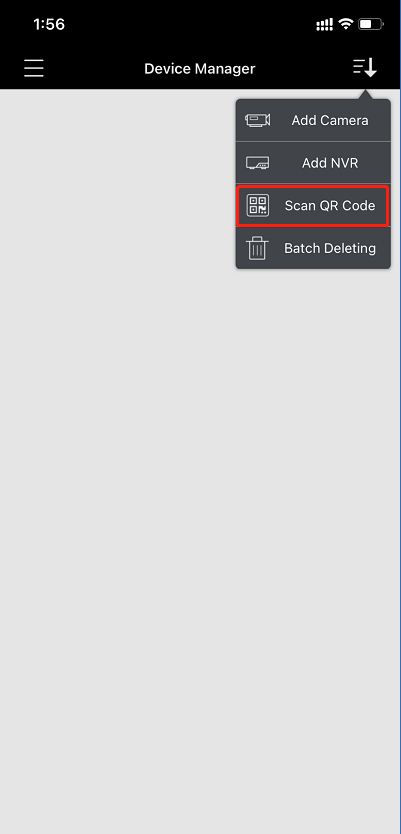
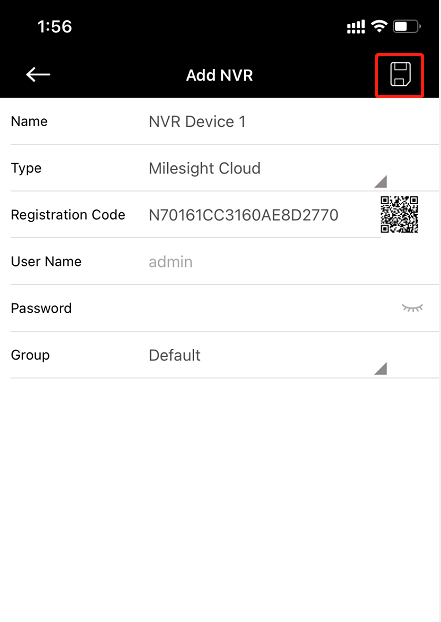
Scan QR Code
Step 2:
If the device is added by P2P, you can use “Bind to cloud”function to bind the device into Cloud account quickly.
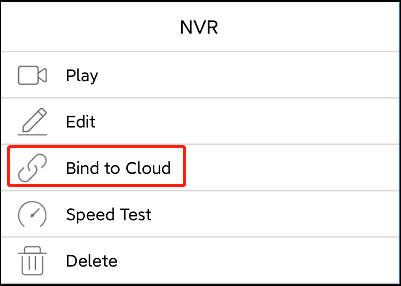
Note:
If you failed to bind the device, possible reasons are as follows:
• The device already bound to other account.
• The device already bound to your account.
• Your Cloud devices already reached 10.
• Network issues.
Step 3:
You can share the devices with another cloud account, and set up User Level and Expiration Time.
|
|
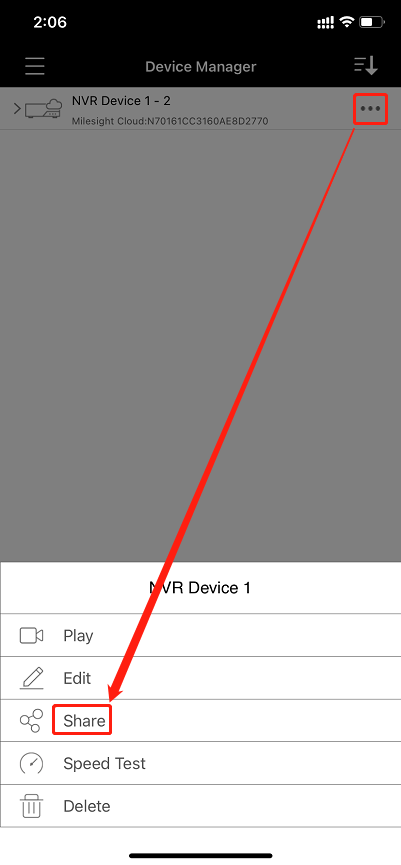
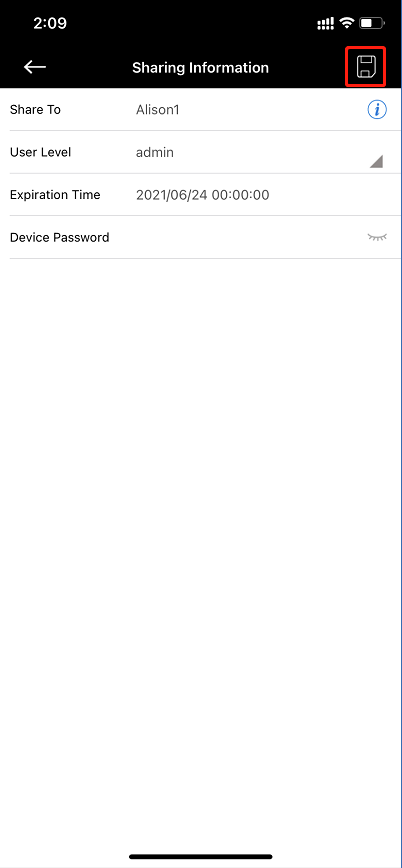
Then you can check the shared devices on Sharing Manager interface.
|
|
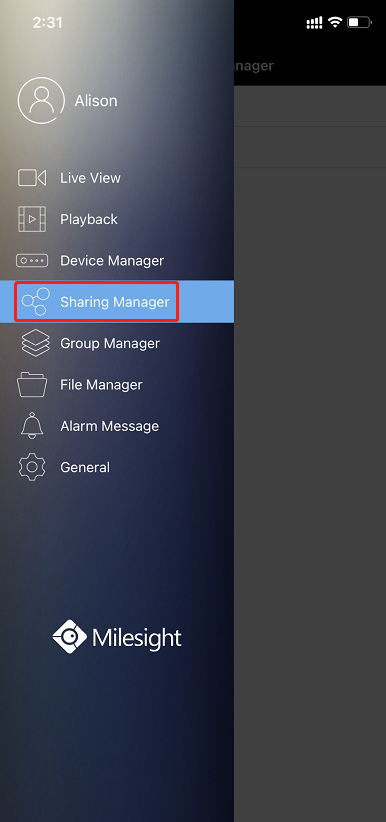
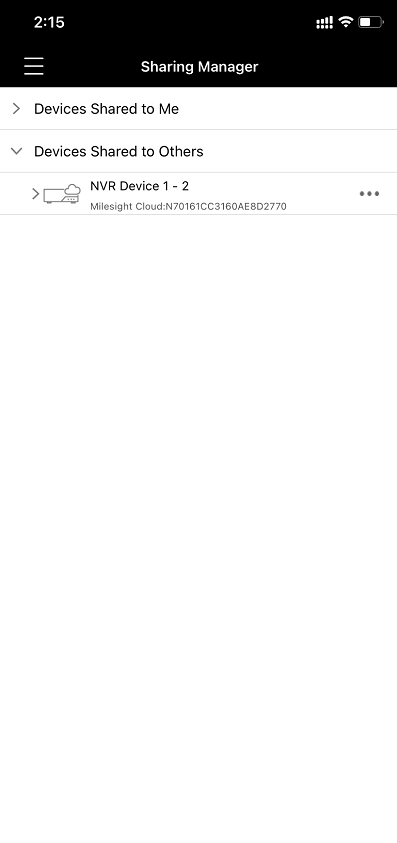
Step 4 :
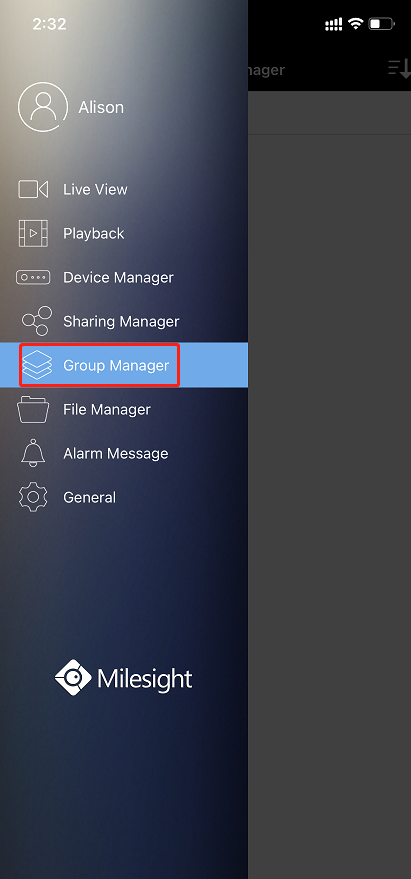
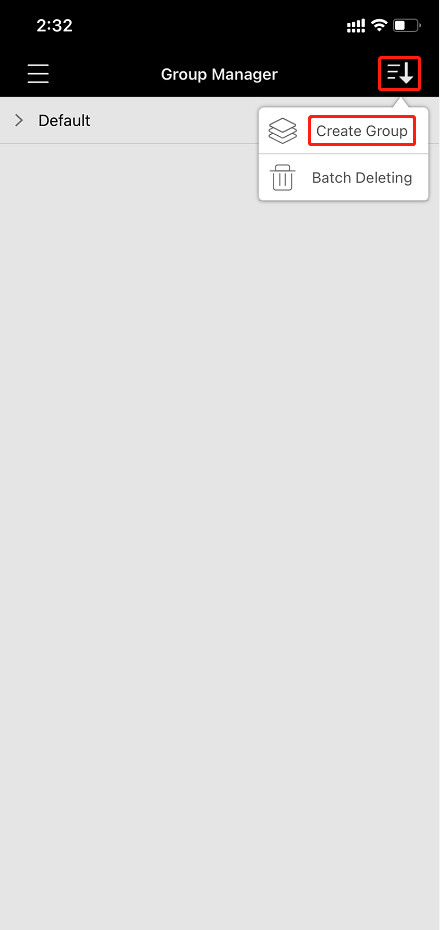
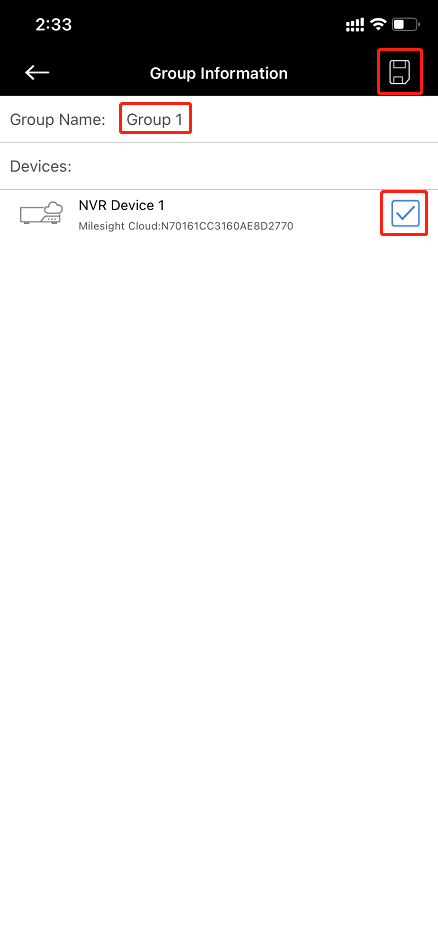
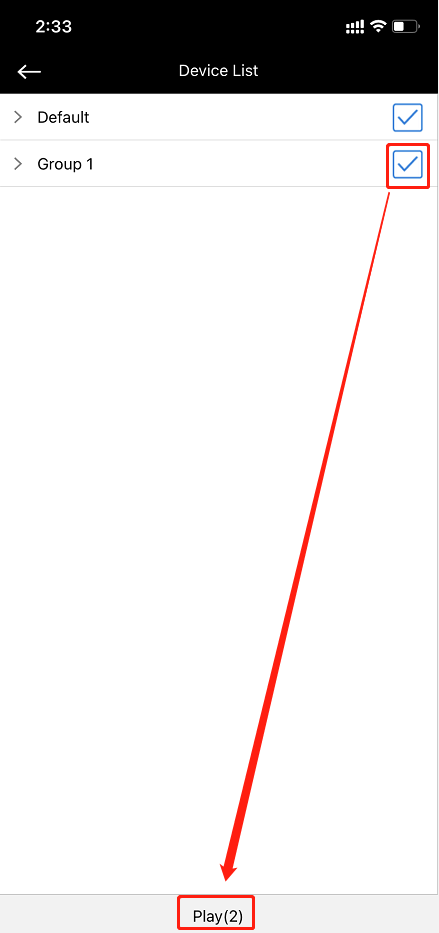
Support for devices grouping and playing devices by group.
|
|
|
|
5. NVR Configuration
There are configurations correspondingly in device side.
Go to System-->Network-->Milesight Cloud interface as picture shows below:
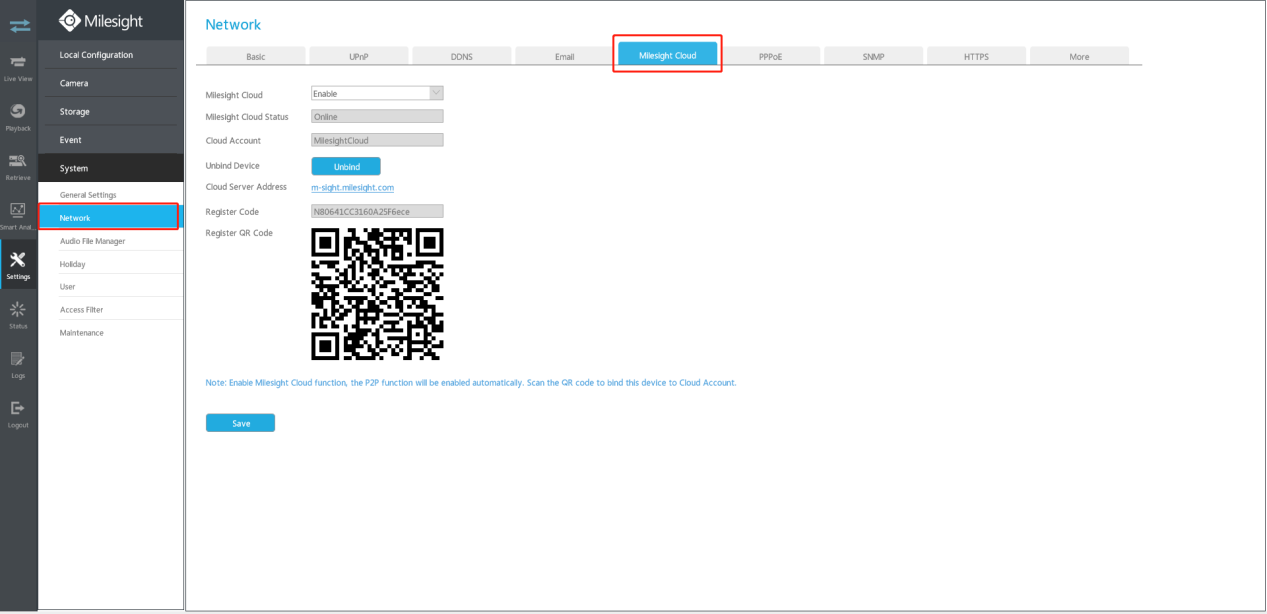
• Milesight Cloud: Please enable Milesight Cloud first.
• Milesight Cloud Status: There are 3 status which are Online, Offline and Disconnected;
- Online/Offline: Enable/Disable Milesight Cloud and the Status will show online/Offline, it means whether the Cloud function is ready for use.
- Disconnected: In some cases the status might show disconnected, and there will be specific reasons like picture shows below:

• Cloud Account: It shows the the account that is bound to your device.
• Unbind device: Click the button to delete device from Cloud account;
Assuming you find that your device were bound to another account, you can use this function to unbind your device.
• Cloud Server Address: Click m-sight.milesight.com to go to Cloud web page.
• Register QR Code: Scan the QR code to add device by Milesight Cloud in M-Sight Pro.
• For now Cloud function only available for NVR.
• Enable the Milesight Cloud function and the P2P function will be enabled automatically.
• If you are not logged in Cloud account and scan the QR code to add device, the device will be added by P2P in M-Sight Pro. But if you already logged in the account then scan the QR code, the device will be added by Milesight Cloud.
Note:
-END-