
Lead in
This document is organized by the order below:
How to Enable the Motion Detection
Way one--enable the motion detection via NVR
Local monitor setting
Web interface setting
Way two--enable the motion detection via IP cameras
Recording Setting for Motion Detection
Local monitor setting of recording
Web interface setting of recording
Other Alarm Actions for Motion Detection
Local monitor setting of other alarm actions
Web interface setting of other alarm actions
Note:
• The 1. is the first step and the basic of 2. and 3.. If you want to record video when motion detection is triggered, please refer to 1. and 2.. If you want to hear audio alarm or set other alarm actions when something moves in the detected region, please refer to 1 and 3..
• Please attach importance to where the mark ***** appears, because it may removes your confusions or give a quick guide when you operate the motion detection of NVR.
1. How to Enable the Motion Detection
Milesight’s NVR and IP cameras are data synchronization in the terms of motion detection; hence you can just choose one of two ways below, via NVR or via IP cameras, to enable it.
1.1 Way one--enable the motion detection via NVR
• Local monitor setting
Step1: Log in the local monitor, and go to “Event”→“Motion Detection”
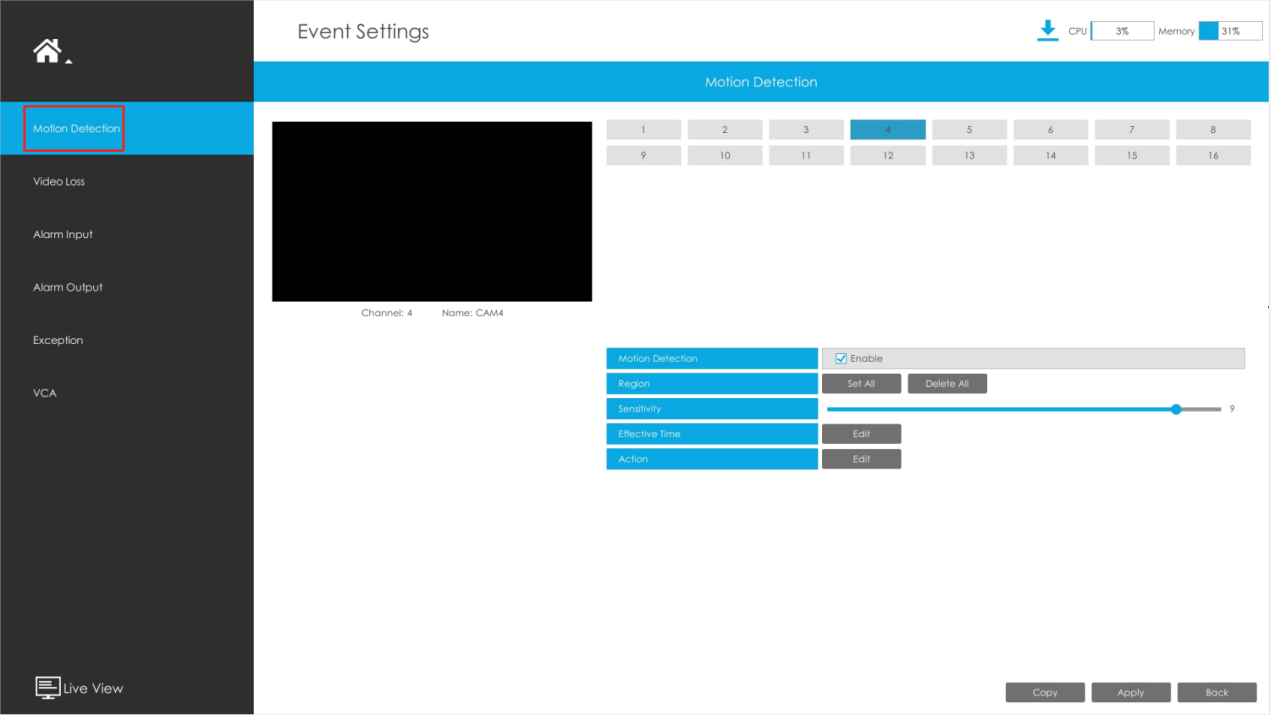
Figure 1.1 Motion Detection Settings in Local Monitor
Step2: Choose the corresponding channel, set the motion region and motion sensitivity.
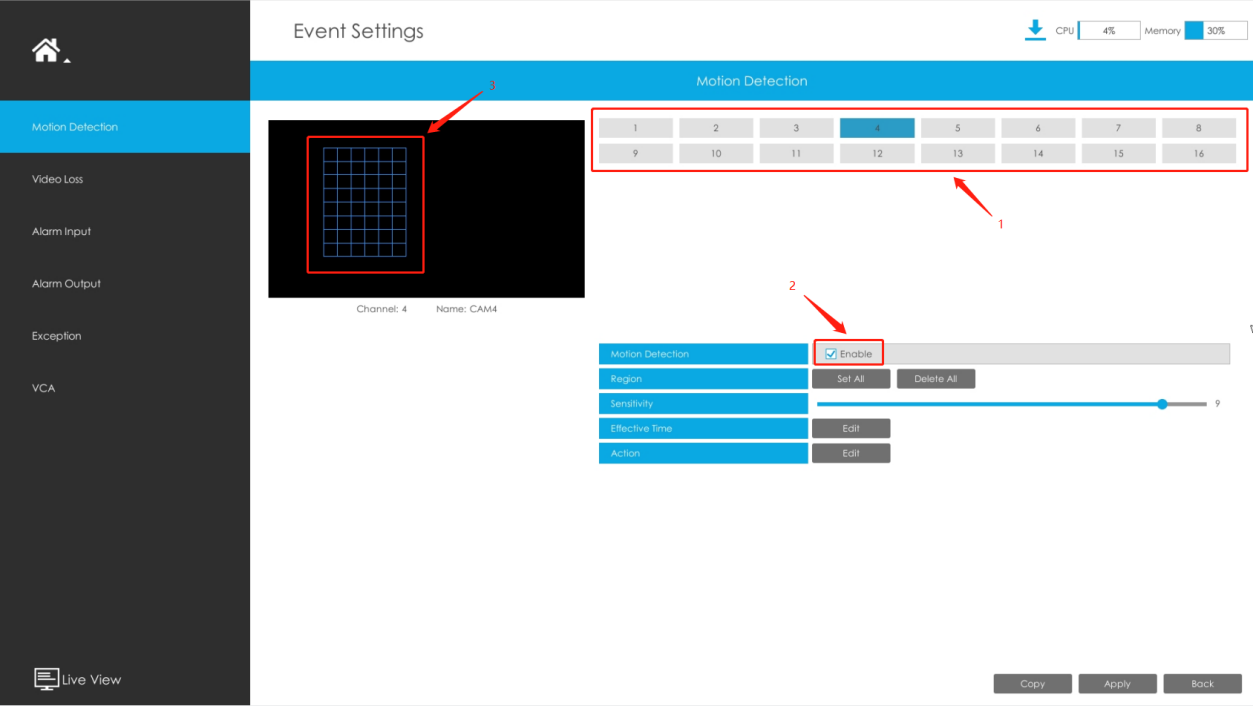
Figure 1.2 Motion Region Setting
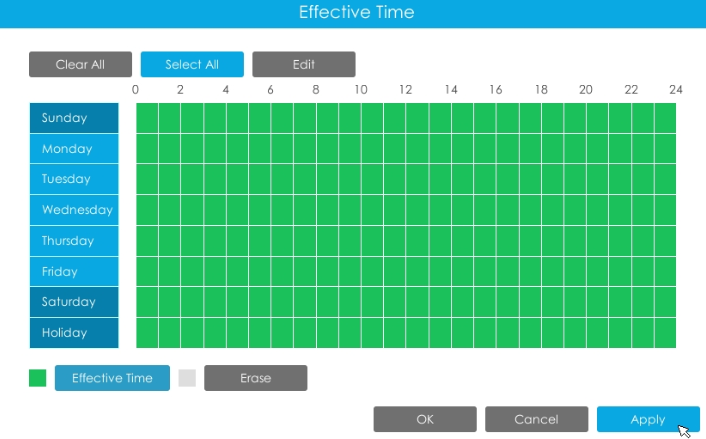
Step3: Set Effective Time of motion detection by clicking Edit.
It will be more convenient by clicking Select All or Clear All to set or clear all time settings.
Step4: Check settings. Log in “Status”→“Event Status”, when something moves in the detected region, we will see the changing to “

” changing to “

”, besides there is a motion indication “

” in local monitor live view.
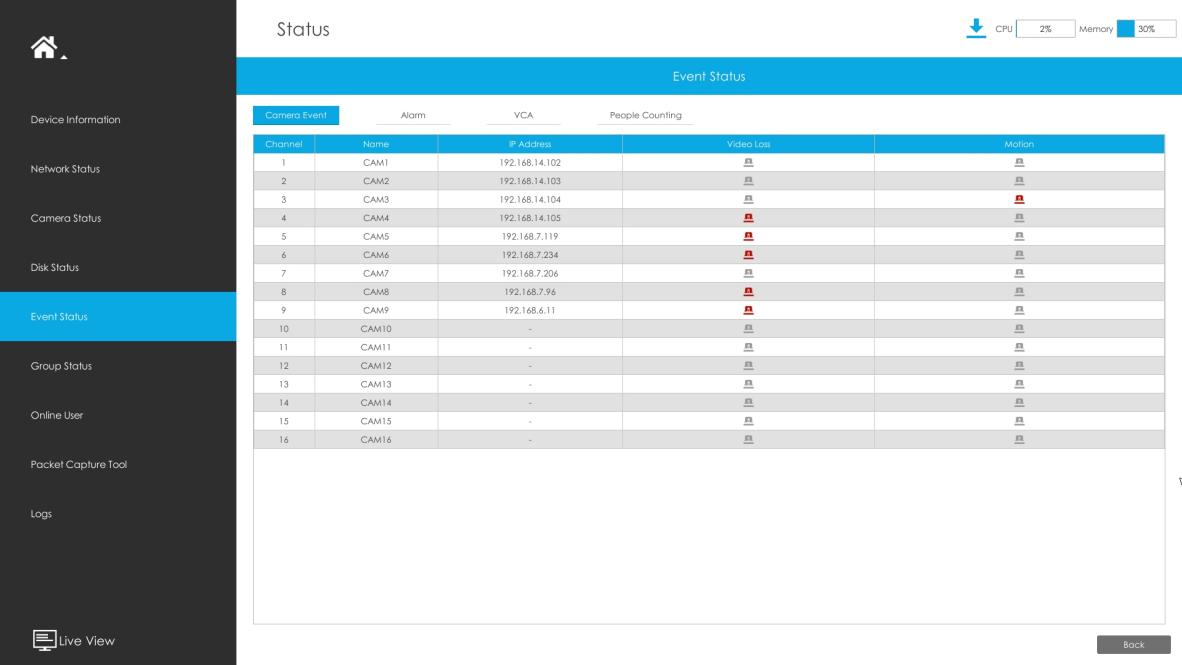
Figure 1.3 motion detection status in NVR local monitor
• Web interface setting
Step1: Log in NVR Web, click “Settings”→“Event”→“Motion Detection”.
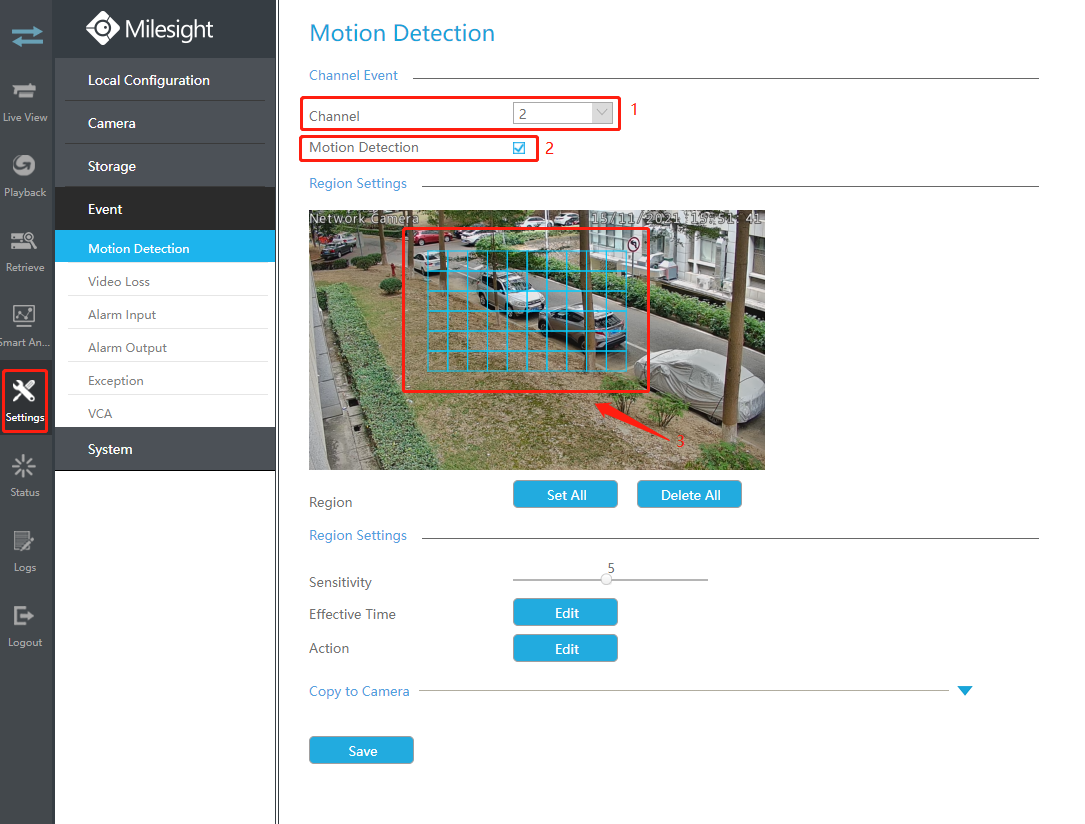
Figure 1.4 Motion Settings in NVR Web
Step2: Choose the corresponding channel, set the motion region and motion sensitivity.
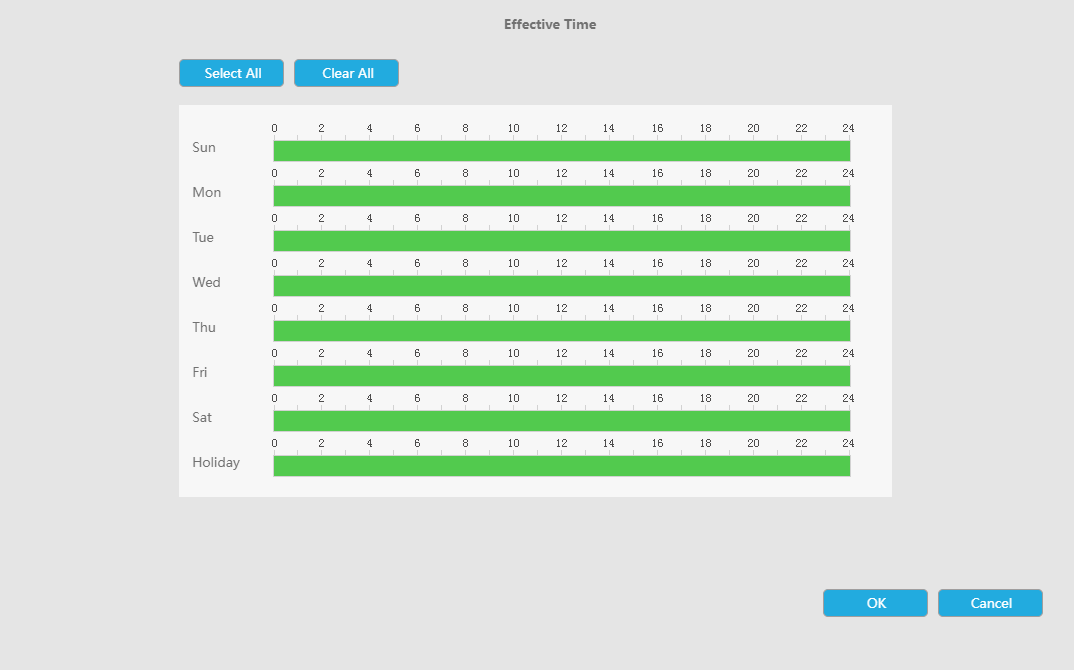
Step3: Set Effective Time of motion detection by clicking Edit.
It will be more convenient by clicking Select All or Clear All to set or clear all time settings.
Step4: Check settings. Log in “Status”→“Event Status”, when something moves in the detected region, we will see the “

” changing to

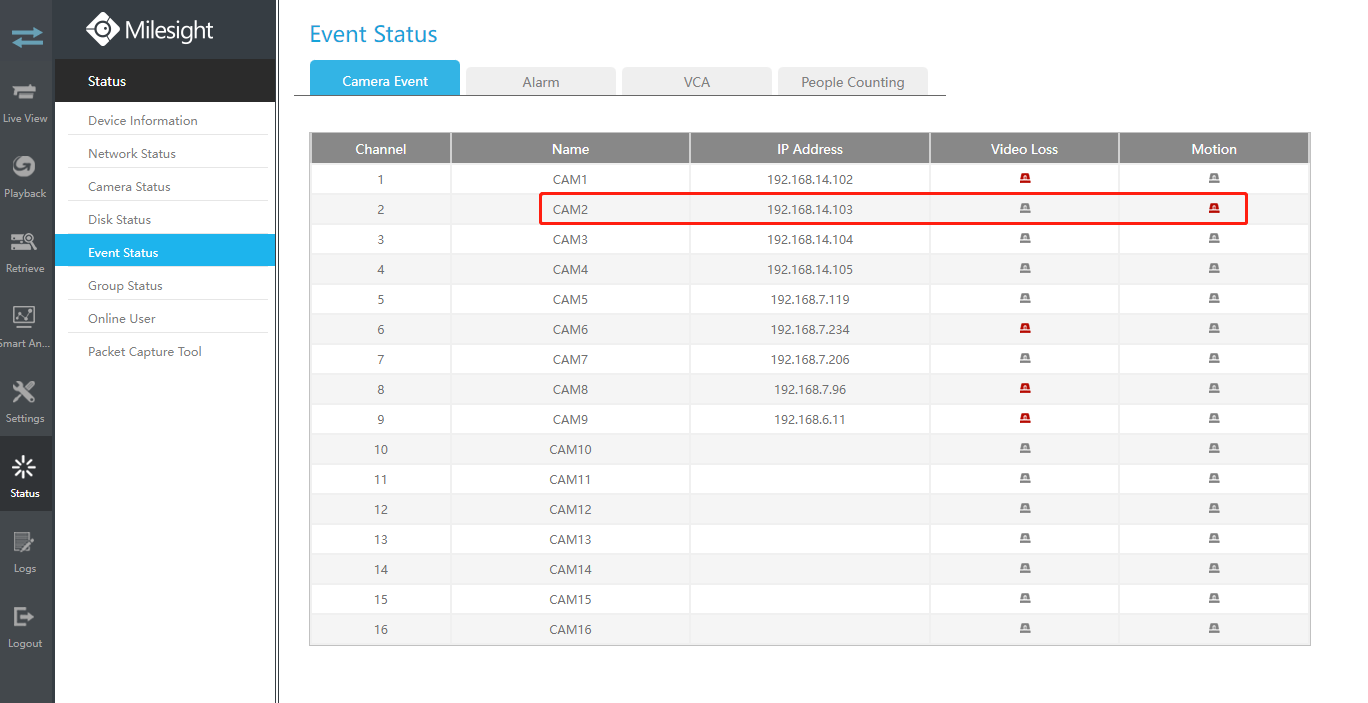
Figure 1.5 motion detection status in NVR Web
1.2 Way two--enable the motion detection via IP cameras
Step1: Log in web, and go to “Advanced Settings”→“Alarm”. Tick “Enable Motion Detection”.\
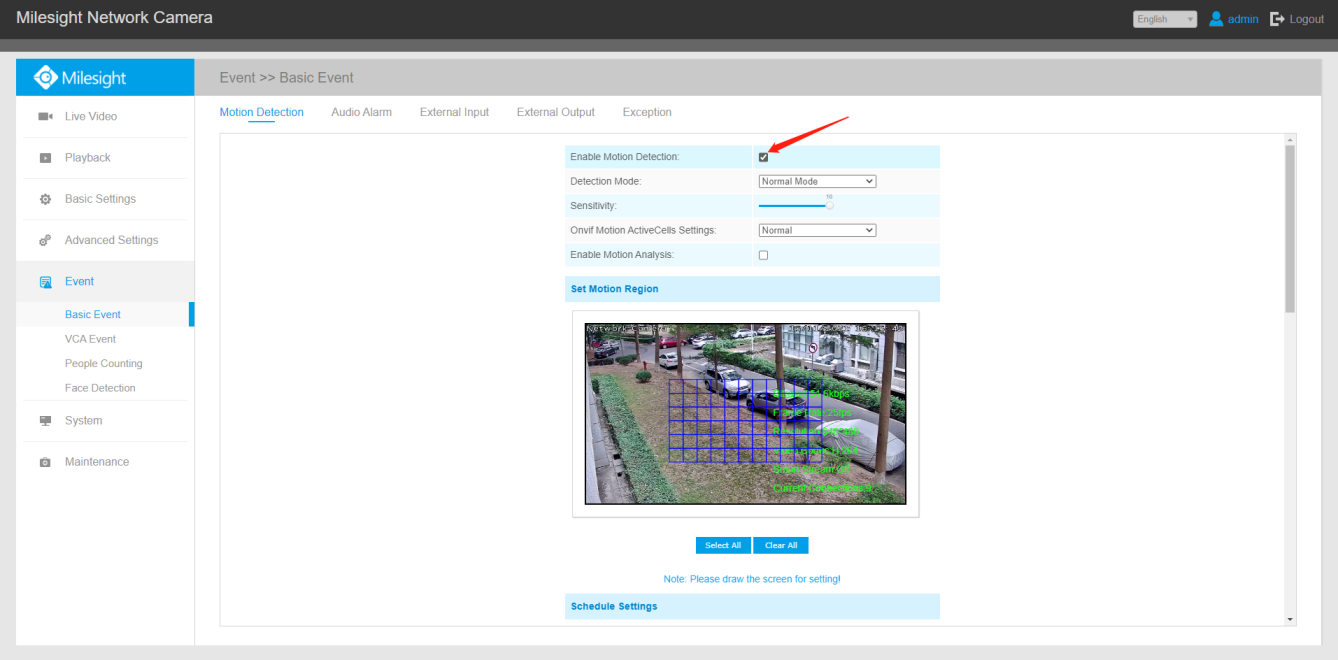
Figure 1.6 Motion Detection Settings
Step2: Set the Motion Region and choose the sensitivity.
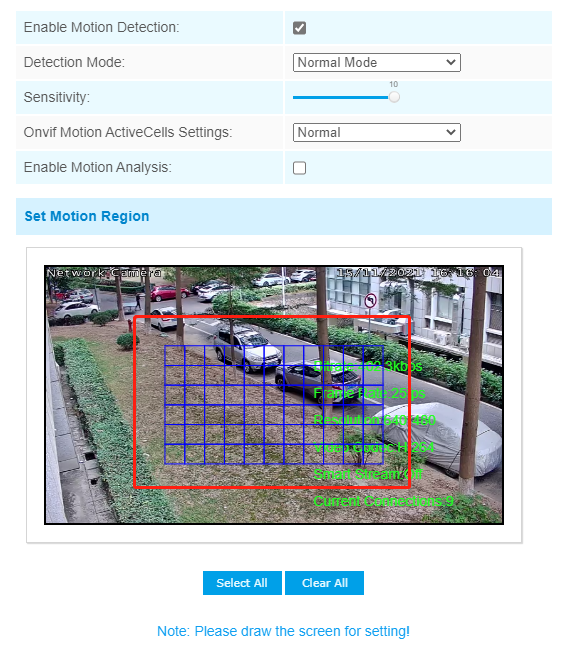
Figure 1.7 motion detection settings
Step3: Set the schedule for motion detection.
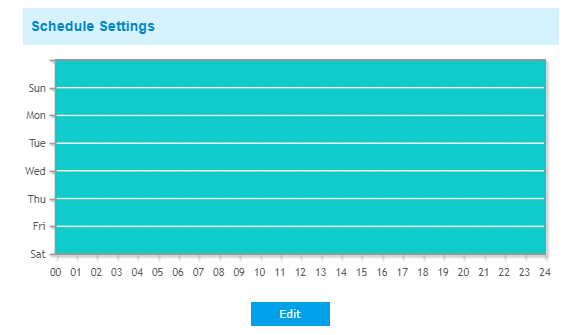
Figure 1.8 Motion Detection Schedule
Step4: Check settings. After setting motion detection successfully, you will see the warming red spot on the live video page. And when you log into NVR, you will see that the NVR updates its parameters with IP cameras automatically.
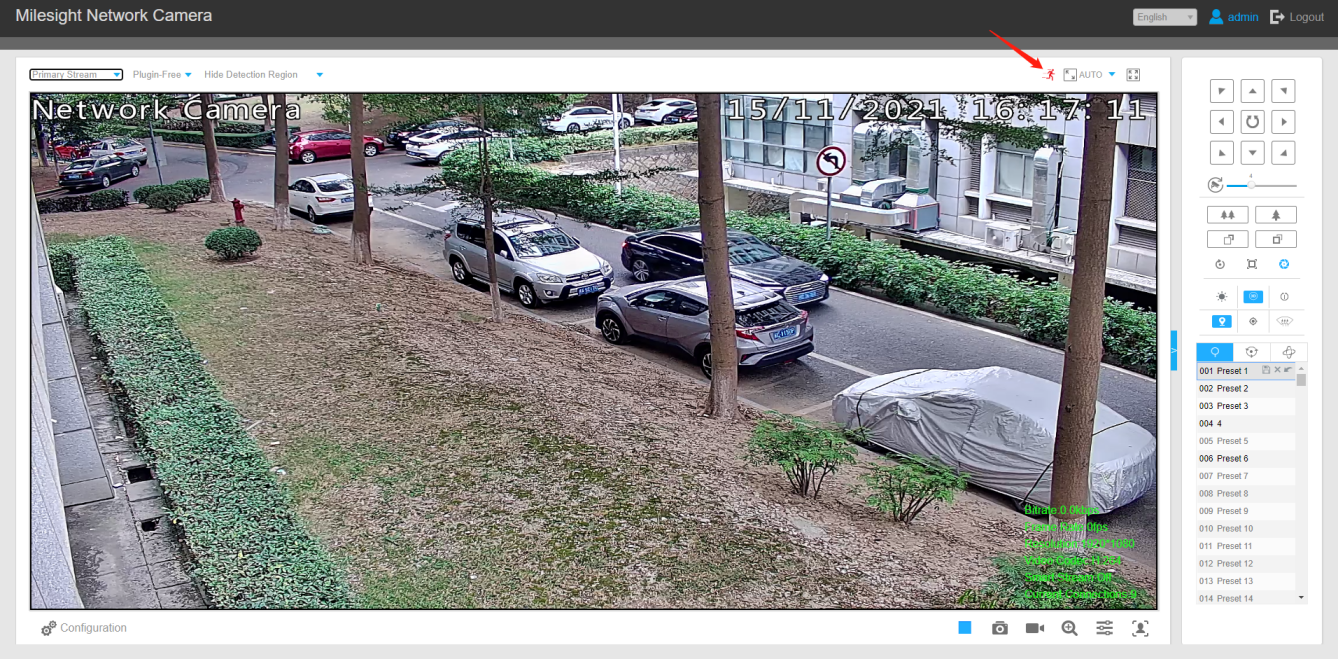
Figure 1.9 motion detection
2. Recording Setting for Motion Detection (based on 1.)
After finishing 1., you can set recording for motion detection.
2.1 Local monitor setting of recording
Step2: Go to “Main Menu”→“Storage”→“Video Record”, draw the time table to set the record schedule for motion detection, like the picture shown below.
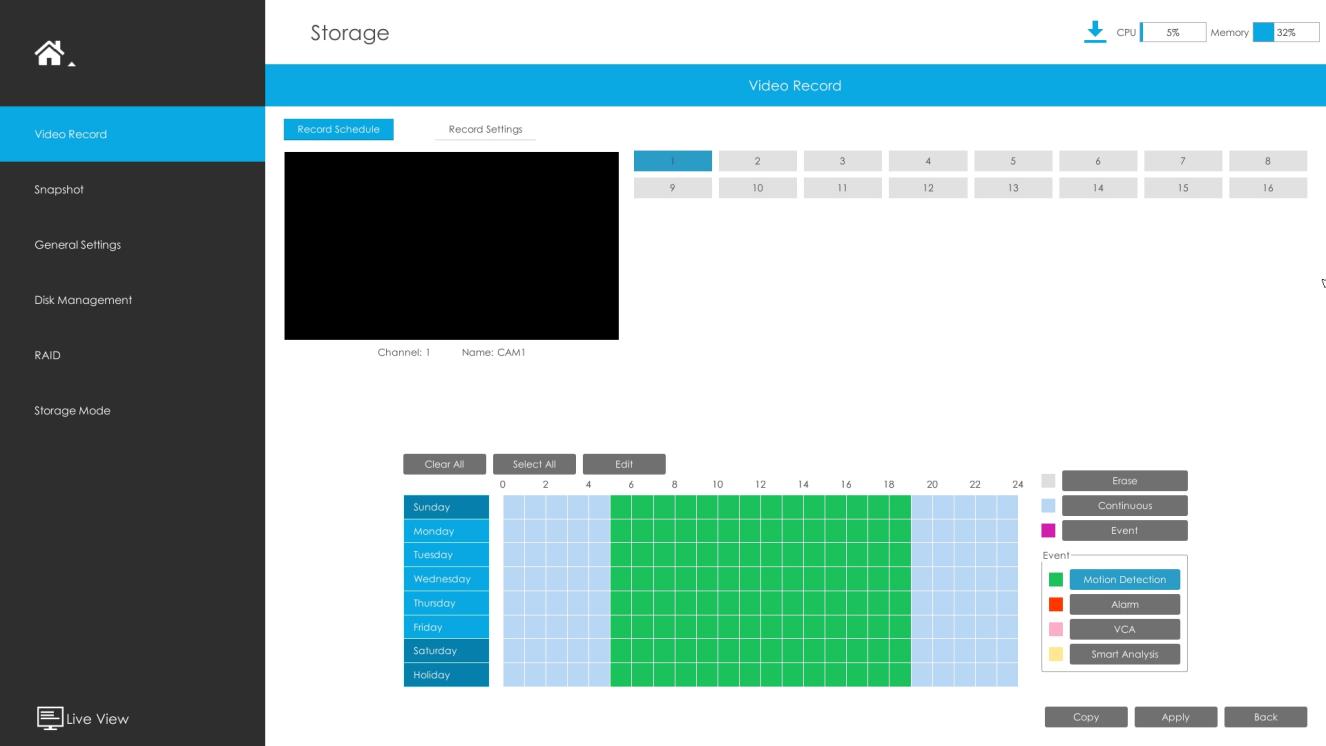
Figure 2.1 Alarm record settings on NVR local monitor
2.2 Web interface setting of recording
Go to Settings → Video Record → Record Schedule, edit the time table to set the record schedule for motion detection, like the picture shown below. Click Motion Detection within the Event table, and the cursor will move to Motion detection. Then you can select a desired time slot to enable recording when motion detection is triggered. It is worth mentioning that the color of time bar is based on the event you set. As for the other event settings for record schedule, please refer to Milesight_NVR_User_Manual.
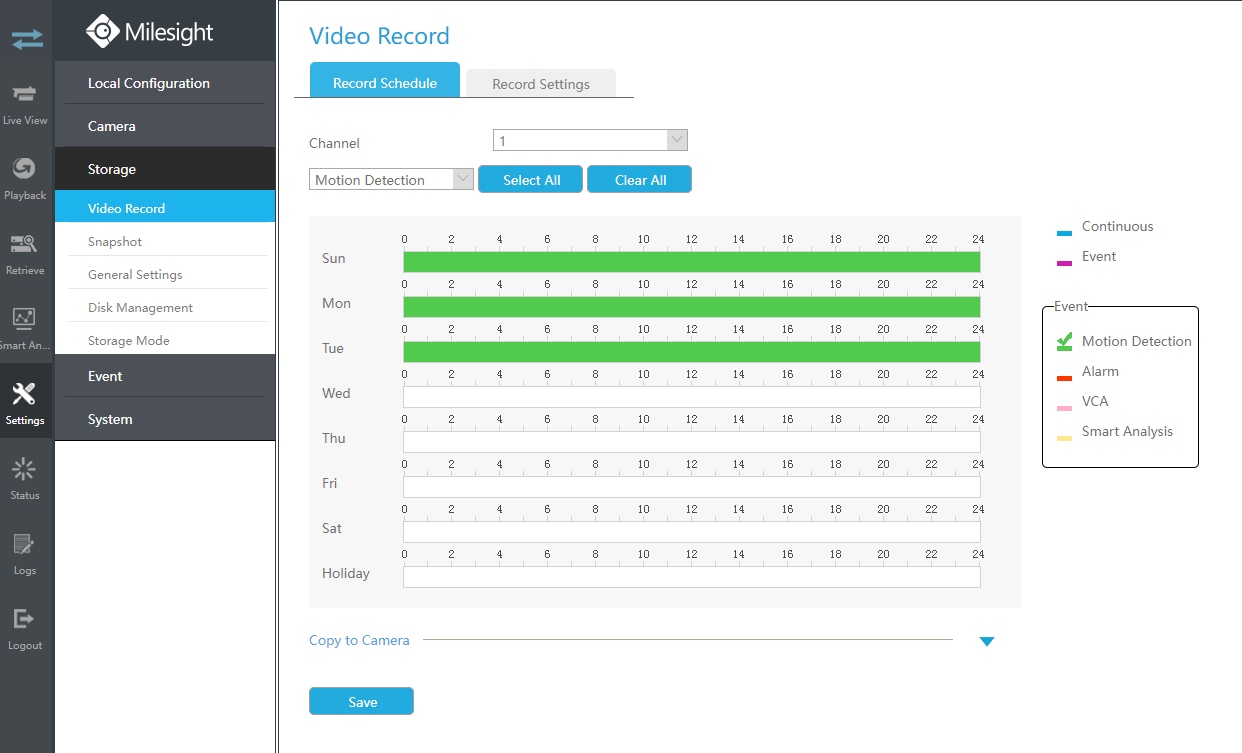
Figure 2.2 Alarm record settings in NVR Web
3. Other Alarm Actions for Motion Detection (based on 1.)
After finishing 1., besides recording, there are other alarm actions for motion detection, like E-mail Linkage, Audible Warming and Alarm Output.
3.1 Local monitor setting of other alarm actions
Step1: Log in NVR local monitor, click “Event”→“Motion Detection”→“Edit”
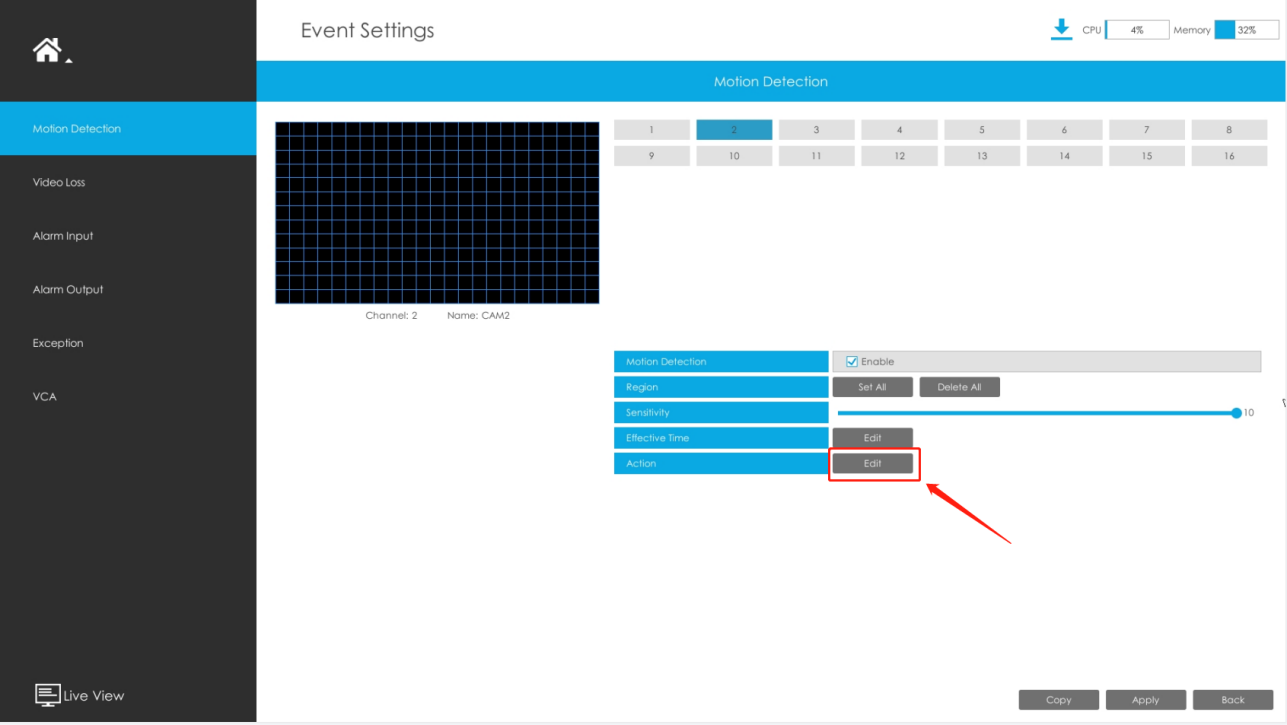
Figure 3.1 Motion Detection
Step2: Choose the effective time or draw the time table, select the alarm action and trigger interval.
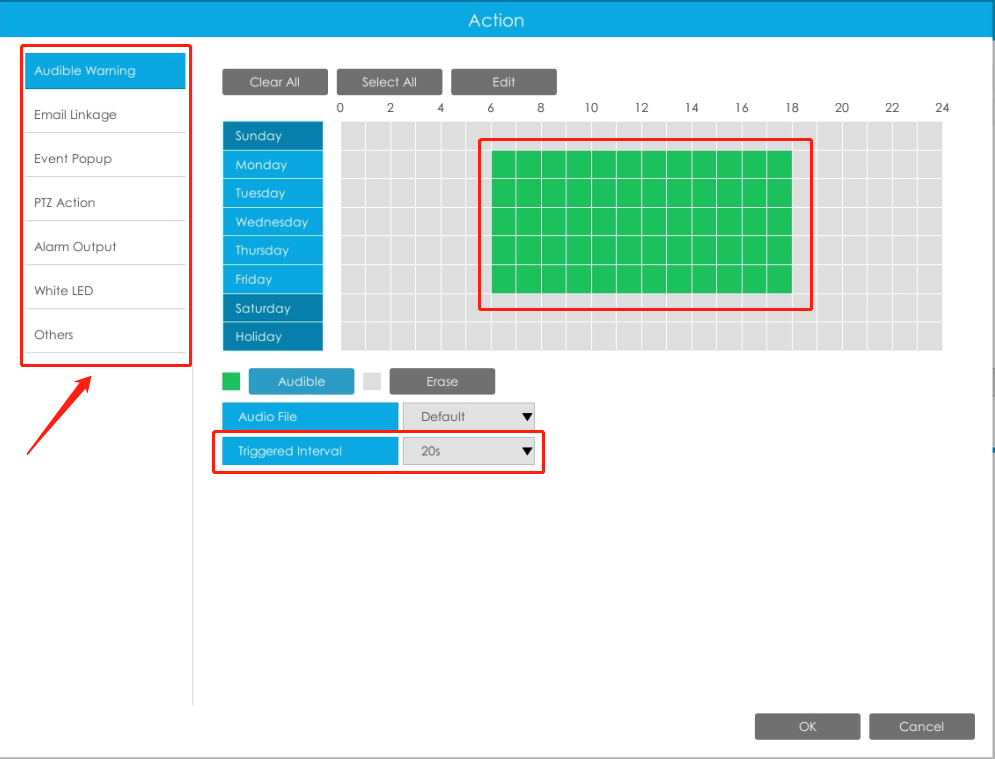
Figure 3.2 other alarm edition on NVR local monitor
3.2 Web interface setting of other alarm actions
Step1: Log in NVR Web, click “Settings”→“Event”→“Motion Detection”, click “Action”, edit the schedule time.(This time table is used for setting the work time of other alarm action, not for recording, do not mix them up)
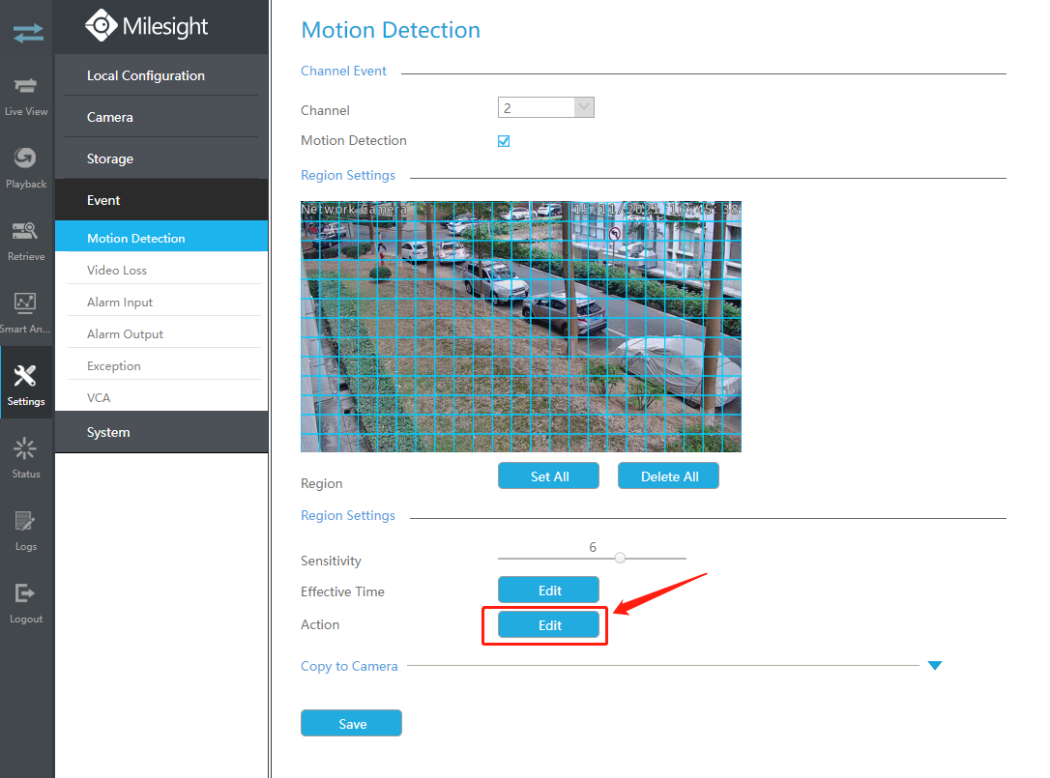
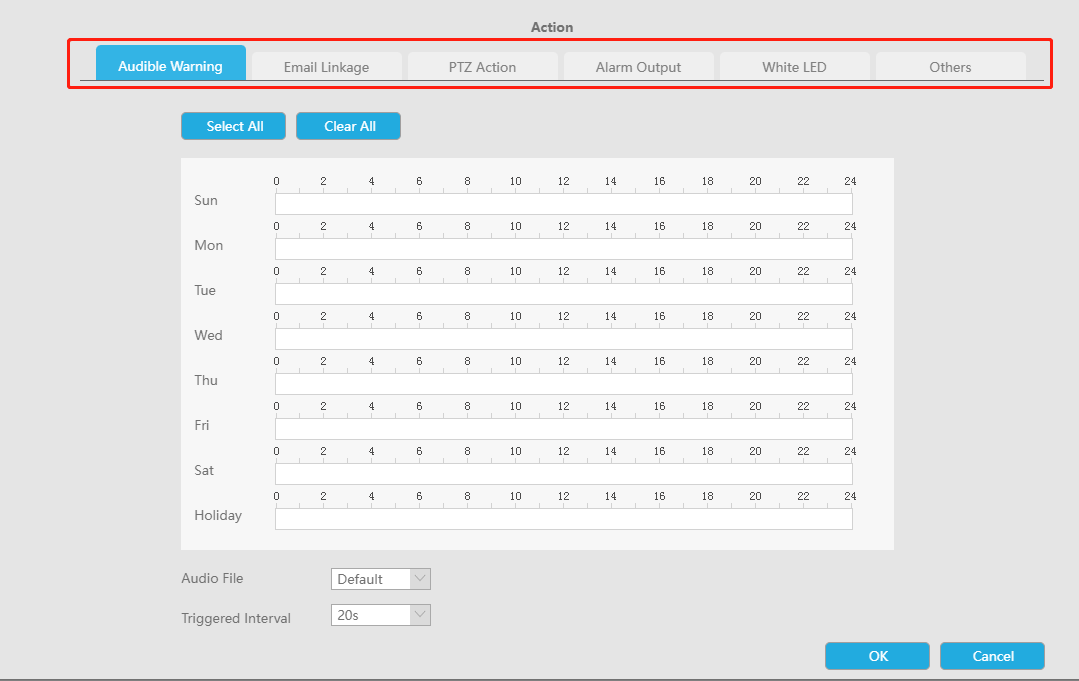
Figure 3.3 other alarm edition in NVR Web
Step2: Select other alarm actions and trigger interval.
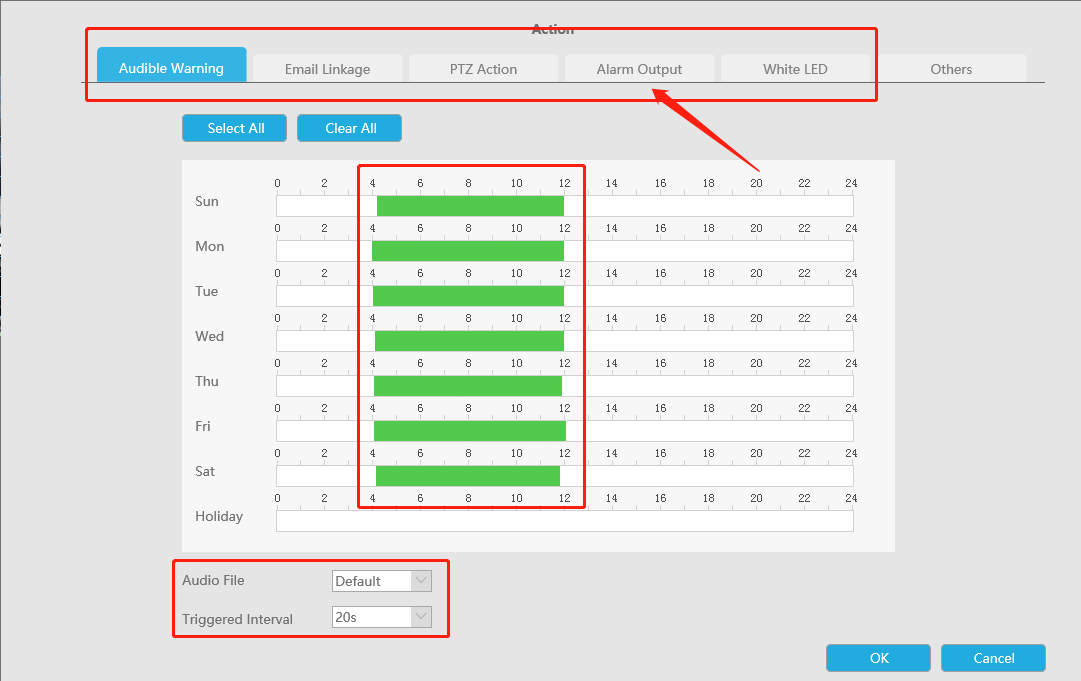
Figure 3.4 other alarm edition in NVR Web
-END-