
IP Camera Version | 45.7.0.79-r9 | NVR Version | XX.9.0.14 | Update | 2022.2.28 |
1.Introduction
Currently AI technology has become the main trend of the intelligent security and safety industry. Milesight keeps attaching importance to it and working on developing various devices with AI technology. Face Detection which can help users instantly obtain people’s faces attributes within the camera view is supported on Milesight NVR. Hence you can filter the relative attributes to select desired targets at ease and apply the IP cameras in more varied scenarios. Generally face detection is only available in Milesight AI models.
Note: Face Detection of none-AI cameras cannot be enabled on Milesight NVR. So please make sure that the suffixes of your camera’s model should include C before enabling Face Detection on NVR. For example MS-C5363-PC, the letter C stands for AI platform.
2.How to enable Face Detection on NVR
Before enabling Face Detection on NVR, please go to the IP camera web page to enable the Face Detection Message Post.
Note: Please select TCP as the Post Type.
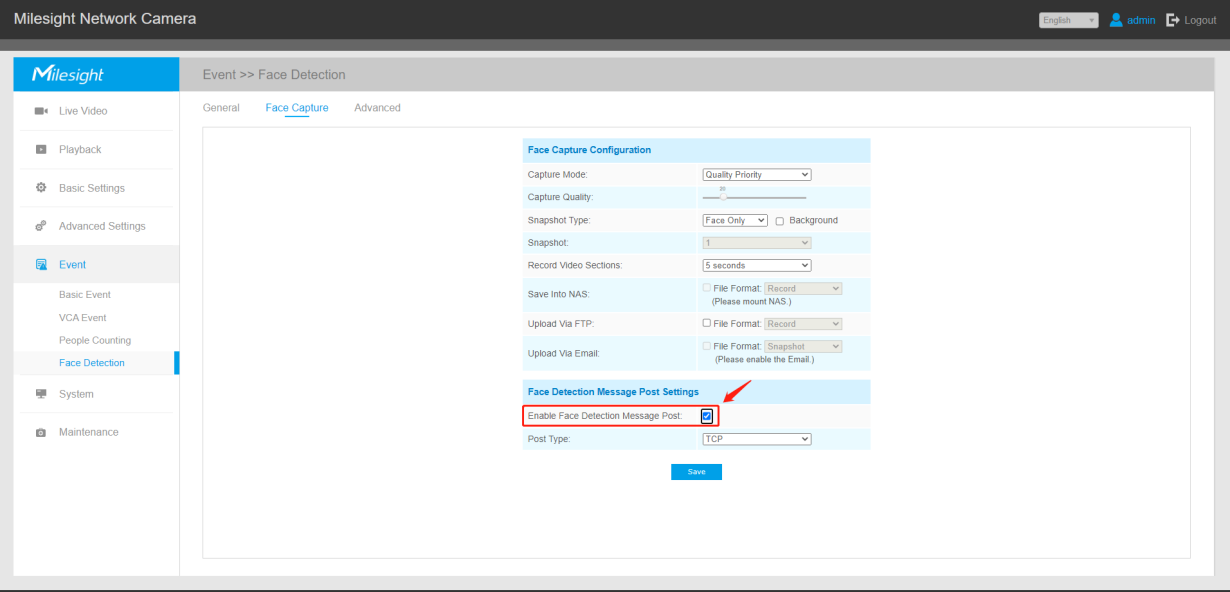
The article will describe the detailed operational steps on both Web page and Local in the following. Actually the essential logic is the same, so the operations are interoperable.
2.1Target Mode
Local has supported Face Detection in Target Mode which can show the face info synchronously with the AI network camera. And the related attributes like gender, age, glasses, mask, cap will be shown on the live view interface.
Note: Currently web page does not support Face captures display in live view.

Click to enable Target Mode
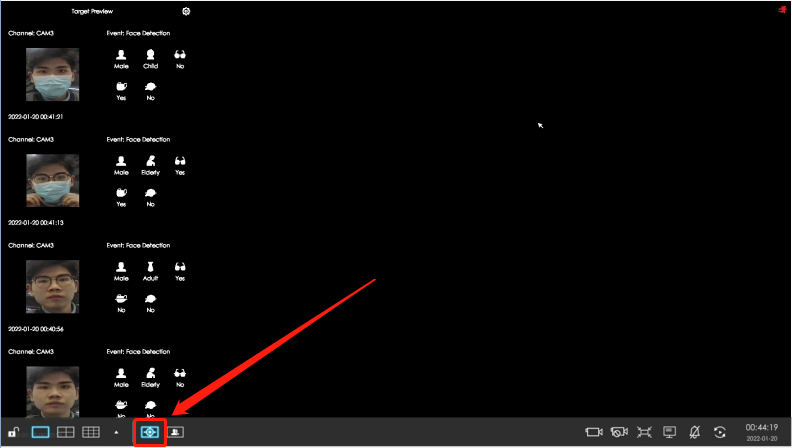
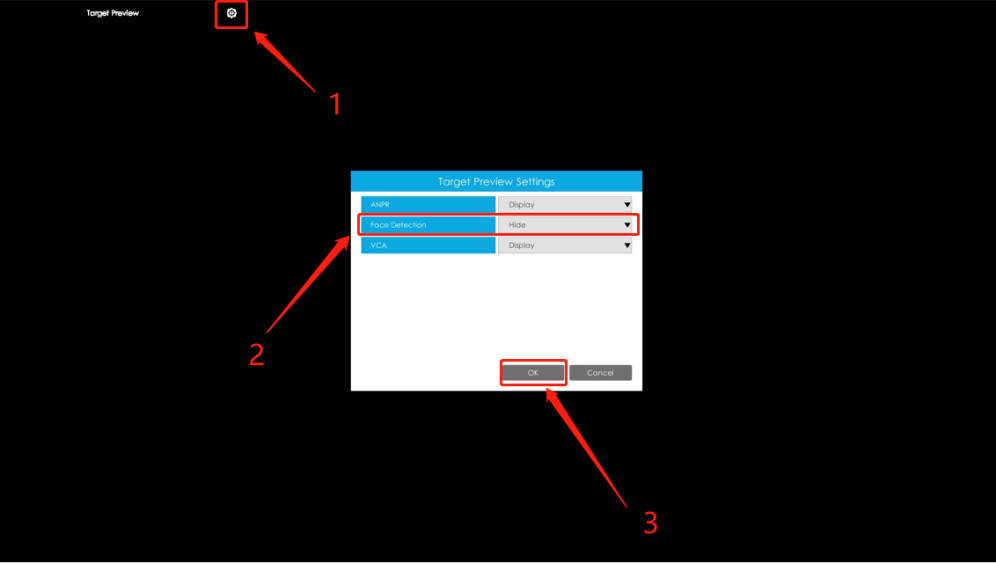
If the face being captured doe not display on the interface, please check the Target Preview Settings.
Click

to trigger Target Preview Settings interface.
Select Display to show the face capture.
Click OK to save the settings.
2.2Face Detection Settings
2.3Face Capture
2.4Channel Event
2.4.1Select the desired channel of AI camera.
If you choose a channel which does not support Face Detection, it will note that This channel does not support this function.
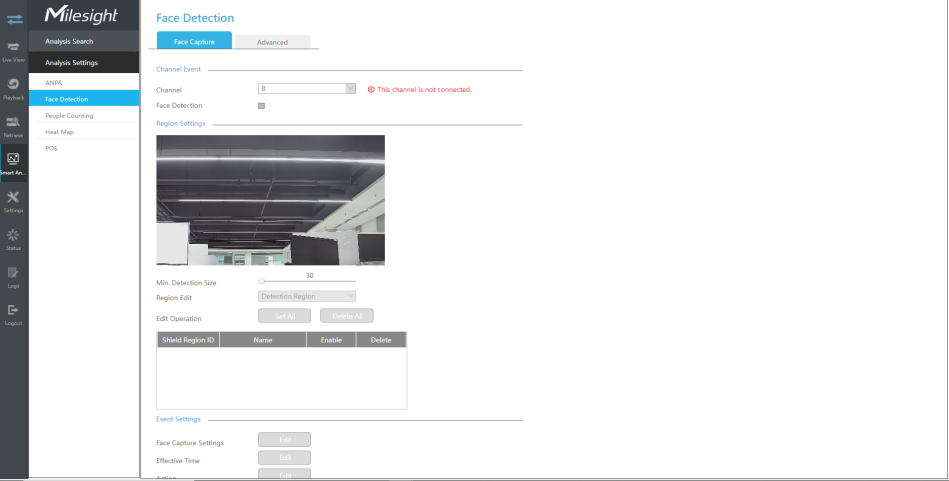
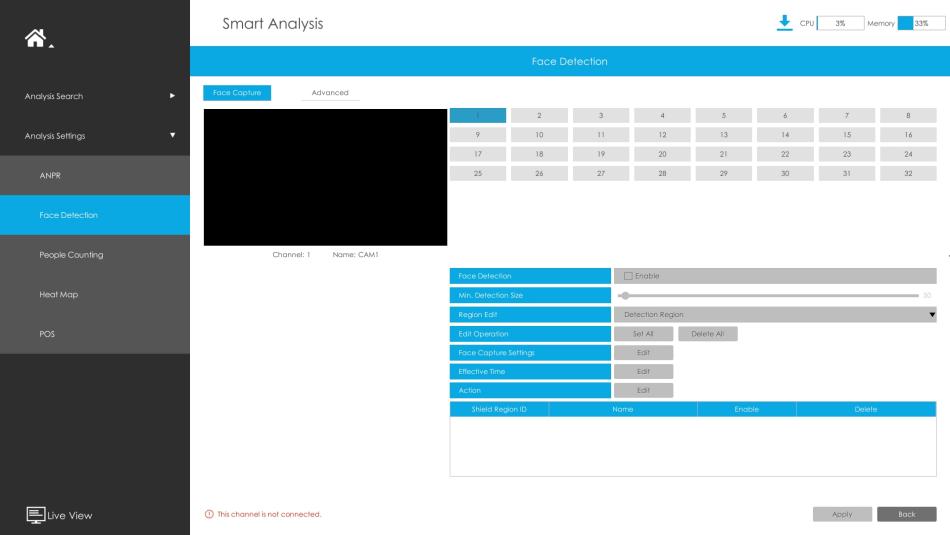
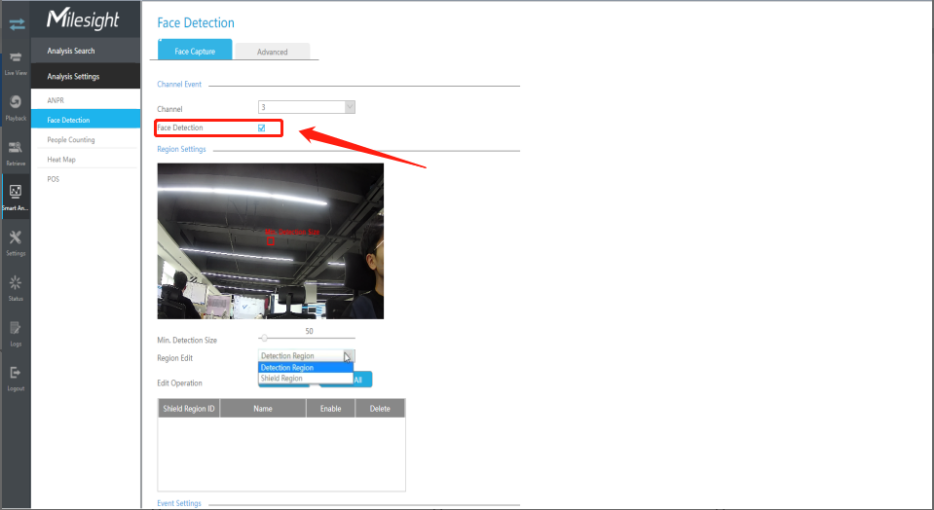
Enable Face Detection, then you can configure the corresponding parameters.
2.4.2Region Settings
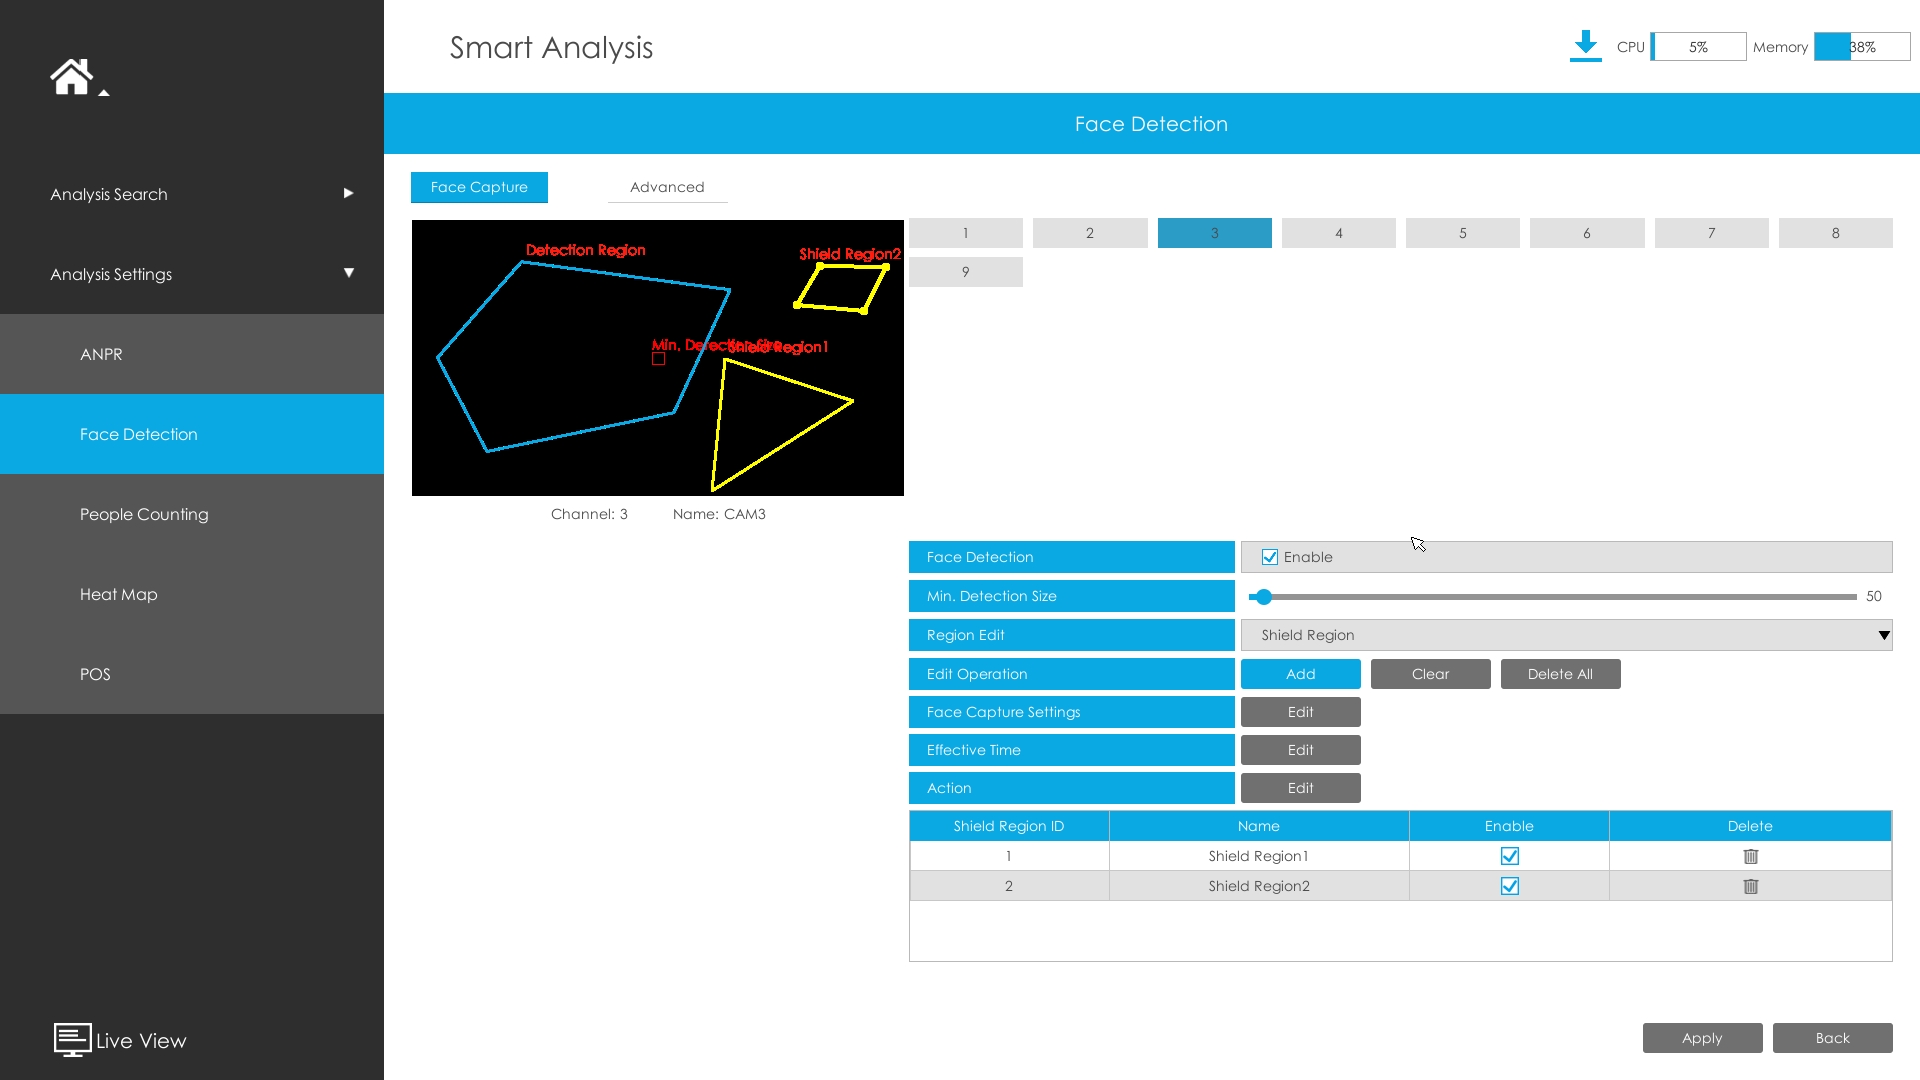
There are two modes for regional edit, Detection Region and Shield Region. The region you draw in each mode plays different parts in Face Detection.
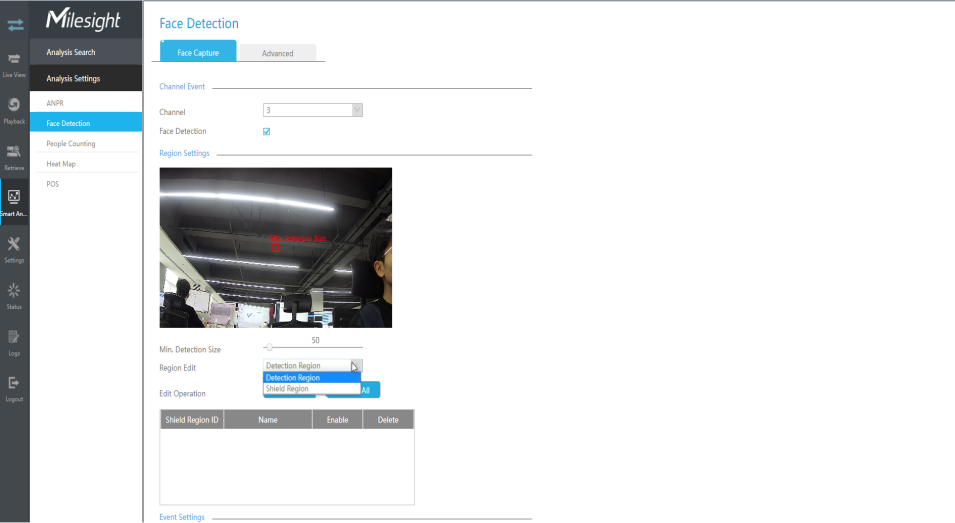
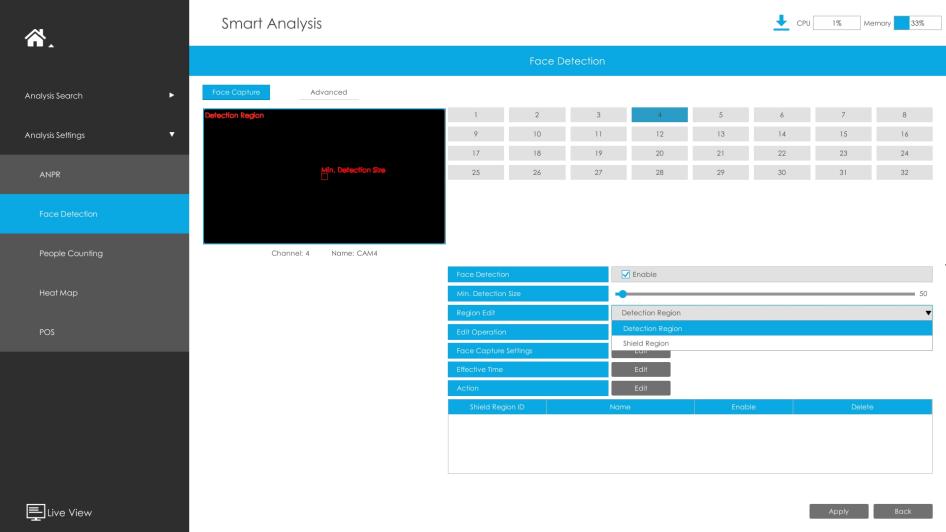
For Detection Region, it will trigger face detection whenever someone enters the specific region you draw. The face info will be captured instantly and the face being captured could be searched in face detection module of Analysis Search.
The Min. Detection Size you set will determine what size of the face will be filtered. If the human face is smaller than the Min.Detection you set, it will not be detected.
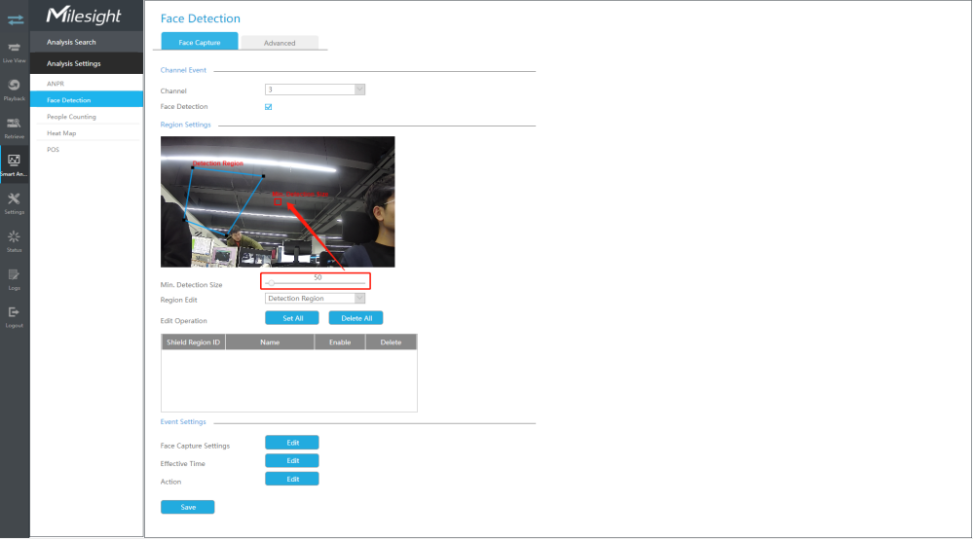
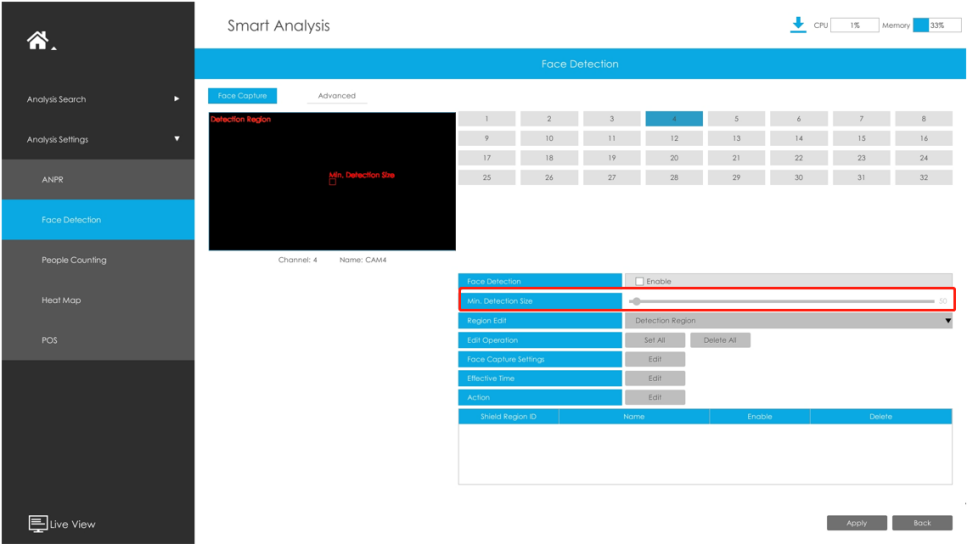
1. Click Set All to pick the entire region. Each person entering the range of the camera’s view will be detected. Or you can draw the region manually.
2. Click Delete All to clear the region you draw.
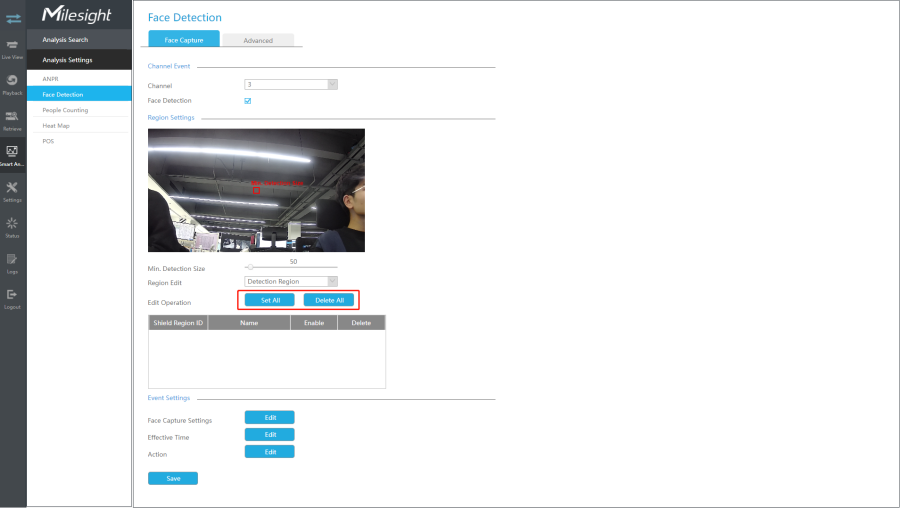
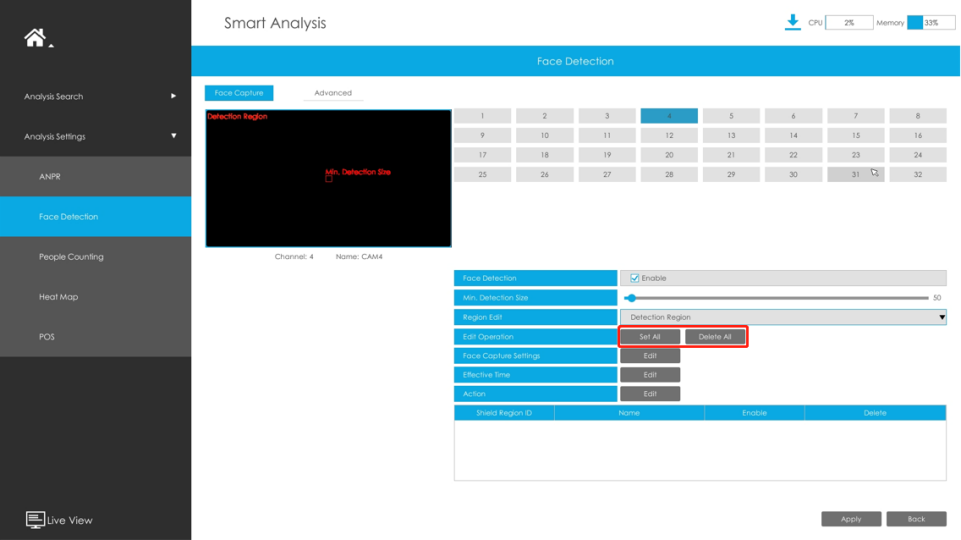
For Shield Detection, click Add to save after drawing the regions you do not want to be detected.
If drawing an unsatisfying region on the screen, click Clear to withdraw the previous regional setting. Click Delete All to one-click clear all the regions you draw. The regions you draw will be tagged in the table correspondingly, and can be managed respectively.
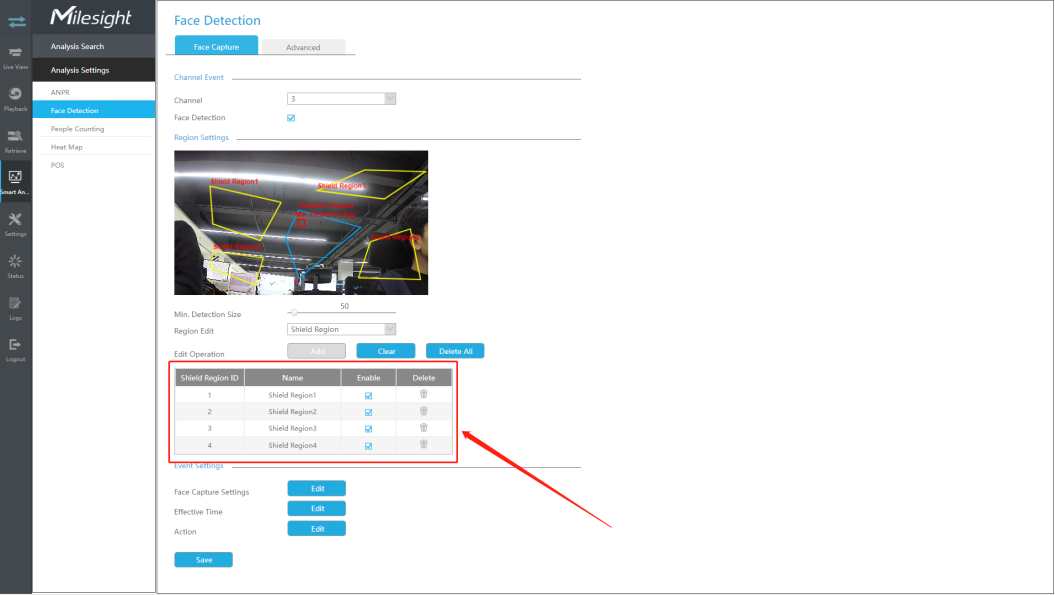
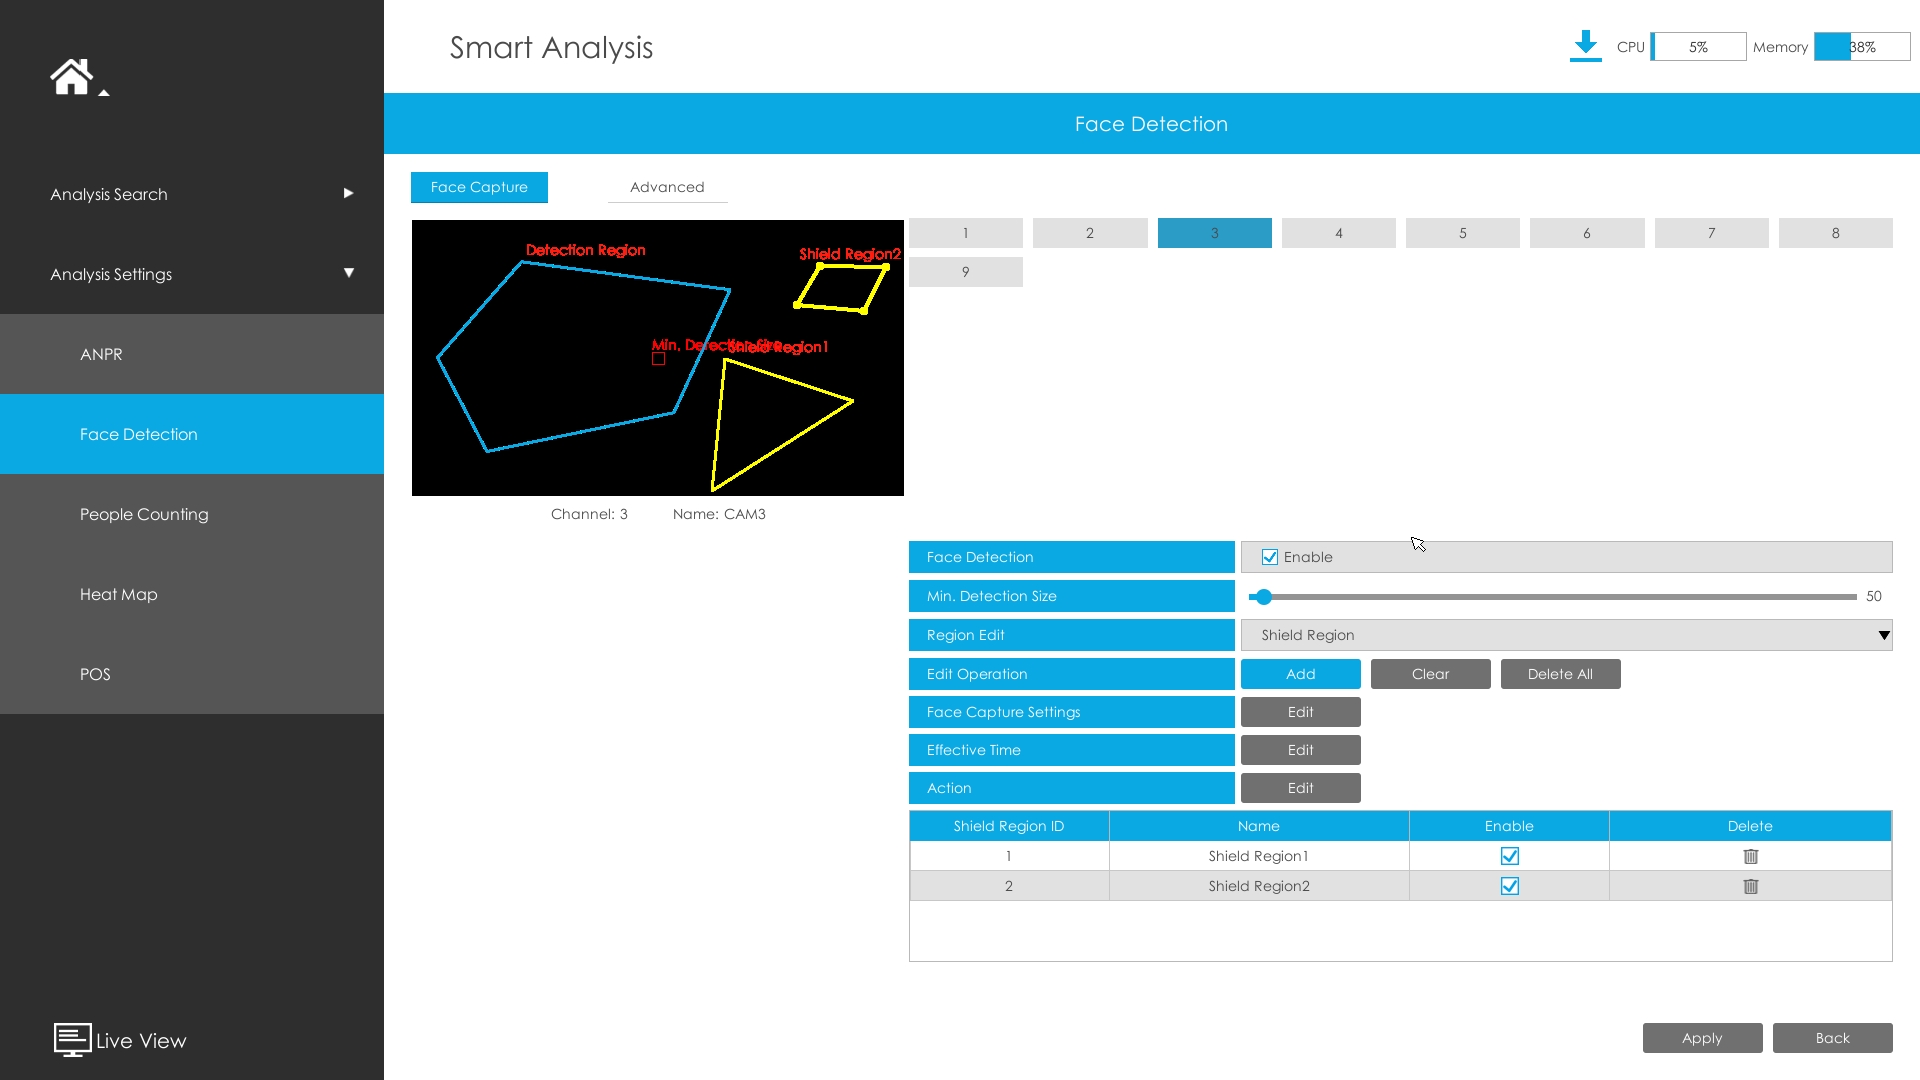
Note:
a. Only one region is available to set in Detection Region.
b. The limits of Shield Region is 4.
2.4.3Event Settings
1. Face capture settings
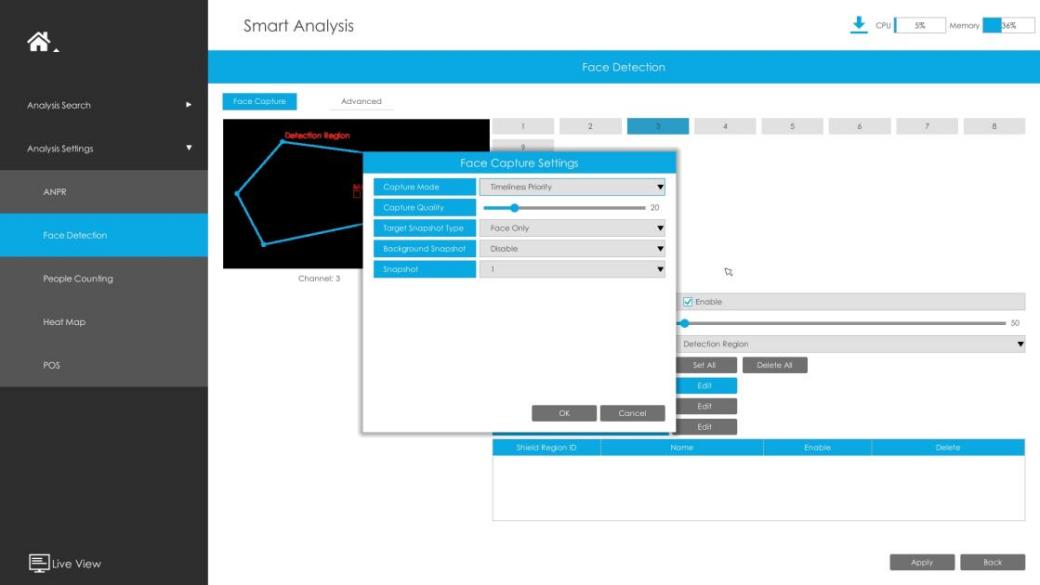
Click Edit to configure Face Capture parameters. You can select Quality Priority, Timeliness Priority and Customize.
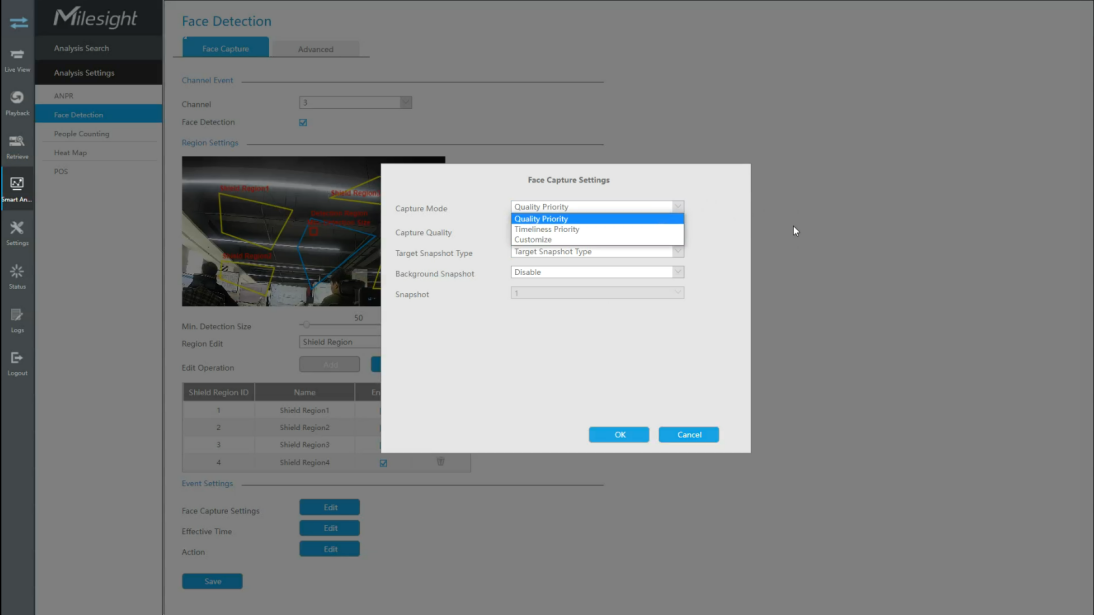
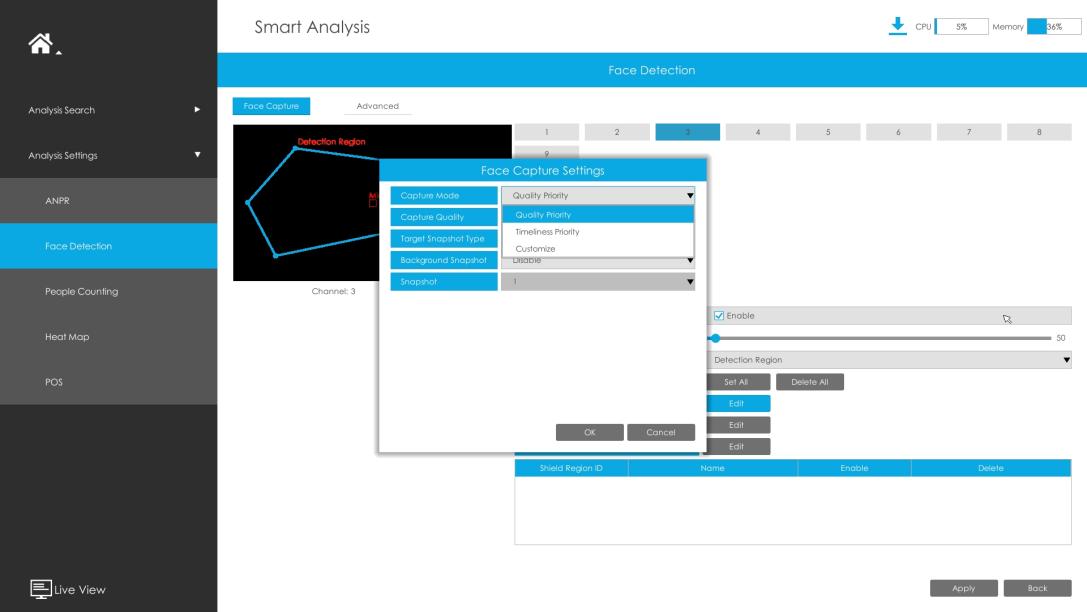
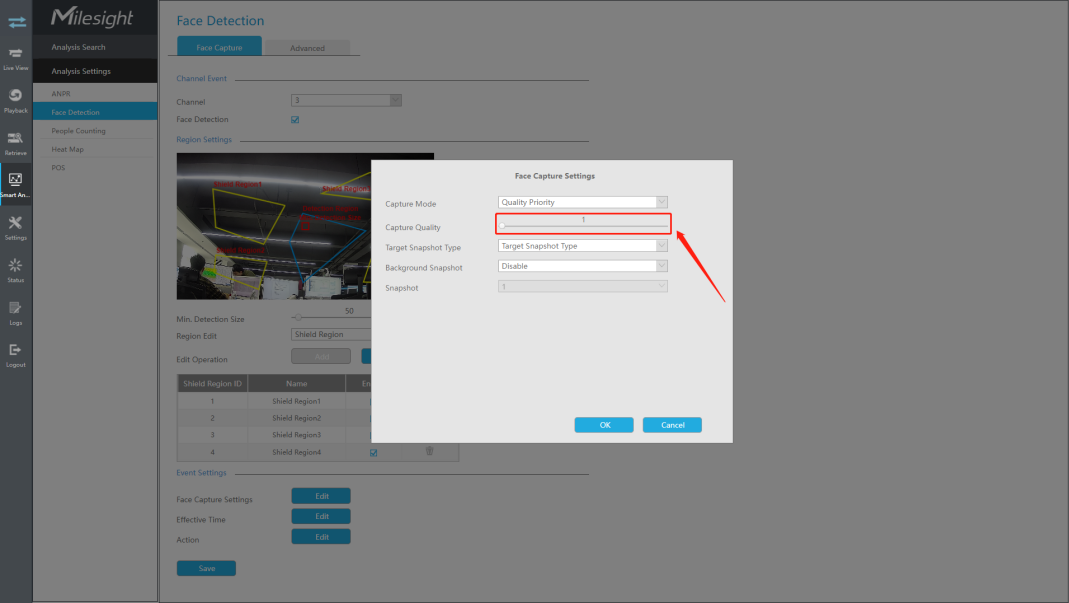
In Quality Priority mode, you can set the capture quality from 1 to 100, and the value will determine the face image quality. Therefore setting a high capture quality can result in missing some unclear captures.
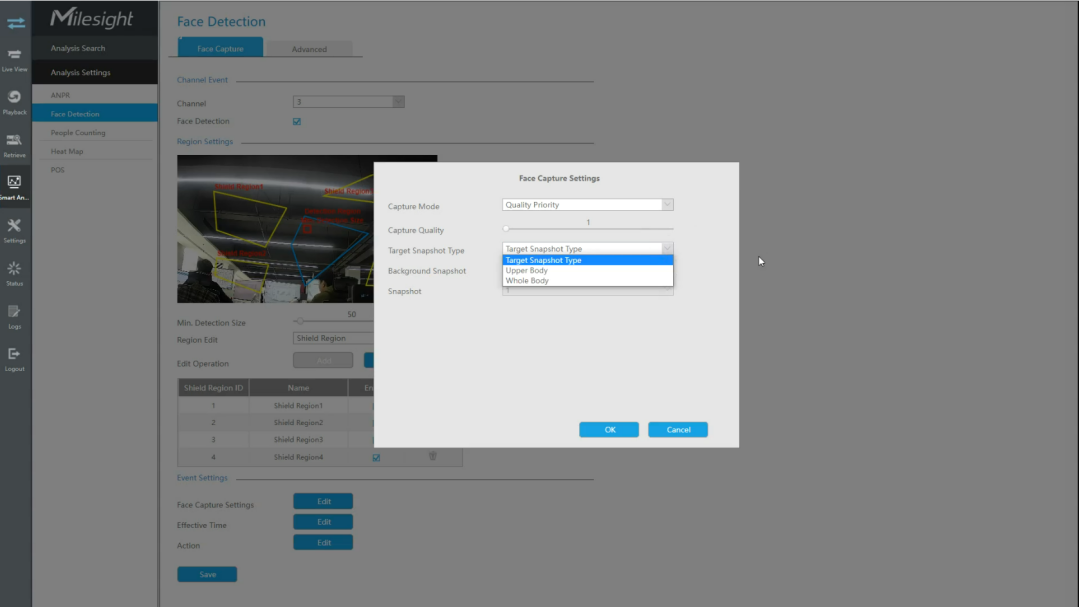
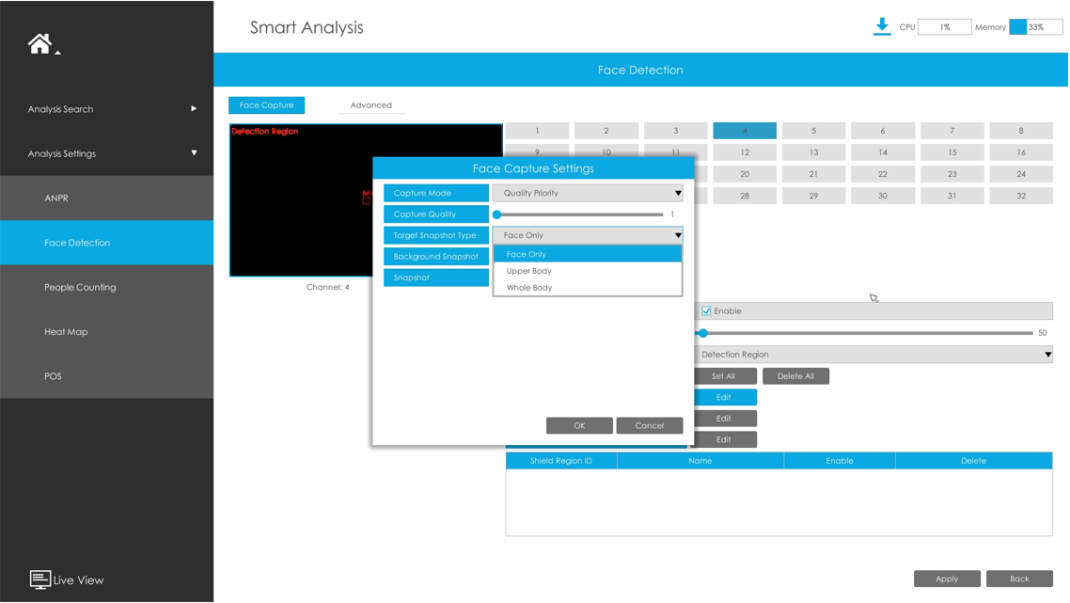
Considering the needs of different users, various target snapshot types can be selected on the Mileage NVR. After setting the snapshot type, you will get the corresponding captures
• Target Snapshot Type
• Upper Body
• Whole Body
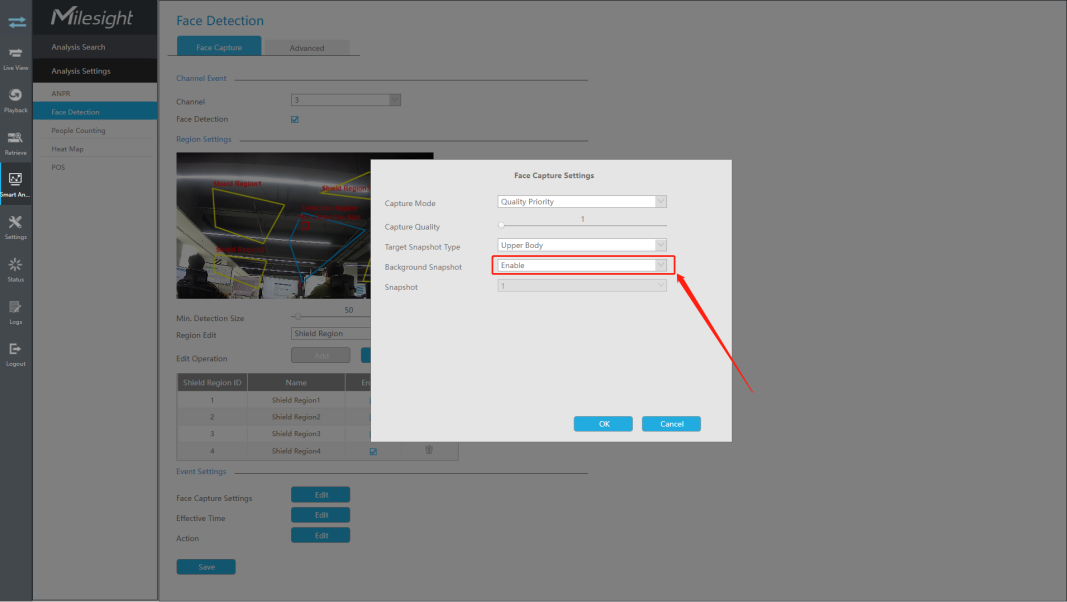
If you want to obtain the background info at the same time. Select Enable to activate Background Snapshot.
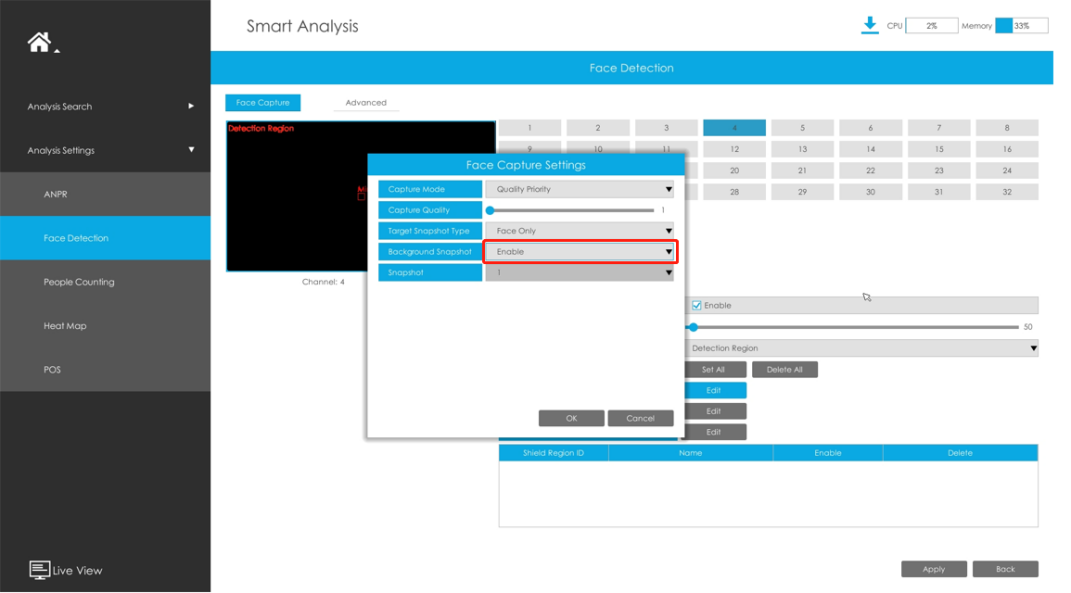
Note: Only one high-quality snapshot will be generated after the AI algorithm comparison.
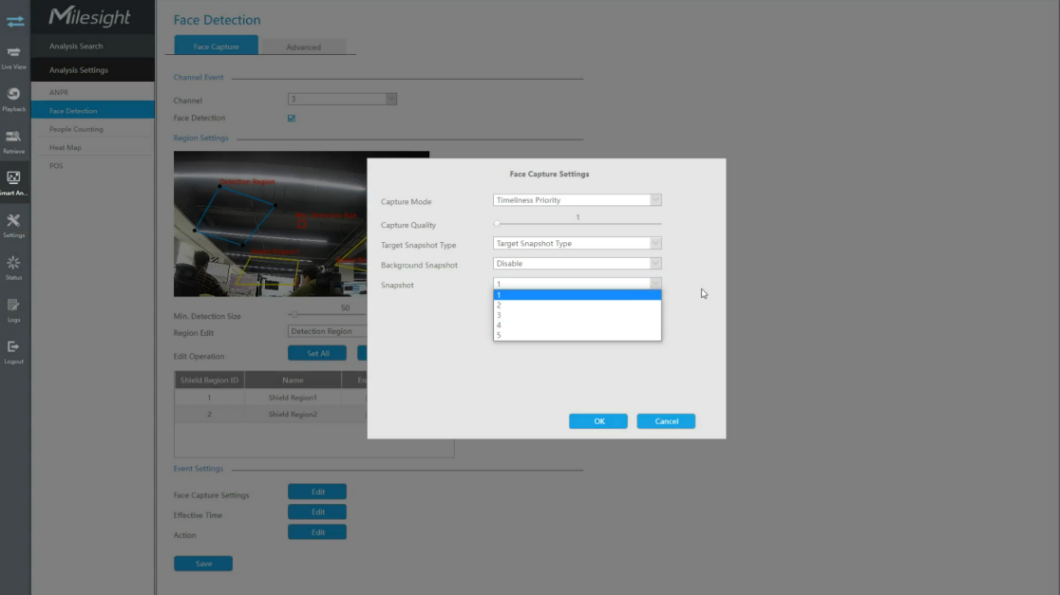
In Timeliness Priority mode, the mechanism is to capture the face info in a more instant way. So you can choose the quantity of the Snapshots.
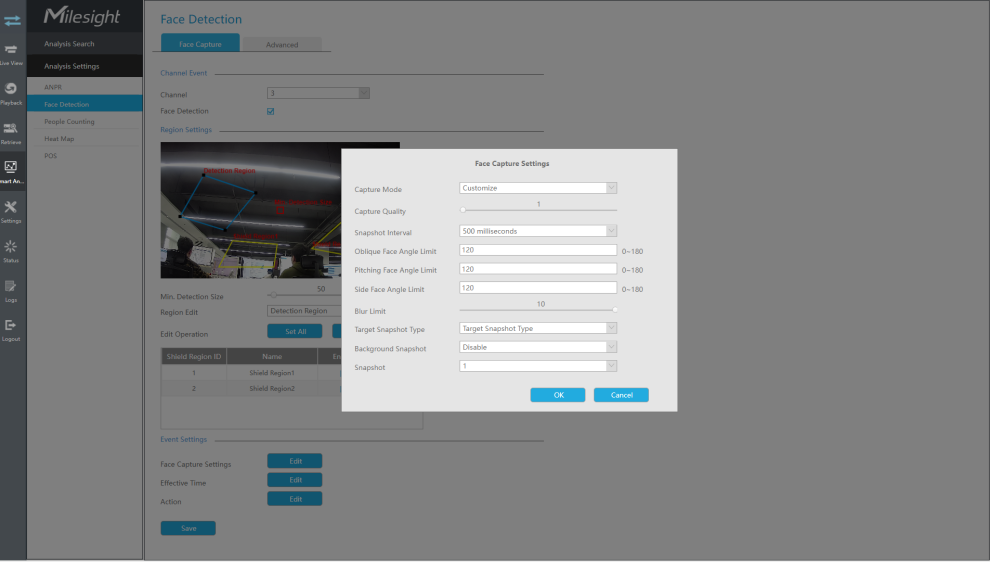
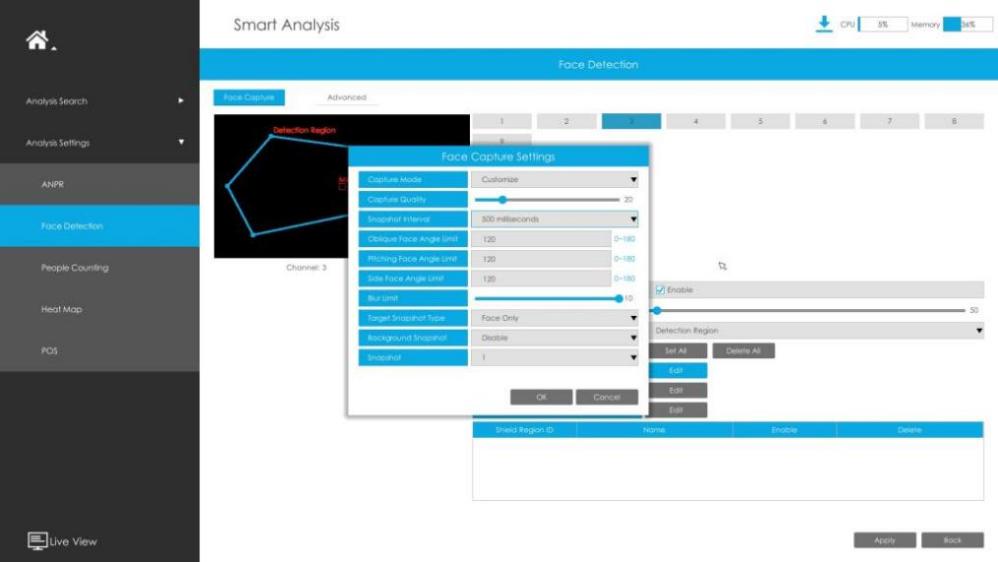
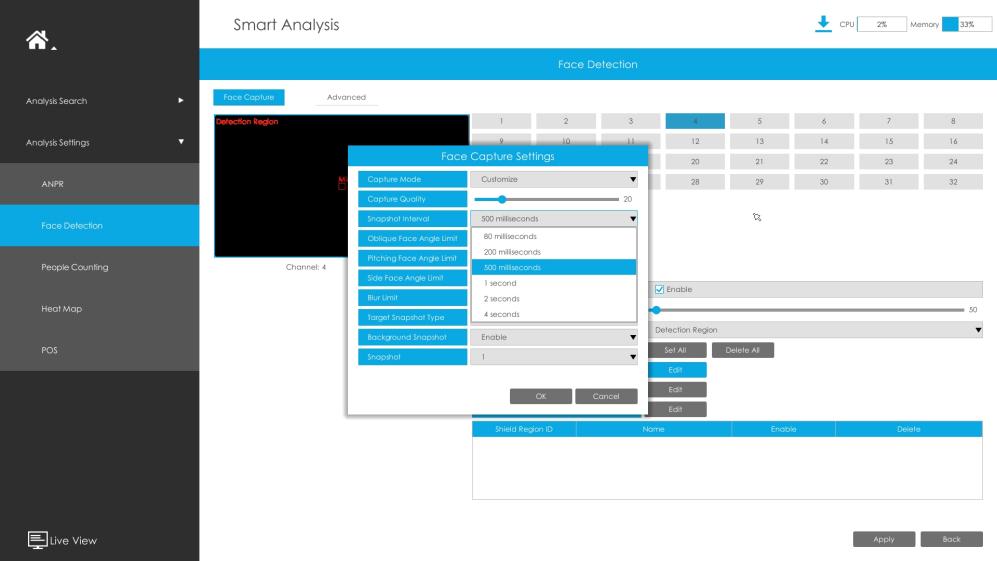
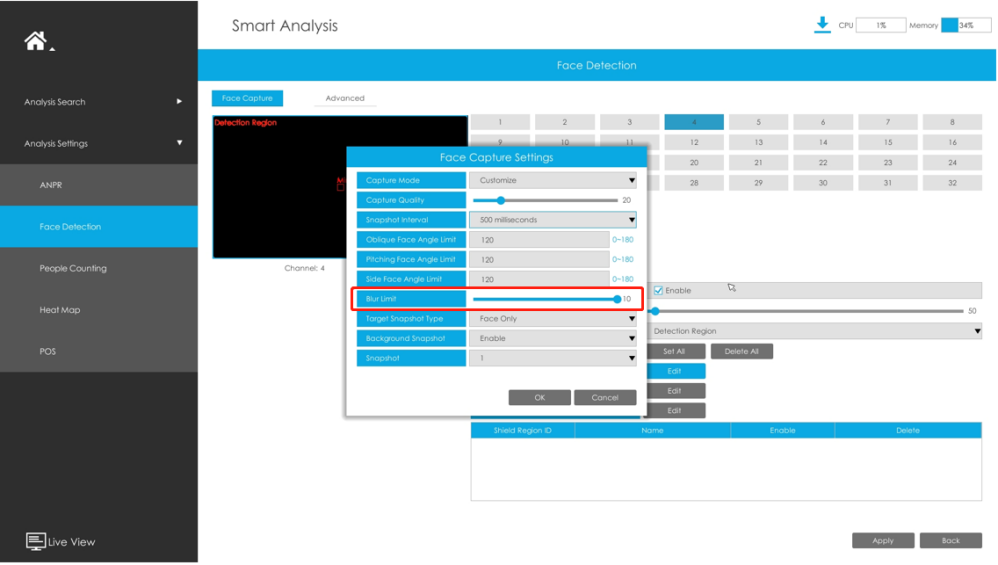
In Customize mode, you can configure the face capture parameters at will. Generally you can customize the face capture from three aspects, Interval, Angle, and Blur.
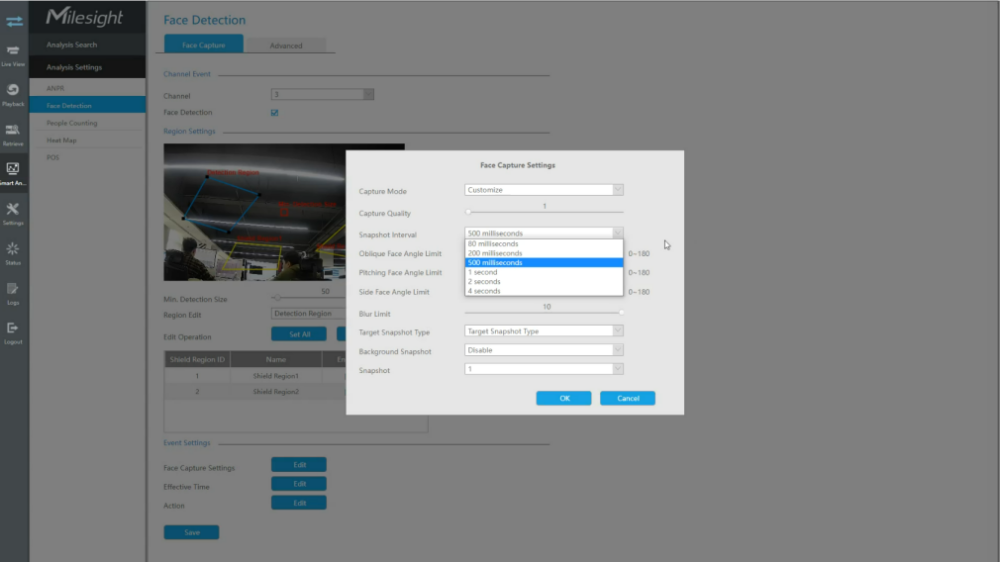
As the picture shows, there are 6 snapshot intervals to select. The lower value you set the more frequently the snapshots will take.
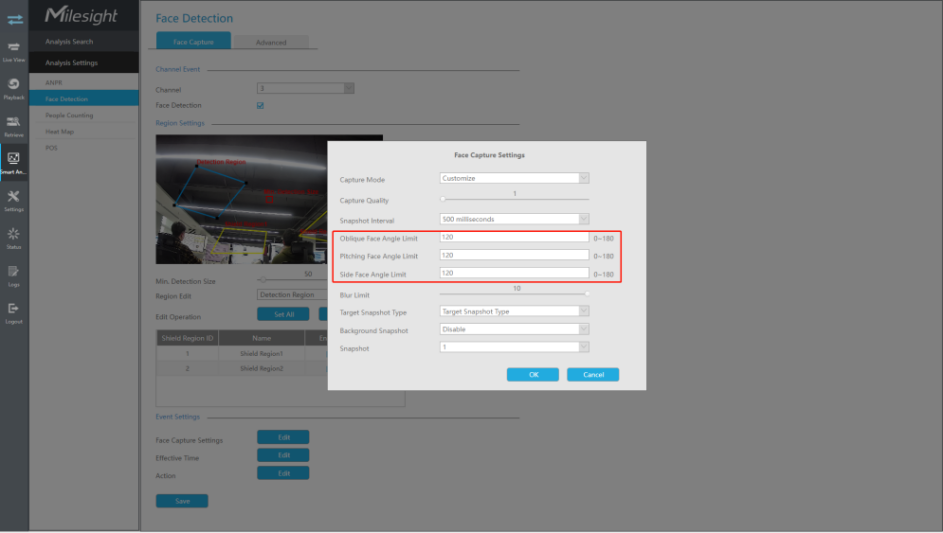
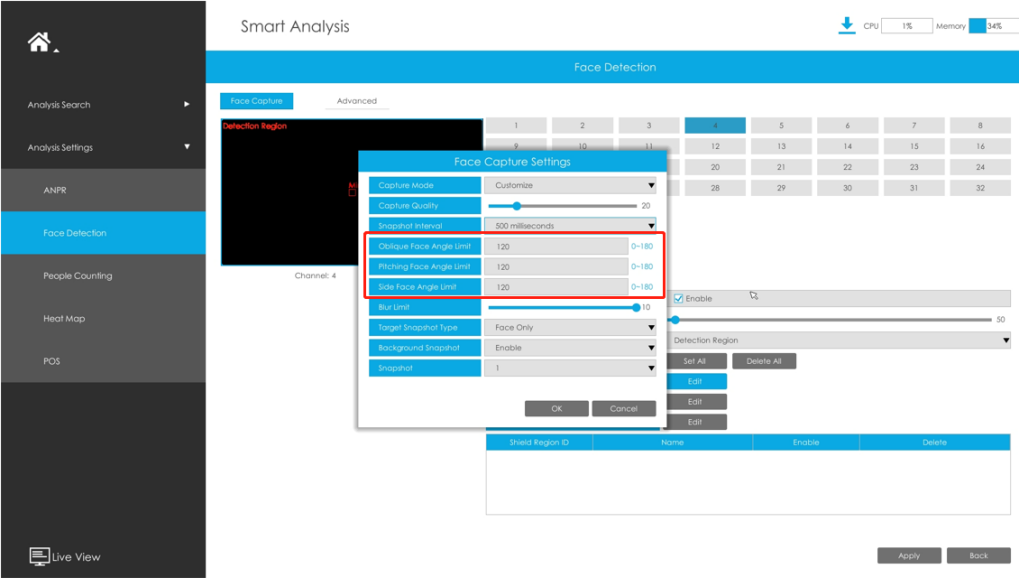
Since the camera captures human face from various angles, adjusting the Oblique Face Angle Limit, Pitching Face Angle Limit and Side Face Angle Limit will greatly help you to gain the high quality snapshots. If any angle of the snapshots is higher than the limit, the AI algorithm will discard it automatically.
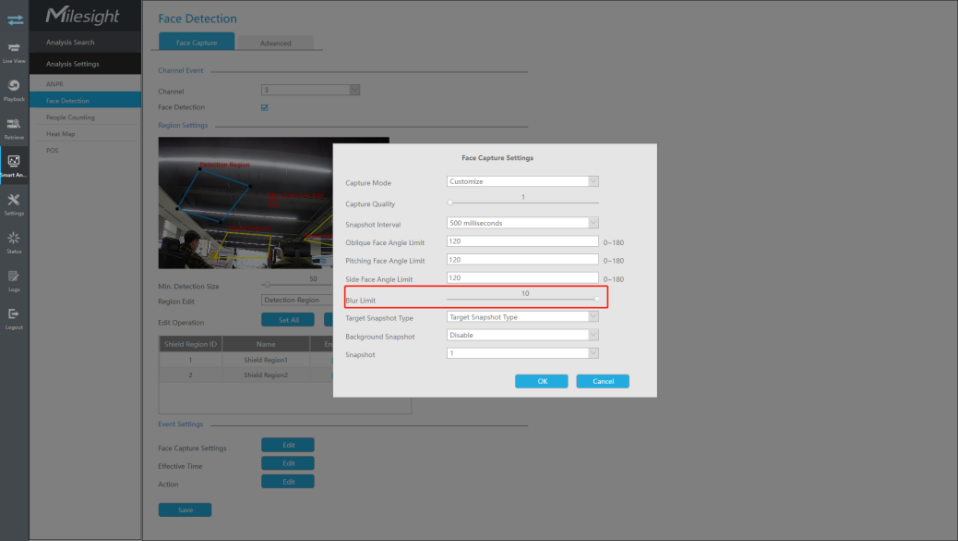
Obviously the image can be affected by some quick motions. So the blur should be taken into high consideration .
If the blur value of the capture is higher than the blur limits you set, it will be filtered. The blur limit is from 1 to 10.
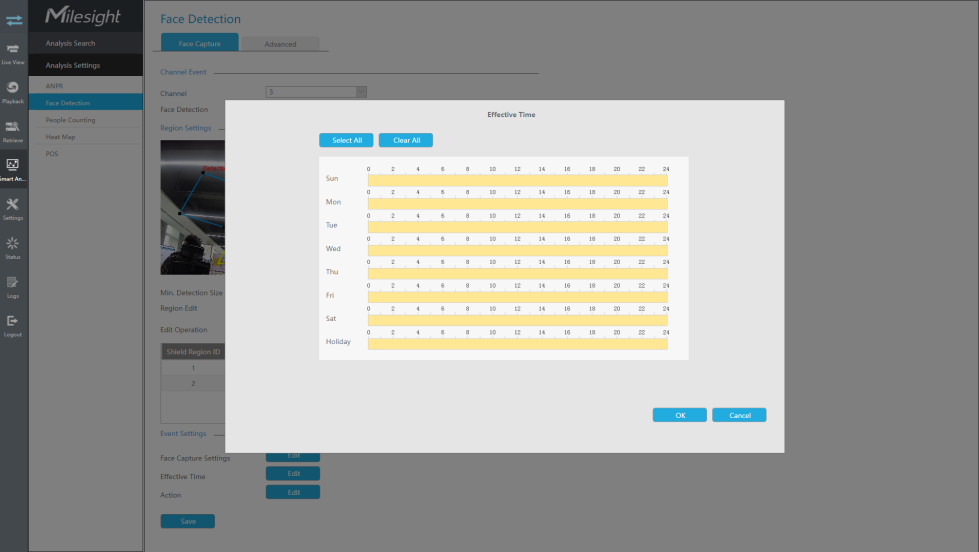
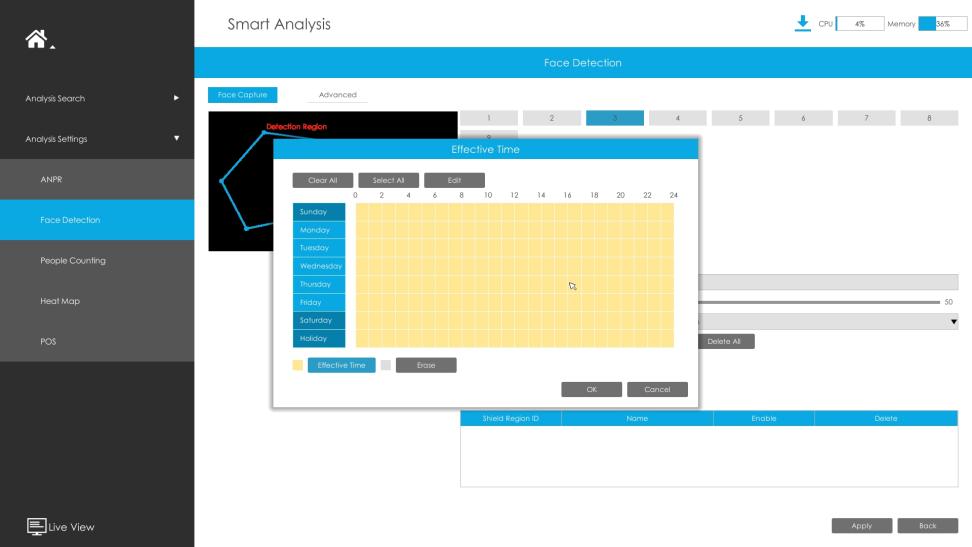
2. Effect Time
You can set the schedule to make face detection take effect during the corresponding period.
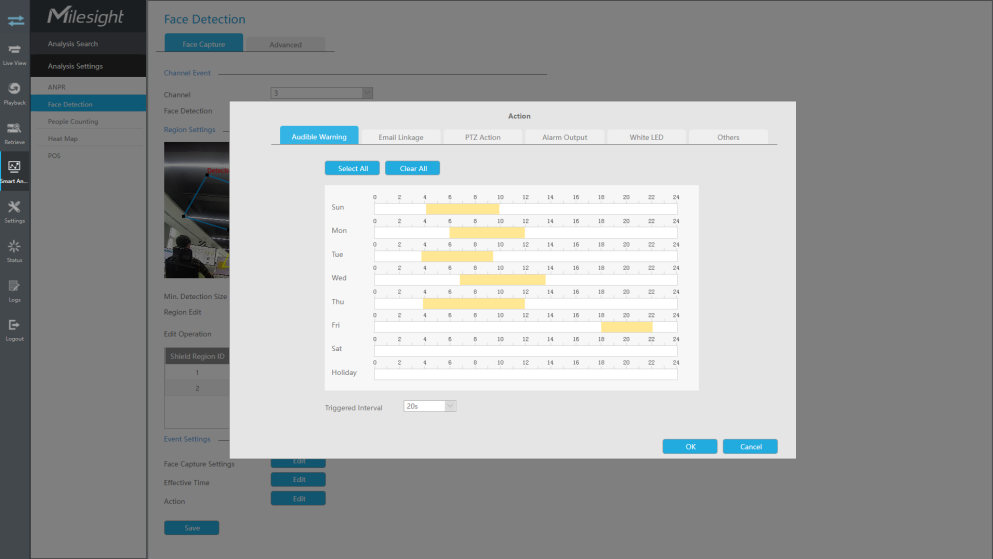
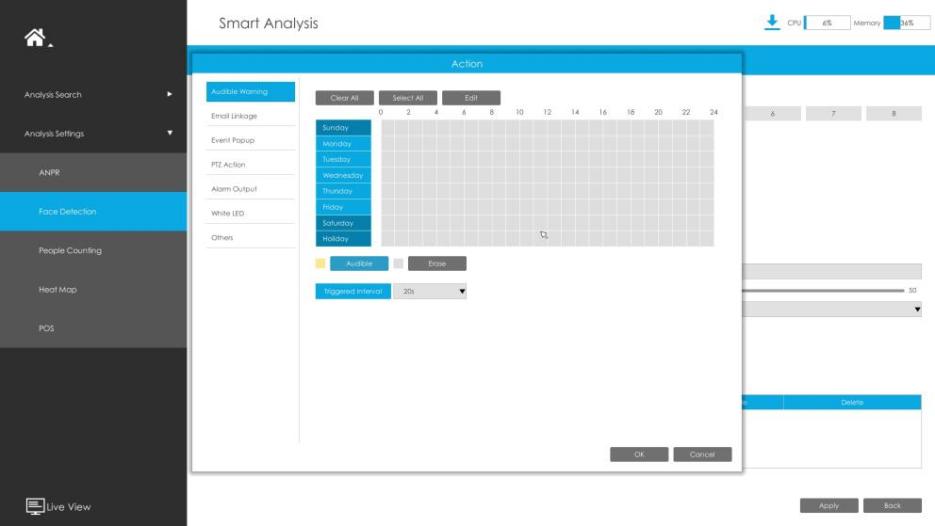
3. Action
When the face is detected, it will trigger the relative action. And you can select time slots to decide when the setting will function.
4. Advanced
Click Edit to configure Attribute Recognition parameters. The AI algorithm will judge the face capture by the attributes you set.
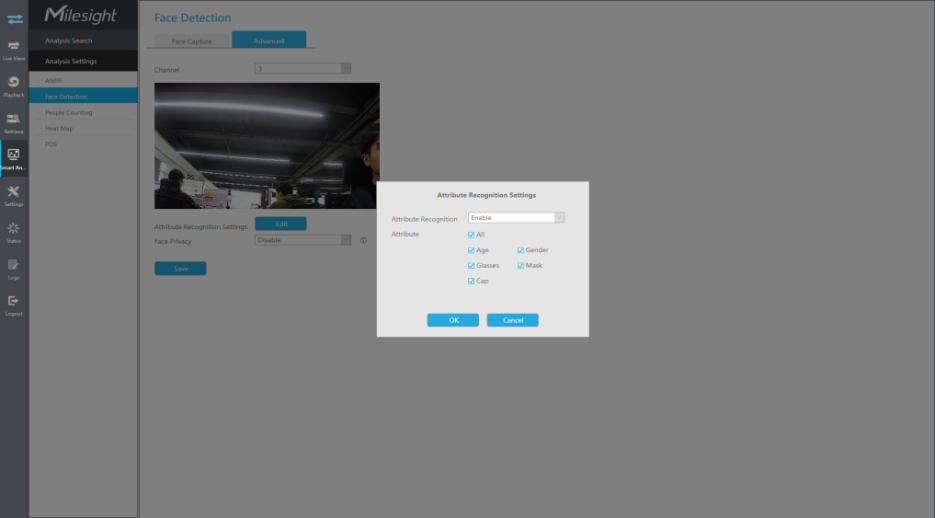
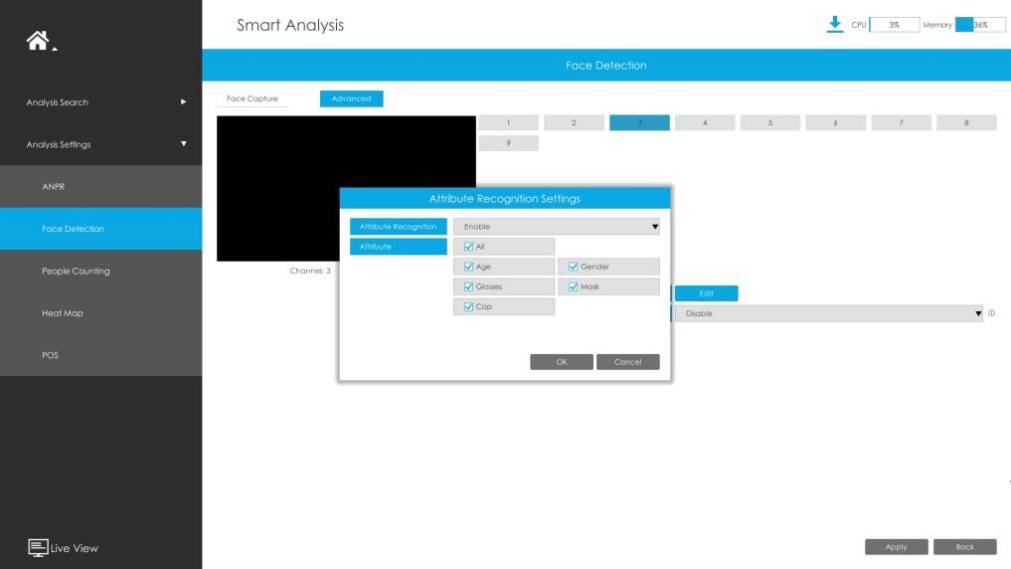
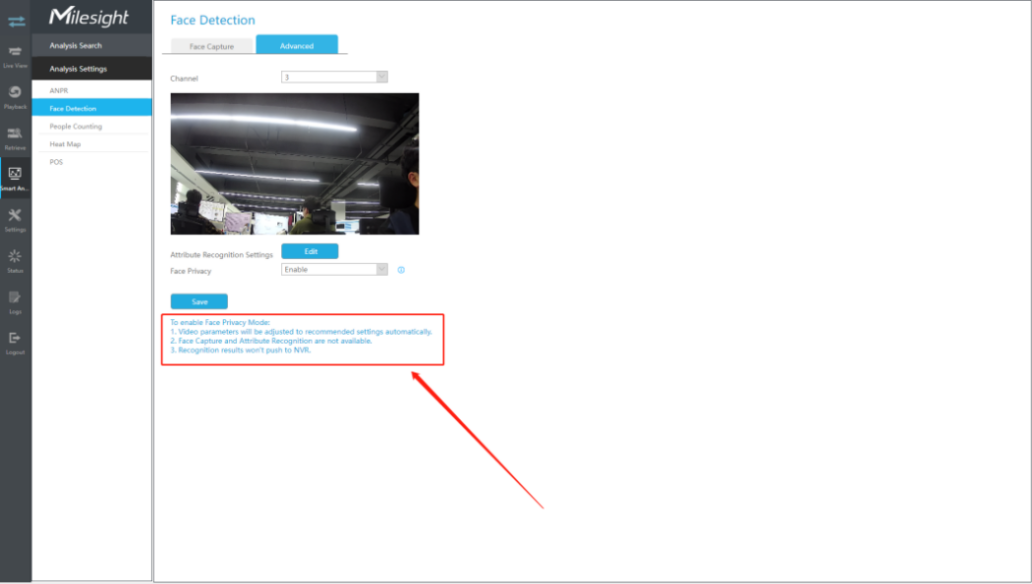
If you enable Face Privacy, please pay attention to the tips as the picture shown.
5. Face Detection Search
1. Select the desired channel.
2. Select the filtered attributes.
• Age: Child, Adult, Elderly.
• Gender: Male, Female.
For glasses, mask and cap, you can choose Yes/No to decide the judging tags.
All means the search will display the whole capture records. Also choose N/A to ignore the attributes on the capture.
3. Select the start time and end time, which can enhance the search efficiency.
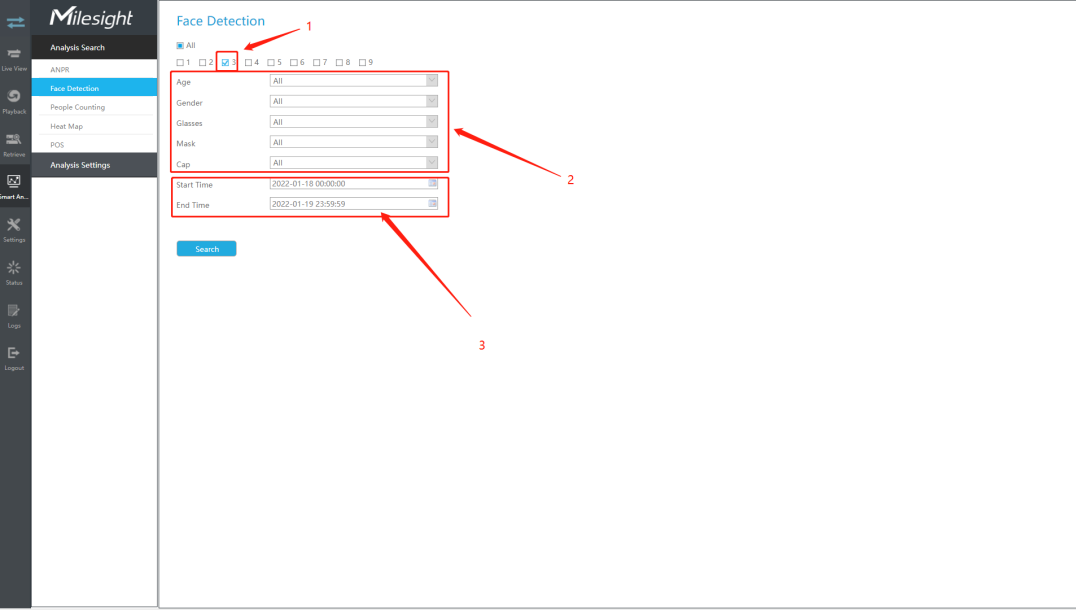
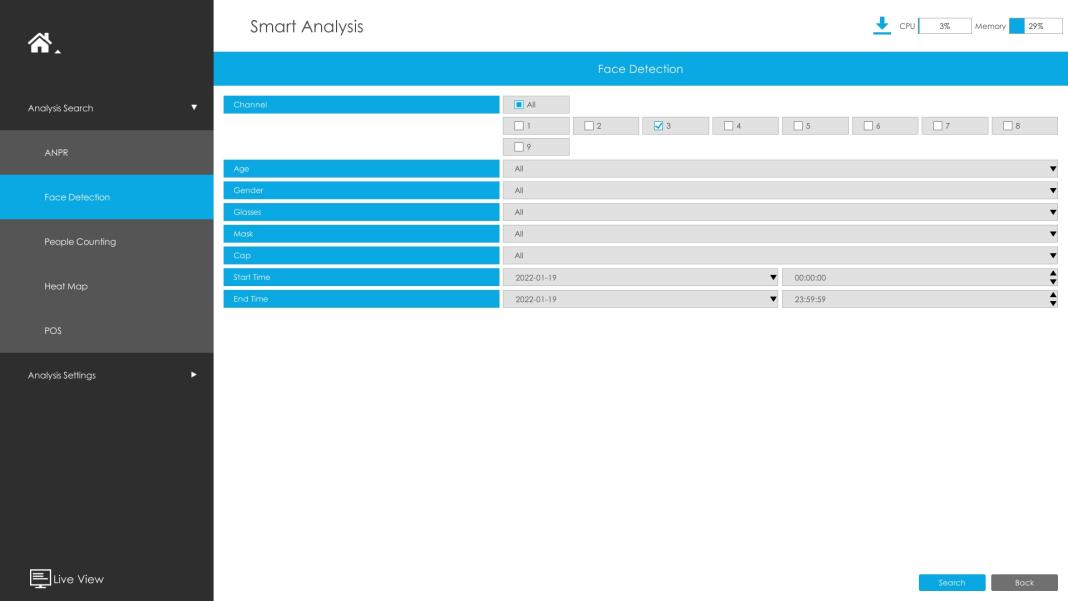
4. Click Search to retrieve the face captures.
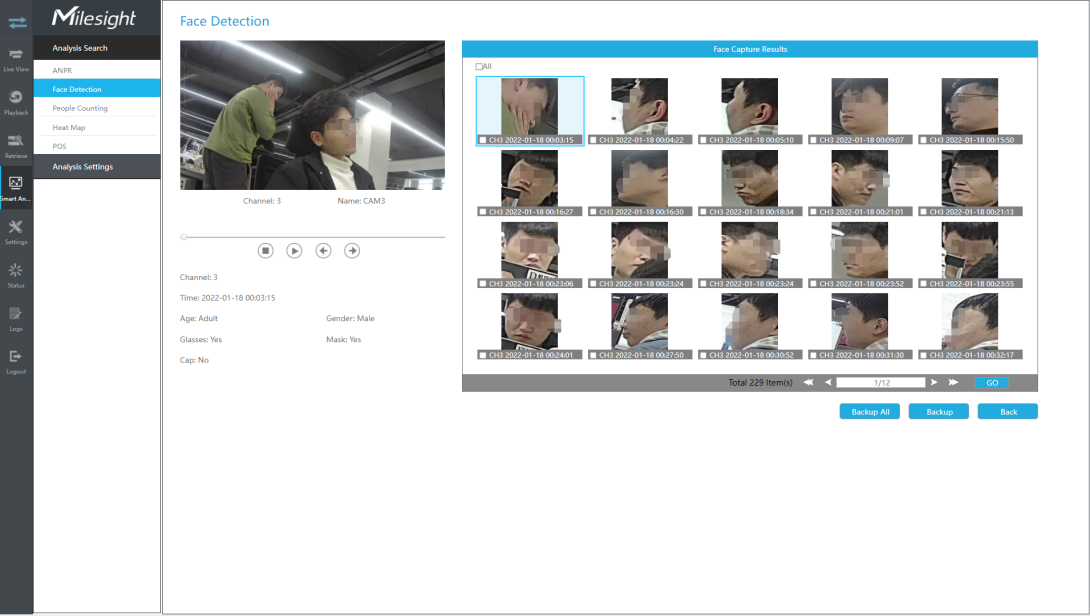
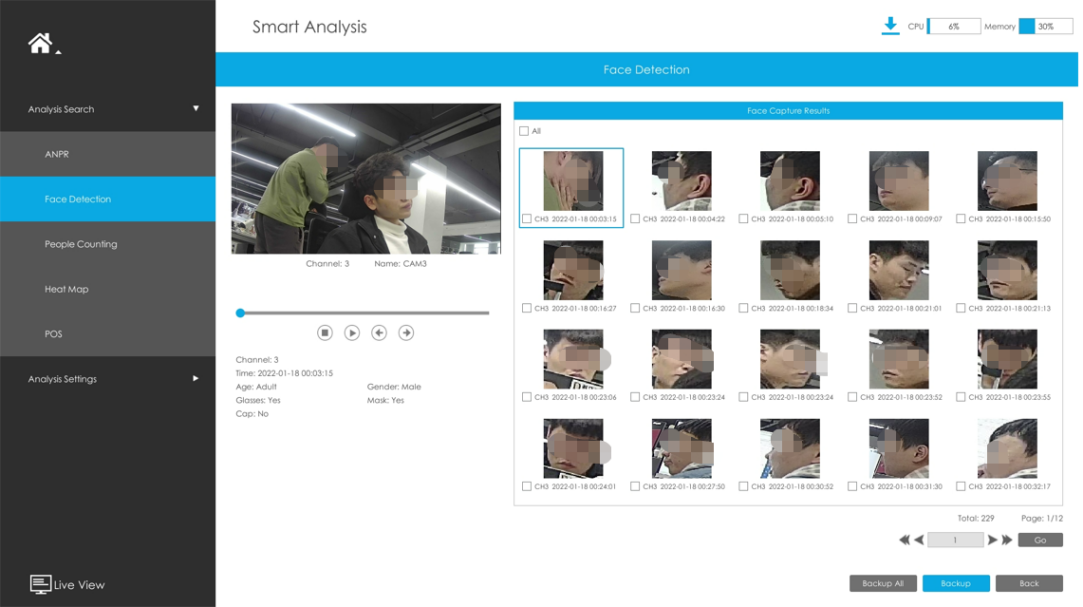
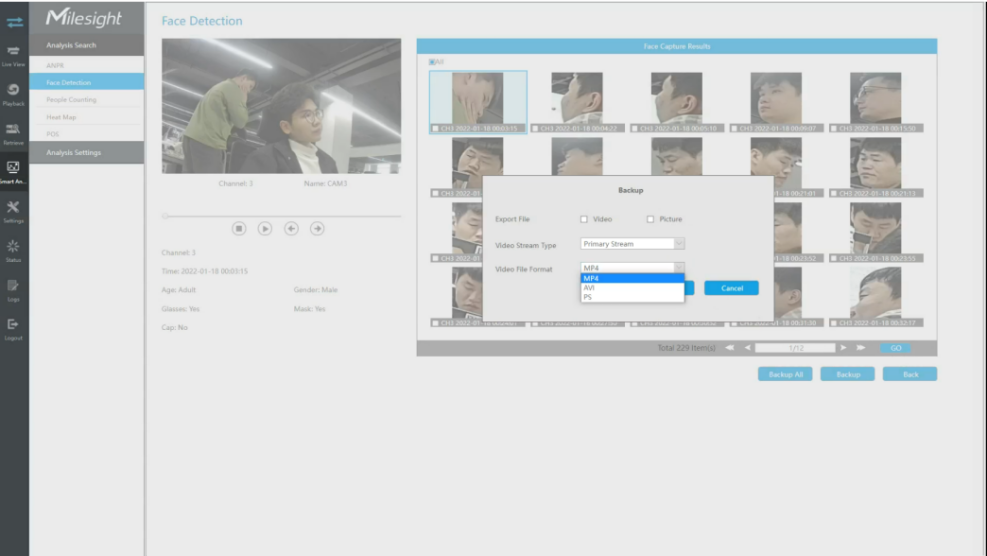
5. Click Backup All to one-click back up all snapshots. Also you can select the desired snapshots then click Backup.
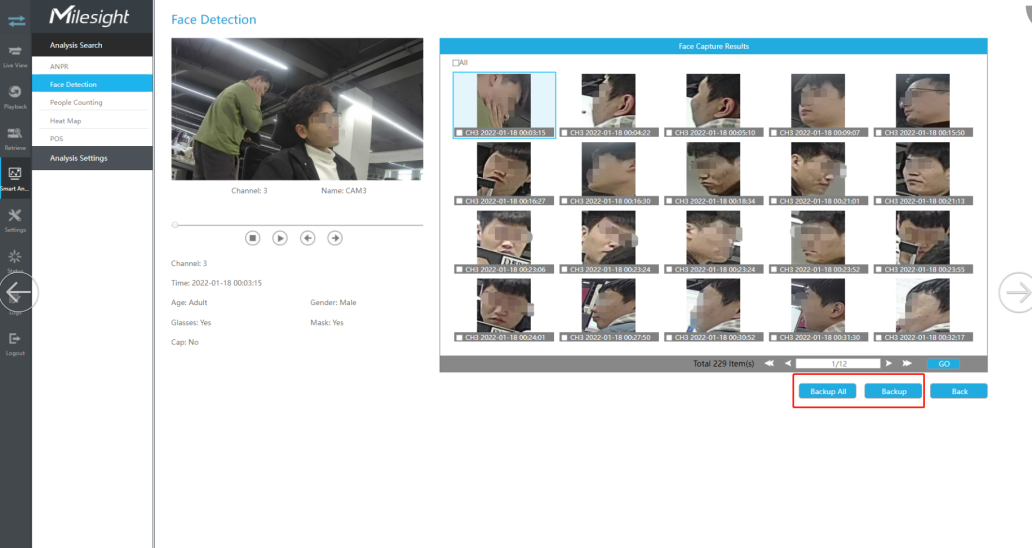
You can choose to export the video or picture.
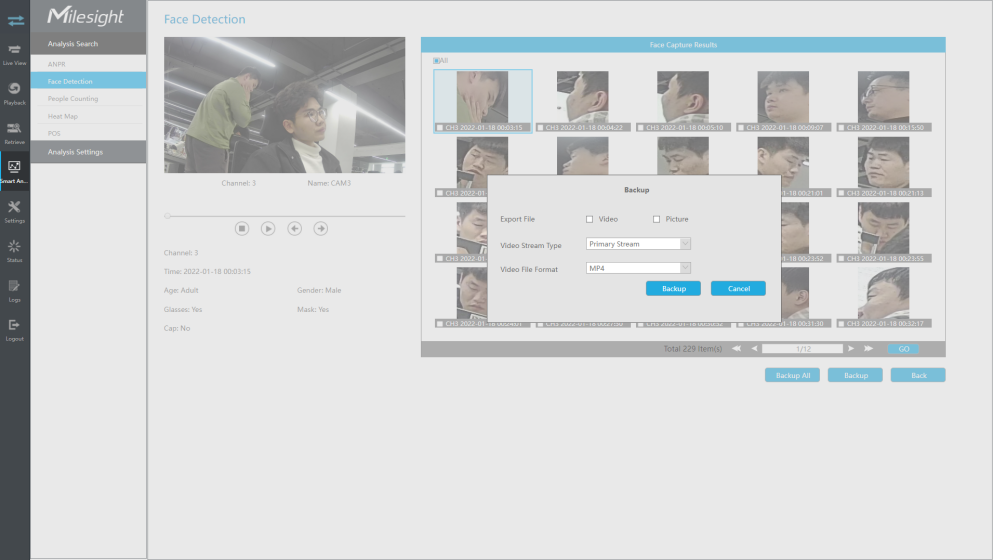
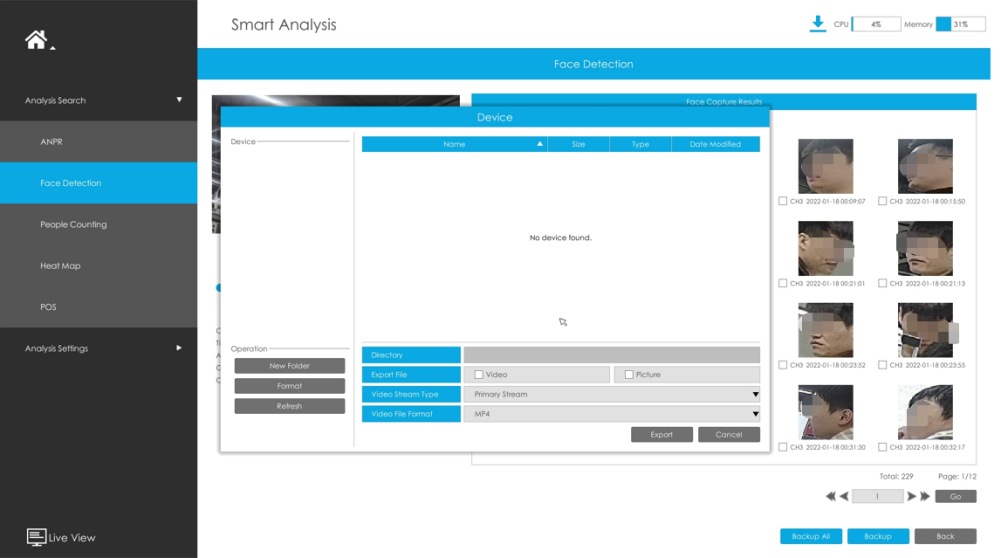
Note: It is required to set up the external equipment to export the video and picture on Local.
Moreover, it is supported to select the video stream type so you can export the Primary stream, Secondary stream even Primary + Secondary stream according to your actual storage condition.
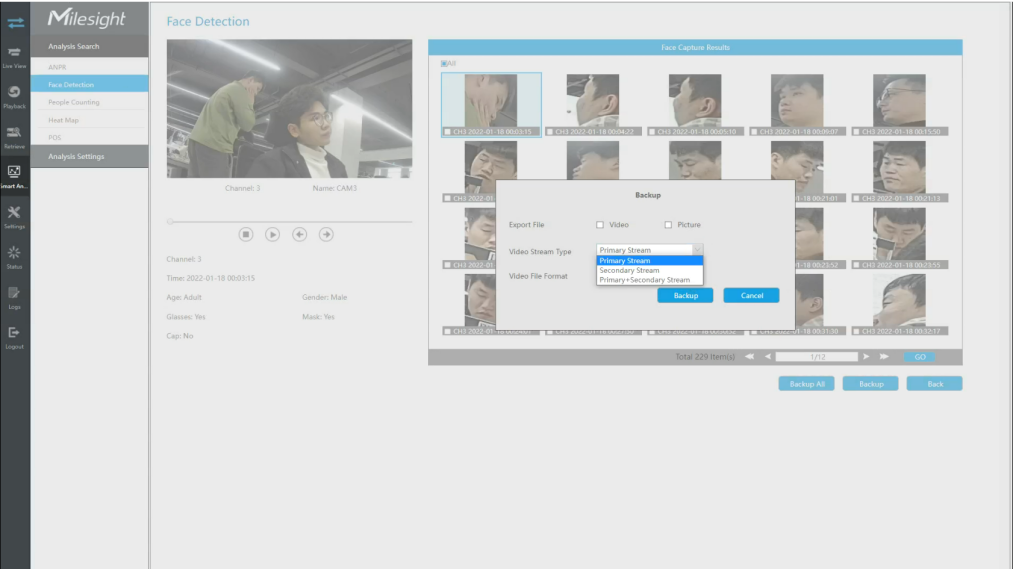
To match more players, the export file supports various formats.
-END-