
1. What is ANPR
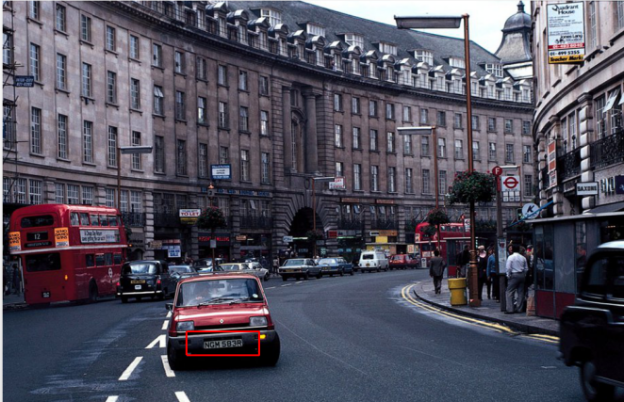
ANPR(Automatic Number Plate Recognition) is a technology that uses optical character recognition on images to read vehicle registration plates. For Milesight, the ANPR algorithm is embedded in cameras, which allows the cameras to recognize, capture and upload license plate images all alone and intelligently.
2. Why Milesight ANPR Solution
• Quick Capture & Accurate Recognition
• Accurate License Plate Identification Under all kinds of conditions
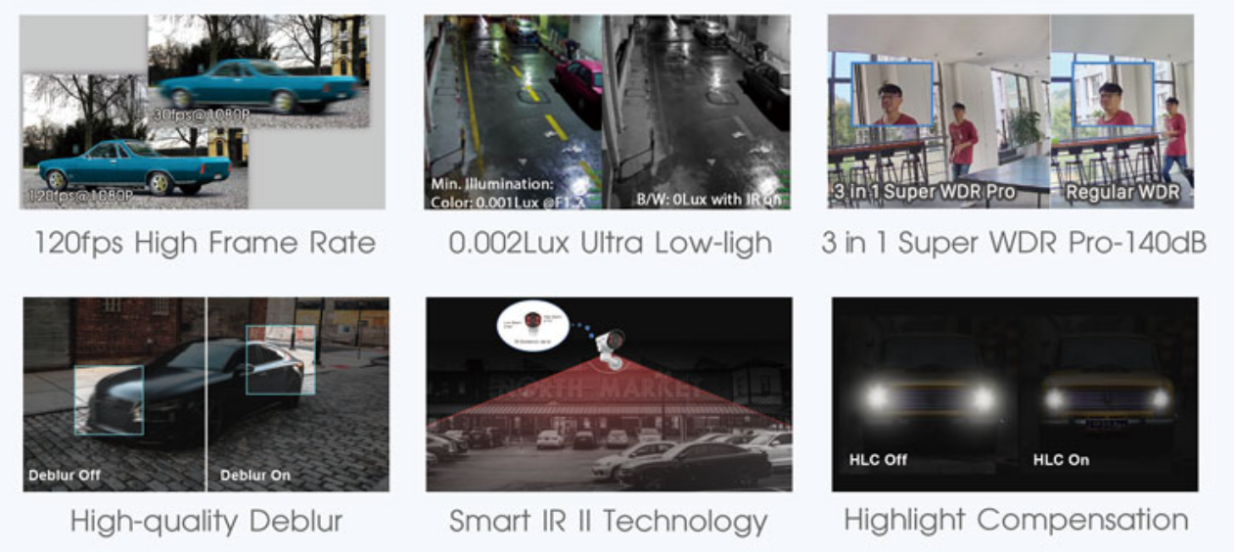
• High-reliability License Plate Recognition with more than 95% high performance accuracy
1. Up to 4 Detection Regions
2. Reliable Confidence Level
3. Vehicle Direction Recognition
4. Detection Regions of PTZ
5. DACH Region Recognition
• Intelligent Analysis & Efficient Management
• White and Black List Management
• A Stand-alone ANPR Solution
• Fully Integrated with Milesight NVR/CMS/VMS Enterprise
• 3rd Integration: CGI
• Adaptable to Most Operation Requirements
• Max recognition speed 120 km/h
• Over 70 countries and regions
• Various options
LPR 12X H.265+ AF Motorized Pro Bullet Network Camera
LPR 12X H.265+ Mini PTZ Bullet Network Camera
LPR H.265+ ABF Pro Box Network Camera
LPR H.265+ Mini Bullet Network Camera
LPR H.265+ Vandal-proof Motorized Mini Bullet Network Camera
LPR H.265+ Motorized Pro Bullet Network Camera
• Installation Angle Considerations
To increase the accuracy of license plate recognition, be sure to install the LPR cameras properly to capture the license plates with the correct image size, lighting conditions and installation angle. The following highlights are the precautions of installation angle:
1. Installing the camera in front of the vehicle (Recommended):
The captured image should be filled with a full width of the vehicle.
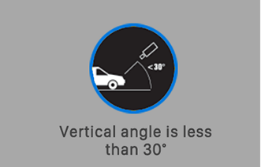
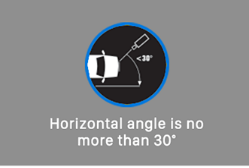
2. Installing the camera slightly to the side:
To avoid capturing unnecessary contents in the image, the camera should be installed in a higher position(Vertical angle is less than 30°; Horizontal angle is no more than 30°; Tile angle is less than 5°) to capture the front part of the vehicle.
|
|

3. Countries/Regions that support ANPR
Currently, we have three kinds of LPR, including LPR1, LPR2 and LPR3. LPR1 is used in Asian region, LPR2 is for European region, and LPR3 is for Korea. It covers over 70 countries and regions.
LPR1:
Country/Region | Abbreviation | Country/Region | Abbreviation | |
Angola | AGO | Macau, China | MAC | Support |
Australia | AUS | Malaysia | MYS | Support |
Brazil | BRA | Saudi Arabic | SAU | Support |
Chile | CHL | Singapore | SGP | Support |
Hong Kong, China | HKG | South Korea | KOR | Support |
India | IND | Taiwan, China | TWN | Support |
Indonesia | IDN | Thailand | THA | Support |
Iran | IRN | Turkey | TUR | Support |
Israel | ISR | United States (California Only) | USA | Support |
Japan | JPN | Vietnam | VNM | Support |
LPR2:
Country/Region | Abbreviation | Country/Region | Abbreviation | |
Albania | ALB | Lithuania | LTU | Support |
Austria | AUT | Luxembourg | LUX | Support |
Belgium | BEL | Macedonia | MKD | Support |
Bosnia /Herzegowina | BIH | Malta | MLT | Support |
Bulgaria | BGR | Montenegro | - | Support |
Croatia | HRV | Netherlands | NLD | Support |
Cyprus | CYP | Norway | NOR | Support |
Czech Republic | CZE | Poland | POL | Support |
Denmark | DNK | Portugal | PRT | Support |
Estonia | EST | Romania | ROU | Support |
Finland | FIN | Serbia | SRB | Support |
France | FRA | Slovakia | SVK | Support |
Germany | DEU | Slovenia | SVN | Support |
Greece | GRC | Spain | ESP | Support |
Hungary | HUN | Sweden | SWE | Support |
Iceland | ISL | Switzerland | CHE | Support |
Italy | ITA | Turkey | TUR | Support |
Ireland | IRL | The United Kingdom | GBR | Support |
Israel | ISR | Vatican city state | VAT | Support |
Latvia | LVA | - | Support | |
CIS (former Soviet Union)
Country/Region | Abbreviation | Country/Region | Abbreviation | |
Armenia | ARM | Moldova | MDA | Support |
Azerbaijan | AZE | Russian Federation | RUS | Support |
Belarus | BLR | Tajikistan | - | Support |
Georgia | GEO | Turkmenistan | TKM | Support |
Kazakhstan | KAZ | Ukraine | UKR | Support |
Kirgizstan | - | Uzbekistan | UZB | Support |
4. How to set ANPR with Milesight Network Cameras
4.1Settings
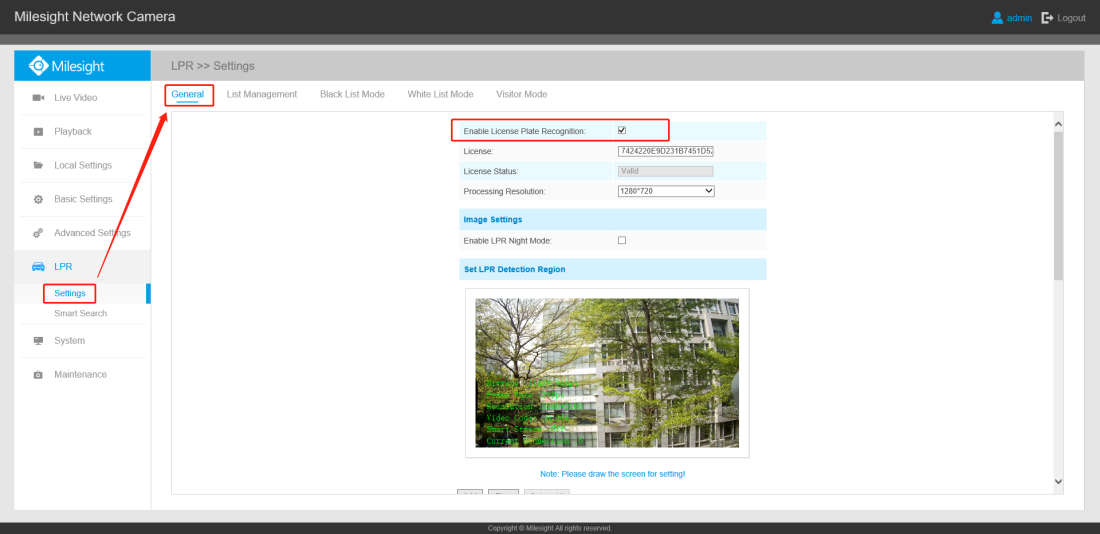
Step1: Go to“LPR”->“Settings”,after log in the web.
Check the checkbox “Enable License Plate Recognition”, and you can draw the screen to select the areas interested. There will be shown in the blue box as below.
[License]: A license will be automatically assigned to each device.
[License Status]: This column is used to display the status of the license, “Valid”or “Invalid”.
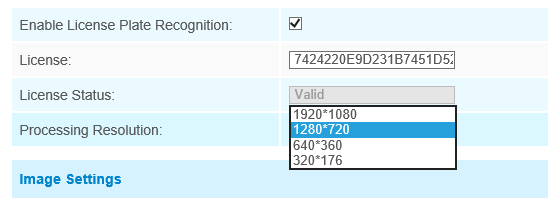
[Processing Resolution]: Default resolution selected is 1280*720. You can choose different resolution according to the network environment.
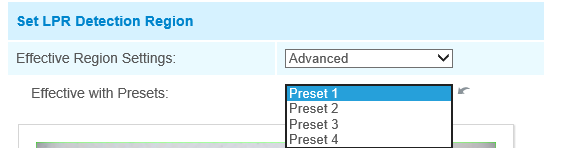
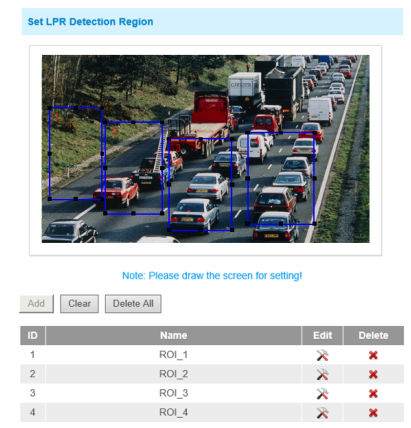
[Set LPR Detection Region]: You can set up to 4 ROI areas by drawing the screen. If you choose Normal Mode, it supports configuring the LPR detection regions for the current area. If you choose Advanced Mode(Only for PTZ series), it supports configuring different LPR detection regions for different PTZ presets(Only support Preset 1~4 so far).
Notes:
• The optimal interval of Milesight LPR cameras to recognize license plates is within 130-300 PX.
• For better performance, please choose the appropriate resolution in advance.
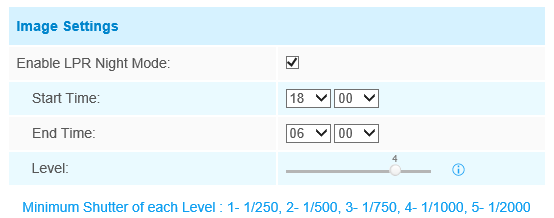
[LPR Night Mode]: Achieve the best effect of LPR night recognition by adjusting different parameter levels. You can also schedule the Start Time and End Time, and adjusting the level according to the environment.
Step2: Schedule Settings. You can draw the schedule by clicking“Edit”button. And then click “Save” or “Reset” after finishing the setting.
|
|
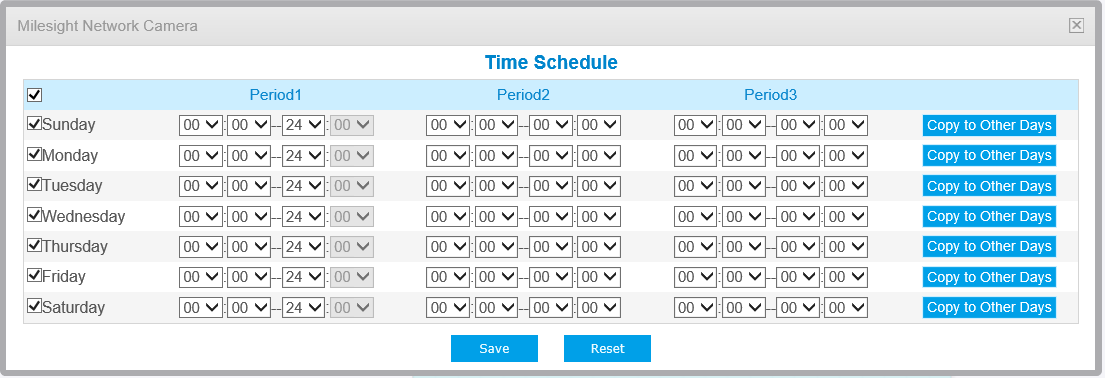
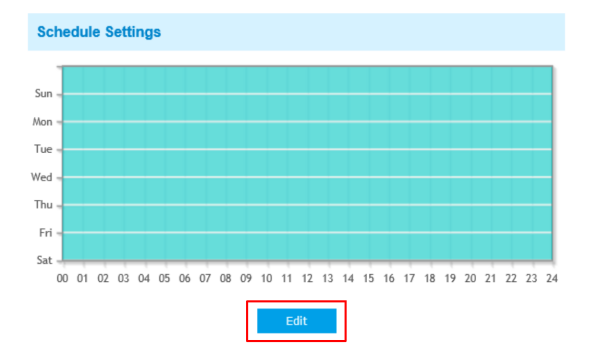
Step3: Detection Settings and LPR Message Post Settings.
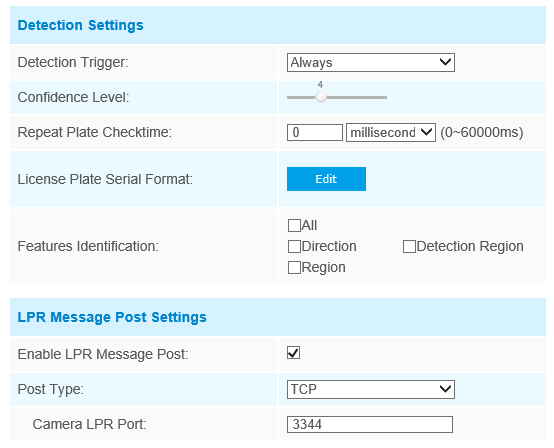
[Detection Trigger]: If you choose “Always”, camera will always detect the license plate. If you choose “Alarm input”, camera will only detect the license plates when Alarm Input is being triggered.
[Confidence Level]: You can set the confidence level from 1 to 10. When the confidence level of the license plate is higher than the set confidence level, it will push the license plate image to the logs interface.
[Repeat Plate Checktime]: Set the time interval for repeatedly reading license plates to effectively avoid duplicate identification of parking vehicles.
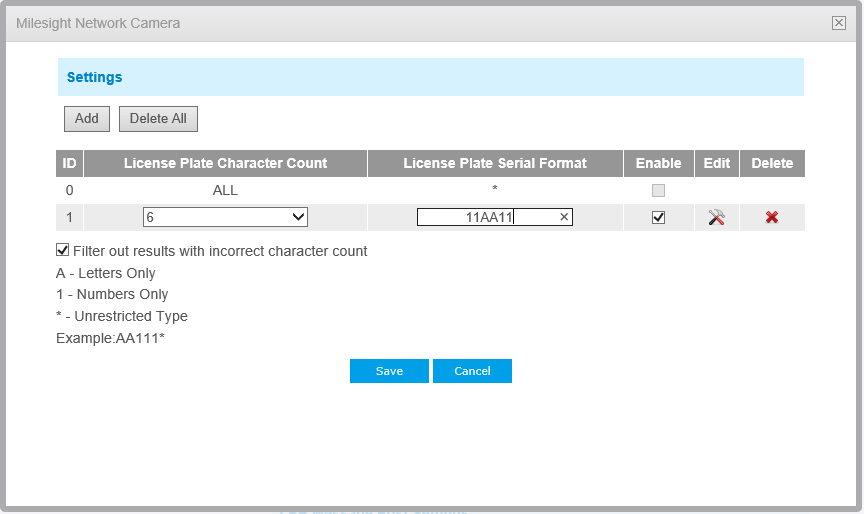
[License Plate Serial Format]: Formulate identification rules and automatically filter wrong license plate information to achieve more intelligent and accurate license plate recognition.
[Feature Identification]: Check Region, Direction, ROI_ID or All to enable Features Identification, it will display the corresponding information on the logs interface.
Note: Region detection only supports DACH region.
[LPR Message Post Settings]: Check the checkbox to enable LPR Message Post. It will push information to some third-party devices or software that are compatible with ours. Information can be pushed by RTSP, TCP or HTTP.
More information about LPR Message Post, please refer to Milesight-Troubleshooting-Integration between LPR Camera and NVR(VMS).
Step4: Don’t forget to click “Save” after finishing all settings.
4.2List Management
Add the license plates to this interface as Black or White type (Black/White List), and then you can set the alarm action for these license plates in the corresponding Black list mode or White list mode interface. When these license plates are detected, the camera will respond to your settings accordingly.
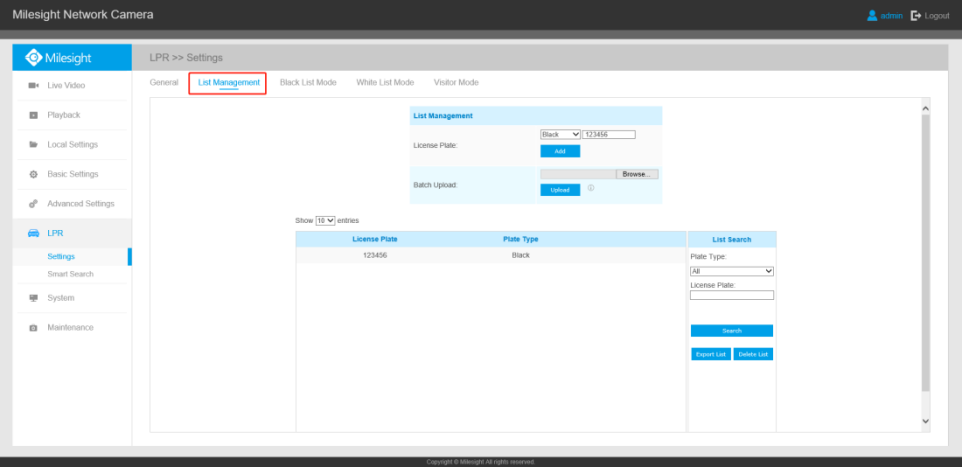
[Add License Plate]: Select the license plate type as black or white, enter the license plate number, click the “Add” button, the license plate number will be added successfully.
[Batch Upload]: You can add a csv file of the license plates you want to add, click the “Browse”button to import the form to this interface, click the“Upload”button, the license plates will be added successfully.
Notes:
• You can firstly download the template as a reference in this interface.
• It allows to add 1000 license plates to Black and White List.
[List Search]: Select Plate Type or directly enter the license plate number, click the “Search”button, the corresponding license plate will be displayed in the list as below.
[Export List]: Click the“Export List”button to export the license plates in the current list as a csv file locally.
[Delete List]: Click the“Delete List”button to delete all the license plates in the current list.
4.3Black /White/Visitor List Mode
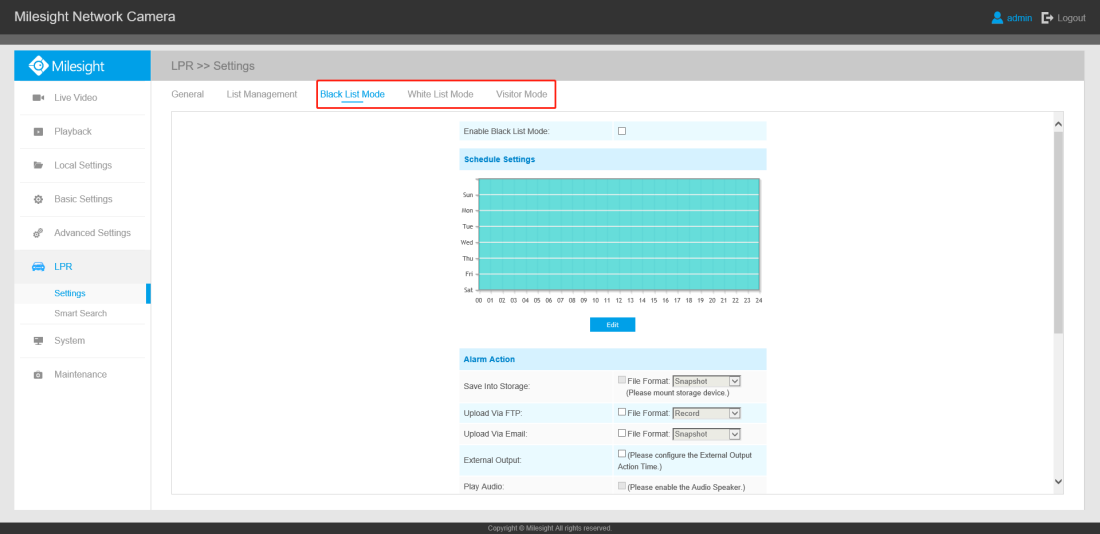
Step1: Check the checkbox to enable Black List Mode.
Step2: Schedule Settings. You can draw the schedule by clicking“Edit”button.
Step3: Set Alarm Action.
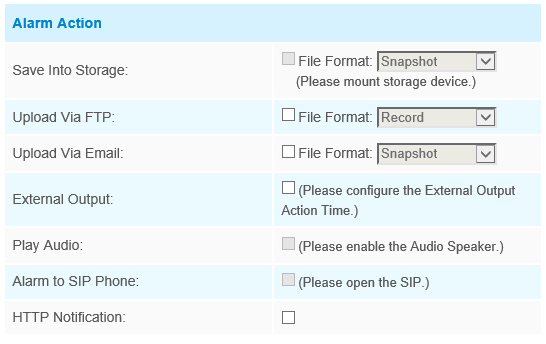
Table 1 Description of the buttons
Parameters | Function Introduction |
Save Into Storage | Save alarm recording files into SD Card/NAS. When NAS and SD cards are both added to camera, storage priority will be given to NAS. |
Upload Via FTP | Upload the recording files via FTP |
Upload Via SMTP | Upload the files via SMTP |
External Output | If the camera equips with External Output, you can enable the action after configuring the trigger duration |
Play Audio | If the camera equips with Speaker, you can enable the action after configuring the audio speaker |
Alarm to SIP Phone | Support to call the SIP phone after enabling the SIP function. |
HTTP Notification | Support to pop up the alarm news to specified HTTP URL. |
Step4: Set Alarm Settings.
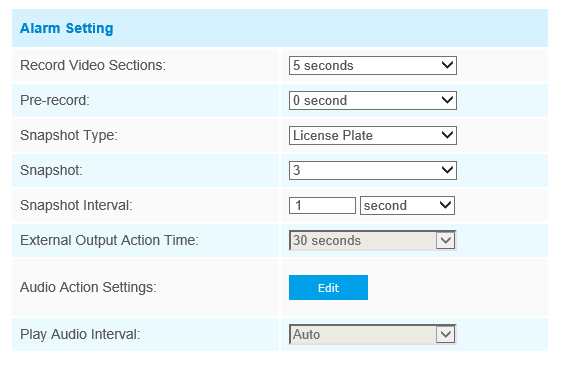
Table 2 Description of the buttons
Parameters | Function Introduction |
Record Video Sections | Six different periods are available(5, 10, 15, 20, 25, 30 sec) |
Pre-record | Reserve the record time before alarm, 0~10 sec |
Snapshot Type | The type of Snapshot, License Plate, Full Snapshot or All. |
Snapshot | The number of snapshot, 1~5 |
Snapshot Interval | It cannot be edited unless you choose more than 1 to Snapshot |
External Output Action Time | Duration of an alarm. It cannot be edited unless you enable the External Output on the Alarm Action firstly. |
Audio Action Settings | Set the audio schedule to trigger different audio files for different alarm actions. Note: The audio files you can upload in “Audio File Manager” interface.
|
Play Audio Interval | Auto/ 10 seconds/ 30 seconds/ 1 minute/ 5 minutes/ 10 minutes are available. |
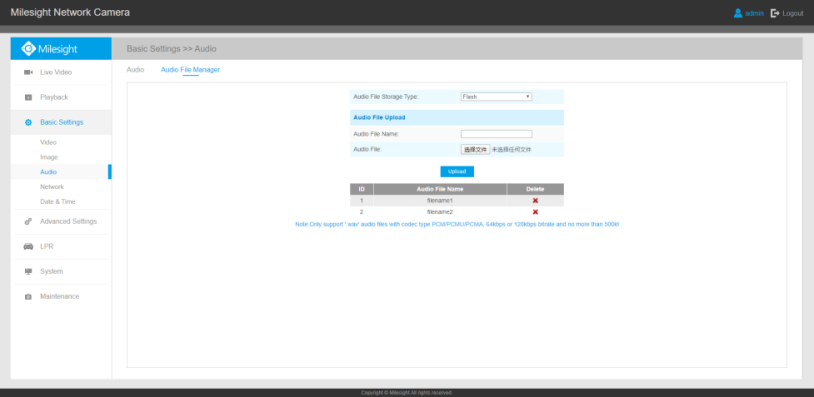
After that, when a license plate marked as“Black”,“White”,“Visitor”is detected, the camera will respond accordingly to your settings.
4.4Professional LPR Liveview Interface
Milesight LPR camera supports professional LPR Live View interface. You can see the real-time license plate recognition results.
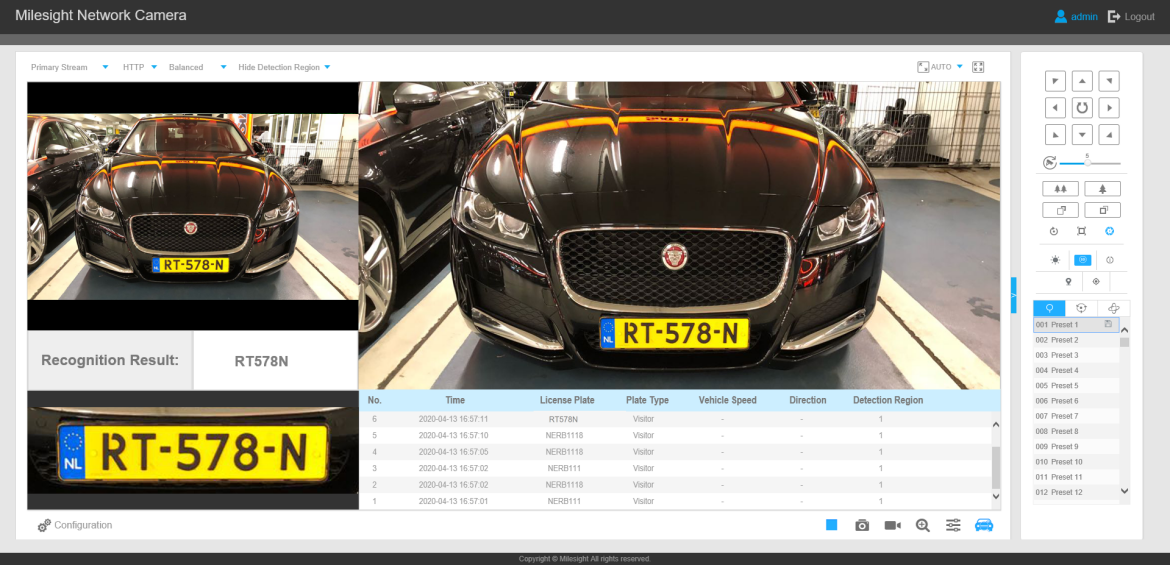
Note:
1. Upgrade your device to corresponded firmware version.
Camera: V4X.7.0.74 or above.
Firmware download link: http://www.milesight.com/support/download#firmware
2. If there is no SD card or NAS as the storage space, the snapshots of license plate will be temporarily stored locally on the PC, cleared after logging out, and do not support Smart Search which will be introduced in the next part.
4.5Smart Search
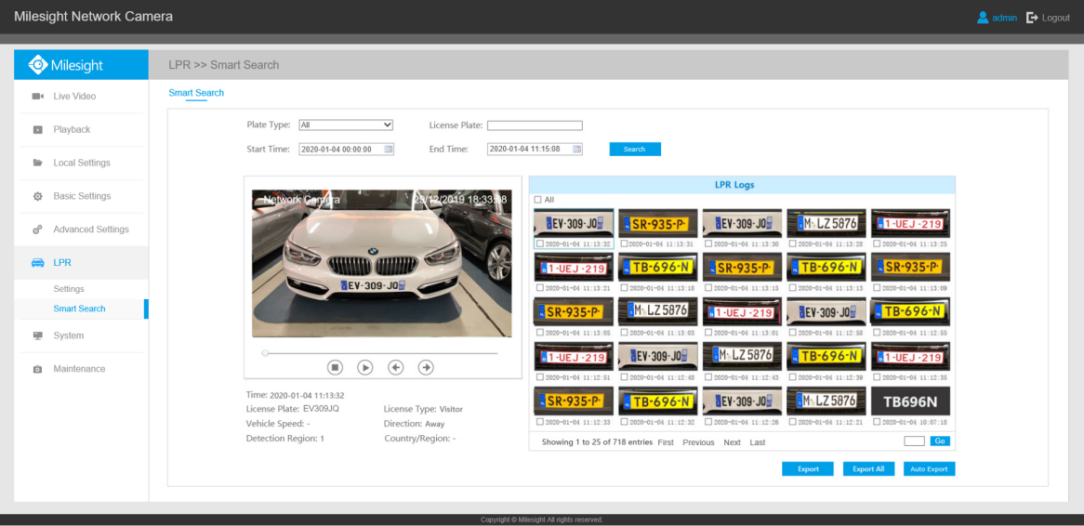
Step1: Select Plate Type or directly enter the license plate number.
Step2: Select Start Time and End Time, click the “Search” button to achieve fuzzy search, then the corresponding license plates or license plates containing search keywords will be shown on the logs while the complete video and license plate information will be shown on the left of the interface.
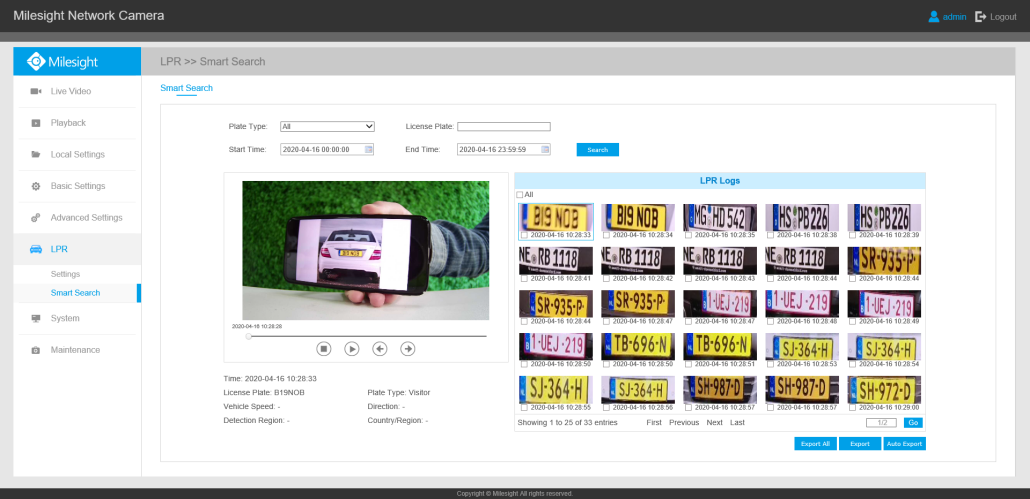
There are two methods to backup LPR logs.
① Backup license plates you want.
Step1: Tick license plates you want to backup and click “Backup” button ;
Step2: Select the export file type, video stream type and video file format, then click “Export” button.
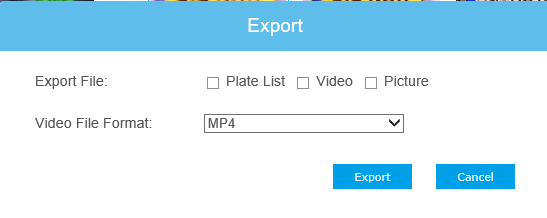
② Backup all.
Step1: Click “Export All” button;
Step2: Select the export file type, video stream type and video file format, then click “Export” button.
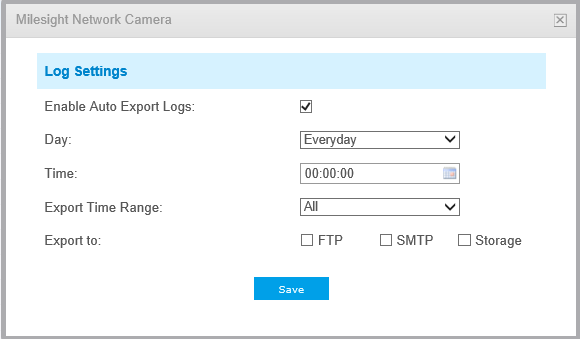
You can also click the "Auto Export" button to automatically export the logs to FTP, SMTP or Storage.
Note:
1. Insert available SD card or add NAS to camera as storage. Otherwise, you can’t check the LPR recording and snapshots.
2. Upgrade your device to corresponded firmware version.
Camera: V4X.7.0.74 or above.
Firmware download link: http://www.milesight.com/support/download#firmware
5. How to set ANPR with Milesight NVRs
5.1Preparation
Here are some notes you should notice before using ANPR function.
1. Insert available HDD or add NAS to NVR as storage. (Otherwise, you can’t check the recording and logs.)
2. Upgrade your device to corresponded firmware version.
Camera: V4X.7.0.72-r16 or above.
NVR: V7X.9.0.7-r7 or above.
Firmware download link: http://www.milesight.com/support/download#firmware
3. Ensure your device support LPR/ANPR function.
Model of NVR:
• MS-N7016-UH / MS-N7032-UH (16 ANPR Channels)
• MS-N8032-UH / MS-N8064-UH (16 ANPR Channels)
• MS-N7016-UPH / MS-N7032-UPH (16 ANPR Channels)
Name of LPR Camera:
• LPR H.265+ Mini Bullet Camera
• LPR H.265+ Vandal-proof Motorized Mini Bullet Camera
• LPR H.265+ Motorized Pro Bullet Camera
• LPR 12X H.265+ AF Motorized Pro Bullet Camera
• LPR 12X H.265+ Mini PTZ Bullet Camera
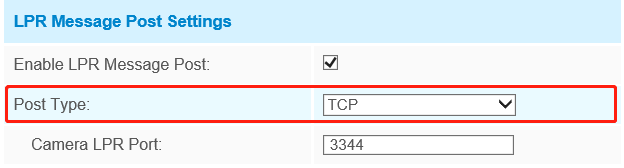
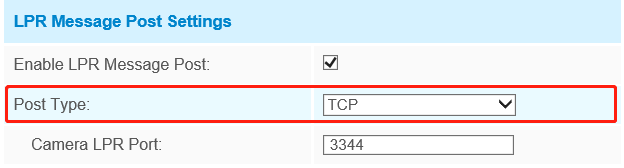
4. Ensure that NVR can get license plate information. Please set TCP as Post Type which is the default mode. It can be set in Camera web page -> Advanced Settings -> ANPR -> Settings interface.
5.2Settings
Step1: Go to“Event”->“ANPR”, select a channel and enable ANPR function.
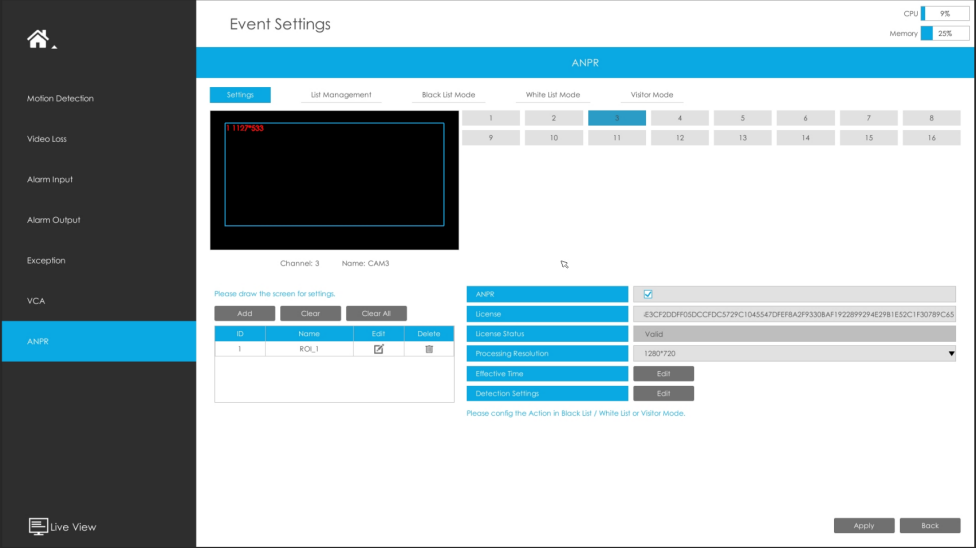
[License]: A license will be automatically assigned to each device.
[License Status]: This column is used to display the status of the license, “Valid”or “Invalid”.
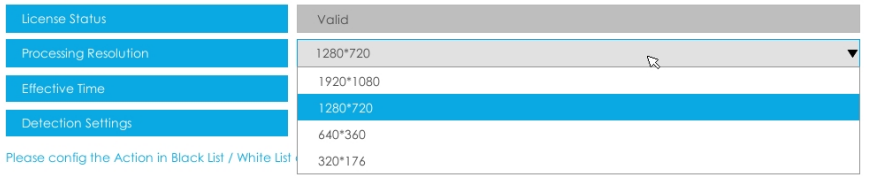
[Processing Resolution]: Default selected resolution is 1280*720. Users can choose different resolution according to the network environment.
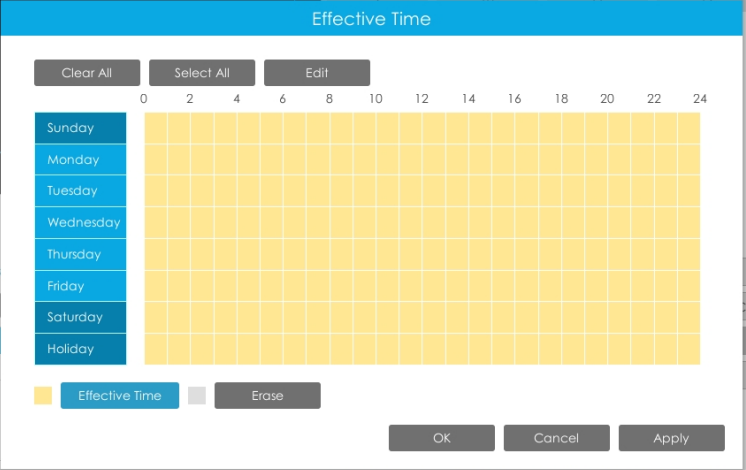
Step2: Set ANPR function effective time. You can draw the schedule by clicking“Edit”button. Draw the schedule and then click “OK” or “Apply” after finishing setting.
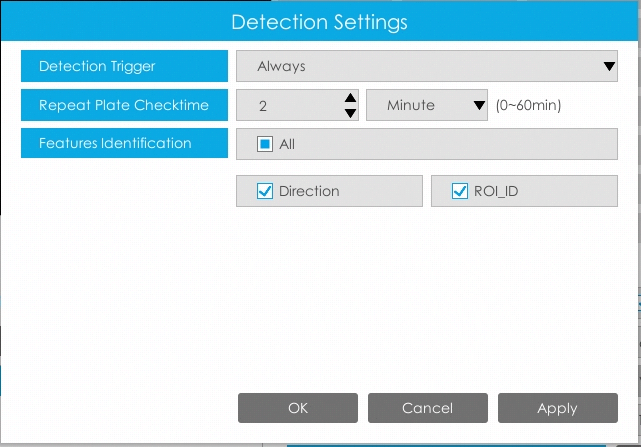
Step3: Set detection parameters including Detection Trigger, Repeat Plate Checktime and Features identification.
[Detection Trigger]: Always and Alarm Input are available. It will only detect when alarm input is triggered if you select Alarm Input.
[Confidence Level]: You can set the confidence level from 1 to 10. When the confidence level of the license plate is higher than the set confidence level, it will push the license plate image to the logs interface.
[Repeat Plate Checktime]: The same license plate information won’t be received on NVR within the time you set.
[Feature Identification]: Check Region, Direction, ROI_ID or All to enable Features Identification, it will display the corresponding information on the logs interface.
Note: Region detection only supports DACH region.
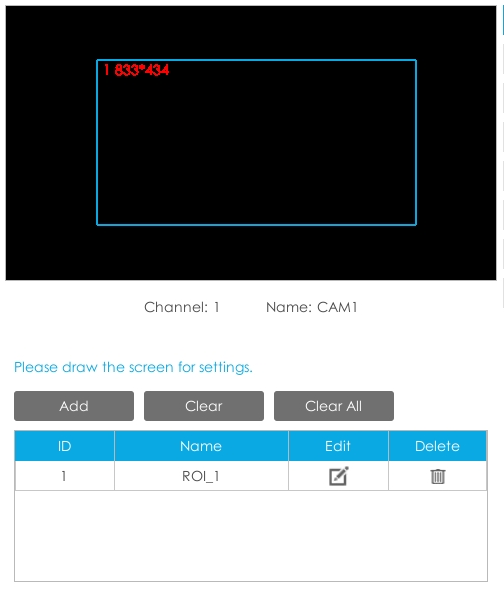
Step4: Set the detected ROI region which can be up to 4 regions. License plate will only be detected in the ROI regions.
5.3List Management
Make a license plate list for your own NVR ANPR system.
Upload license plates and set them with different license type here. 10000 License plates can be added at most.
Kindly note that the list is exclusive for NVR, working with all LPR cameras you add. It won’t synchronize with the list on camera side.
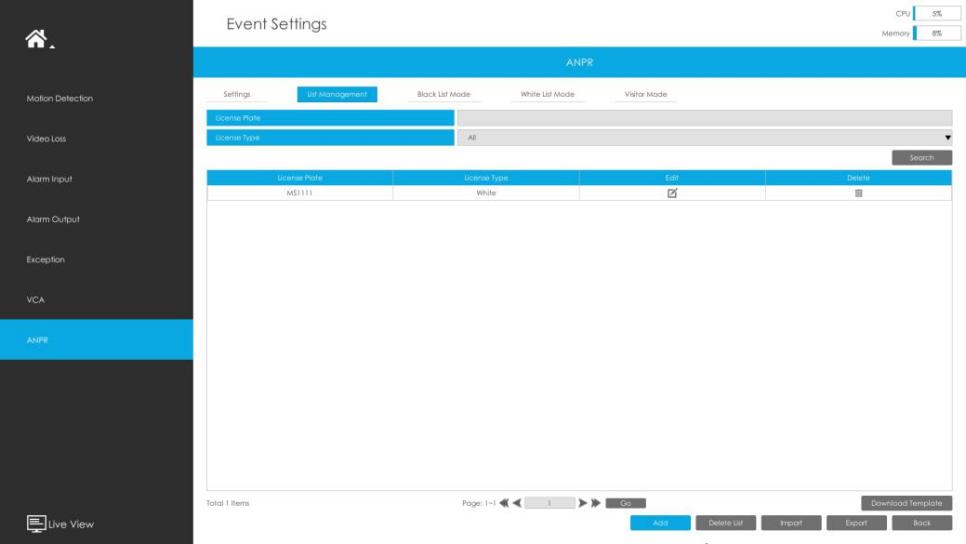
There are two methods to add license plates:
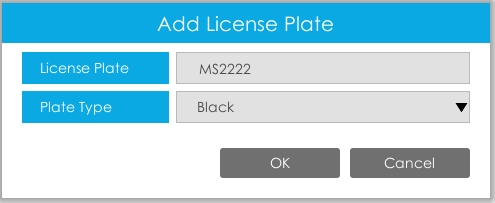
1. Add one by one.
Step1: Click Add button
Step2: Input the license plate and select license type.
Step3: Click OK and then the license plate will be added into the list.
2. Batch upload by importing template.
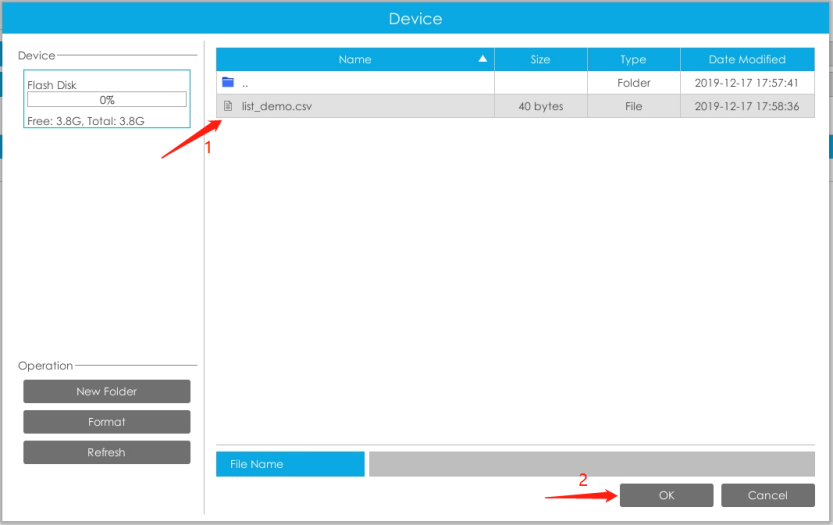
Step1: Click Download Template button , select USB device folder and click OK to download Template.
Step2: Input all license type and license plate number as Template shows.
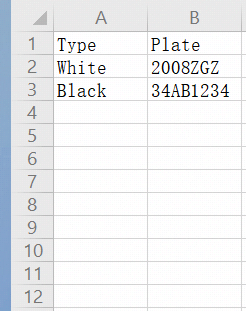
Step3: Click Import button , select the file and click OK to add all license plates into list.
5.4Black/White/Visitor List Mode
We provide you three modes for better event management.
Black List Mode: Manage event for license plates in black list.
White List Mode: Manage event for license plates in white list
Visitor Mode: Manage event for those license plates do not have license type.
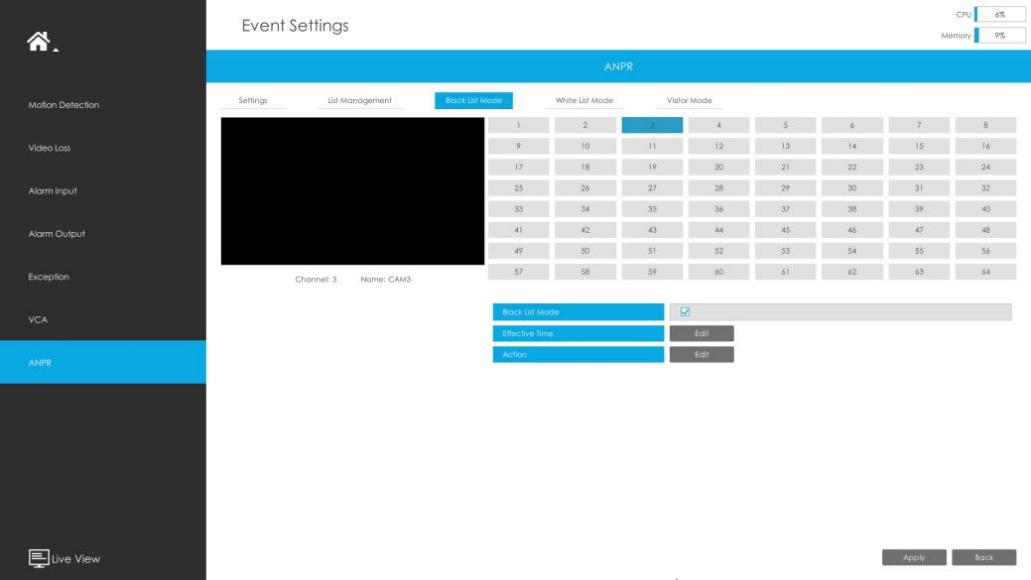
Steps for settings:
Step1: Enable Black List Mode/White List Mode/Visitor Mode as your demand.
Step2: Set effective time for the mode to work.
Step3: Set actions you need including Audible Warning, Email Linkage, Event Popup, PTZ Action, Alarm Output and Trigger Channels Record.
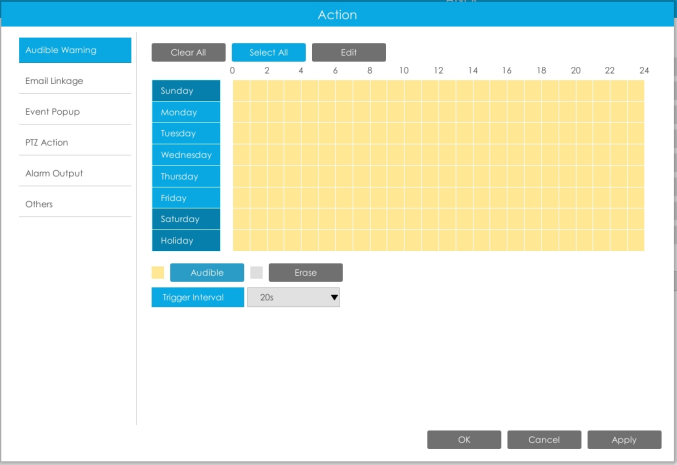
Note:
Do not forget to enable these modes, set effective time and record action for corresponded mode, so that you can get real-time video when license plate is detected (Effective time and record action is enabled by default.). You can refer to How to check ANPR record part for detailed record settings.
5.5Professional LPR Liveview Interface
At the beginning, you need to switch the preview mode to ANPR mode.
There are two methods to enter live view ANPR Mode:
1. Right click the mouse and select ANPR Mode as preview mode.
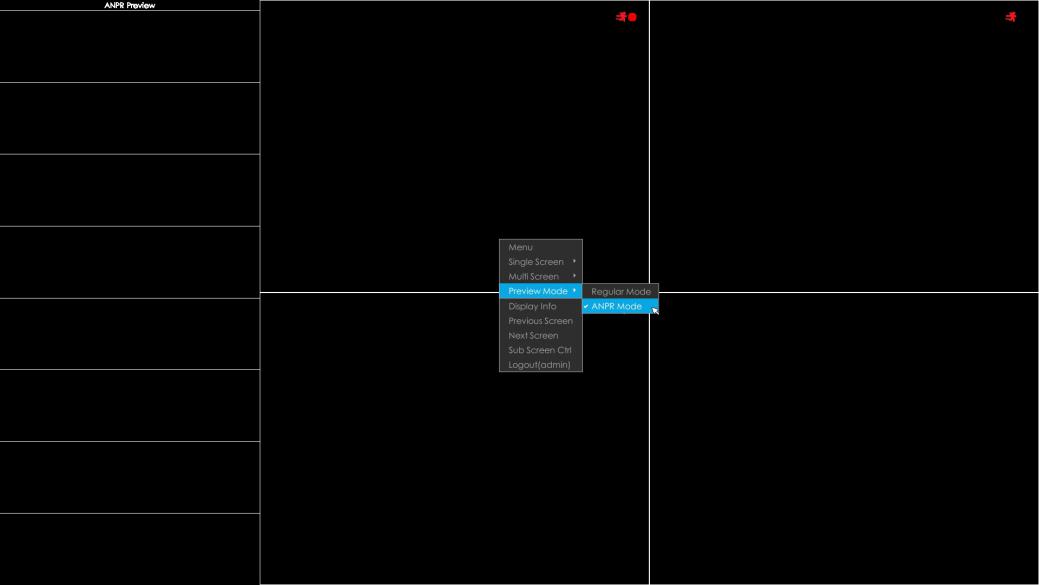
2. Select ANPR Mode on live view bottom tool bar.

After entering ANPR mode, the real-time license plate information will be shown on the left of the interface once it get detected.
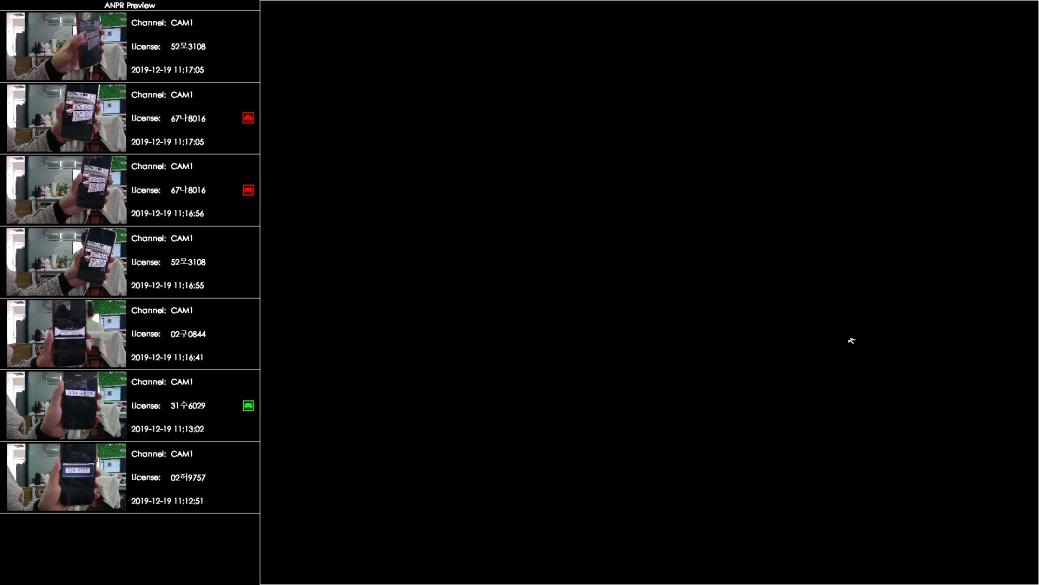
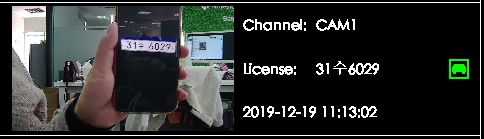
License plate information includes Plate Snapshot, Channel Name, License Plate Number, Detected Time and Plate Type.
Two License types:
| ---- License plate from Black List |

| ---- License plate form White List |

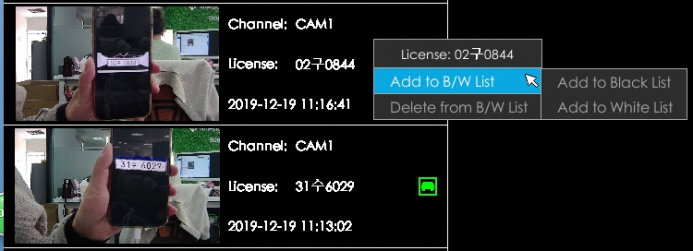
No License plates type will be shown if the license plate does not exist in Black/White list.
| However, you can right click the license plate information to quick add it to Black/White list or delete it from Black/White list. |
Besides, you can click the license plate information to check the latest X seconds (10s~20s) video.

Note:
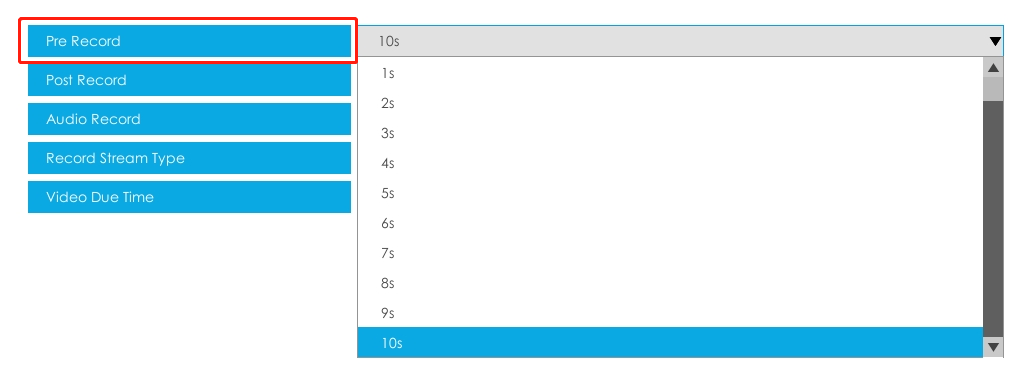
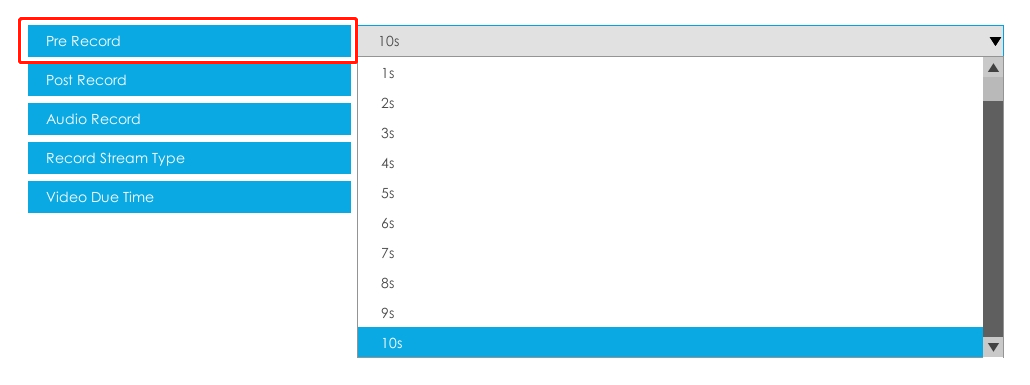
• X = 10 + Pre Record Time
You can set Pre Record Time in Storage -> Video Record -> Record Settings interface.
• Make sure that HDD is available on NVR and correct record settings is made, so that you can check the record on live view. Please refer to How to check ANPR record part for detailed record settings.
• Make sure that NVR can get the license plate information. Please set TCP as Post Type which is the default mode. It can be set in Camera web page -> Advanced Settings -> ANPR -> Settings interface.
5.6Set/Check ANPR Record
Before checking recording files, please make sure that you have proceed correct settings to make record action work.
1. Set Recording
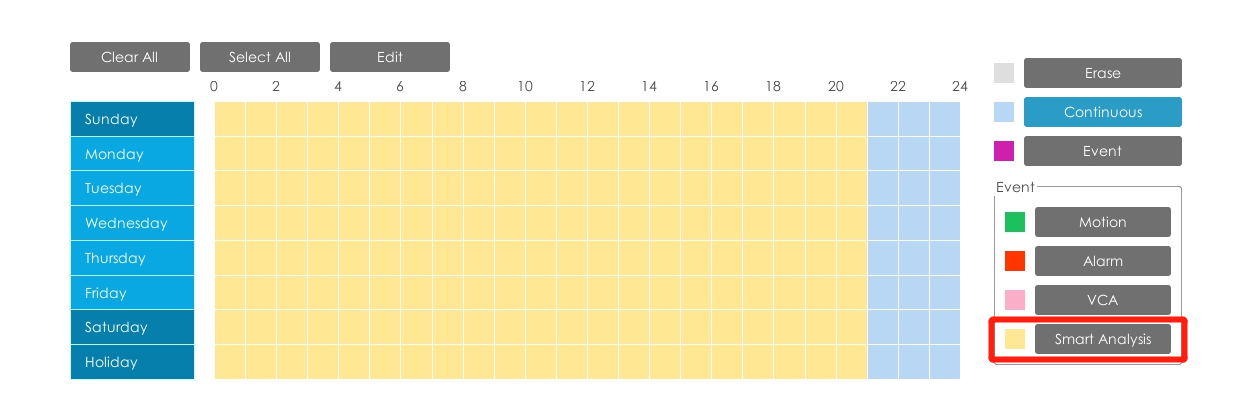
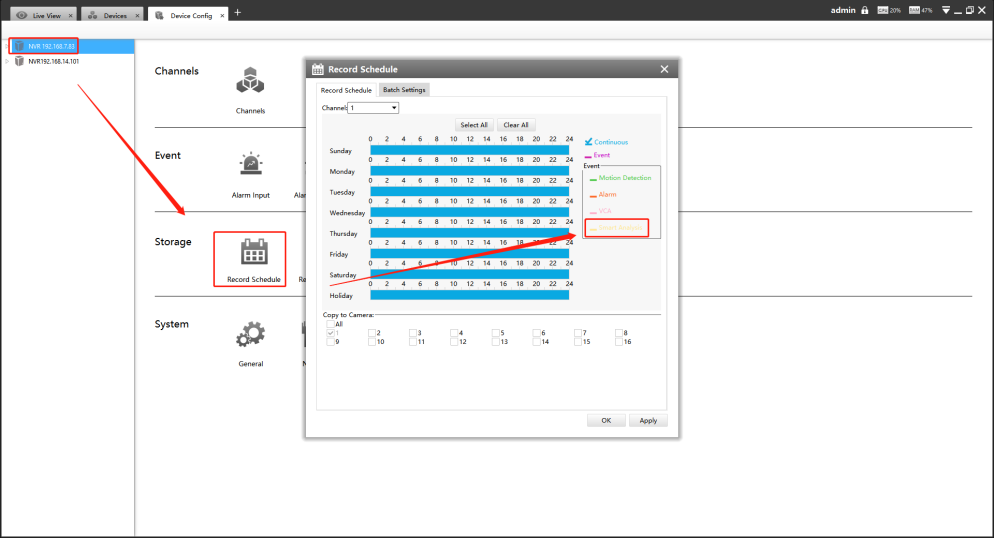
Step1: Set Smart Analysis as Record Type in Storage -> Video Record -> Record Schedule interface.
Step2: Enable Black List Mode / White List Mode / Visitor Mode as your demand.
Step3: Set Effective time and Trigger Channels Record action of your selected mode (Full effective time and trigger channel record are set by default).
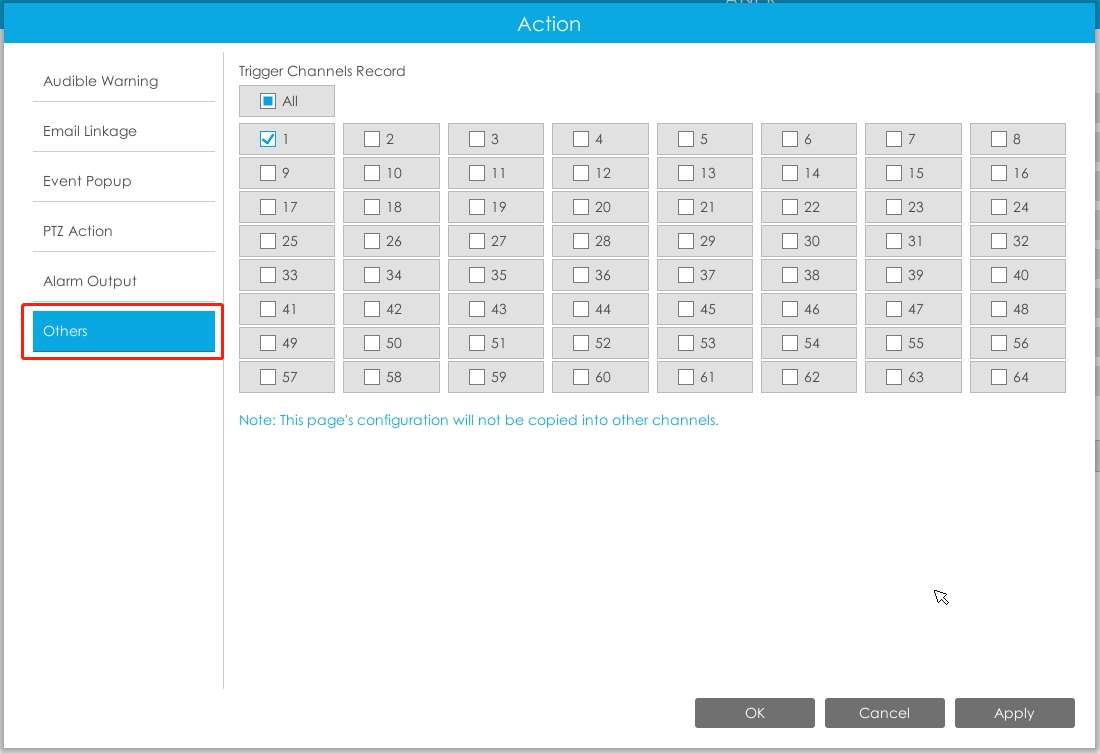
Then NVR will record when license plate is detected .
Note:
Generally, record action is triggered by event. If you just enable ANPR function without enabling Black List/White List/Visitor modes nor setting record action, it means you just enable the function while record action is not set. Then no record will be triggered. So it is necessary to do all above three steps if you want to trigger record action.
2. Check recording
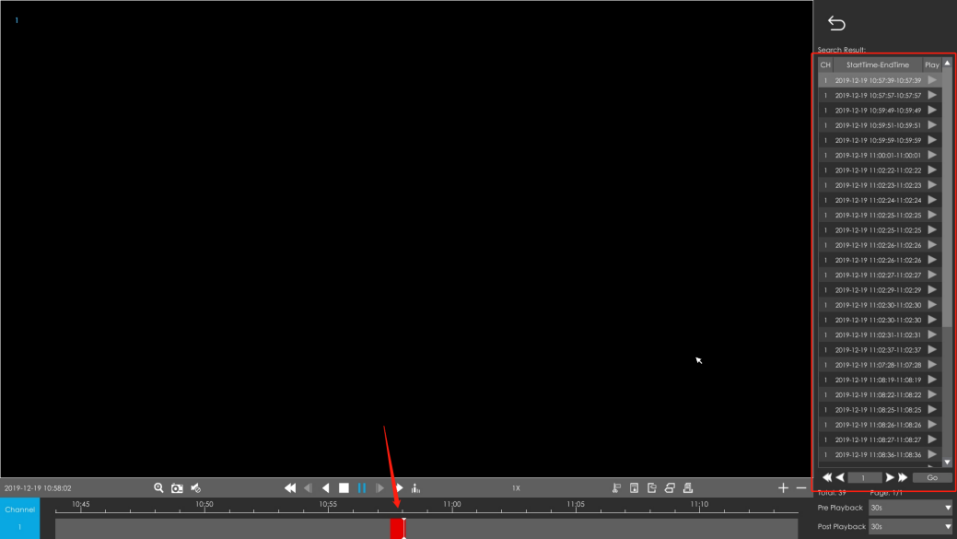
• In Playback
Step1: Entering Playback -> Event Playback -> Smart Analysis interface.
Step2: Input corresponded information and click search button to search.
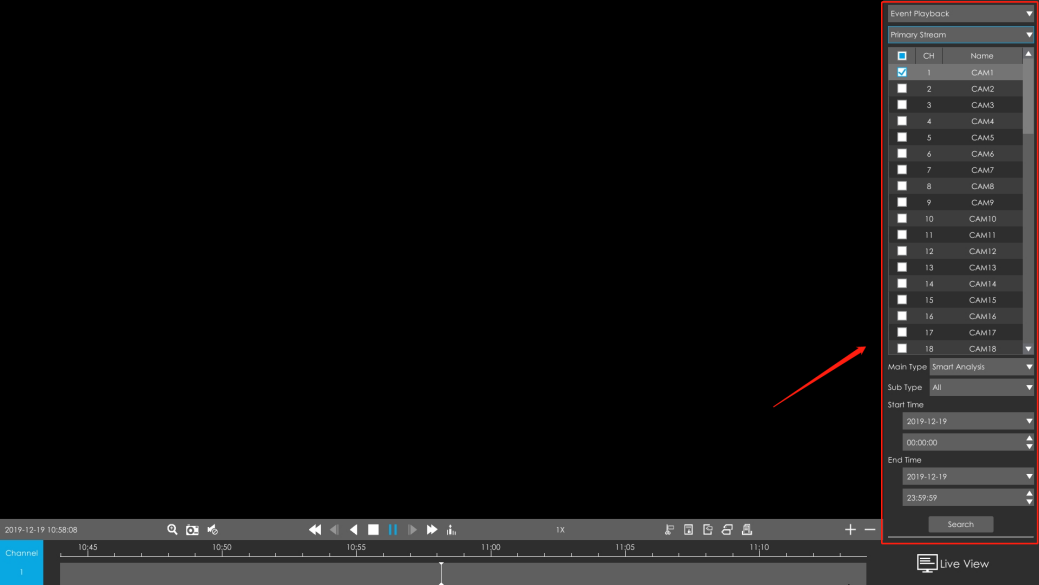
Step3: Click record to play the video searched out .
• In Live View
Click the license plate information to check the latest X seconds (10s~20s) video.

Note:
• X = 10 + Pre Record Time
You can set Pre Record Time in Storage -> Video Record -> Record Settings interface.
• Make sure that HDD is available on NVR on NVR and correct record settings is made so that you can check the record on live view interface. Please refer to How to check ANPR record part to check if record action is correctly set.
5.7Check/Backup ANPR Logs
1. Check ANPR logs
Step1: Search on Smart Analysis interface.
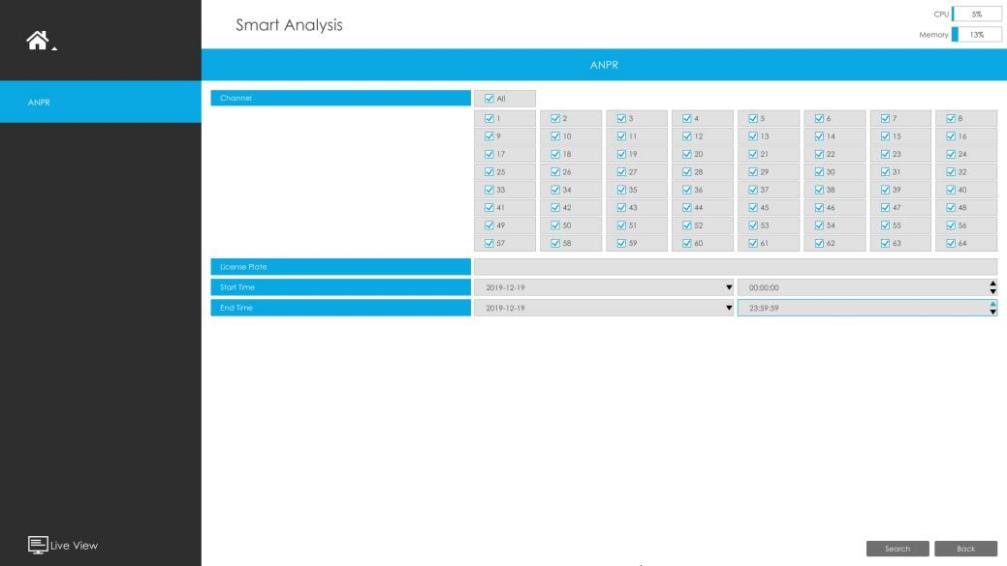
Step2: Input corresponded information and click search button to search.
Then you will get a whole ANPR logs list.
License plate snapshot will be shown on the logs list while the complete image video and license plate information will be shown on the left of the interface.
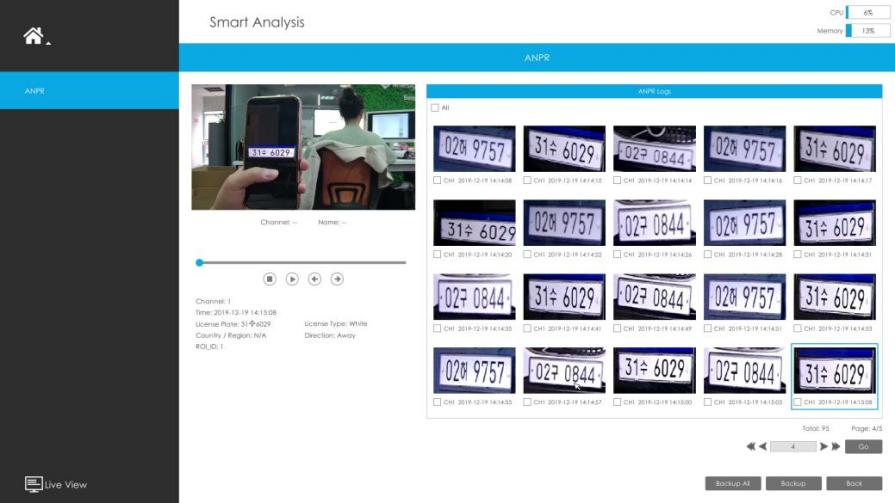
Step3: Click |
| to play the video. |


2. Backup ANPR logs
Two methods are available after searching ANPR logs out .
• Backup license plates you want.
Step1: Tick license plates you want to backup and click backup button
Step2: Select the export file type, video stream type and video file format, then click export button.
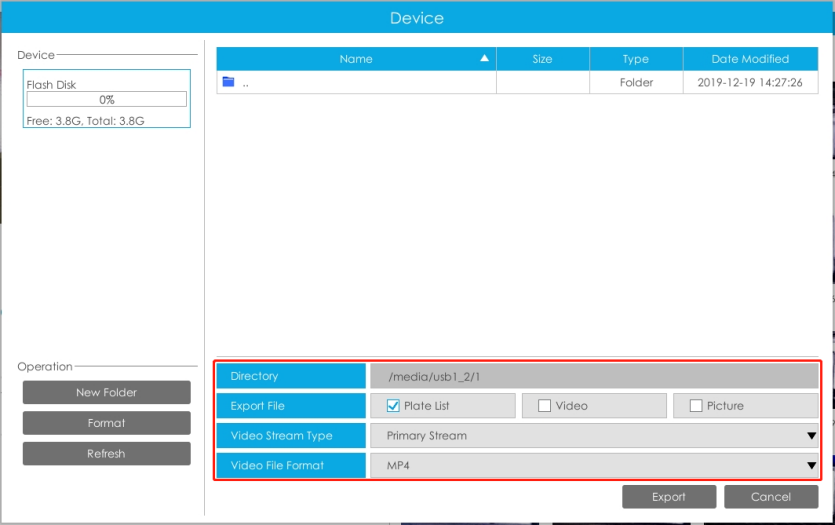
• Backup all.
Step1: Click backup all button.
Step2: Select the export file type, video stream type and video file format, then click export button.
Then you will get corresponded file as selected export file type.

6. How to set ANPR with Milesight CMS
6.1 Preparation
1. Refer to the NVR section
2. Upgrade your CMS to corresponded version.
CMS: V2.4.0.7 or above
Download link: http://www.milesight.com/support/download#software
6.2Settings
Step1: Add NVR to CMS.
Step2: Go to“Device Config”, select a NVR and the channel, then enable ANPR function.
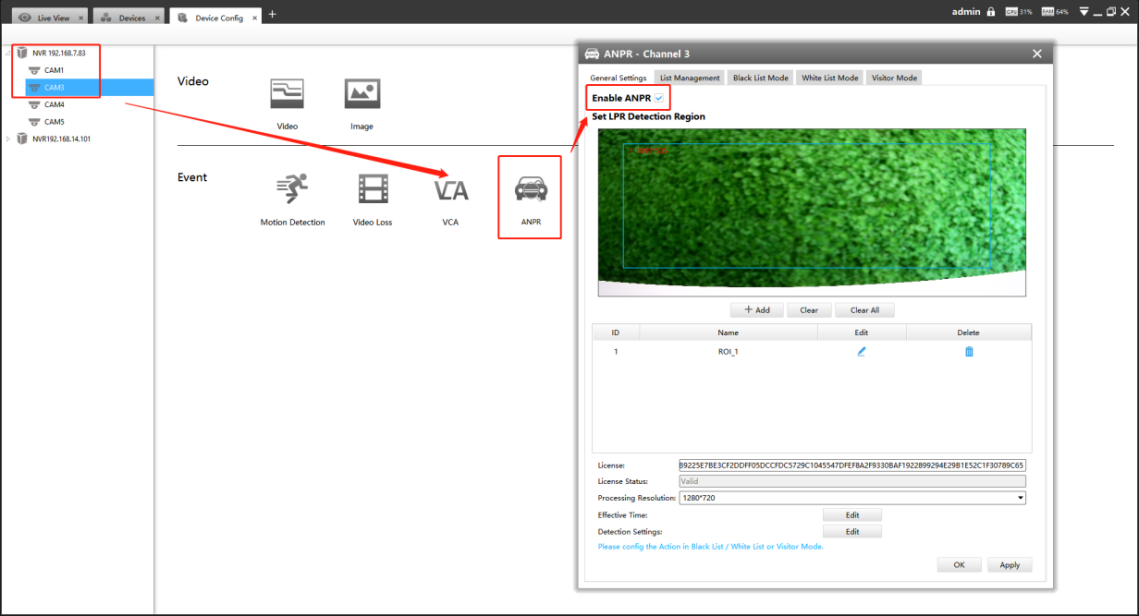
[License]: A license will be automatically assigned to each device.
[License Status]: This column is used to display the status of the license, “Valid”or “Invalid”.
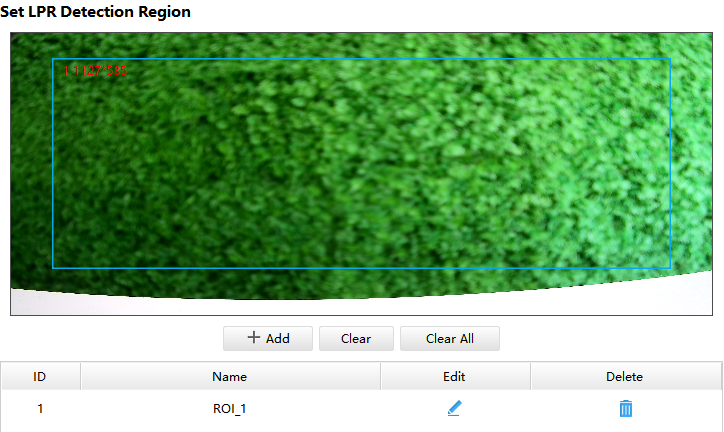
[Set LPR Detection Region]: You can set up to 4 ROI areas by drawing the screen. License plate will only be detected in the ROI regions.

[Processing Resolution]: Default selected resolution is 1280*720. Users can choose different resolution according to the network environment.
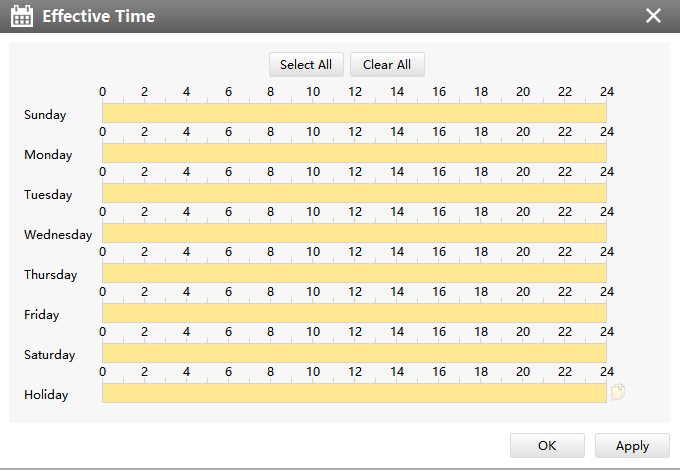
Step2: Set ANPR function effective time. You can draw the schedule by clicking“Edit”button. Draw the schedule and then click “OK” or “Apply” after finishing setting.
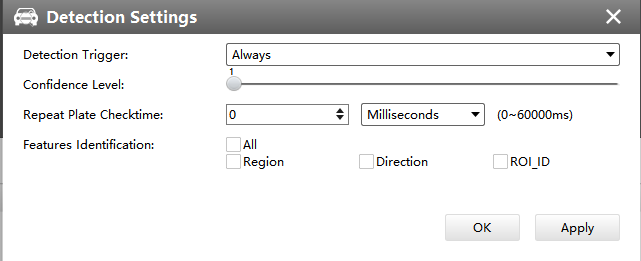
Step3: Set detection parameters including detection trigger, repeat plate checktime and features identification.
[Detection Trigger]: Always and Alarm Input are available. It will only detect when alarm input is triggered if you select Alarm Input.
[Confidence Level]: You can set the confidence level from 1 to 10. When the confidence level of the license plate is higher than the set confidence level, it will push the license plate image to the logs interface.
[Repeat Plate Checktime]: The same license plate information won’t be received on NVR within the time you set.
[Feature Identification]: Check Region, Direction, ROI_ID or All to enable Feature Identification, it will display the corresponding information on the logs interface.
Note: Region detection only supports DACH region.
6.3List Management
Make a license plate list for your own NVR ANPR system.
Upload license plates and set them with different license type here. 10000 plates can be added at most.
Kindly note that the list is exclusive for NVR, working with all LPR cameras you added. It won’t synchronize with the list on camera side.
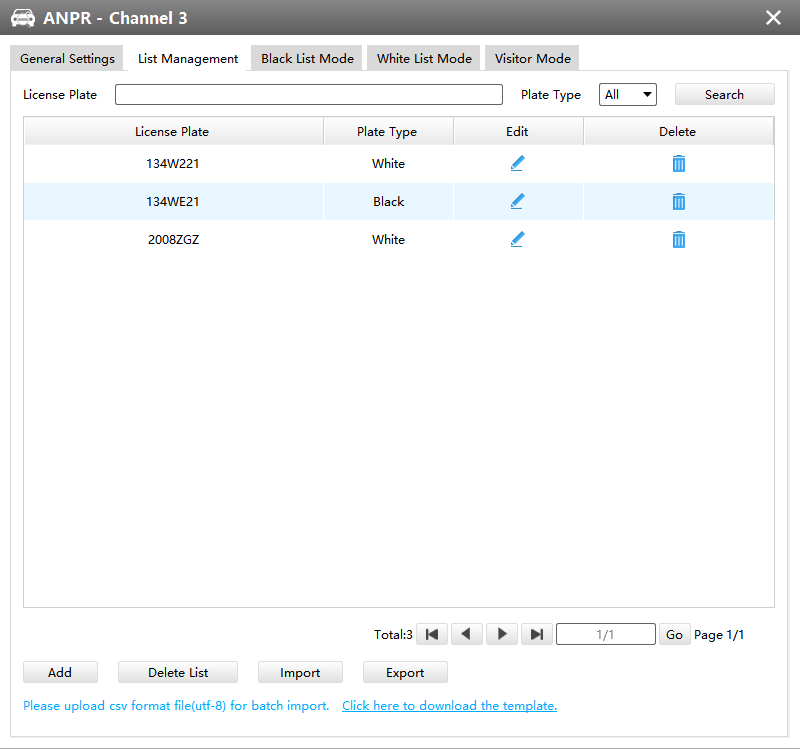
There are two methods to add license plates:
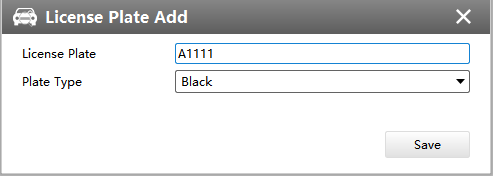
1. Add one by one.
Step1: Click Add button
Step2: Input the license plate and select license type.
Step3: Click OK and then the license plate will be added into the list.
2. Batch adding by importing template.
Step1: Click Download Template, select folder and click OK to download Template.
Step2: Input all license type and license plate number as Template shows.
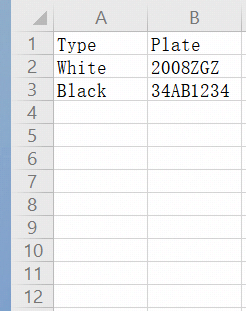
Step3: Click Import button import, select the file and click OK to add all license plates into list.
6.4Black/White/Visitor List Mode
We provide you three modes for better event management, which is based on two license types.
Black List Mode: Manage event for license plates in black list.
White List Mode: Manage event for license plates in white list
Visitor Mode: Manage event for those license plates do not have license type.
Steps for settings:
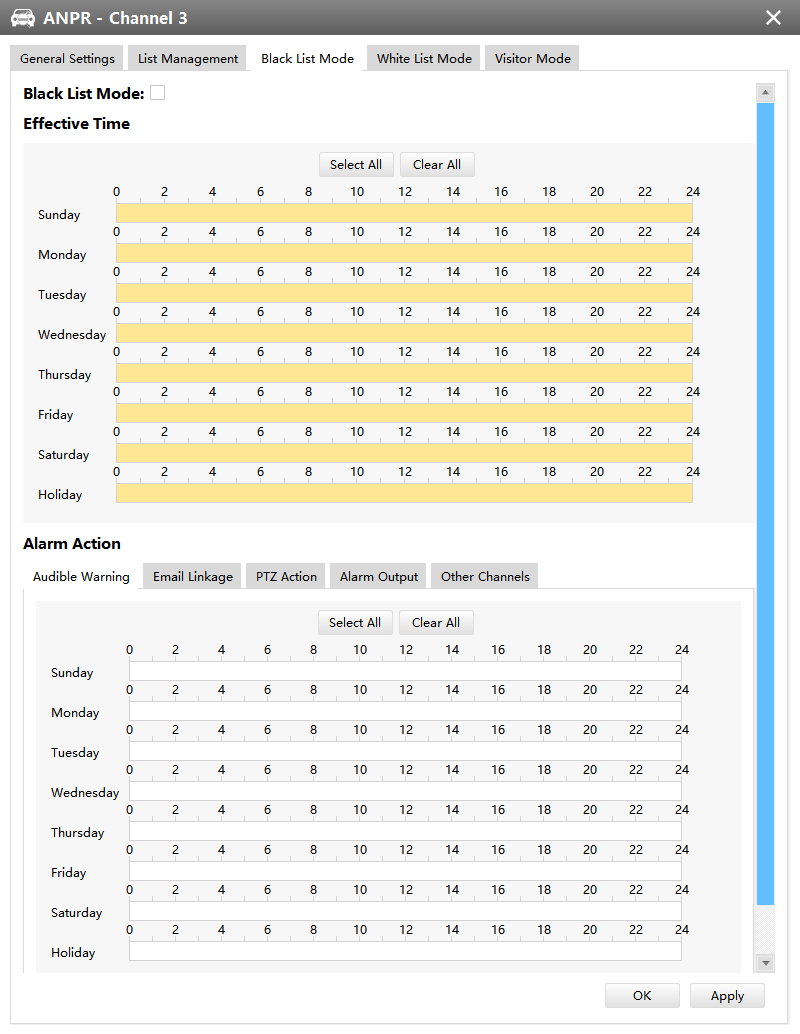
Step1: Enable Black List Mode/White List Mode/Visitor Mode as your demand.
Step2: Set effective time which means Mode works during that.
Step3: Set action including Audible Warning, Email Linkage, PTZ Action, Alarm Output.
6.5Set ANPR Record
Step1: Set Smart Analysis as Record Type in Device -> Select NVR -> Record Schedule interface.
Step2: Enable Black List Mode / White List Mode / Visitor Mode as your demand.
Step3: Set Effective time and Trigger Channels Record action of your selected mode(Full effective time and trigger channel record are set by default).
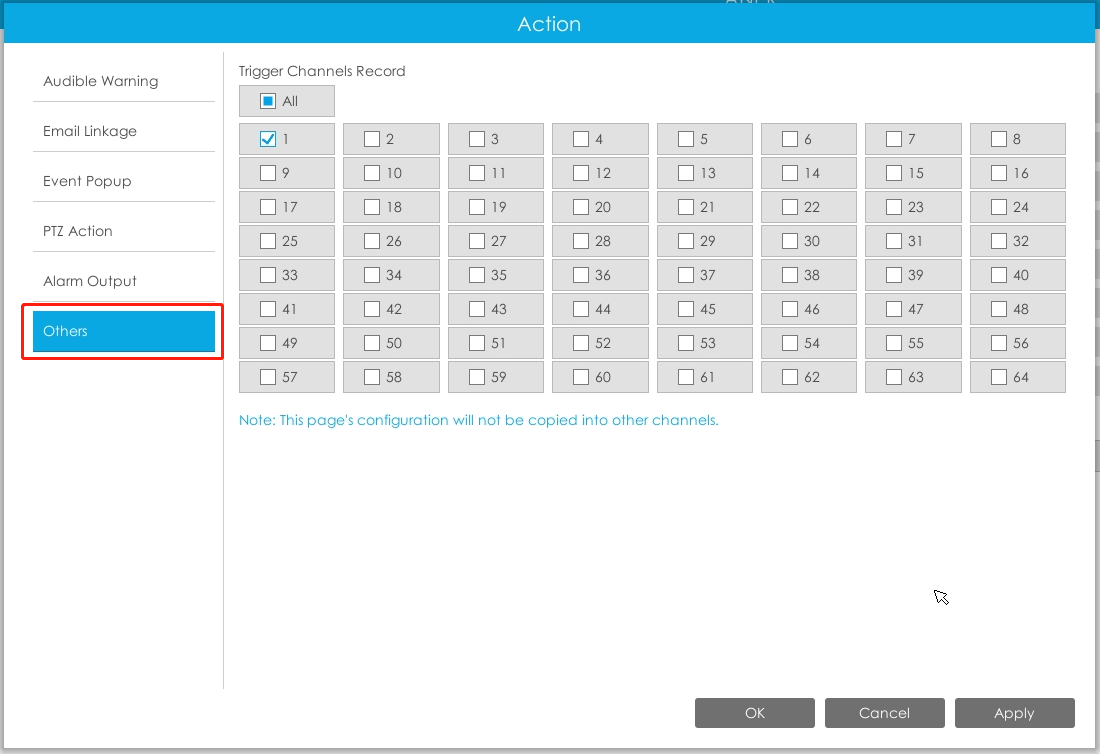
Then NVR will record when license plate is detected .
Note:
Generally, record action is triggered by event. If you just enable ANPR function without enabling Black List/White List/Visitor modes nor setting record action, that means you just enable the function while record action is not set. Then no record will be triggered. So it is necessary to do all above three steps if you want to trigger record action.
6.6Check/Backup ANPR Logs
1. Check ANPR logs
Step1: Search on Smart Analysis interface.
Step2: Input corresponded information and click search button to search.
Then you will get a whole ANPR logs list.
License plate snapshot will be shown on the logs list while the complete image video and license plate information will be shown on the left of the interface.
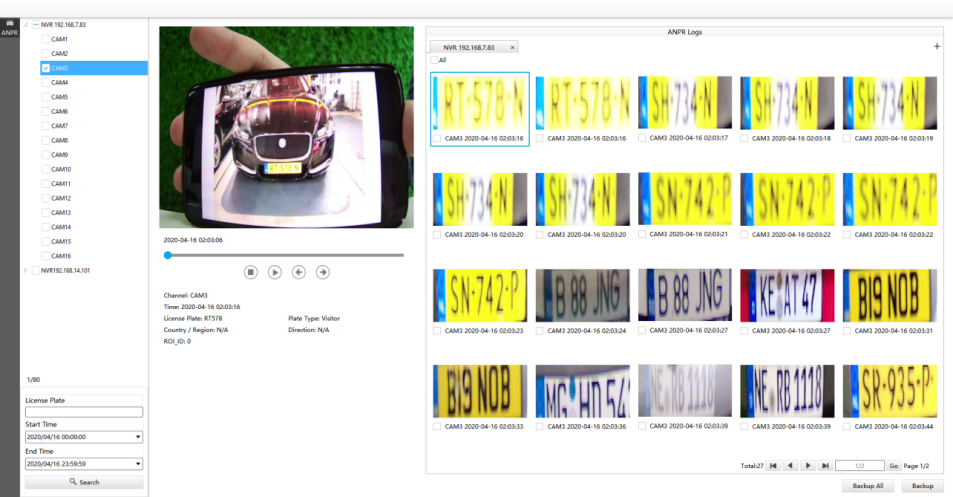
Step3: Click |
| to play the video. |


2. Backup ANPR logs
Two methods are available after searching ANPR logs out .
• Backup license plates you want.
Step1: Tick license plates you want to backup and click backup button
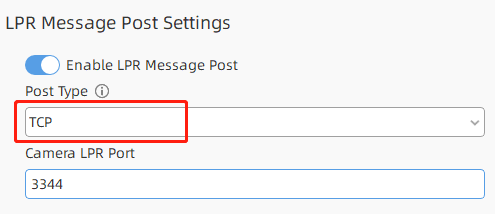
Step2: Select the Export File Path, File Type, Video stream type and Video file format, then click export button.
• Backup all.
Step1: Click backup all button.
Step2: Select the export file type, video stream type and video file format, then click export button.
Then you will get corresponded file as selected export file type.

7. How to set ANPR with Milesight VMS Enterprise
7.1 Preparation
① Refer to the NVR section
② Upgrade your VMS Enterprise to corresponded version.
VMS Enterprise: V1.3.0.0 or above
③ Only the LPR cameras added by MSSP protocol support ANPR function for VMS Enterprise.
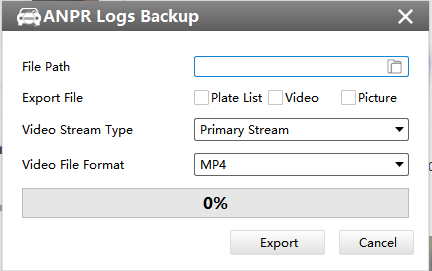
④ Make sure that VMS Enterprise can get the license plate information. Please set TCP as Post Type which is the default mode. It can be set in the Smart Analysis -> ANPR Settings -> Detection Settings interface.
7.2Detection Setting
Here the configuration of the camera web side will be automatically obtained. If the camera web side is not configured, you can configure it in the interface of VMS. After the configuration is completed, it will be synchronized to the camera web side.
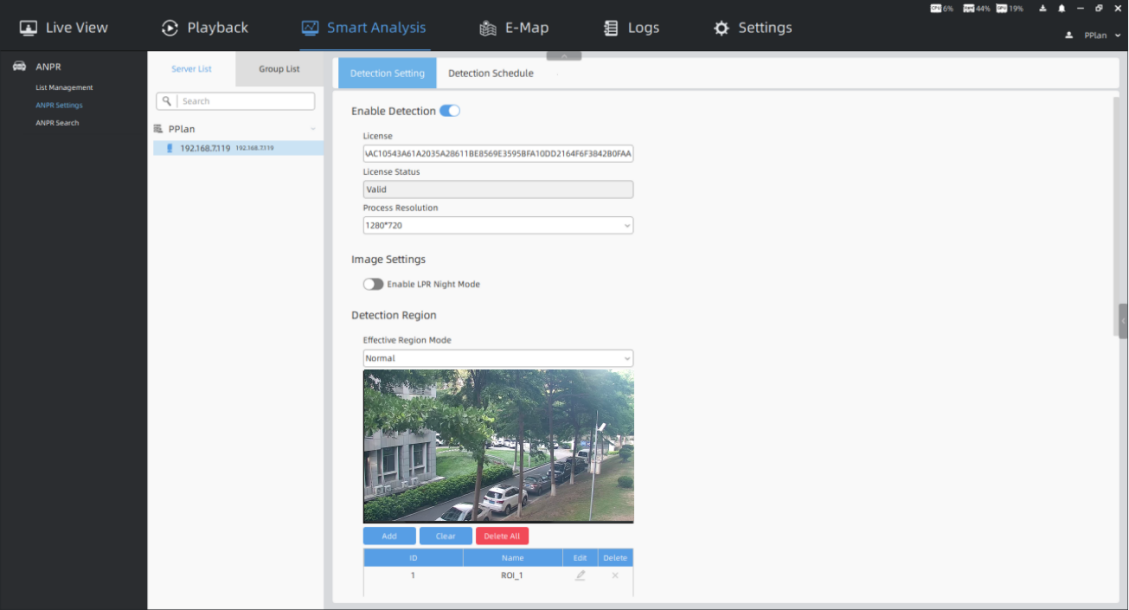
Step1: Select a camera in the devices list tree, then click |
| button to enable Detection. |

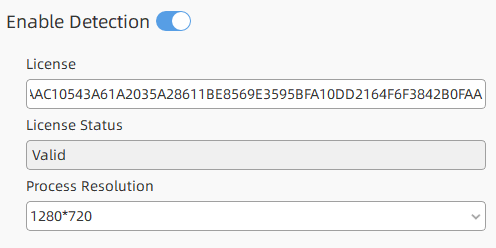
[License]: Only LPR2 and LPR3 need to enter the license to activate the LPR function.
[License Status]: Show present license status, including Valid and Invalid. When the license status changes to be valid, the camera can start detecting the license plates.
[Process Resolution]: Resolution of the stream for LPR analysis, including 1920*1280, 1280*720.
Step2: You can click button to enable LPR Night Mode. The LPR Night Mode supports the optimal LPR night recognition effect by adjusting different parameter levels. You can choose Auto Mode which can automatically switch to night mode according to illumination intensity, or choose Customize Mode to set effective time manually.

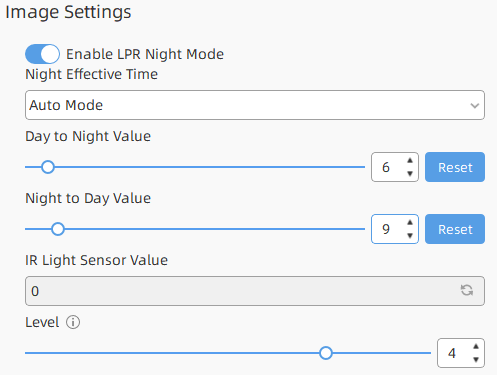
Auto Mode
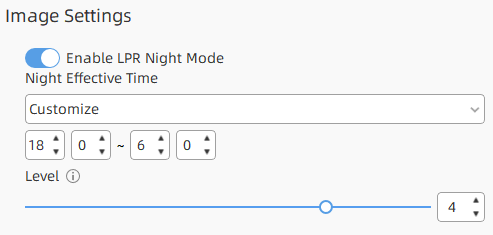
Customize Mode
Step3: You can set up to 4 ROI areas by drawing the screen. If you choose Normal Mode, it supports configuring the LPR detection regions for the current area. If you choose Advanced Mode(Only for PTZ series), it supports configuring different LPR detection regions for different PTZ presets(Only support Preset 1~4 so far).
|
|
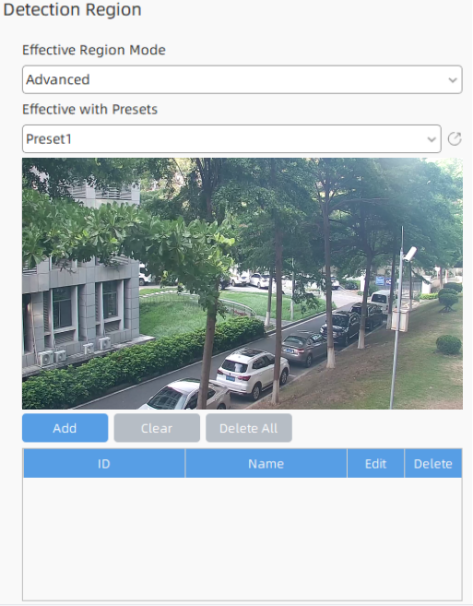
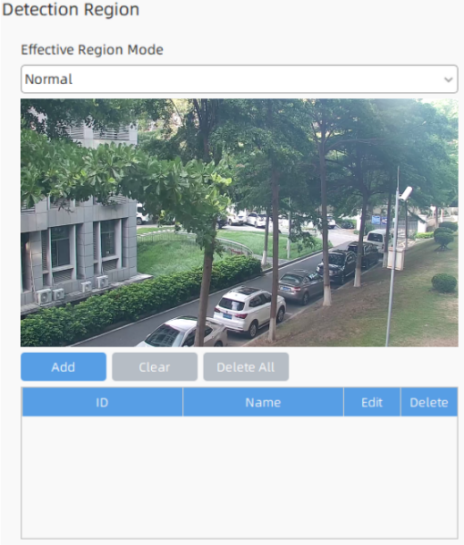
Normal Mode Advanced Mode (For PTZ camera)
Notes
• The optimal interval of Milesight LPR cameras to recognize the license plates width is within 100-200 PX.
• For better performance, please choose the appropriate resolution in advance.
Step4: Schedule Settings. You can draw the schedule by clicking |
| button, and then click |
|


button after finishing the settings.
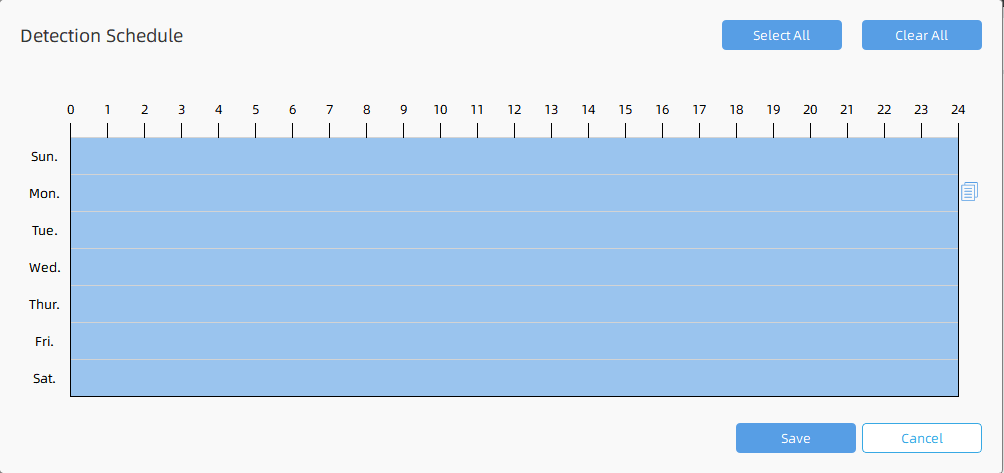
Step5: Set Detection Settings and LPR Message Post Settings.
|
|
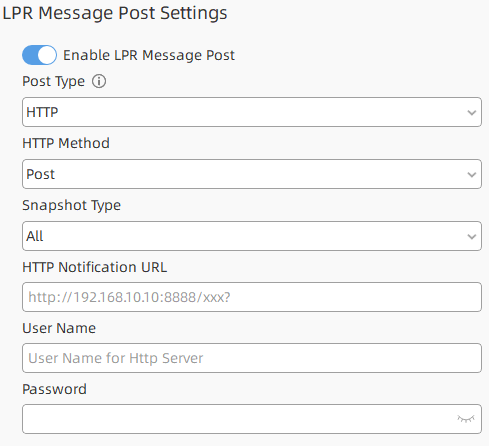
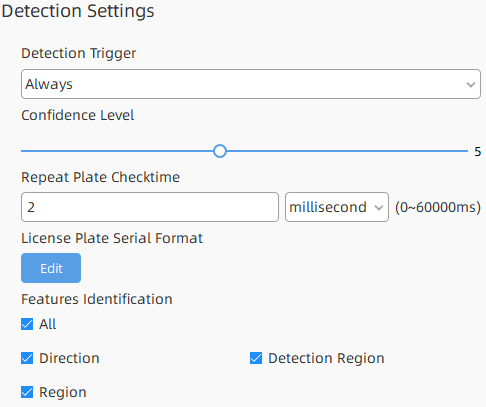
Detection Settings LPR Message Post Settings
[Detection Trigger]: If you choose “Always”, camera will always detect the license plates. If you choose “Alarm Input”, camera will only detect the license plates during Alarm Input is being triggered.
[Confidence Level]: You can set the confidence level from 1 to 10. When the confidence level of the license plate is higher than the set confidence level, it will push the license plate image to the ANPR Search interface.
[Repeat Plate Checktime]: Set the time interval for repeatedly reading the license plates to effectively avoid duplicate identification of parking vehicles.
[License Plate Serial Format]: Formulate identification rules and automatically filter wrong license plates information to achieve more intelligent and accurate license plate recognition.
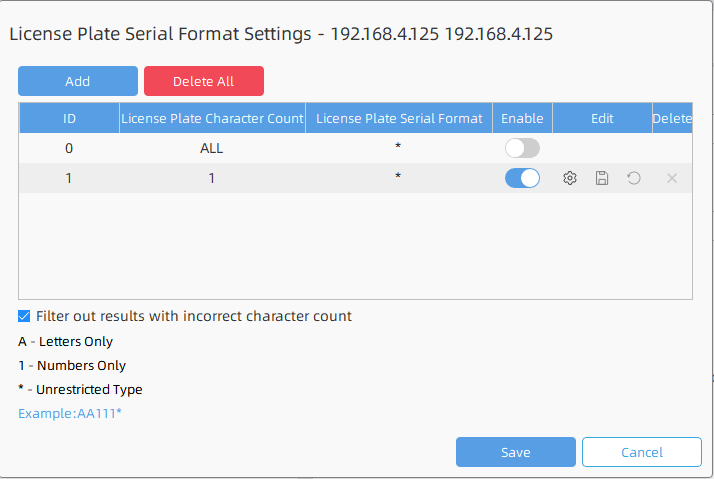
[Features Identification]: Check All, Direction, Direction Region or Region(Only for LPR2) to enable Features Identification, and the corresponding information will be displayed in the ANPR Search interface.
[Enable LPR Message Post]: Click |
| button to enable LPR Message Post. It will push information to some third-party devices or software that are compatible with ours. |

[Post Type]: Information can be pushed by RTSP, TCP or HTTP.

[HTTP Method]: There are two HTTP push methods: Post and Get.
[Snapshot Type]: Three kinds of snapshot can be chosen: All, License Plate and Full Snapshot. When you choose All, License Plate Snapshot and Full Snapshot will be pushed.
Note: This option is available just for Post HTTP Method.
[HTTP Notification URL]: The camera can use the API URL to send LPR information to other devices when the license plate is recognized. The API URL format is defined by the HTTP Server.
[User Name]: User name for HTTP Server.
[Password]: Password for HTTP Server.
[Camera LPR Port]: This option is available for TCP Post type.
Step6: Click |
| button to apply all settings. |

7.3 ANPR Preview
After enabling Detection in the ANPR Settings -> Detection Setting interface, you can click |
| button in the right Function Panel, and the real-time license plate information will be shown on the right of the interface once it is detected. |

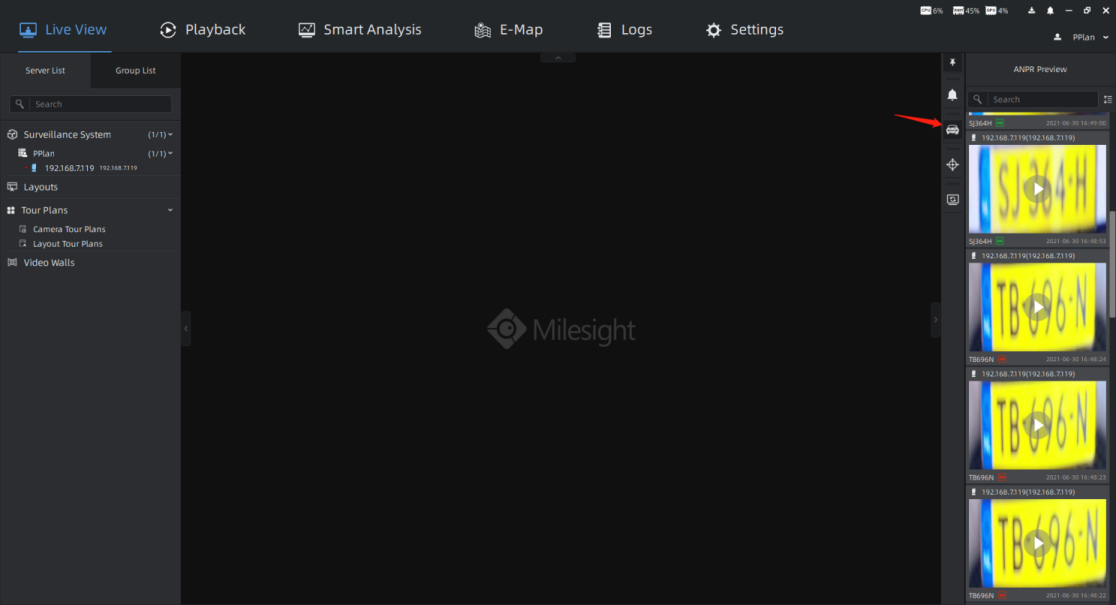
The license plate information includes Plate Snapshot, Device Name, IP, License Plate Number, Detected Time and Plate Type.
Two License types:
| ---- License plate from Black List |

| ---- License plate from White List |

No License plate type will be shown if the license plate does not exist in Black/White list.
| You can right click on the ANPR notification push window to pop up a menu, and choose to add the license plate to White or Black List in the VMS system. If the license plate has already existed in the White or Black List of VMS system, then you can choose to change its type or delete the license plate from White or Black List. |
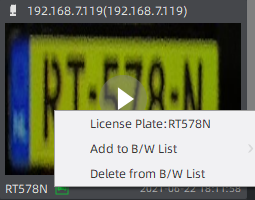
Besides, you can click the license plate information to check the 20s video. (20s = the pre 10s + the post 10s of the license plate event)
Note:
Make sure that correct record schedule settings is made or the ANPR event rules are set to trigger recording, so that you can check the record in the ANPR Preview Panel. You can refer to 7(1) for operation steps.
7.4List Management
Add the license plates as Black/White List as needed in the interface, and the license plates without the set types are the visitors. After enabling license plate recognition, VMS Enterprise will automatically receive the recognition result sent by the Milesight cameras and compare it with the black and white list added in VMS Enterprise.
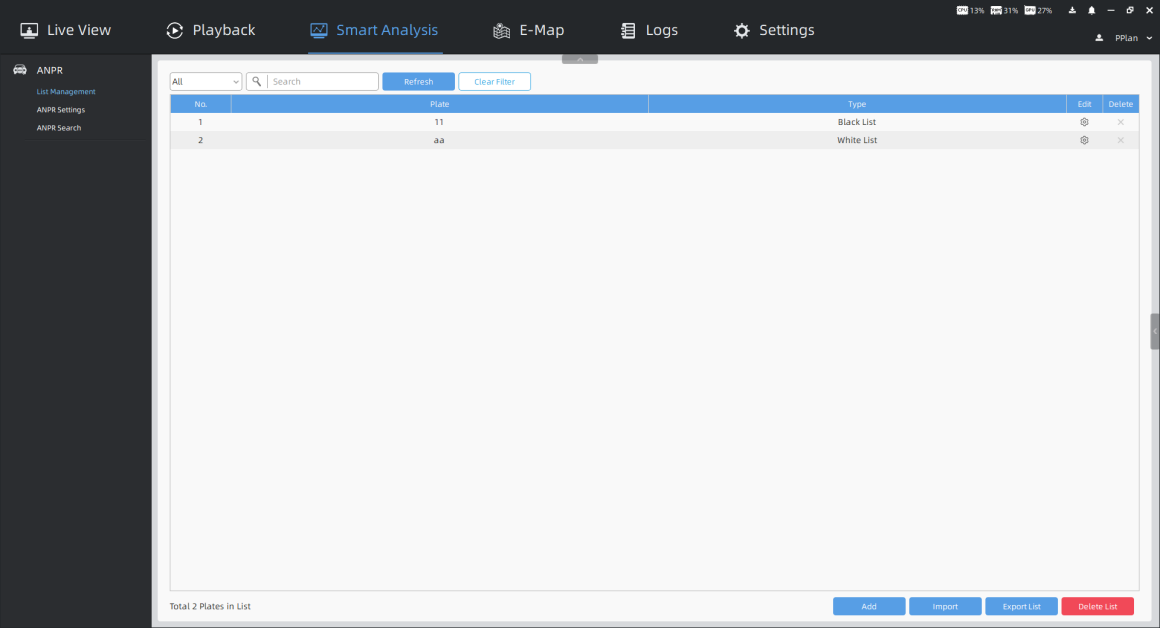
1. Add license plates
You can choose either of the below two ways to add the license plates.
2. Add license plates one by one
Step1: Click |
| button to pop up a Add Plate window, then input the license plate and select the license plate type as black or white list, and click |
|


button.
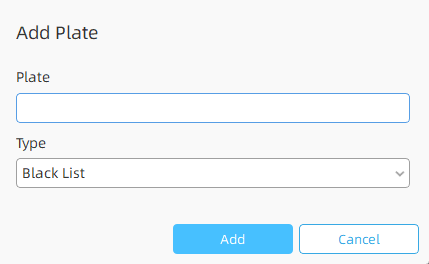
Step2: Repeat the Step1 to add other license plates manually.
3. Batch import license plates
Step1: Click |
| button to pop up a Import Plates window. The imported file must be filled in according to the specified format. You can click |
|


button to download the template.
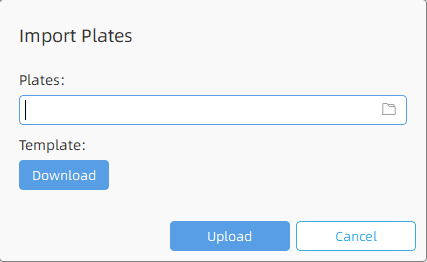
Step2: After filling in, click |
| button to import the plates file, then click |
|


button.
After successful import, you can click |
| button to modify the corresponding license plate and plate type. |

Note:
• The format of the imported license plates file must be csv.
• The CSV must be saved in UTF-8 encoding format.
• A license plate can’t be repeatedly added to the plate list.
• Maximum quantity of license plates added in the list is 10000.
4. Search license plates

You can select the plate types including All, Black List and White List, or directly enter the license plate number, and click the “Search” button, then the corresponding license plates will be displayed in the list below.
Note: The text searched is a case-insensitive contiguous string.
In addition, you can click “Refresh” button to refresh the license plate list. And click“Clear Filter”
button to cancel the filter for the license plate list.
5. Export license plates
You can click “Export List”button to export the license plates in the current list to a csv form locally. If you filter the license plate list, only the filtered list will be exported.
6. Delete license plates
Click “Delete List”button to delete all the license plates in the current list. If you filter the license plate list, only the filtered list will be deleted. You can also click “×” button to delete the corresponding license plate.
7.5Black List/White List/Visitor Detection
Here you can set effective detection schedules for different detection modes, including Black List Detection, White List Detection and Visitor Detection. Only when the detection is enabled and the corresponding schedule is set, the corresponding detection results will be saved and can be viewed in the ANPR Search interface.
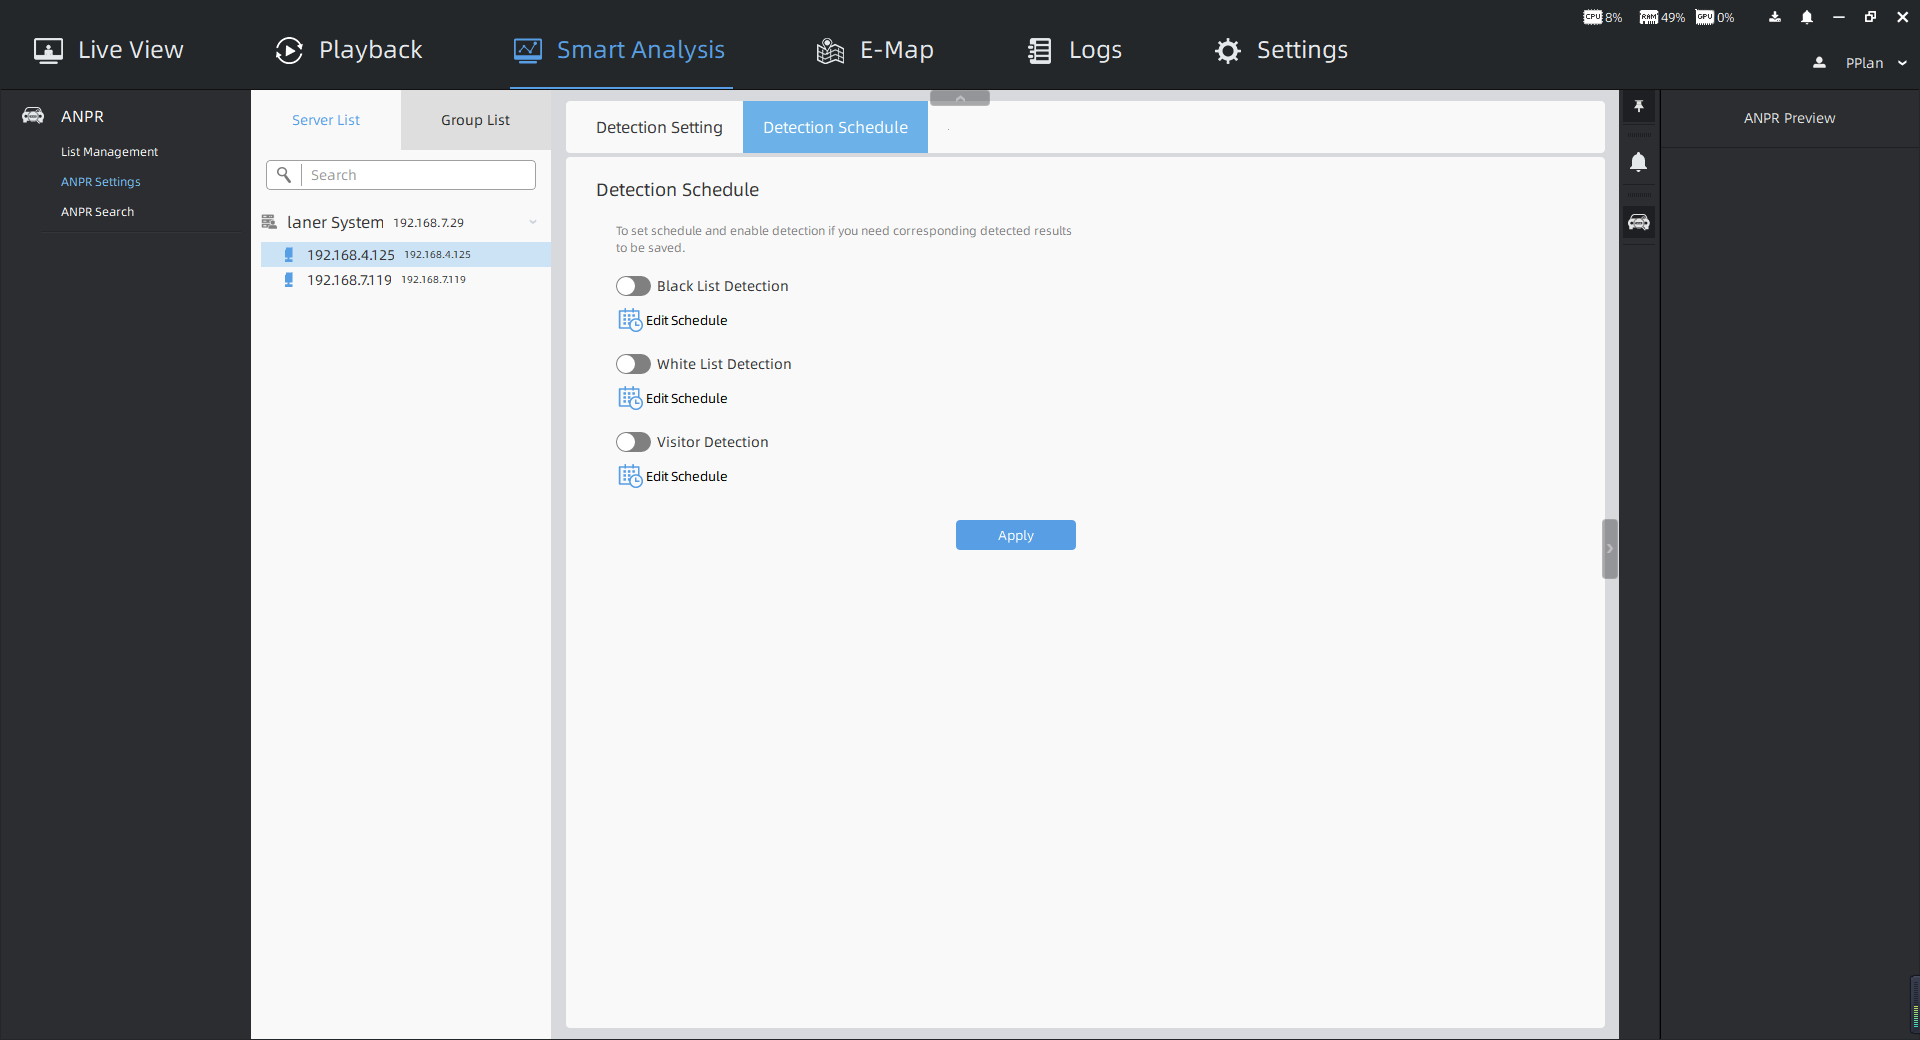
Step1: Click |
| button to enable the function, and then click |
|


button to edit the schedule.
Step2: Click “Apply”button to apply the settings.
Step3: If you want to set related actions for ANPR trigger, you can refer to Method2 of 7(1) for operation steps. Then the set actions will be triggered once the corresponding license plate type is detected.
Step4: Once the ANPR event rules which you set take effect, you can check the ANPR event information in the Logs -> Event Logs interface. The event logs contain the event information about Date/Time, Event, Source, Action, Target and Details.
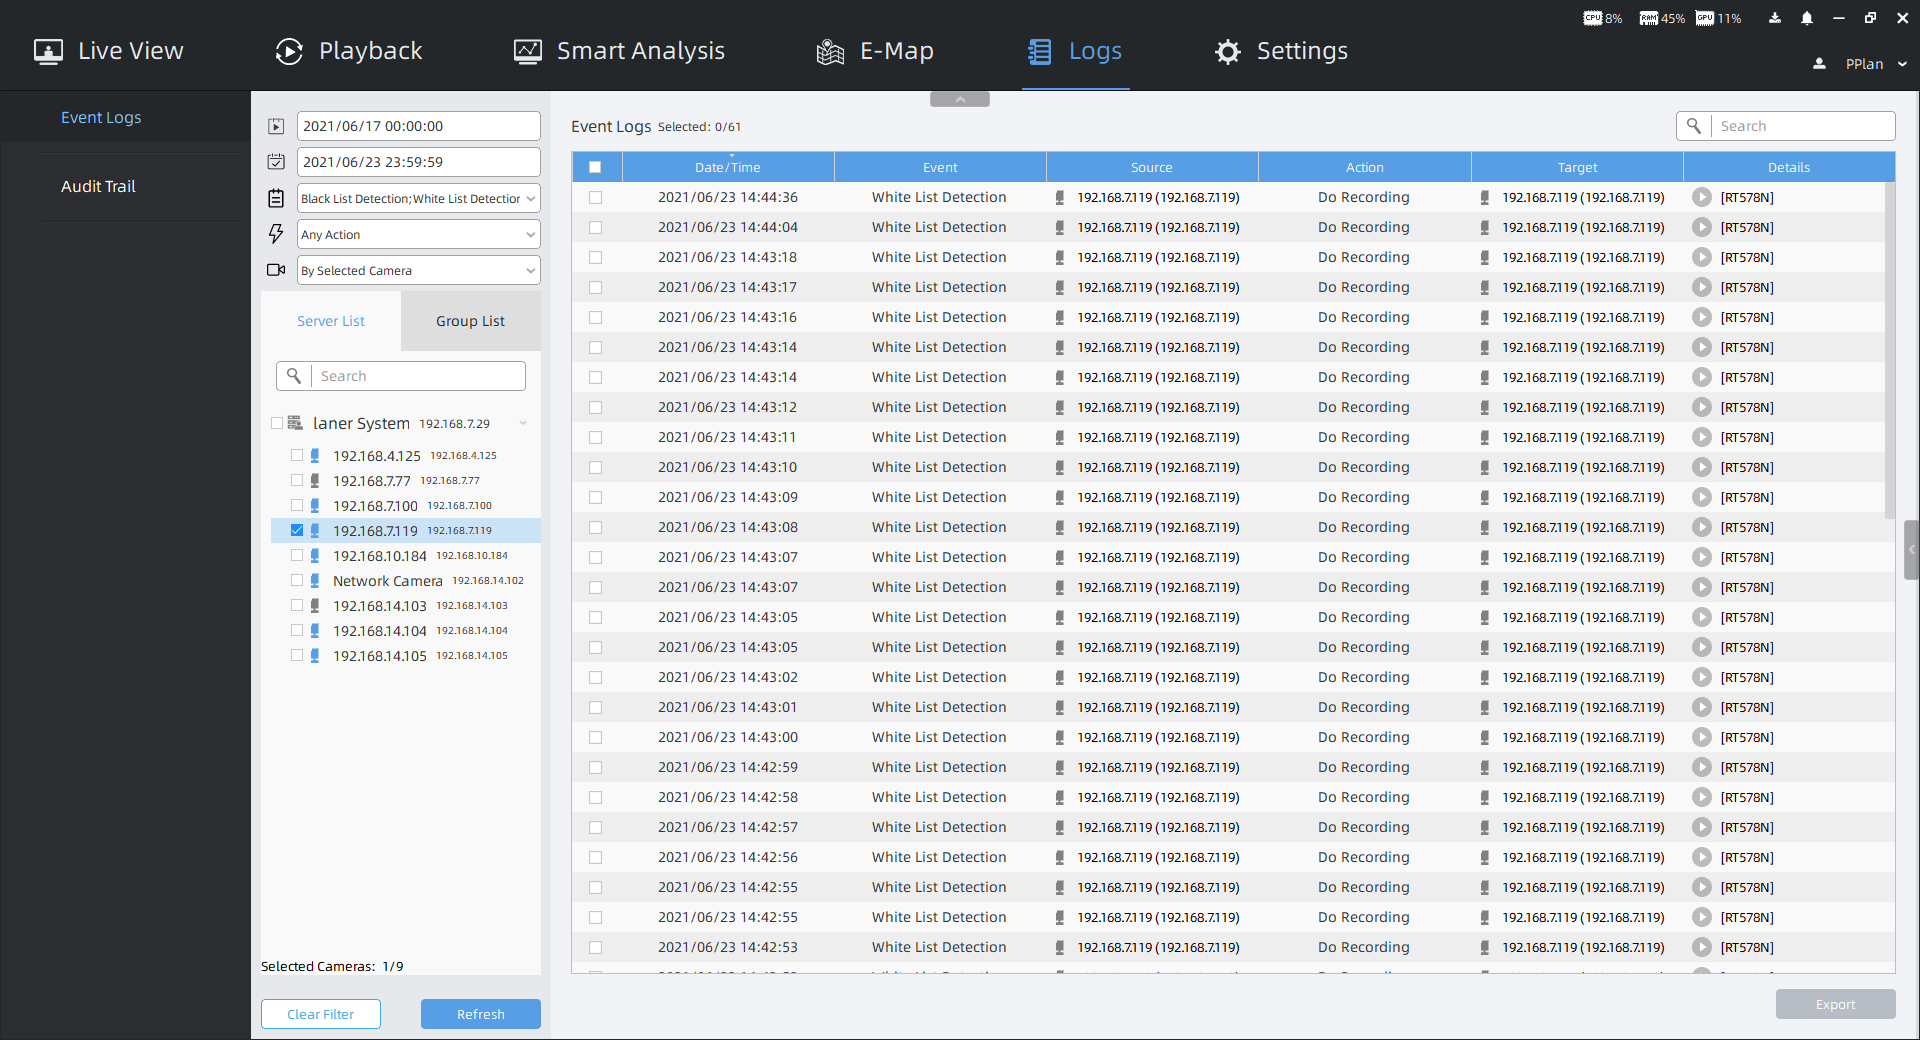
You can set filter condition as you need. In addition, if there is a recording video information about event, then you can click |
| button to check the event video. |

7.6.ANPR Search
When the Black List/White List/Visitor Detection is enabled and the corresponding schedule is set, and the storage disk is enabled, you can view the corresponding detection results in the ANPR Search interface.
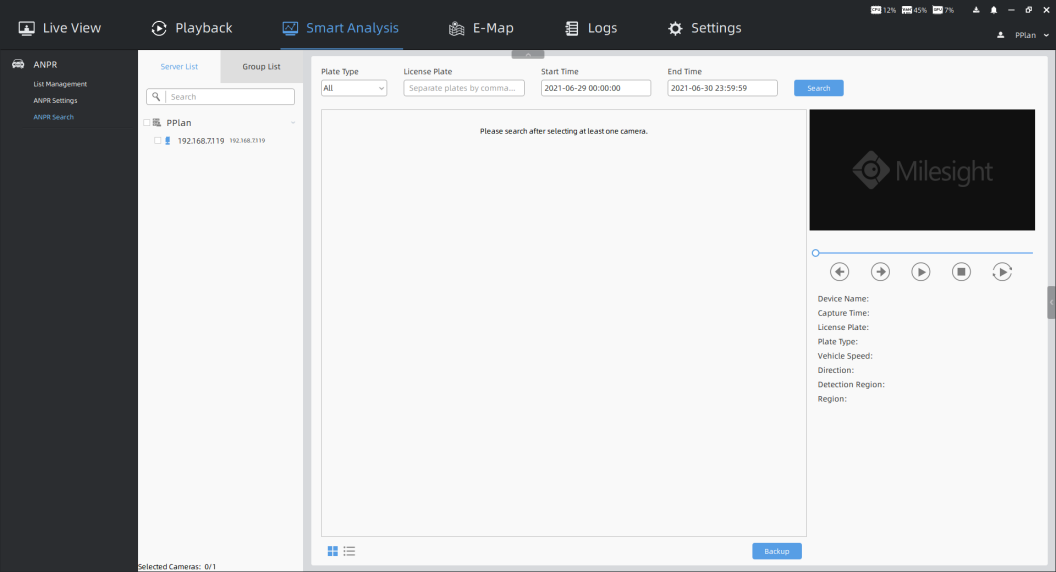
Step1: Check the cameras in the devices list tree, and select the plate type or directly enter the license plate number.
Step2: Select Start Time and End Time, and click Search button. Then the related license plate information will be displayed as below.
Click |
| button to show Thumbnail Mode. |

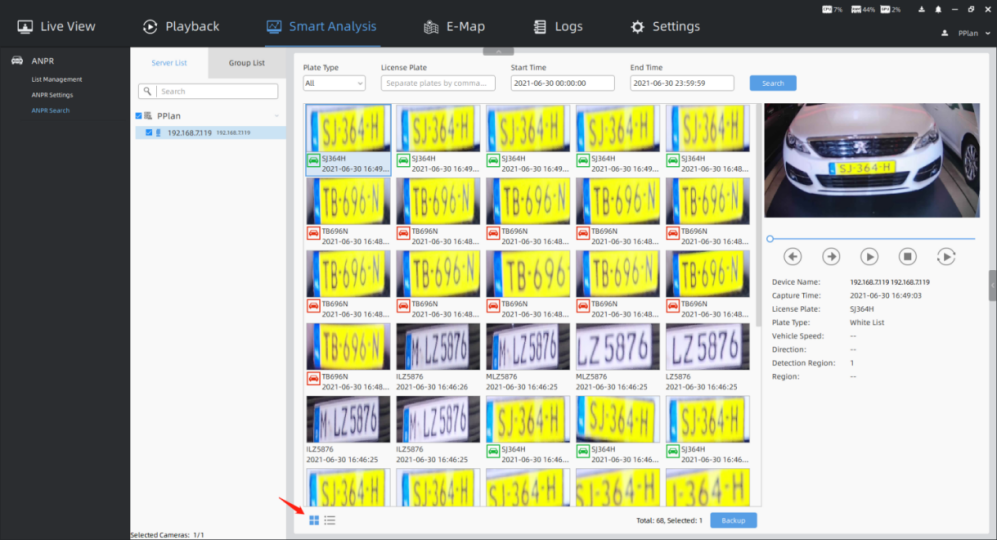
Click |
| button to switch to List Mode. |

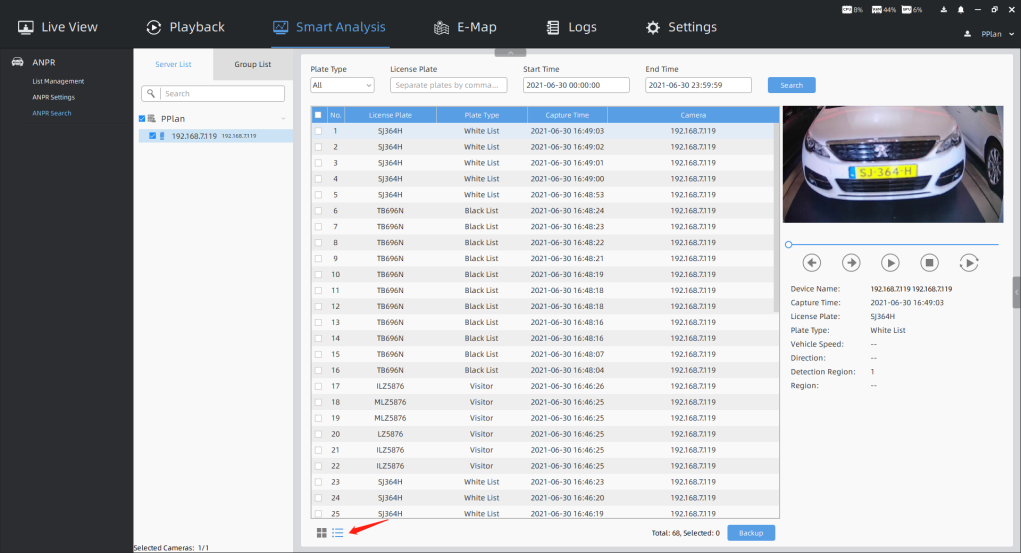
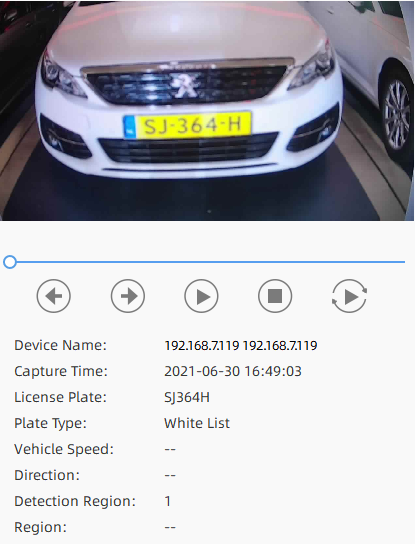
Step3: Click on the thumbnail photo in Thumbnail Mode or license plate row in List Mode under the searched results, then the license plate details will be shown as below. If there is a recording video about the license plate recognition, then you can click button to play the video or click button to play the video in the playback interface.

Note:
Make sure that correct record schedule settings is made or the ANPR event rules are set to trigger recording, so that you can check the record in the ANPR Search interface. You can refer to 7(1) for operation steps.
Step4: You can click Backup button to backup the ANPR files you want to a local folder.
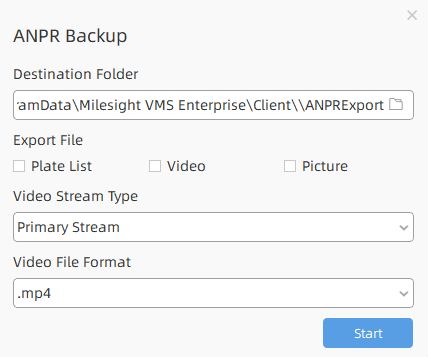
Step5: After setting the backup file destination, type and format, click Start button to start the file backup. You can click |
|

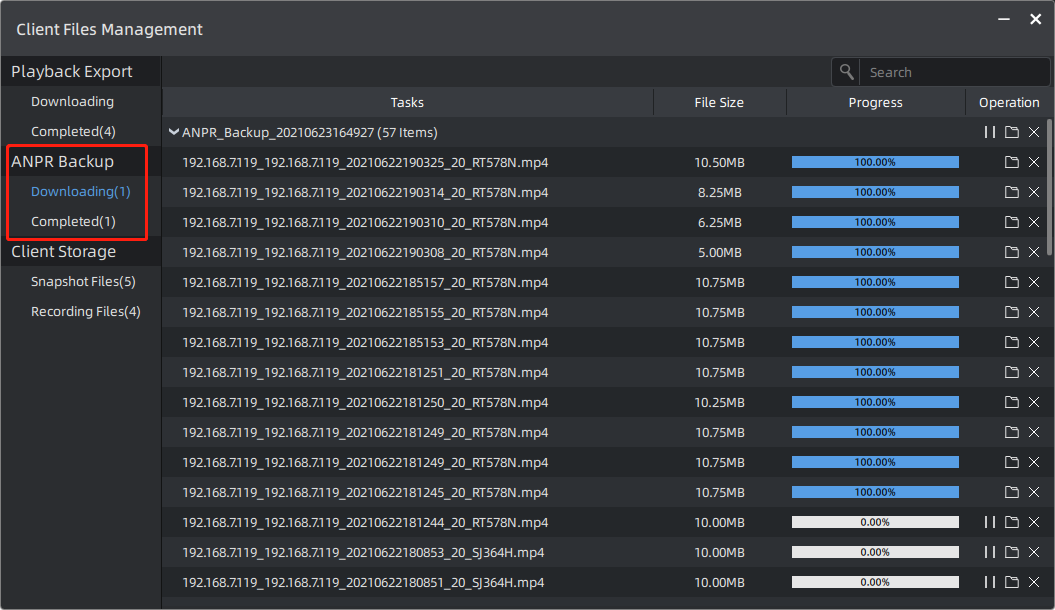
button to check task backup situation as below.
Note:
The backup file of Plate List is csv format.
7.7Set/Check ANPR Record
Before checking recording files, please make sure that you have proceed correct settings to make record action work.
Note:
In the Settings -> System & Servers -> Server Settings -> Storage Management interface, make sure you enable the storage disk you are interested in to store recordings and images of VMS system.
(1) Set Recording
There are two methods to set the ANPR record.
Method1: The record schedule settings.
Step1: Select a camera in the devices list tree in the Settings -> Devices -> Camera Record Schedule -> Schedule interface, then click |
| button to enable Continuous Recording. |

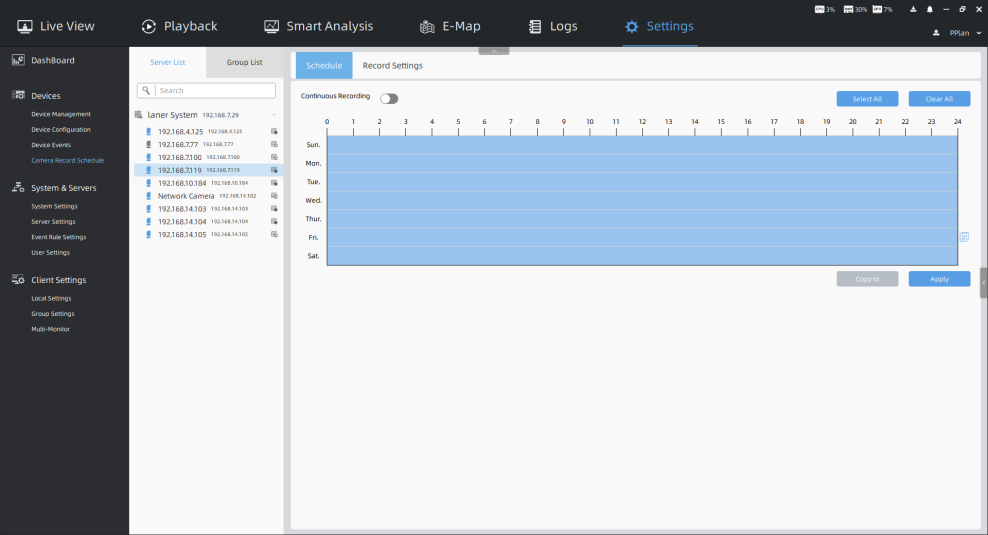
Step2: Set the Schedule, and then click Apply button to apply the settings.
Method2: Set the ANPR event rules to trigger recording.
Step1: Click Add button to add the ANPR event rules in the Settings -> System & Servers -> Event Rule Settings interface.
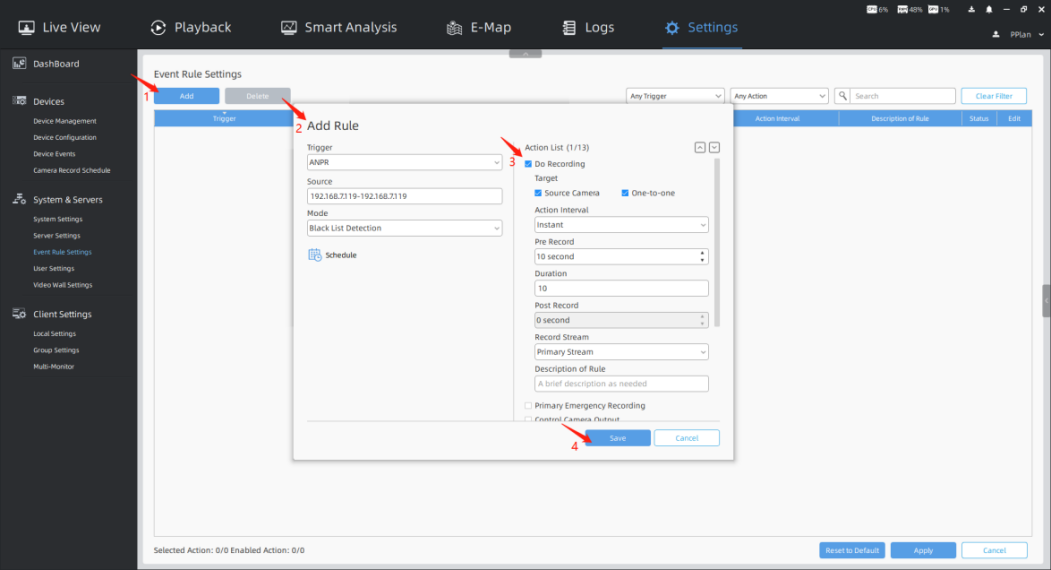
Step2: Then select the trigger type as ANPR, set the source of trigger, and select the detection mode as your demand. And set the schedule and the Do Recording action. After setting the event rules, click Save button
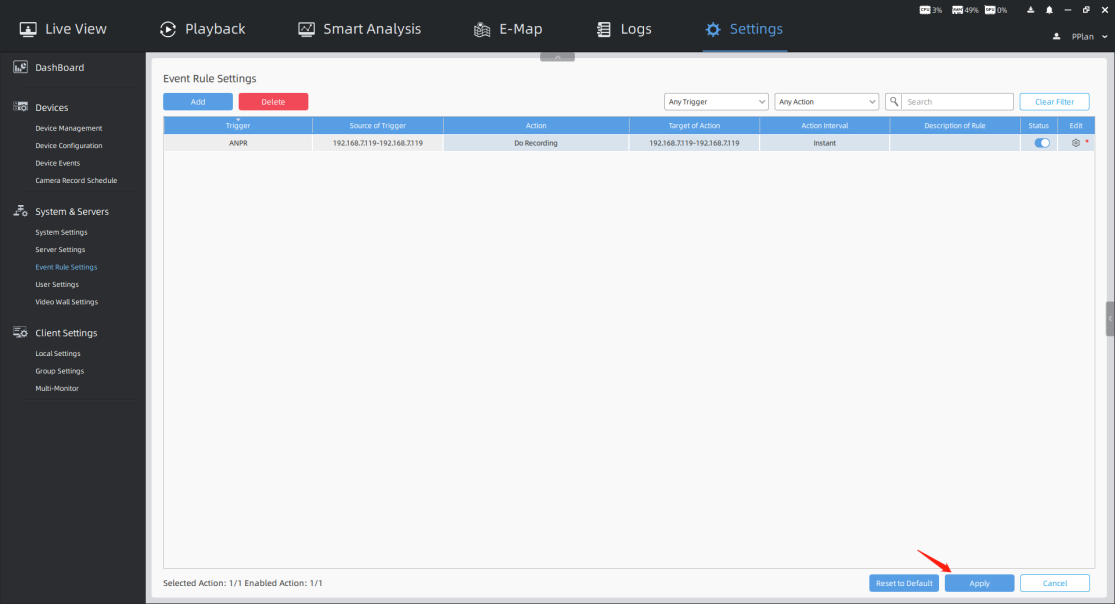
Step3: Then the event rules will be added to the event rule list. Click Apply button to apply the event rules. The recording is triggered when the corresponding license plate type is detected.
Note:
Make sure the corresponding detection mode is enabled and the detection schedule is set. You can refer to 5 for operation steps.
1. Check Recording
2. Playback
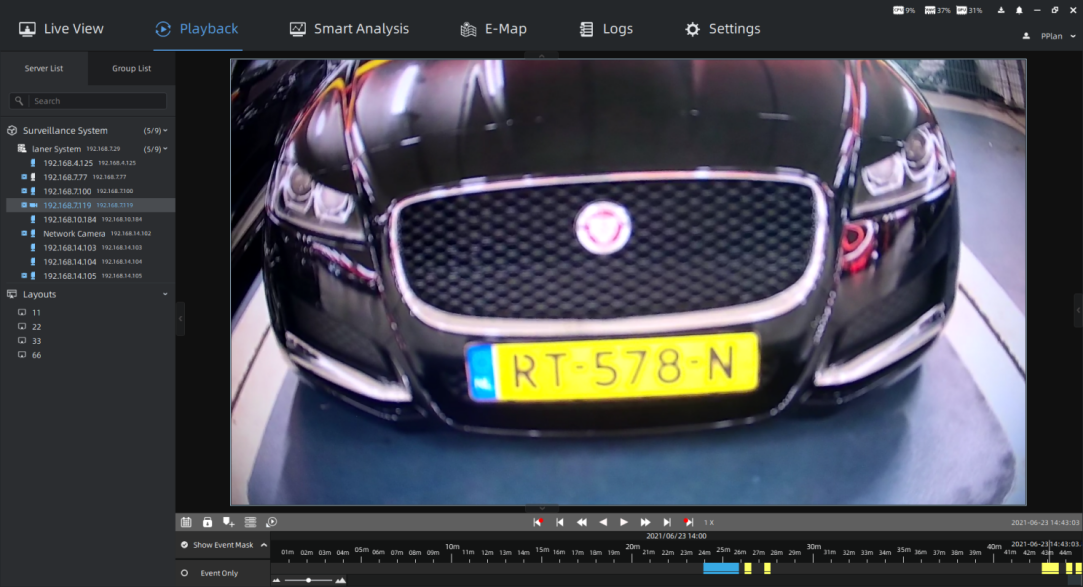
Step1: Select the camera in the Playback interface, click button to select the time. |
|

Step2: You can check Show Event Mask to select the ANPR event, then the ANPR event videos will be displayed in the corresponding color.
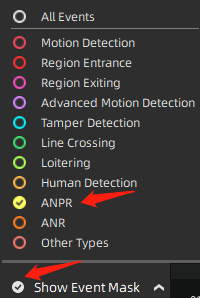
Step3: Select the continuous recording or ANPR event recordings searched out on the time bar to play.
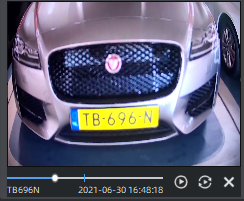
b. ANPR Preview
Click the license plate information to check the 20s video. (20s = the pre 10s + the post 10s of the license plate event)
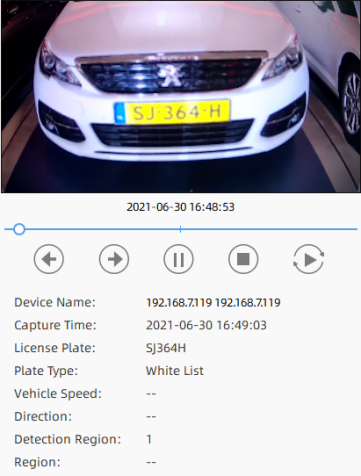
3. ANPR Search
Click button to check the latest 20 seconds video or click button to play the video in the playback interface. (20s = the pre 10s + the post 10s of the license plate event)

-END-