
Version | 1.0 | Update | 2026.09.03 |
1. Introduction
The PMC (Parking Management Camera) is an intelligent camera specifically designed for parking lot entrances, exits, and internal parking space management. It integrates AI, License Plate Recognition (LPR), and video analytics technologies, and can be widely used in scenarios such as parking space occupancy statistics, parking fee management, and illegal parking monitoring, significantly improving management efficiency and intelligent operations.
This article primarily introduces the three LPR function activation methods, configuration, and bounding box logic for the Milesight PMC camera (PMC8266-FPE).
2. Enable LPR AI Application
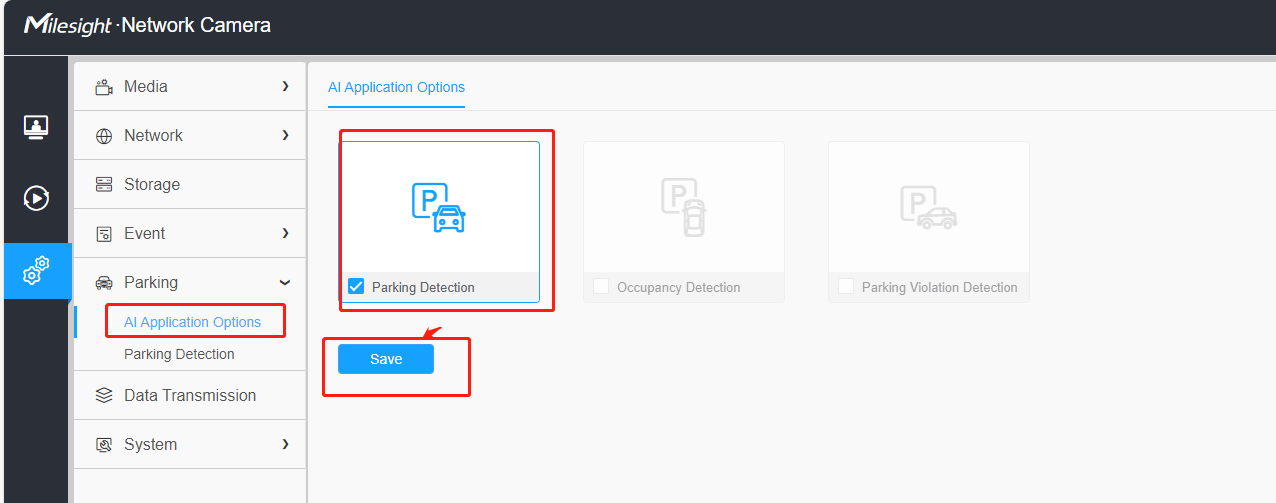
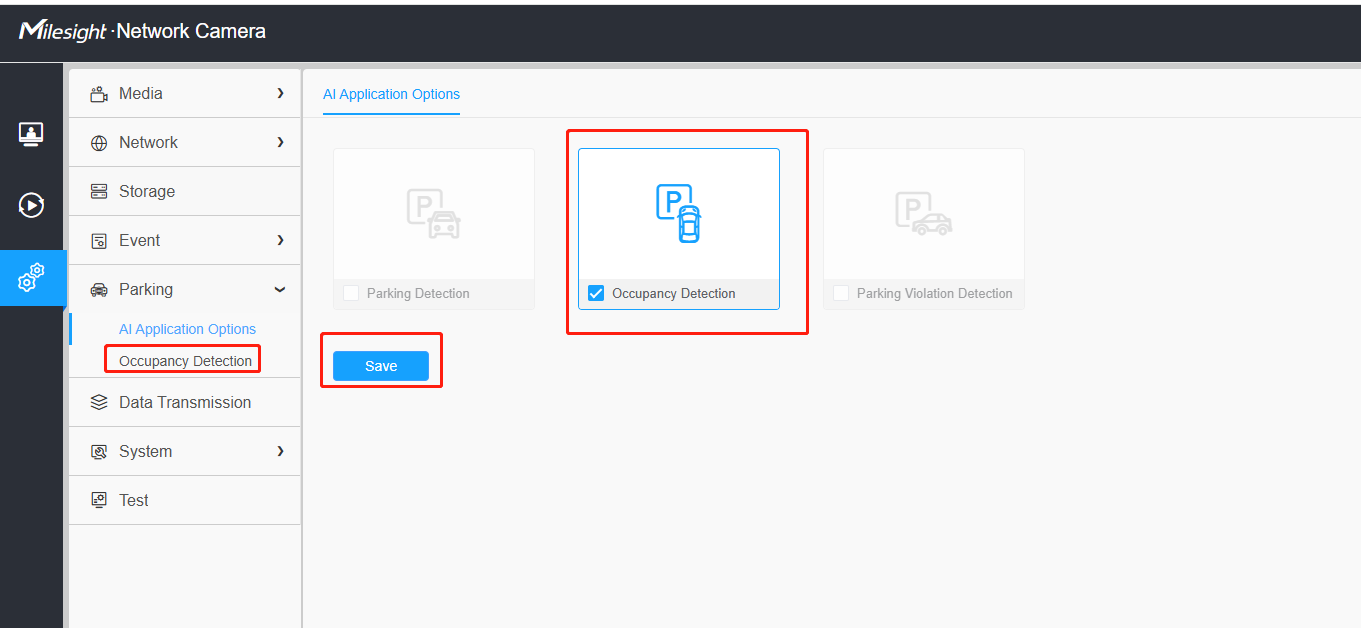
Under Parking → AI Application Options, there are three LPR modes. Please note that only one mode can be enabled at a time based on the usage scenario; They can not be enabled simultaneously.
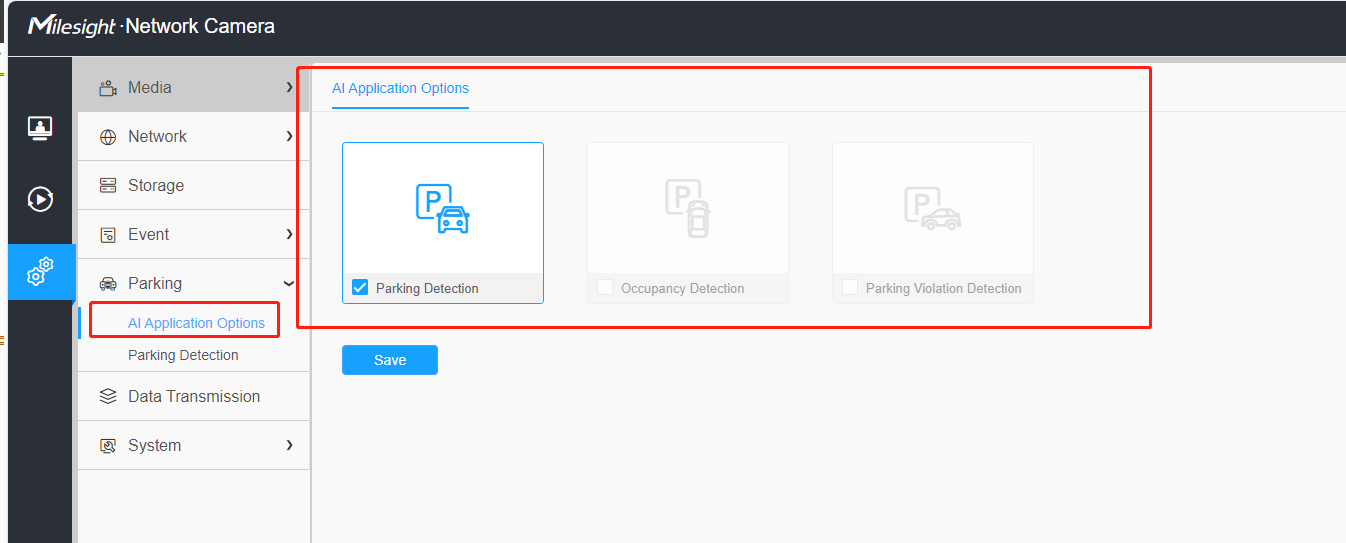
1. Parking Detection
Parking Detection function supports the detection and timing of roadside parking occupation. And it can detect the vehicle attributes and license plate attributes of the occupied vehicle, which greatly helps to manage the parking.
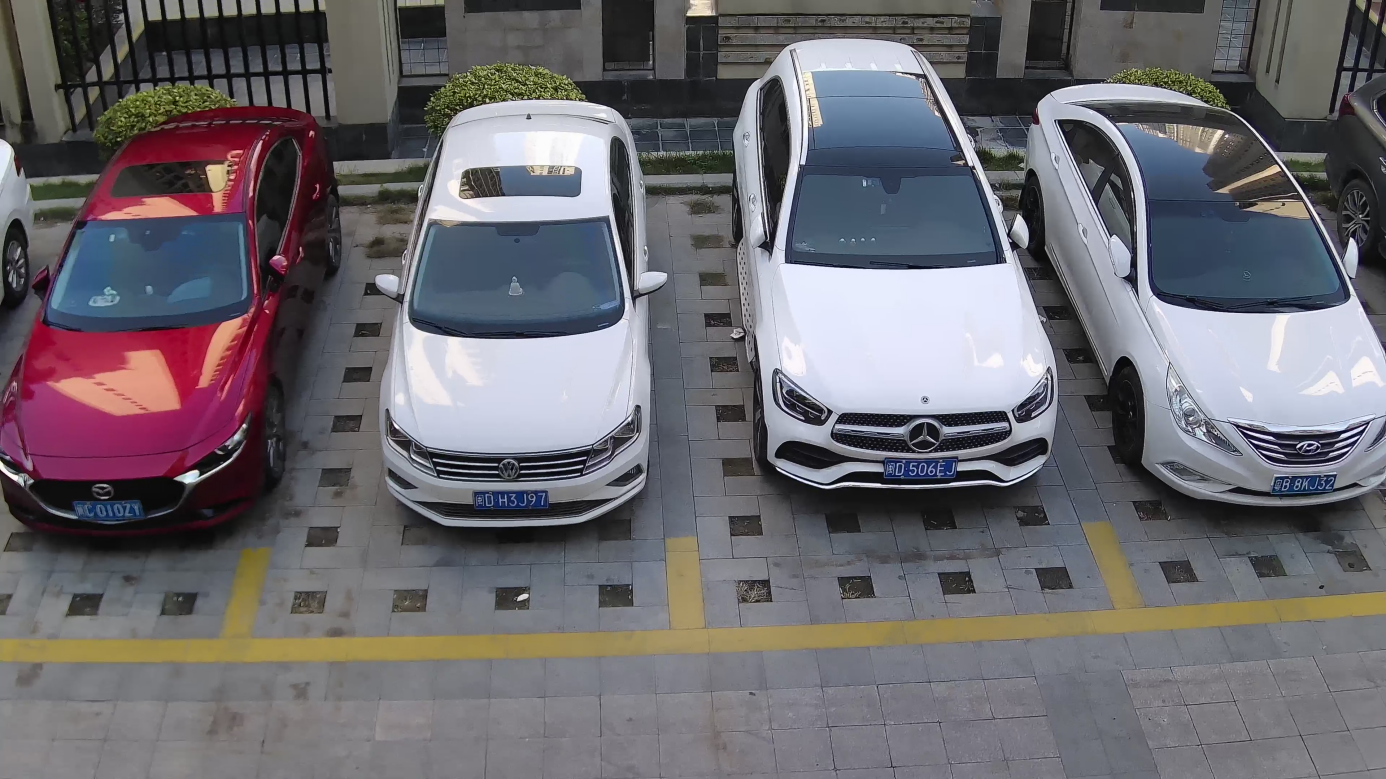
The recommended scenario is in-line parking spaces with no more than six spaces.
2. Occupancy Detection
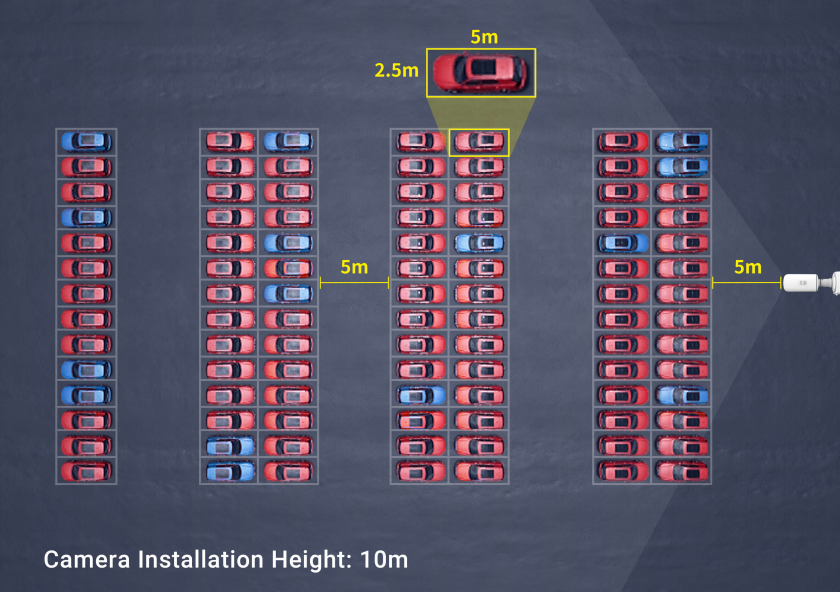
Occupancy Detection mainly used to detect how many parking spaces are occupied, and is suitable for both indoor and outdoor parking lots,it based on Al algorithm can realize simultaneous detection and
management of up to 100 parking spaces with up to 98% detection accuracy.
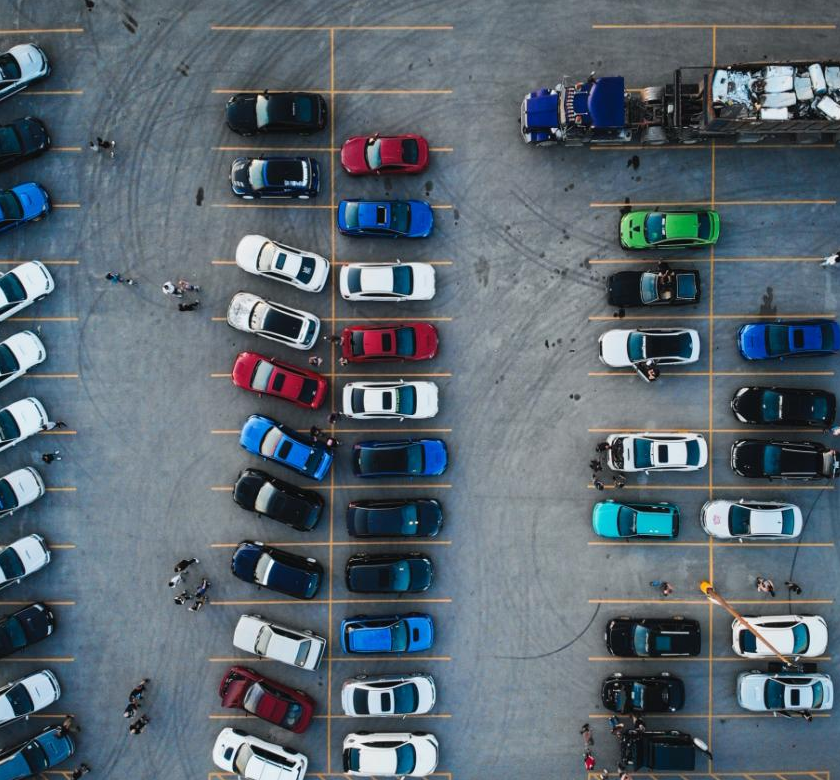
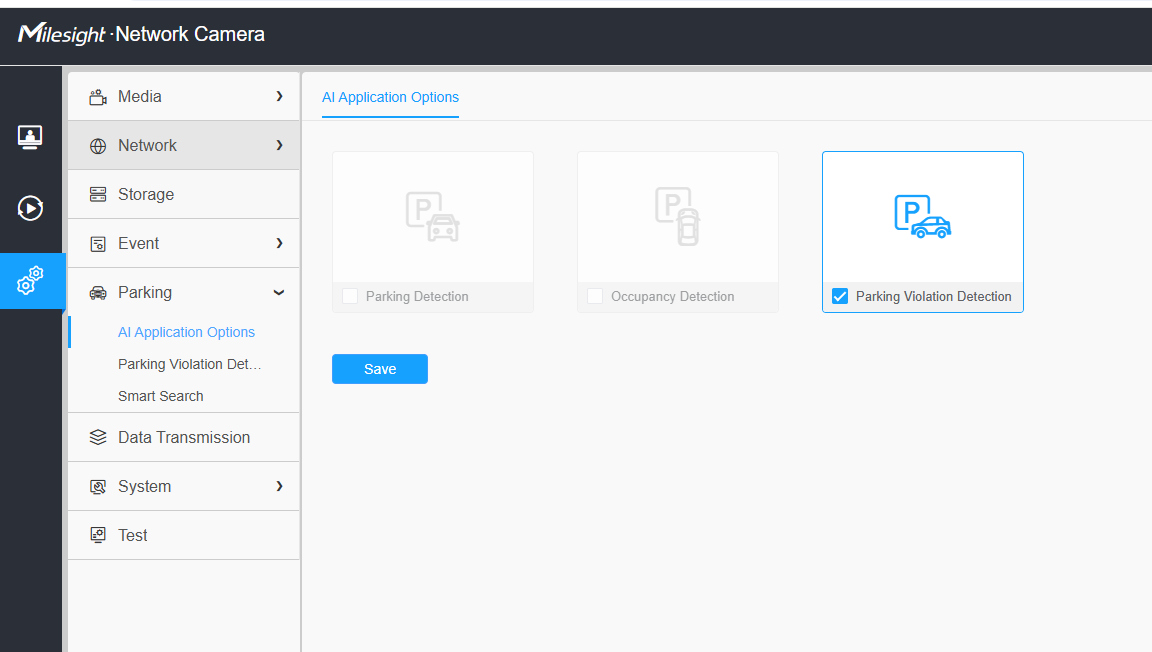
3. Parking violation detection
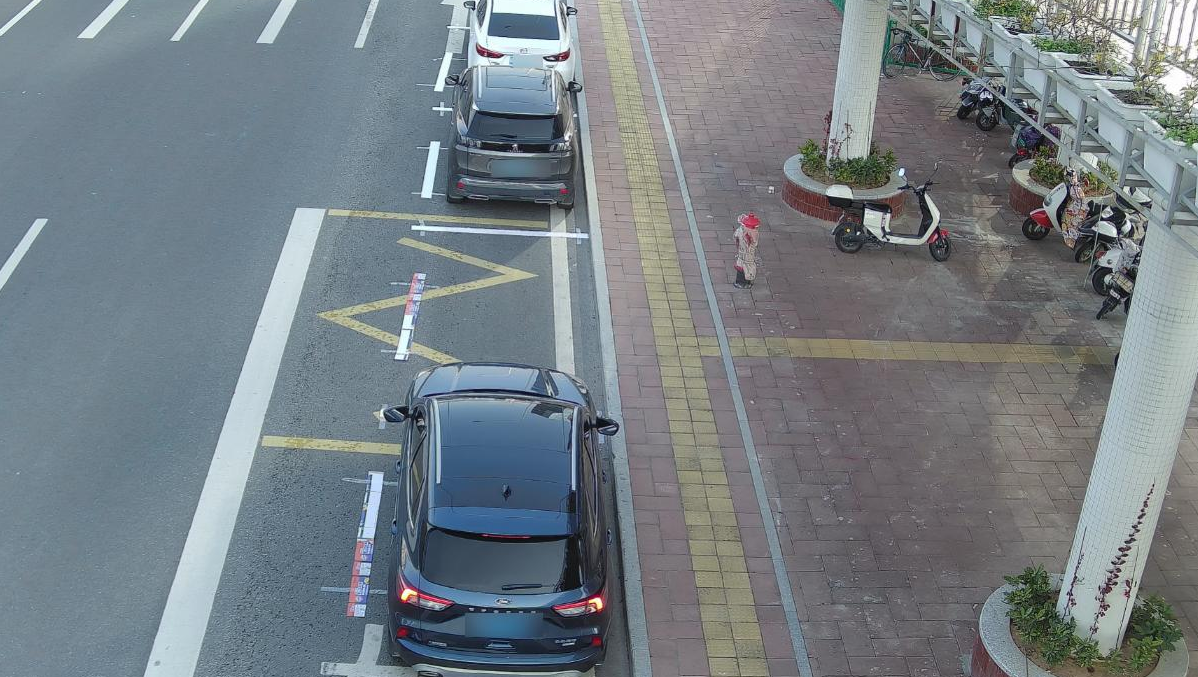
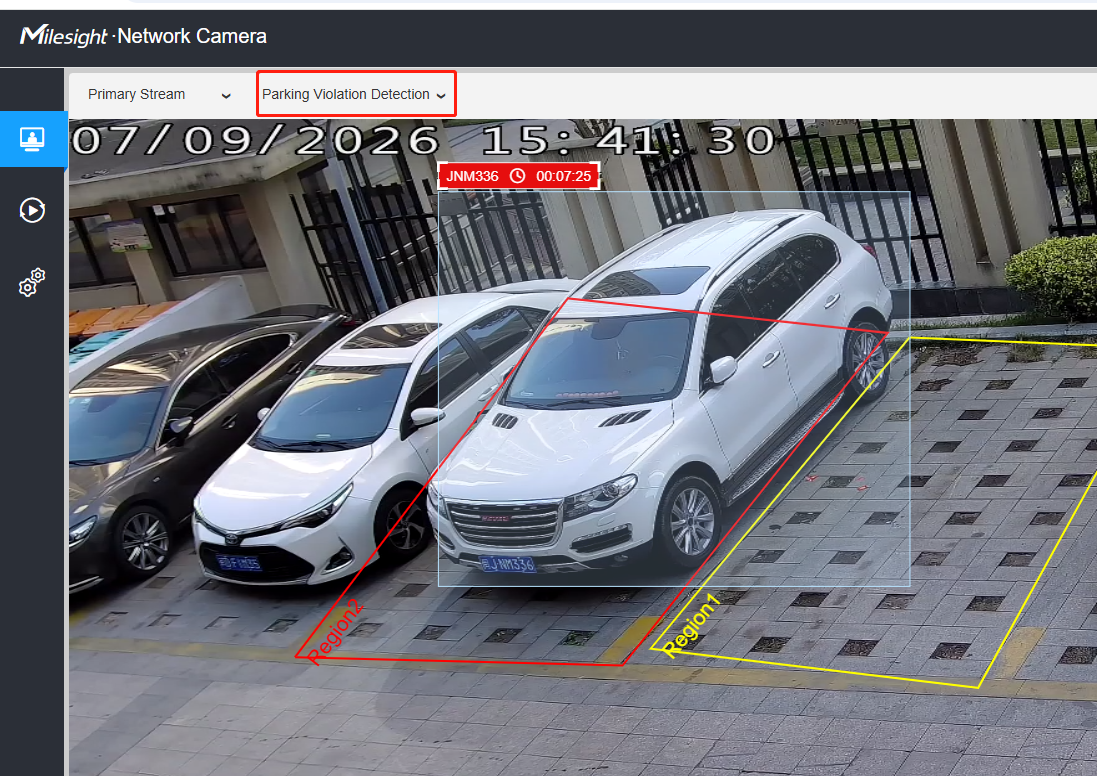
Parking Violation Detection function supports real-time detection, timing and trigger alarm of illegal parked vehicles. Also, it can detect the vehicle attributes and license plate attributes of the illegal parked vehicles.
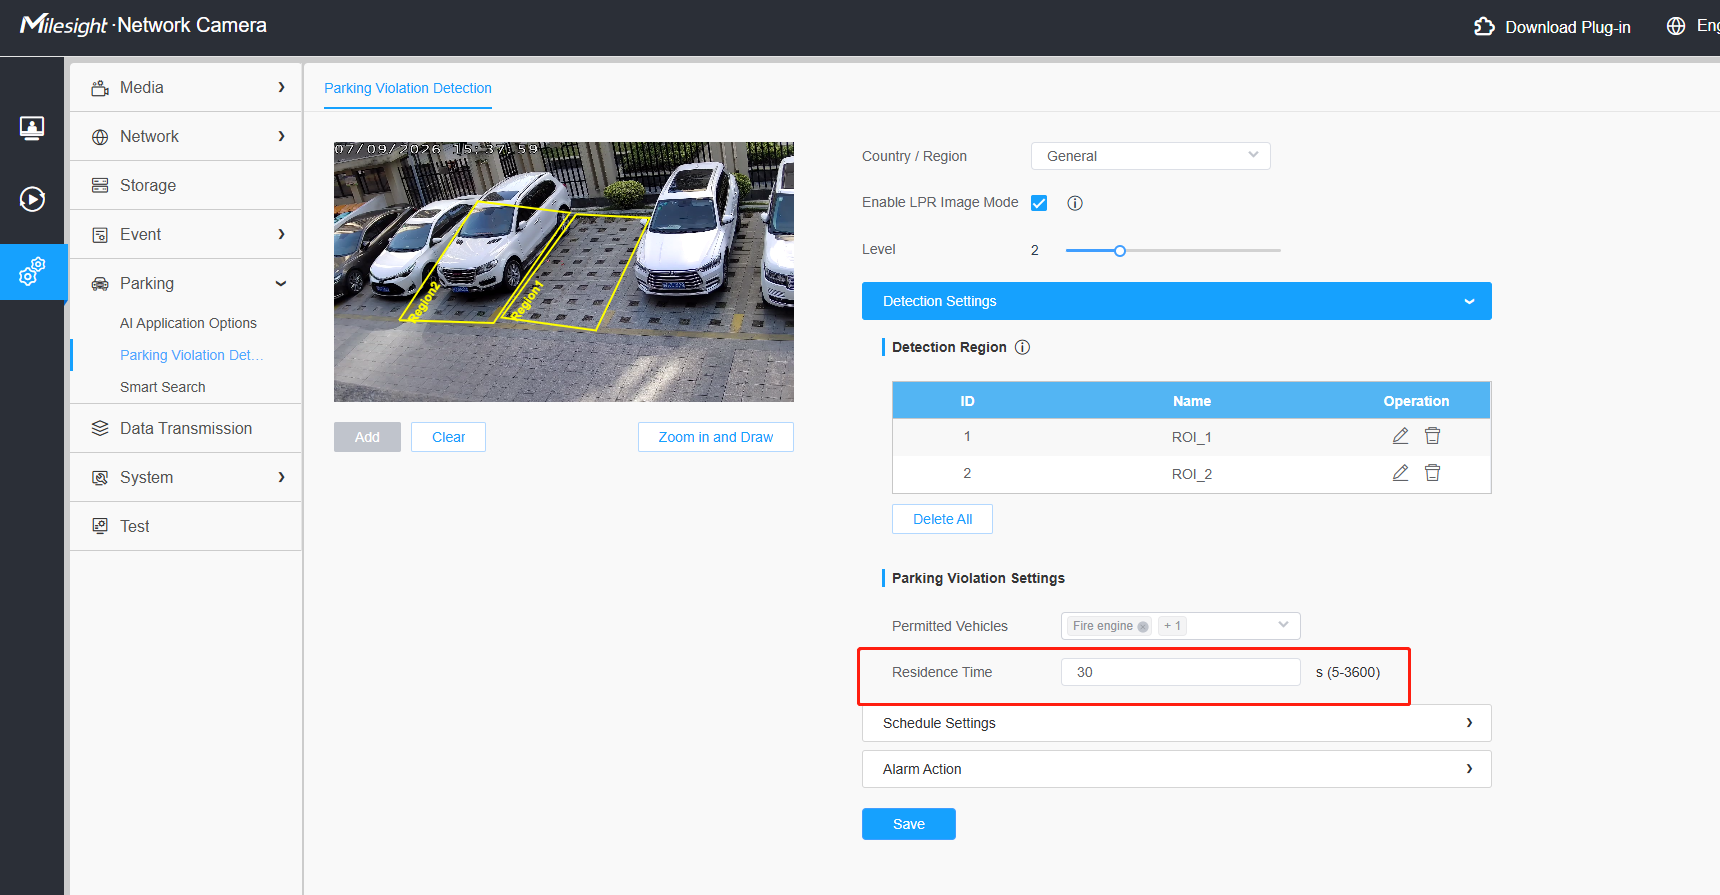
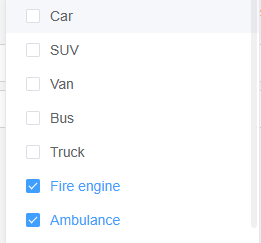
This function can be applied to parking areas for special vehicle types, such as ambulance and fire truck parking areas or bus parking areas, by setting the allowed vehicles as needed. And Residence Time can be set to apply this function to the time-limited parking areas, and the alarm will be triggered when the vehicle is parked over time. There are more application can be expanded by setting schedule, such as parking is allowed at night and not allowed during the day. This function is excellent for helping with traffic parking control.
3. PMC Configuration Guidance
1. How to configure Parking Detection
Step1: Check the check box to enable the Parking Detection function.
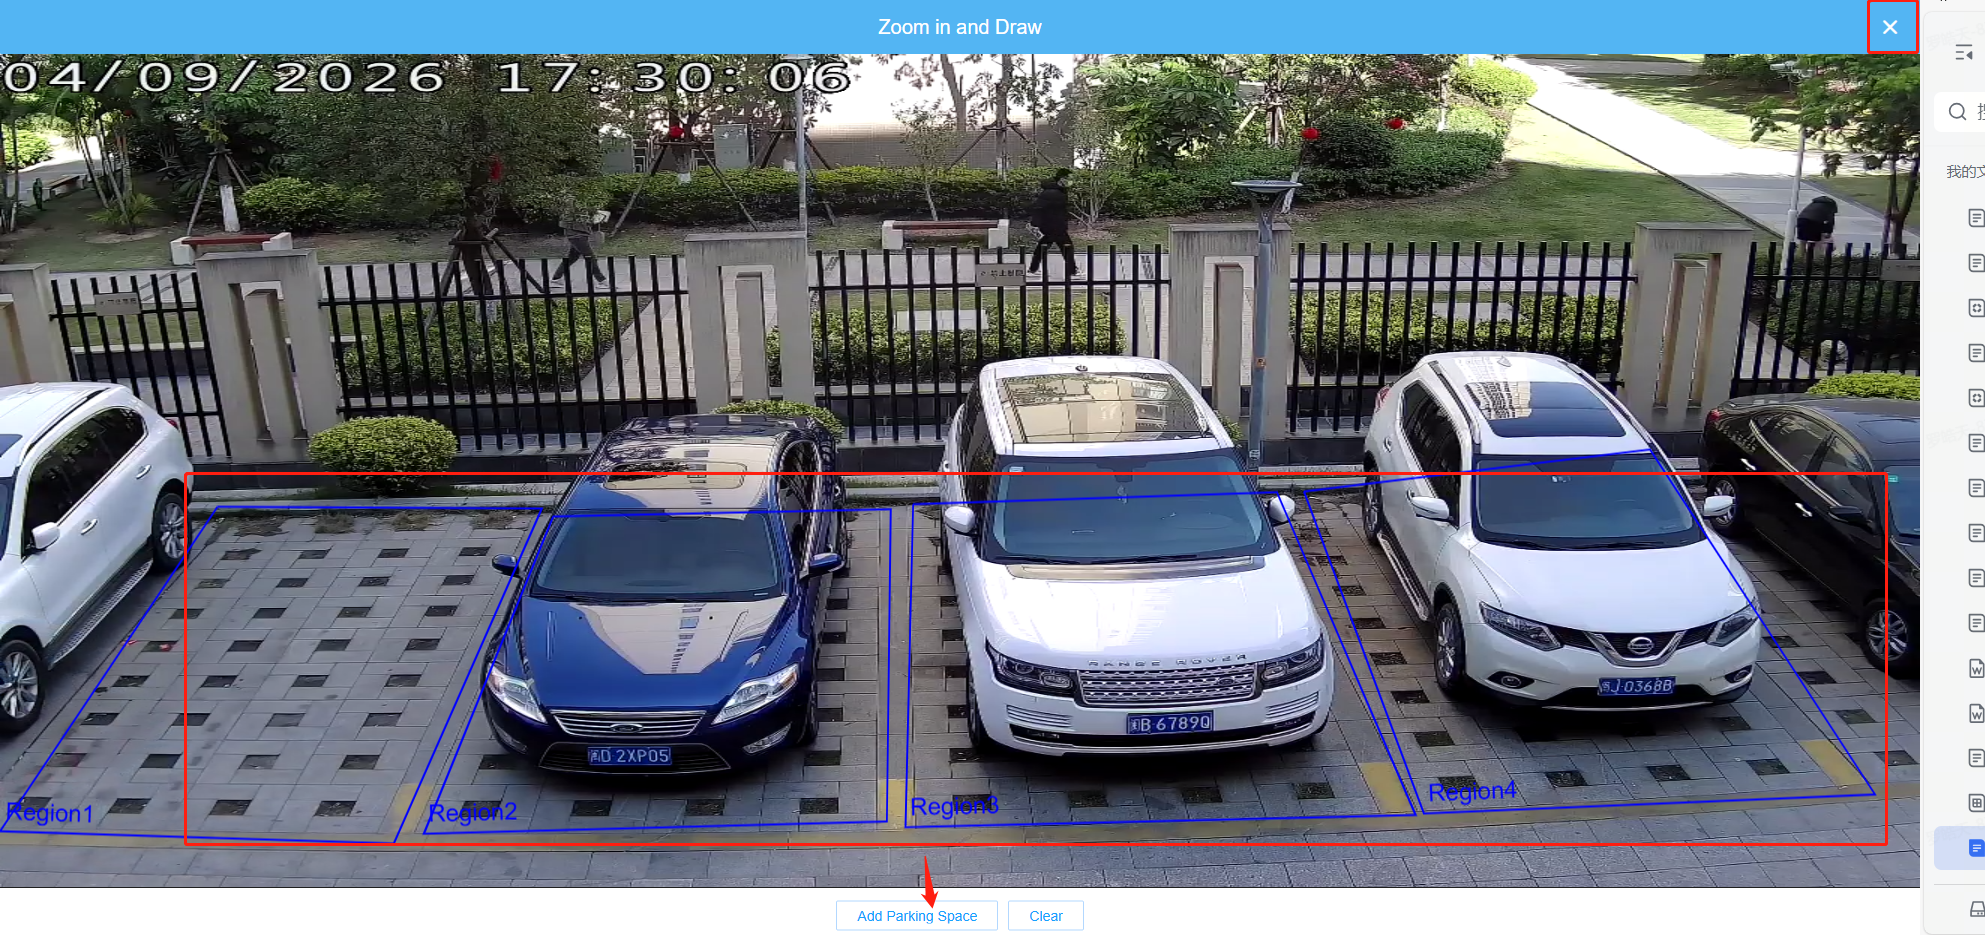
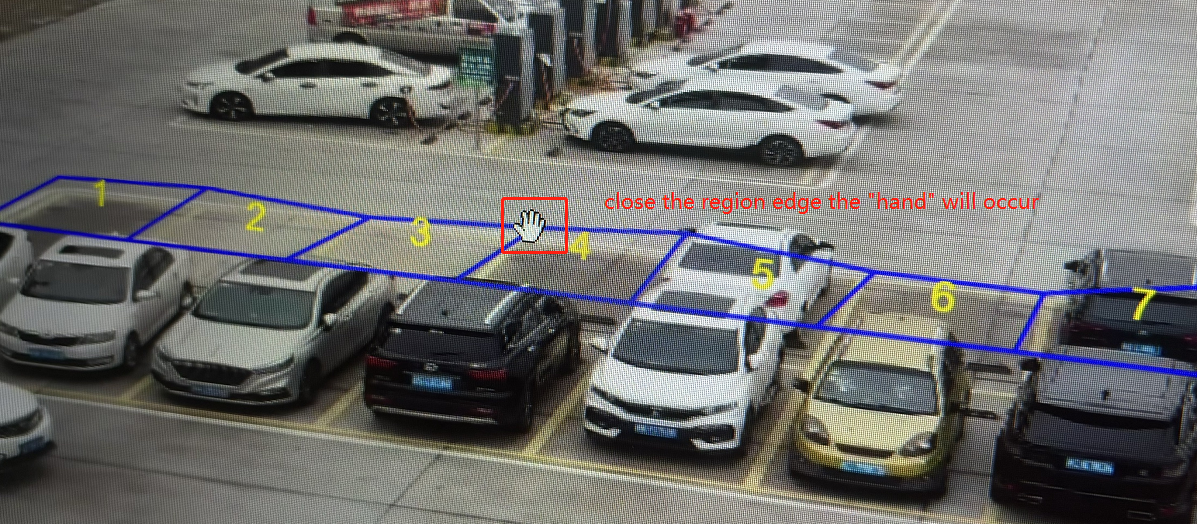
Step2: Draw detection regions. Support simultaneous detection of parking spaces(max to 6). And you can customize the name/number.
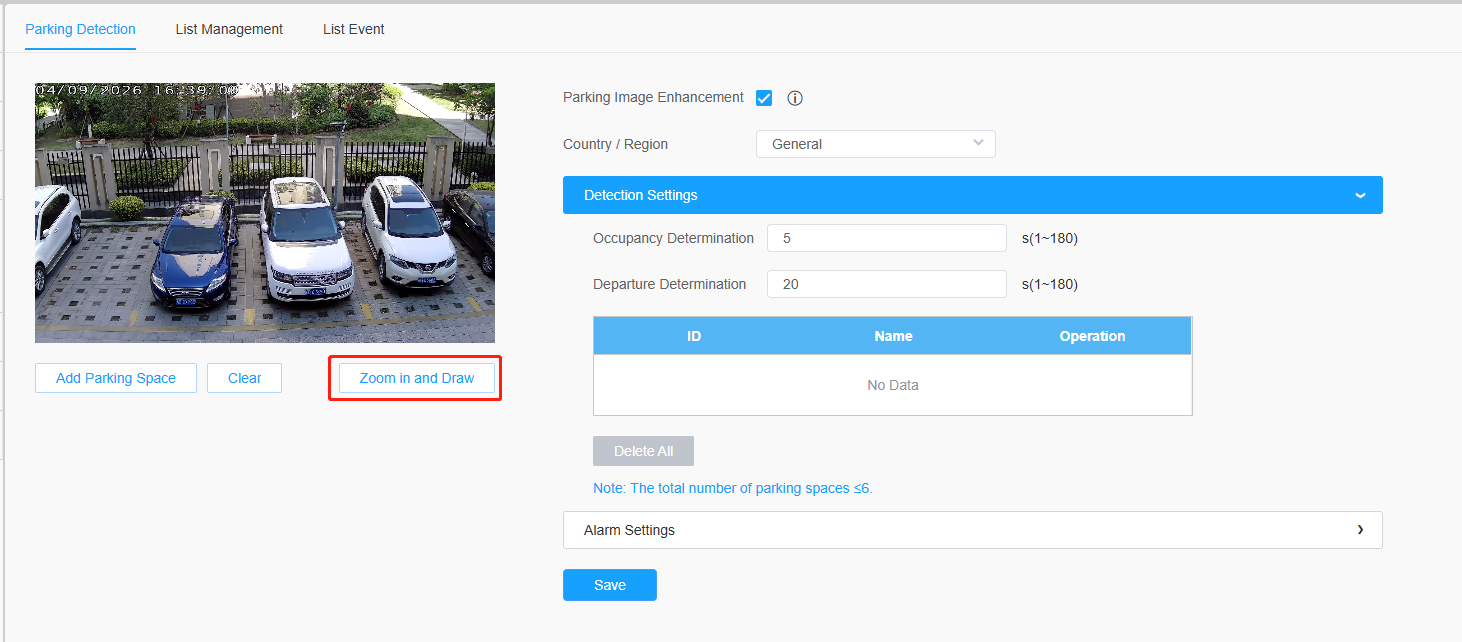
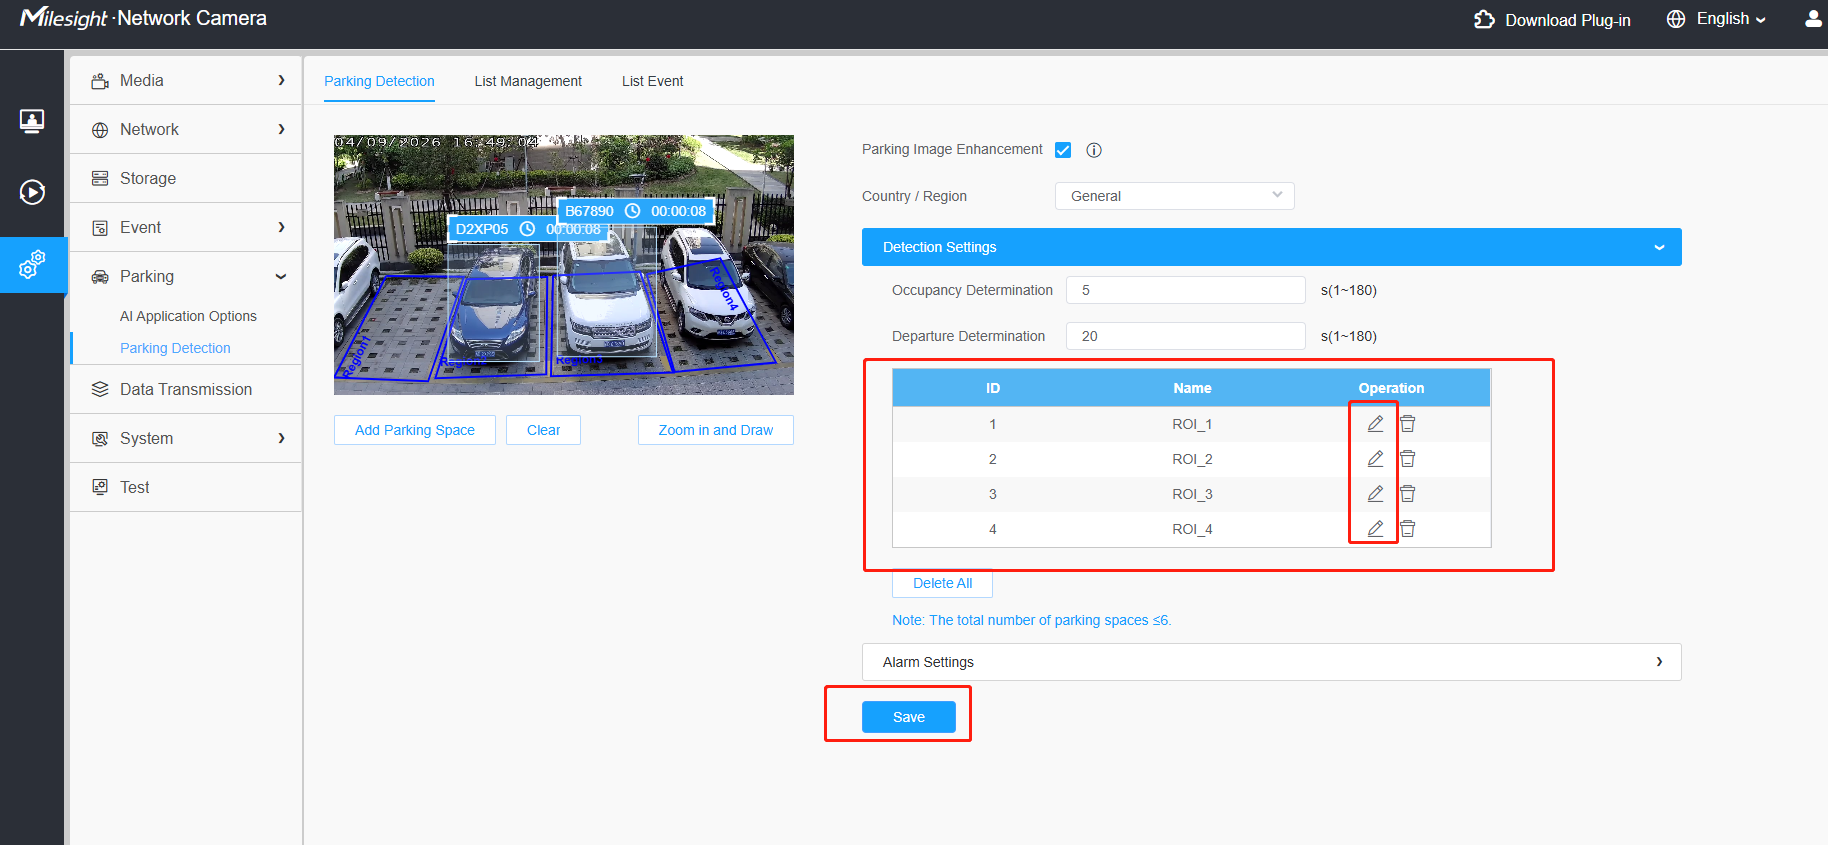
Occupancy Determination:Indicates how long after the vehicle enters the parking space the timer starts.
Departure Determination:Indicates how long after the vehicle leaves the parking space the timer stops.
Note:For parking space detection, you should draw one bounding box for each individual space.The recommended scenario is in-line parking spaces with no more than six spaces.When drawing the regions, do not overlap them with each other.
2. How to configure Occupancy Detection
Step1: Check the check box to enable the occupancy detection function.
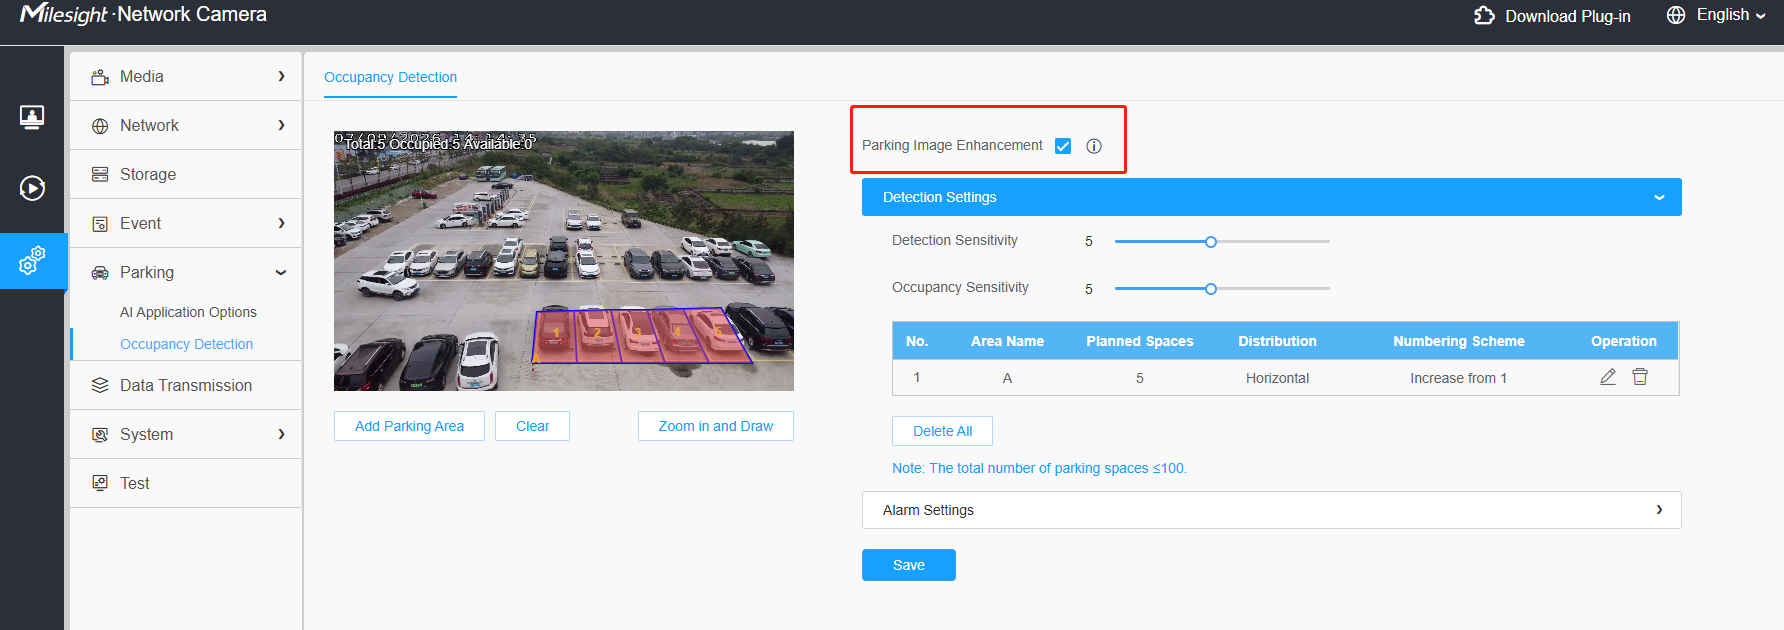
If it's hard to identify vehicle bodies at night, you can enable "Parking Image Enhancement" function.
Step2:Click “Zoom in and Draw.” Draw the parking area.
Note: The area must be drawn one row or one column of parking spaces at a time. Count the number of parking spaces in each row or column before drawing.
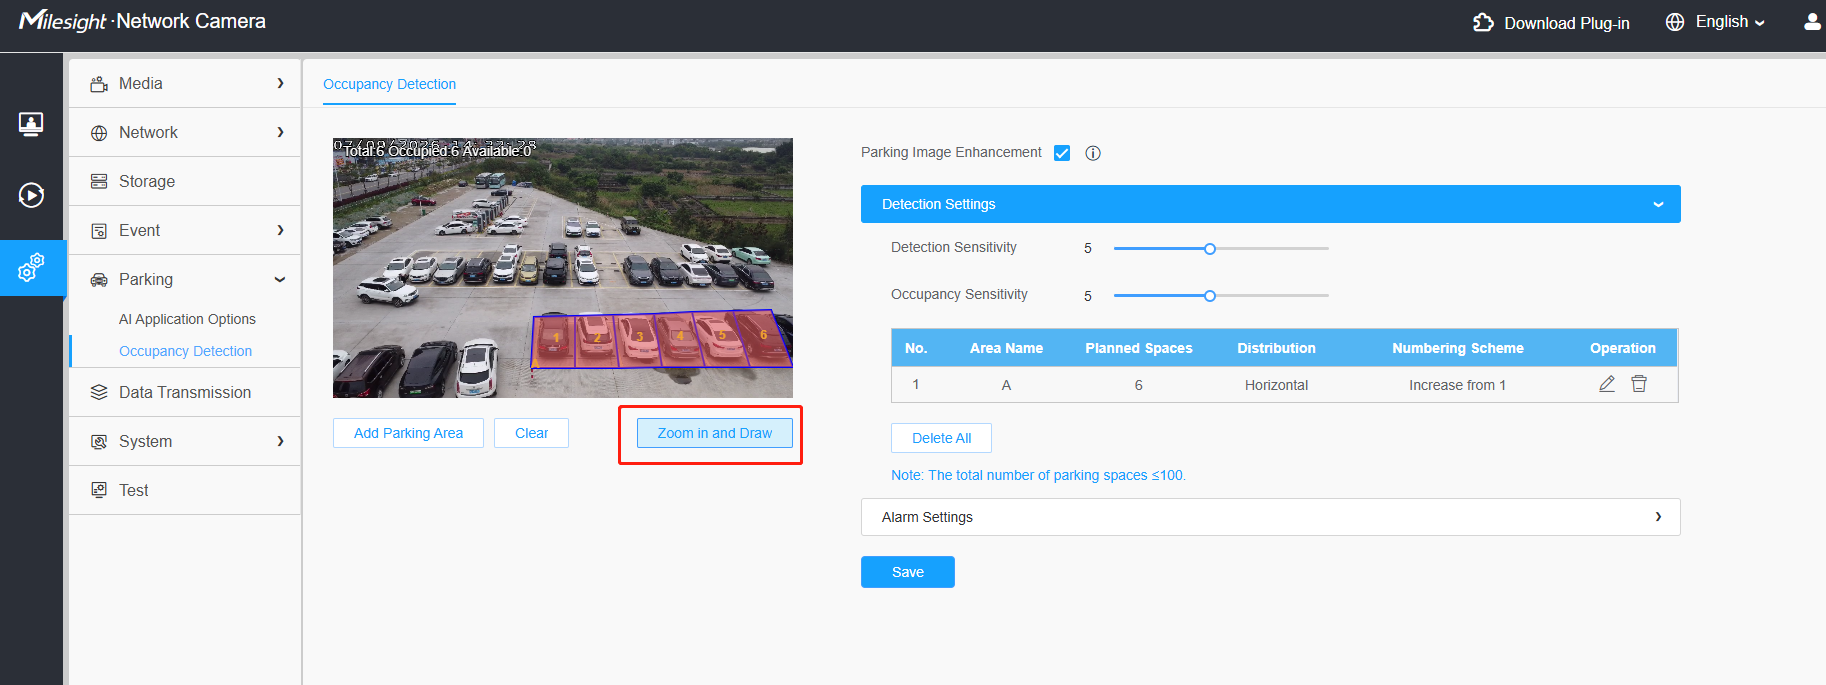
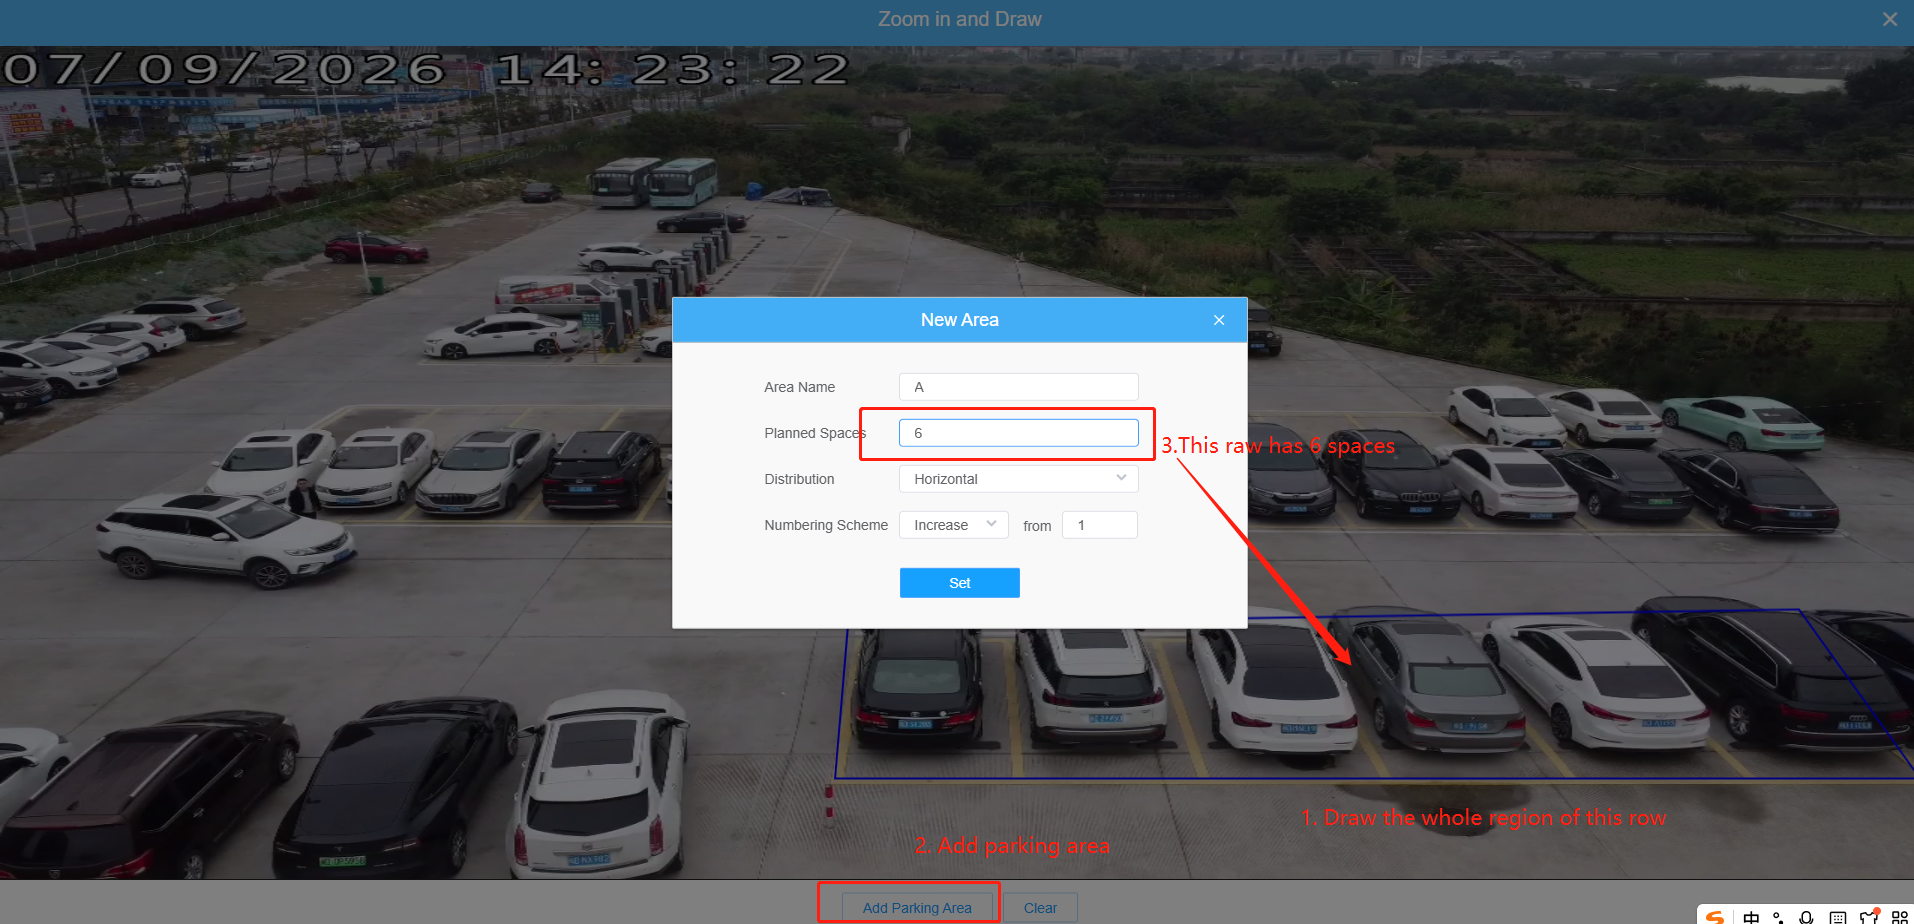
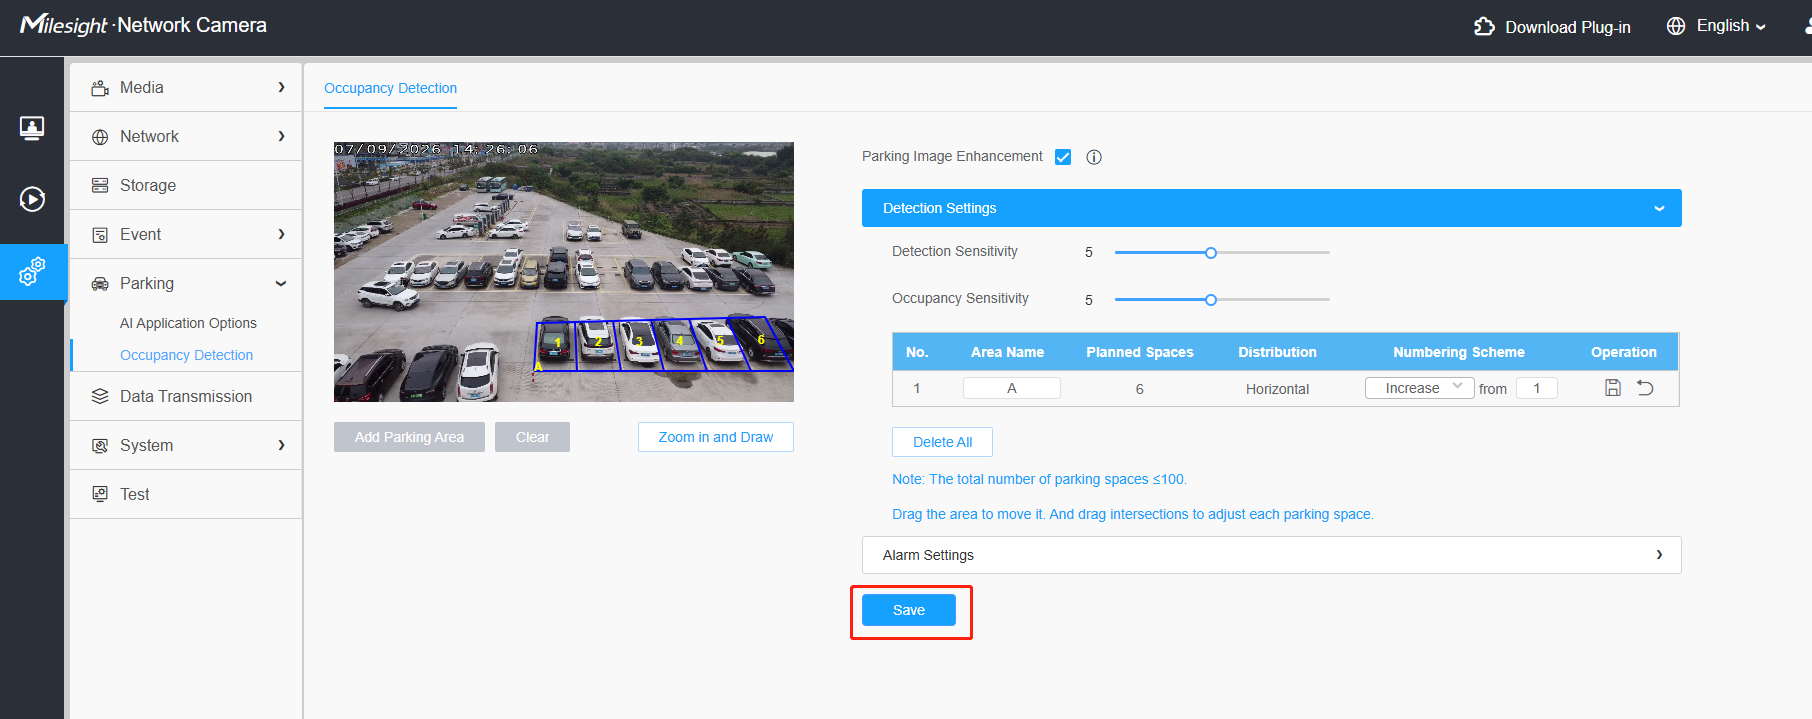
Step3:Now that the first line above is complete, follow the same procedure for the remaining lines.
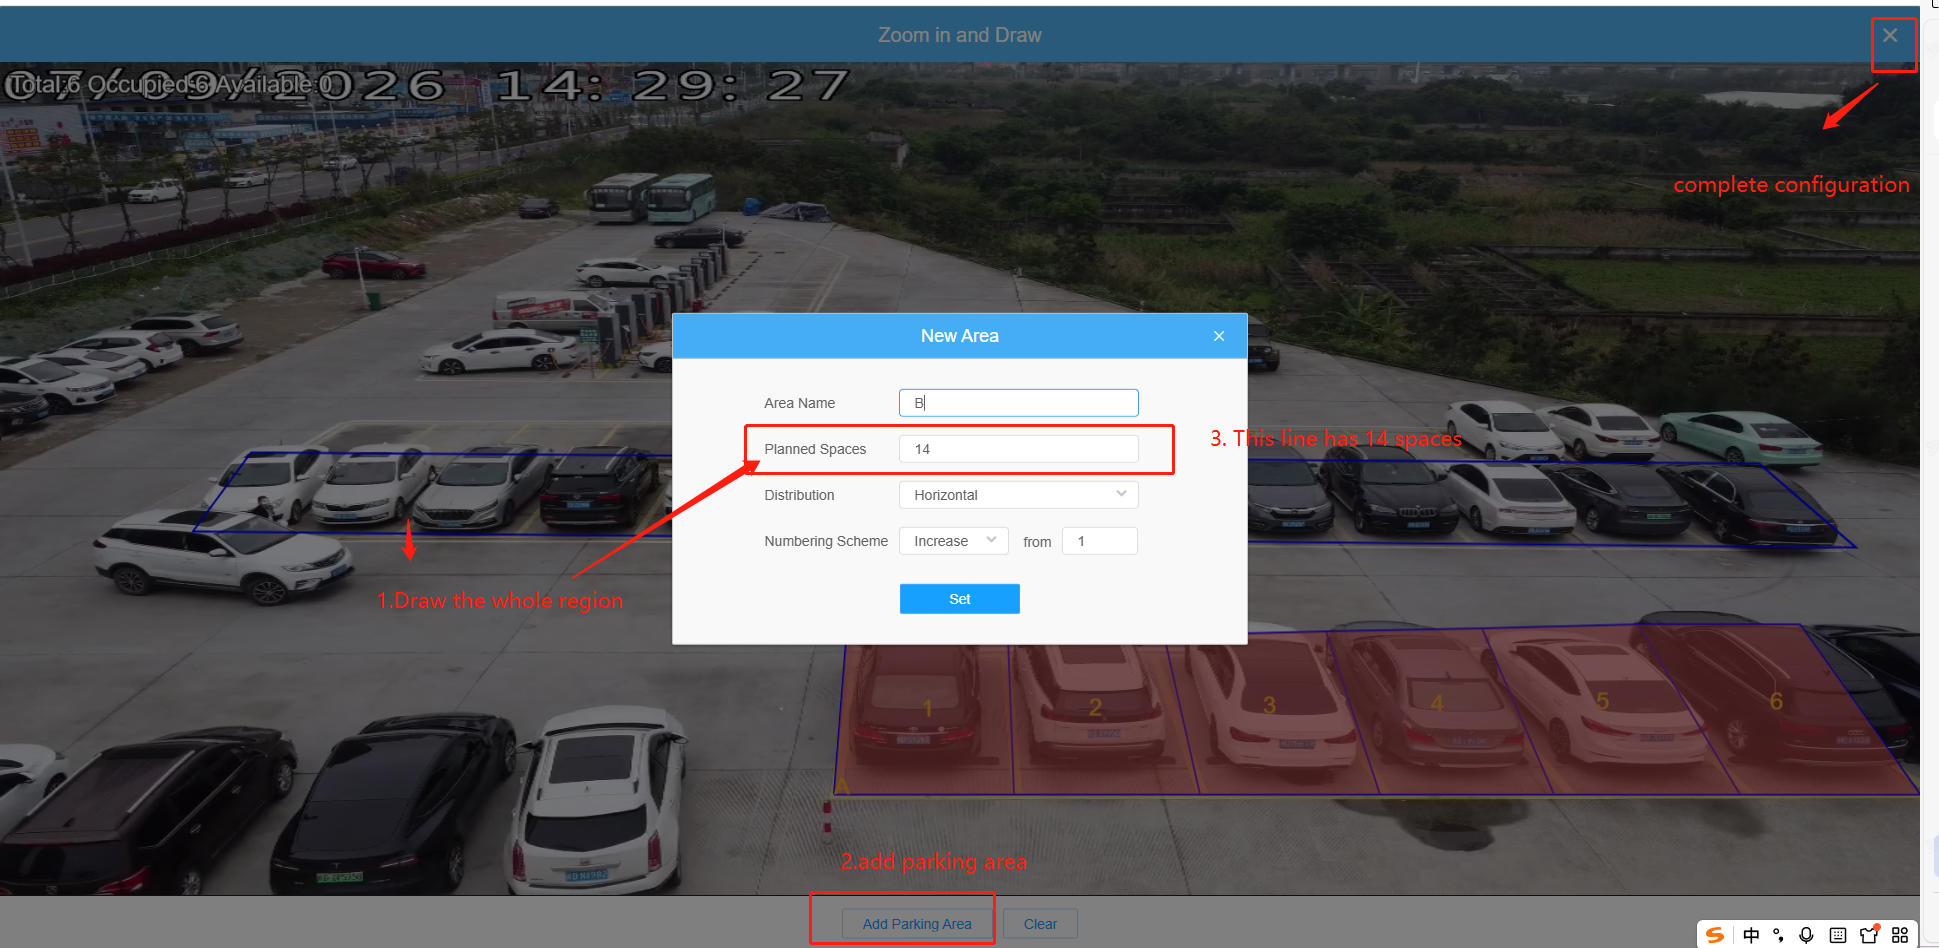
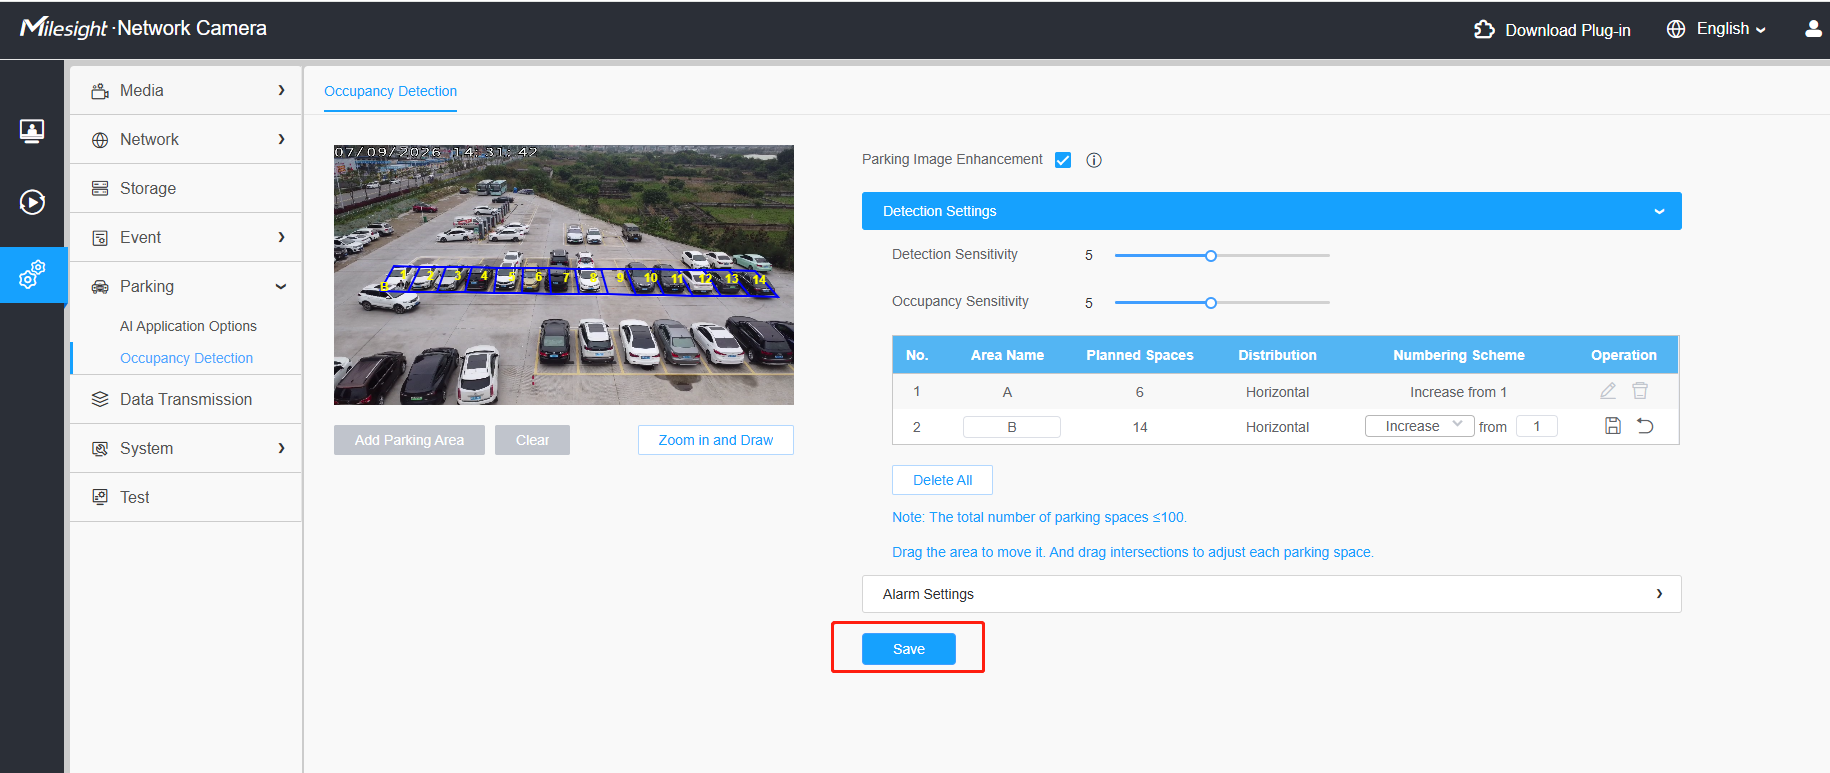
After you finish drawing, wait a few seconds to see the results immediately.
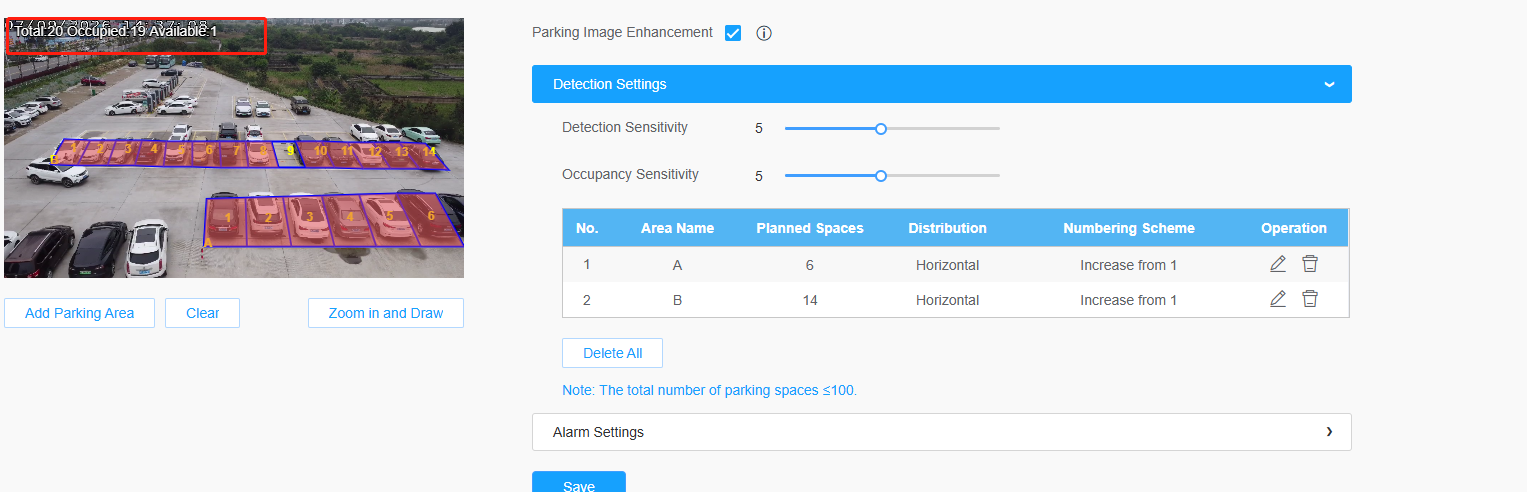
Detection Sensitivity: The higher the sensitivity, the easier occupancy is to be detected. For example, when the sensitivity is set to 10, it is possible to identify some objects that look like cars as cars, resulting in false detection.
Occupancy Sensitivity: The higher the sensitivity, the parking space will be judged to be occupied if it is slightly occupied for a while.For example, when the sensitivity is set to 10, the parking space may be judged as occupied when the vehicle passes by the parking space only briefly.
Note:Occupancy detection requires a suitable installation environment; however, the camera’s field of view must provide full coverage and a clear image (as shown below: the segmented bounding box must be fully within the camera’s field of view).
If the automatic segmentation isn't precise, you can fine-tune it while drawing.
3. How to configure Parking Violation Detection
Step1: Check the check box to enable the Parking Detection function.
Step2: Draw detection regions. Support simultaneous detection of parking spaces(max to 2). And you can customize the name/number.
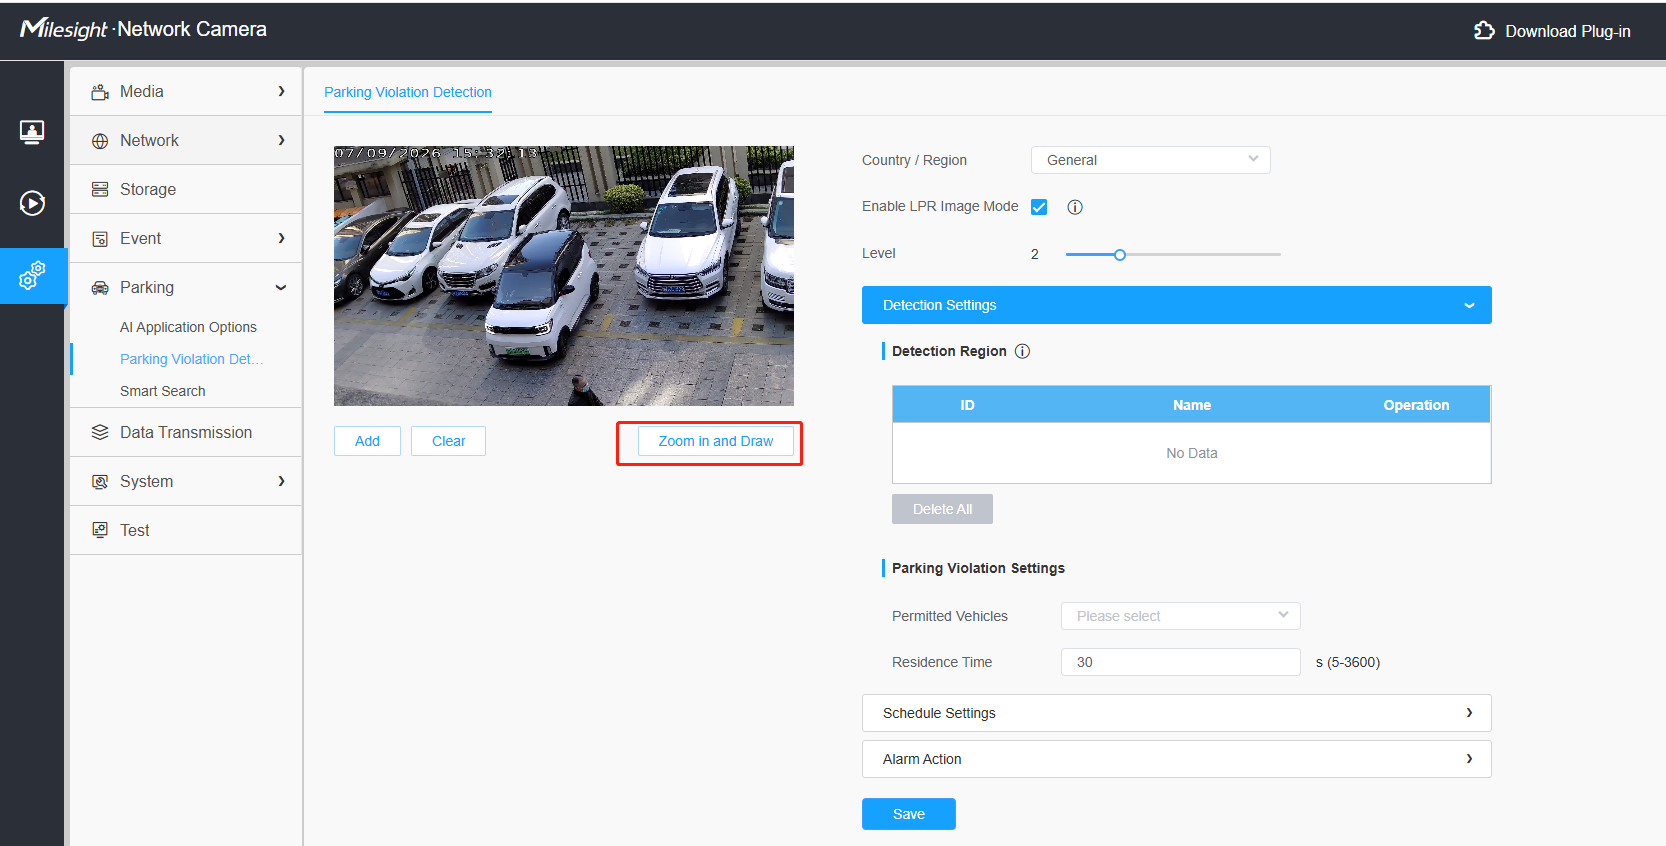
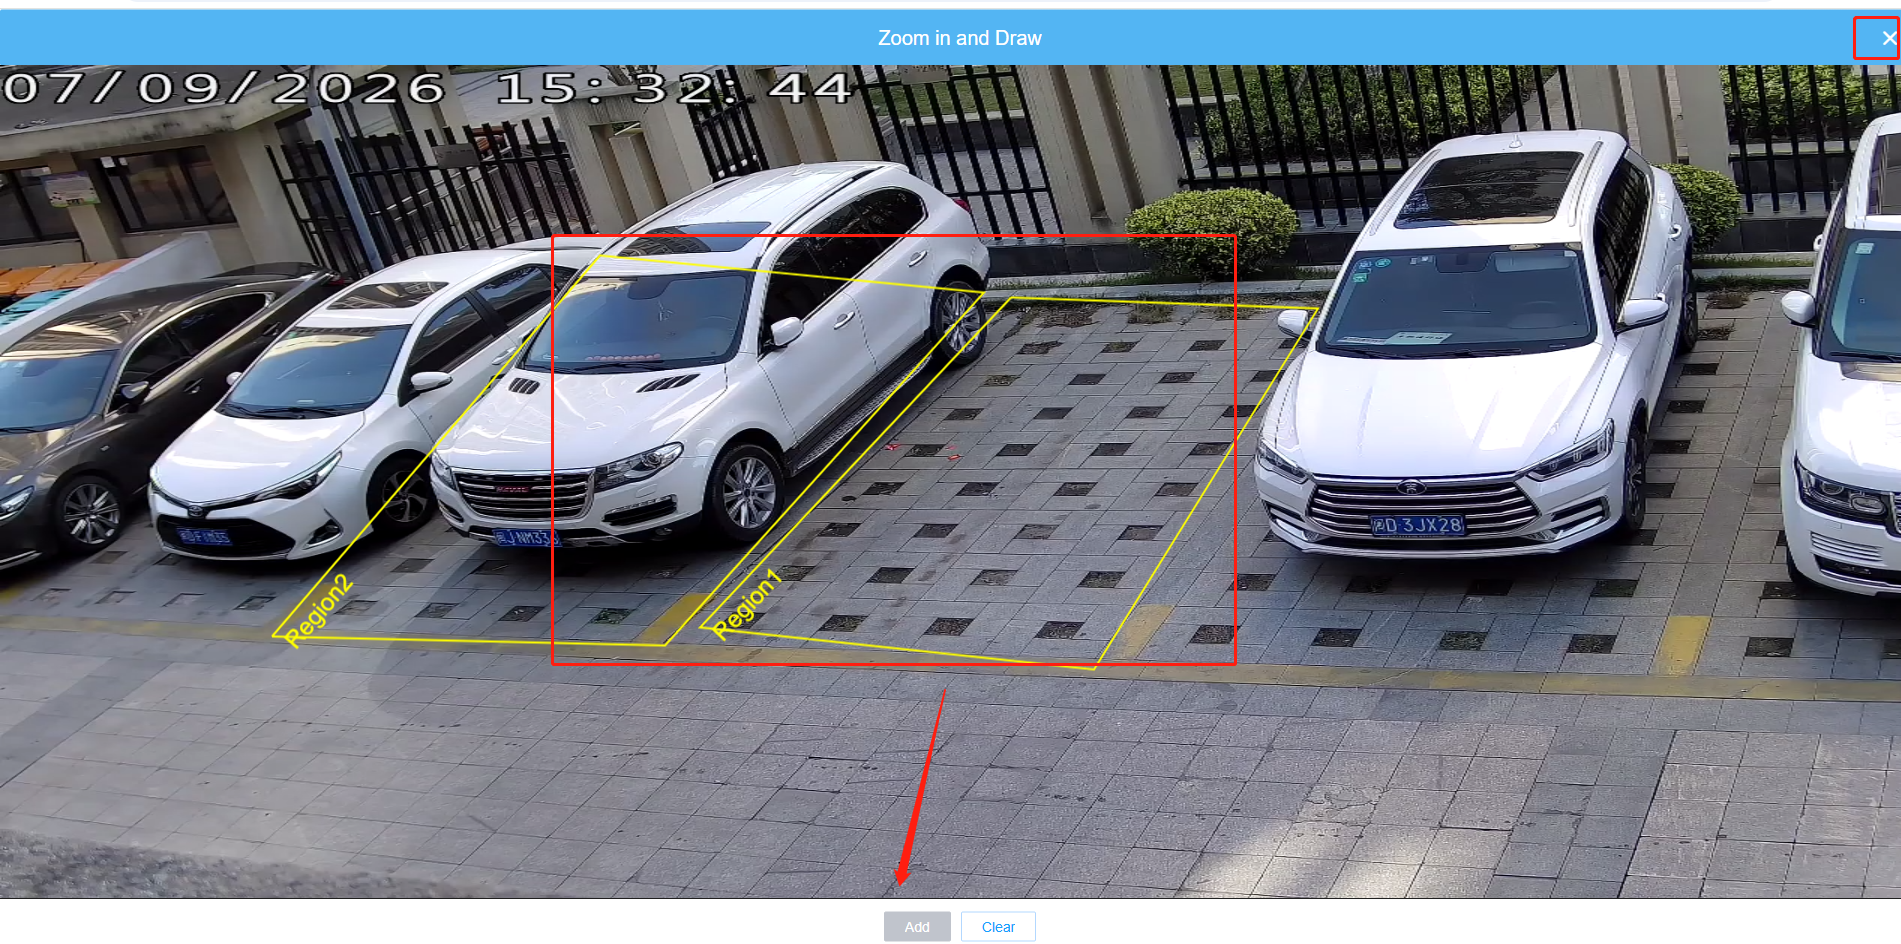
Note:As described in Part 2, the overall mapping logic for parking violation detection is the same as that for parking detection, but the use case is different—it is primarily used for illegal parking. Therefore, an alarm is triggered as soon as a vehicle stops in that area.
You can also select certain vehicles to allow them to remain parked for a certain period of time without triggering an alarm.
4. Data Transmission
Regarding data transmission, we support three methods: HTTP, TCP, and MQTT.
There are three types of reports: Trigger Report, Periodic (Interval) Report, and Timeout Report. Among these, Parking Detection and Occupancy Detection support all three report types, while Parking Violation Detection supports only the Trigger Report.
The application scenarios and configuration methods for each report type are as below:
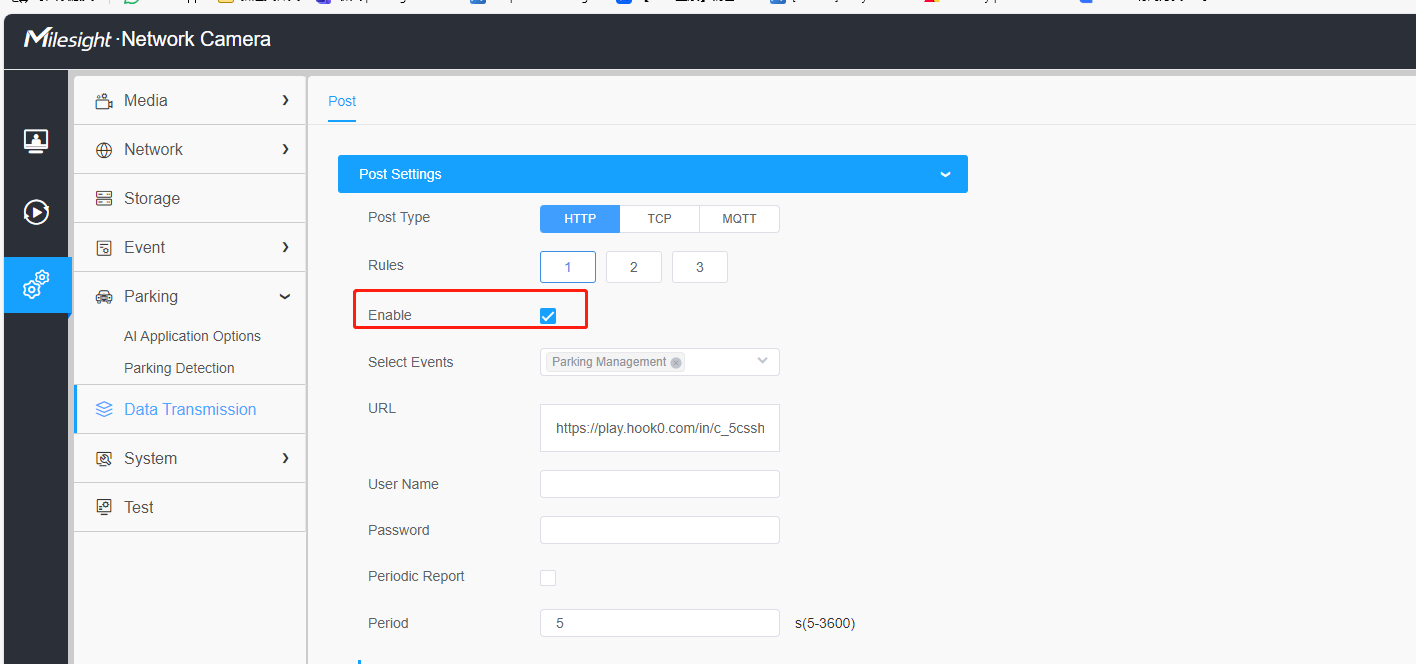
1.If you want to receive real‑time push notifications, once you check the "Enable" box, it will trigger a Trigger Report and push the data to the HTTP, TCP, or MQTT address you have configured.
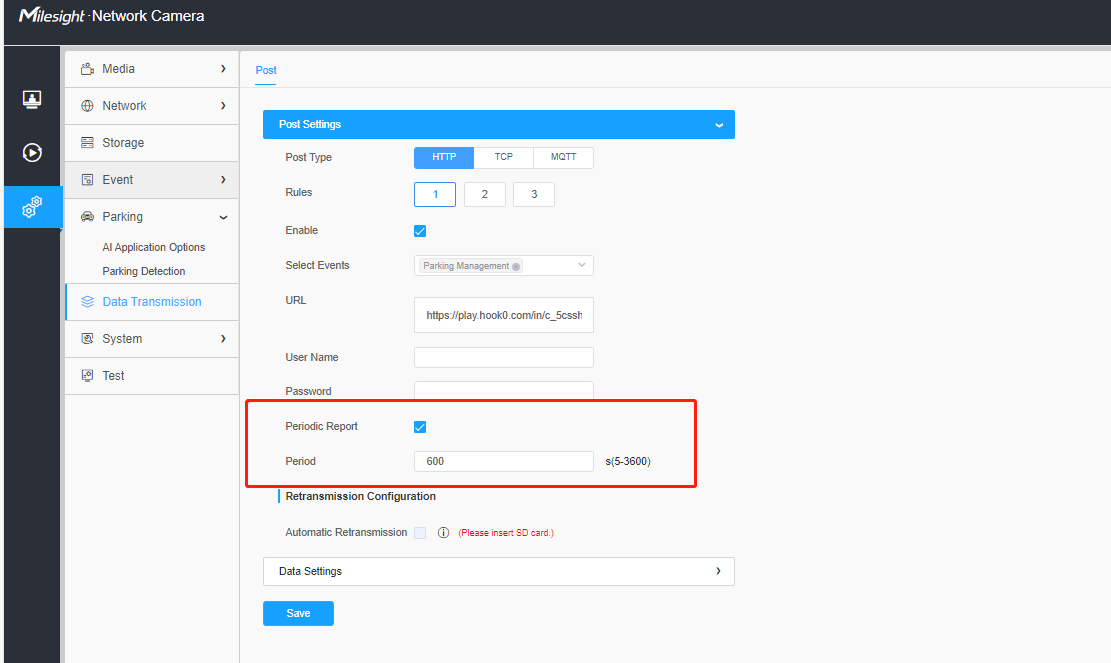
2.If you want to receive notifications at scheduled intervals, you can enable the Periodic Report and set the desired time interval.
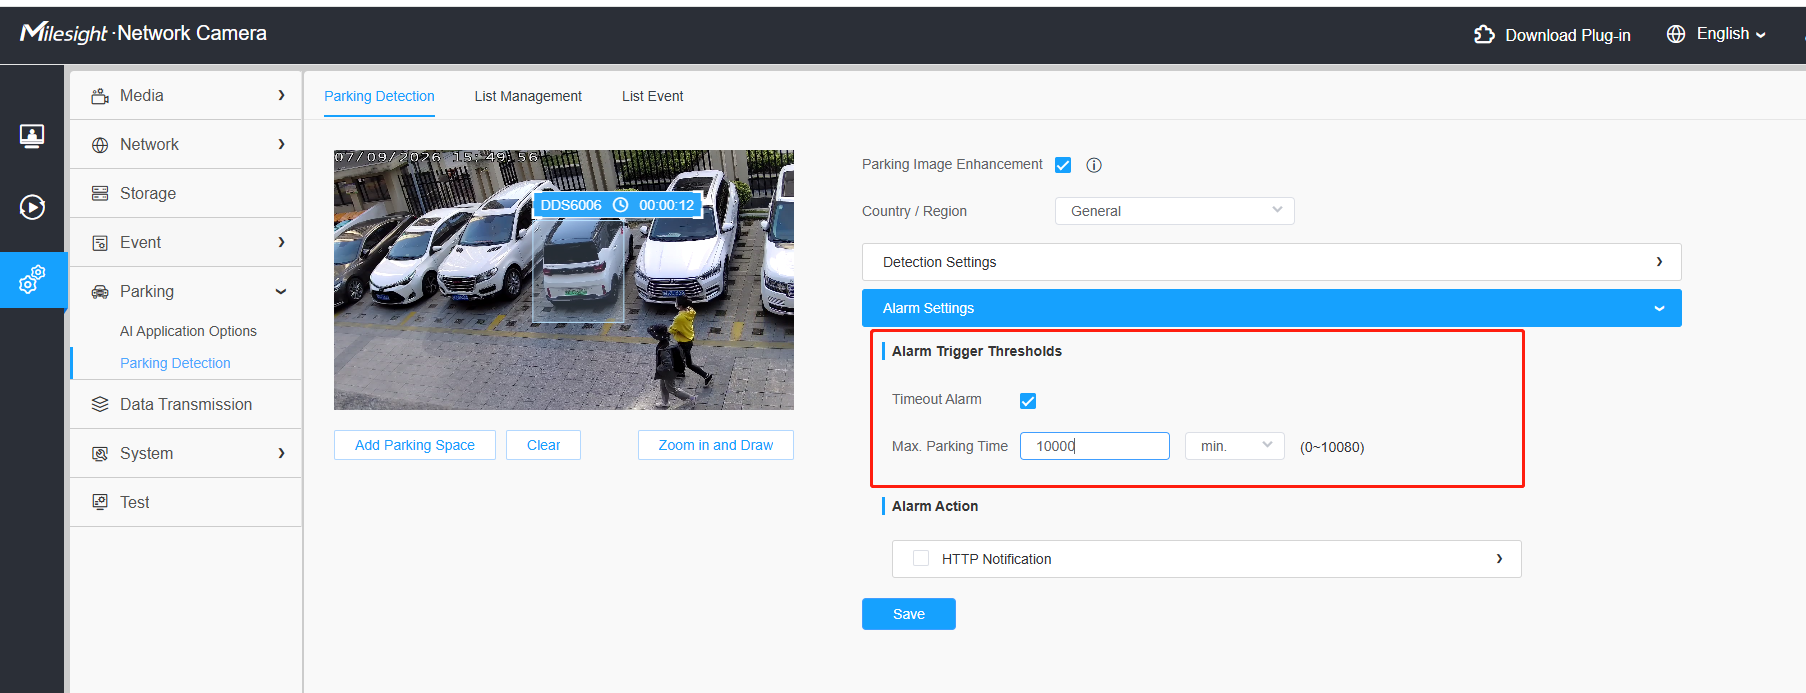
3.If you want to receive reports when an event exceeds a certain duration, you can enable the Timeout Report here and set the desired time period.
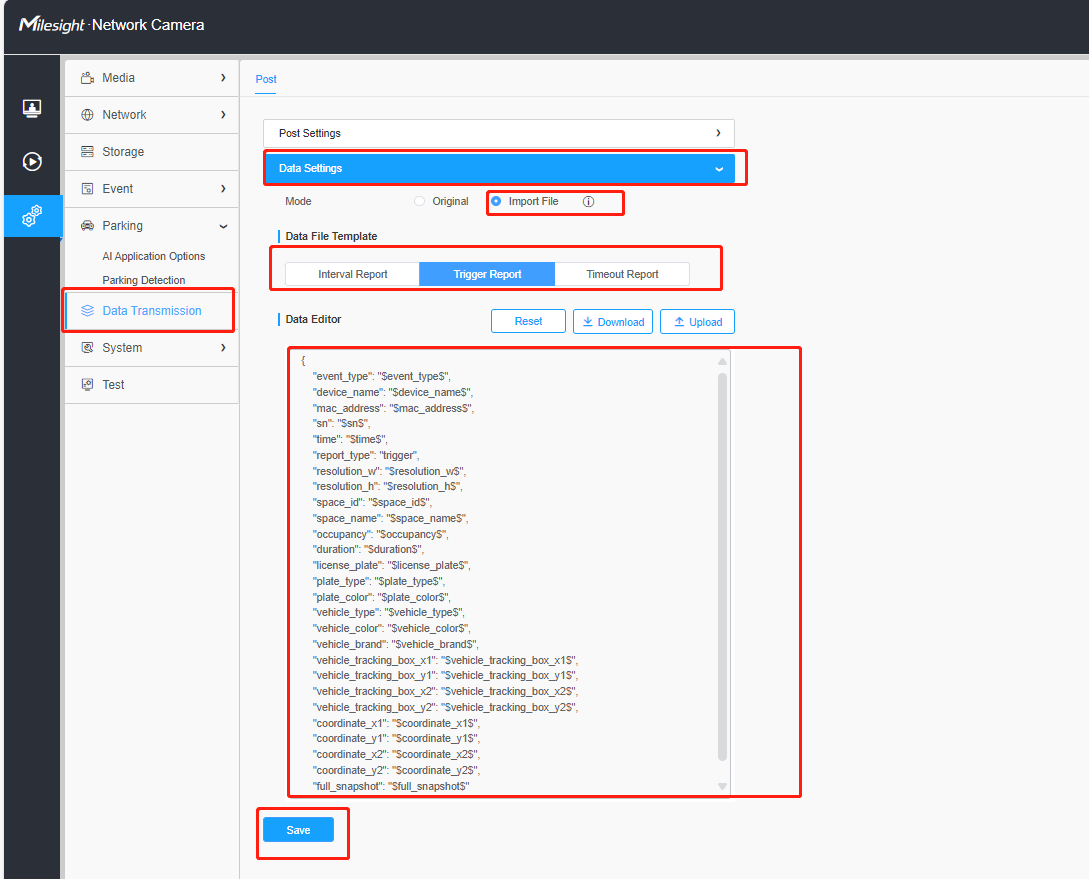
Note:You can check the "Import File" option in the Data Settings to configure the format and data items for each report type.
If you still have any issue about Parking Management Camera, please email support@milesight.com with the MAC address of the camera, or you could create a ticket to get help from the Milesight Support Team:
https://support.milesight.com/support/tickets
——END——