
1.What is LPR
LPR/ANPR(License Plate Recognition) is a technology that uses optical character recognition on images to read vehicle registration plates. For Milesight, the LPR algorithm is embedded in cameras, which allows the cameras to recognize, capture and upload license plate images all alone and intelligently.
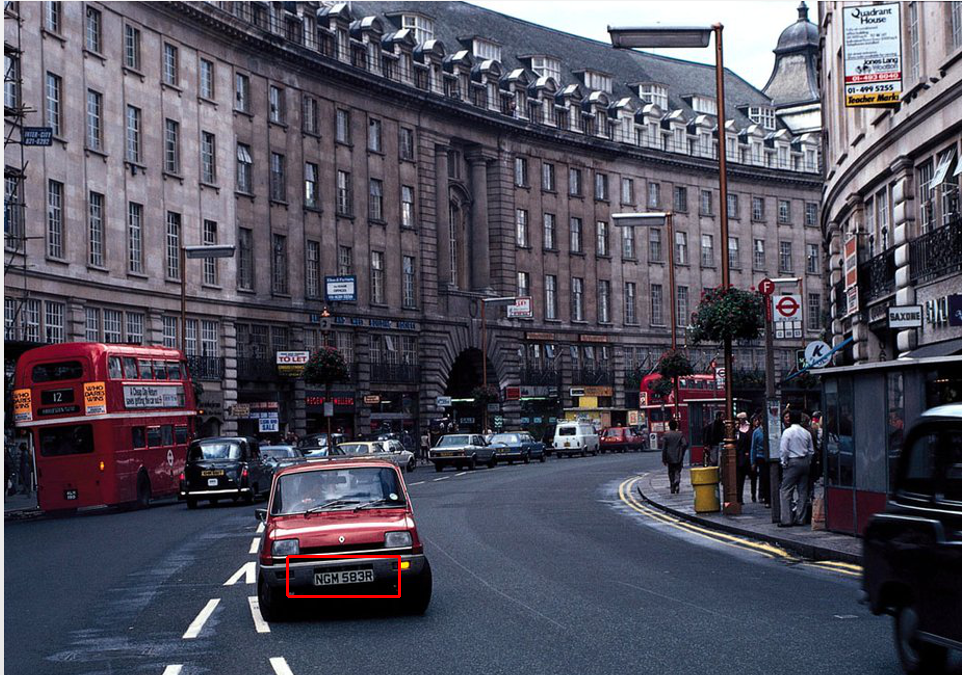
Figure 1 LPR
2.Countries that support LPR
For Milesight, the LPR function applicable to the following countries:
Country | Abbreviation | Country | Abbreviation | |
Albania | ALB | Lithuania | LTU | Support |
Austria | AUT | Luxembourg | LUX | Support |
Belgium | BEL | Macedonia | MKD | Support |
Bosnia /Herzegowina | BIH | Malta | MLT | Support |
Bulgaria | BGR | Montenegro | - | Support |
Croatia | HRV | Netherlands | NLD | Support |
Cyprus | CYP | Norway | NOR | Support |
Czech Republic | CZE | Poland | POL | Support |
Denmark | DNK | Portugal | PRT | Support |
Estonia | EST | Romania | ROU | Support |
Finland | FIN | Serbia | SRB | Support |
France | FRA | Slovakia | SVK | Support |
Germany | DEU | Slovenia | SVN | Support |
Greece | GRC | Spain | ESP | Support |
Hungary | HUN | Sweden | SWE | Support |
Iceland | ISL | Switzerland | CHE | Support |
Italy | ITA | Turkey | TUR | Support |
Ireland | IRL | The United Kingdom | GBR | Support |
Israel | ISR | Vatican city state | VAT | Support |
Latvia | LVA | - | Support | |
CIS (former Soviet Union)
Country | Abbreviation | Country | Abbreviation | |
Armenia | ARM | Moldova | MDA | Support |
Azerbaijan | AZE | Russian Federation | RUS | Support |
Belarus | BLR | Tajikistan | - | Support |
Georgia | GEO | Turkmenistan | TKM | Support |
Kazakhstan | KAZ | Ukraine | UKR | Support |
Kirgizstan | - | Uzbekistan | UZB | Support |
Notes
The algorithm of Milesight LPR doesn’t support text recognition other than letters and numbers.
3.Milesight LPR Cameras
LPR 12x H.265+ AF Motorized Pro Bullet Network Camera
LPR 12x H.265+ Mini PTZ Bullet Network Camera
LPR H.265+ ABF Pro Box Network Camera
LPR H.265+ Mini Bullet Network Camera
LPR H.265+ Vandal-proof Motorized Mini Bullet Network Camera
LPR H.265+ Motorized Pro Bullet Network Camera
The integration with NVR/CMS is in processing, which is going to bring another supreme experience.
Notes
Installation Angle Considerations
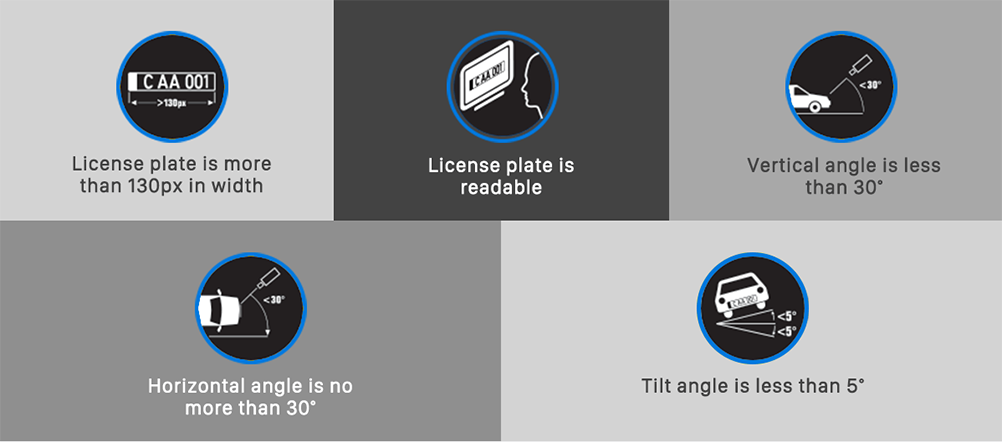
To increase the accuracy of license plate recognition, be sure to install the LPR cameras properly to capture the license plates with the correct image size, lighting conditions and camera angle. The following highlights is the precautions of installation angle:
Installing the camera in front of the vehicle (Recommended):
The captured image should be filled with a full width of the vehicle.
Installing the camera slightly to the side:
To avoid capturing unnecessary contents in the image, the camera should be installed in a higher position(Vertical angle is less than 30°; Horizontal angle is no more than 30°; Tile angle is less than 5°) to capture the front part of the vehicle.
4.How to set LPR
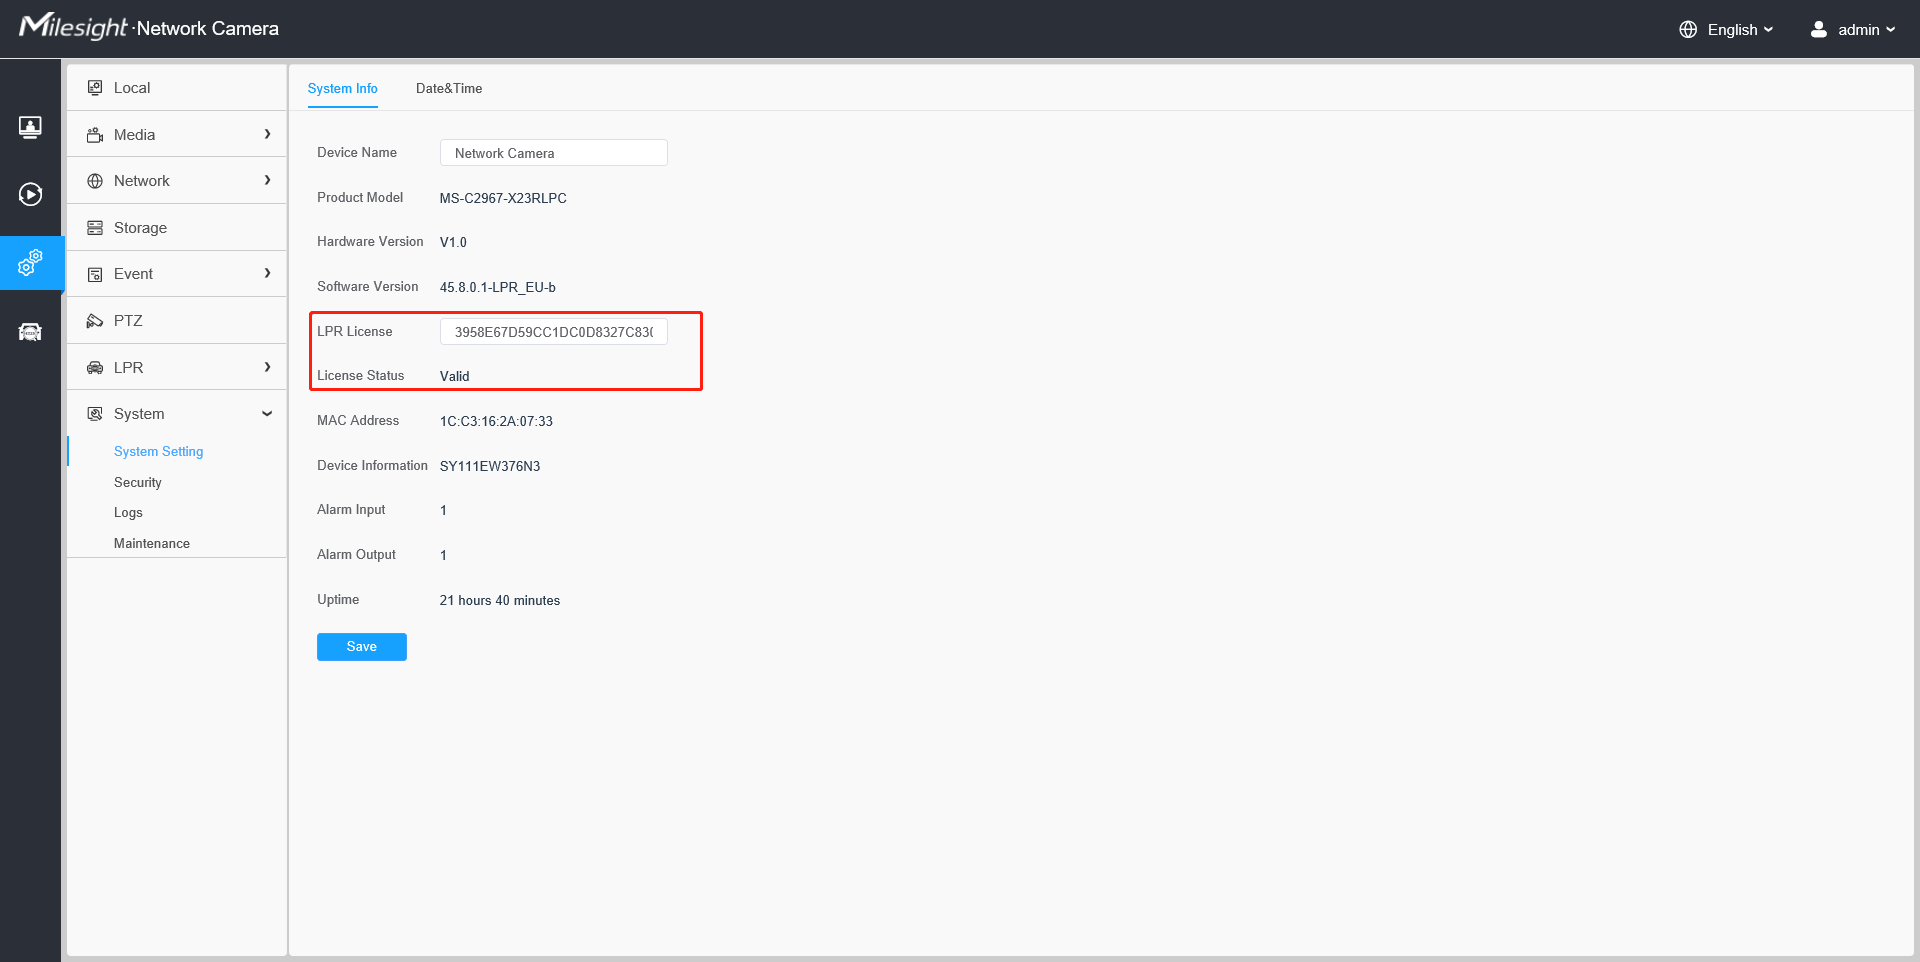
[LPR License]: Generated by camera's information.
[License Status]: Show present license status, including Valid and Invalid.
The license status ,must be “Valid” before setting LPR.
4.1Settings
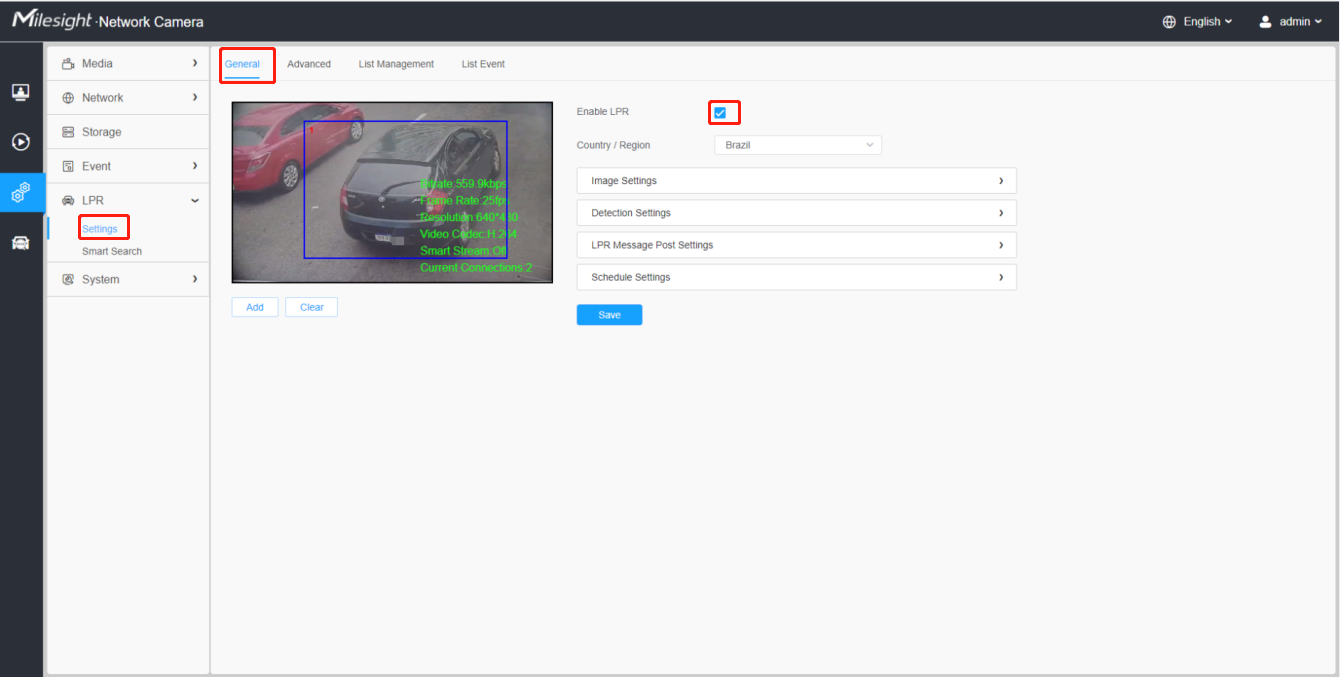
Step1: After log in the web, and go to “LPR “→ “Settings“→”General”.
Check the checkbox “Enable License Plate Recognition”, you can draw the screen to select area interested. There will be shown in the blue box as below.
Step 2: Detection Settings.
You can draw the screen to select four areas interested. The area as shown in the blue box below, it will also display pixels above each area.
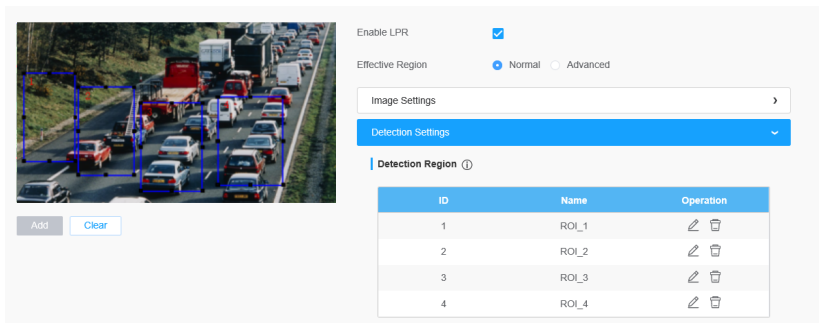
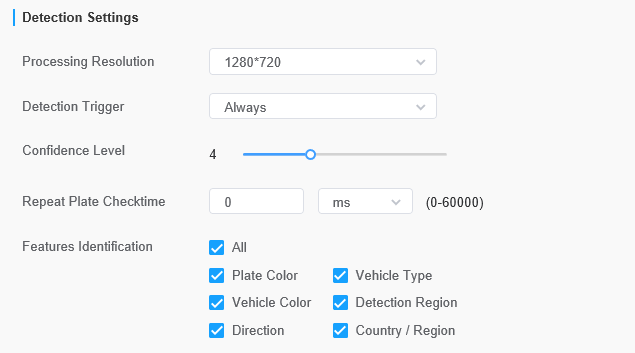
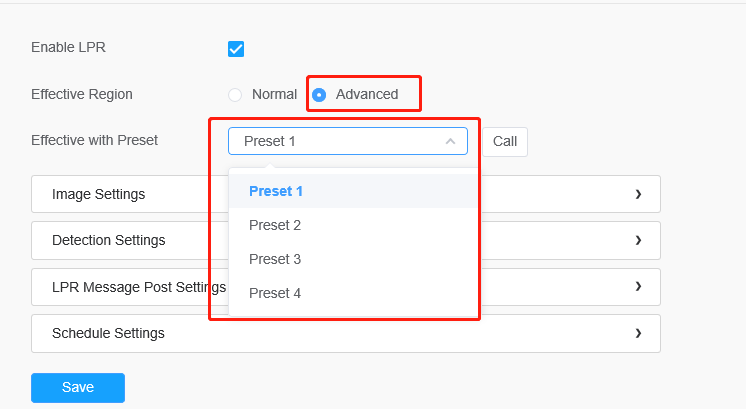
[Detection Region]: You can set up to 4 ROI areas by drawing the screen. If you choose Normal, it supports configuring the LPR detection regions for the current area. If you choose Advanced (Only for PTZ series), it supports configuring different LPR detection regions for different PTZ presets(Only support Preset 1~4 so far).
[Processing Resolution]: Default selected resolution is 1280*720. Users can choose different resolution according to the network environment.
[Detection Trigger]: If you choose “Always”, camera will always detect the license plate. If you choose “Alarm input”, camera will only detect the license plate when Alarm Input is being triggered.
[Confidence Level]: You can set the confidence level from 1 to 10. When the confidence level of the license plate is higher than the set confidence level, it will push the license plate image to the logs interface.
[Repeat Plate Checktime]: Set the time interval for repeatedly reading license plates to effectively avoid duplicate identification of parking vehicles.
[Feature Identification]: Check Plate Color, Vehicle Type, Vehicle Color, Detection Region, Direction, Country / Region or All to enable Features Identification, it will display the corresponding information on the logs interface.
Notes
The optimal recognize license plates interval of Milesight LPR cameras within 130-300 PX.
For better performance, please choose the appropriate resolution in advance.
Step3: LPR Message Post Settings.
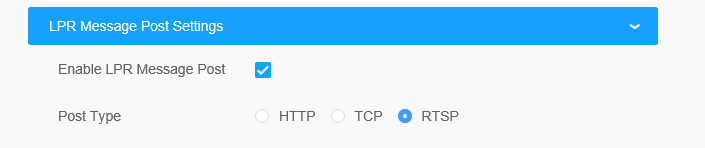
[LPR Message Post Settings]: Check the checkbox to enable LPR Message Post. It will push information to some third-party devices or software that are compatible with ours. Information can be pushed by RTSP, TCP or HTTP.
More information about LPR Message Post, please refer to
Milesight-Troubleshooting-Integration between LPR Camera and NVR(VMS).
Step 4: Schedule Settings. You can draw the schedule by clicking. And then click [Save] or [Delete] after setting. You also can copy the settings to other channels.
|
|
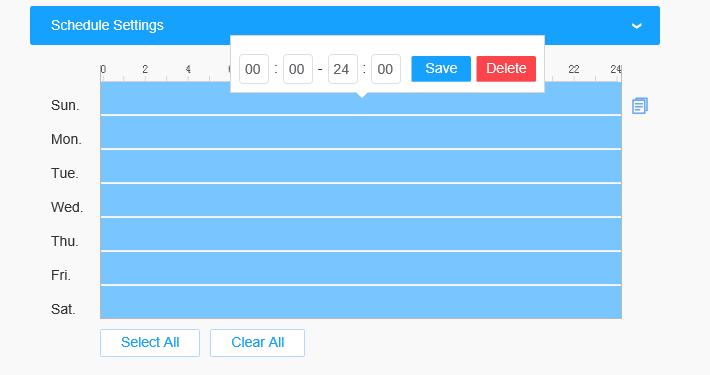
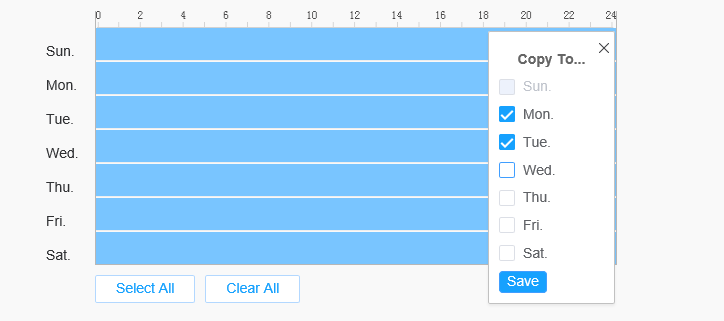
Step 5: Don’t forget to click “Save” after finishing all settings.
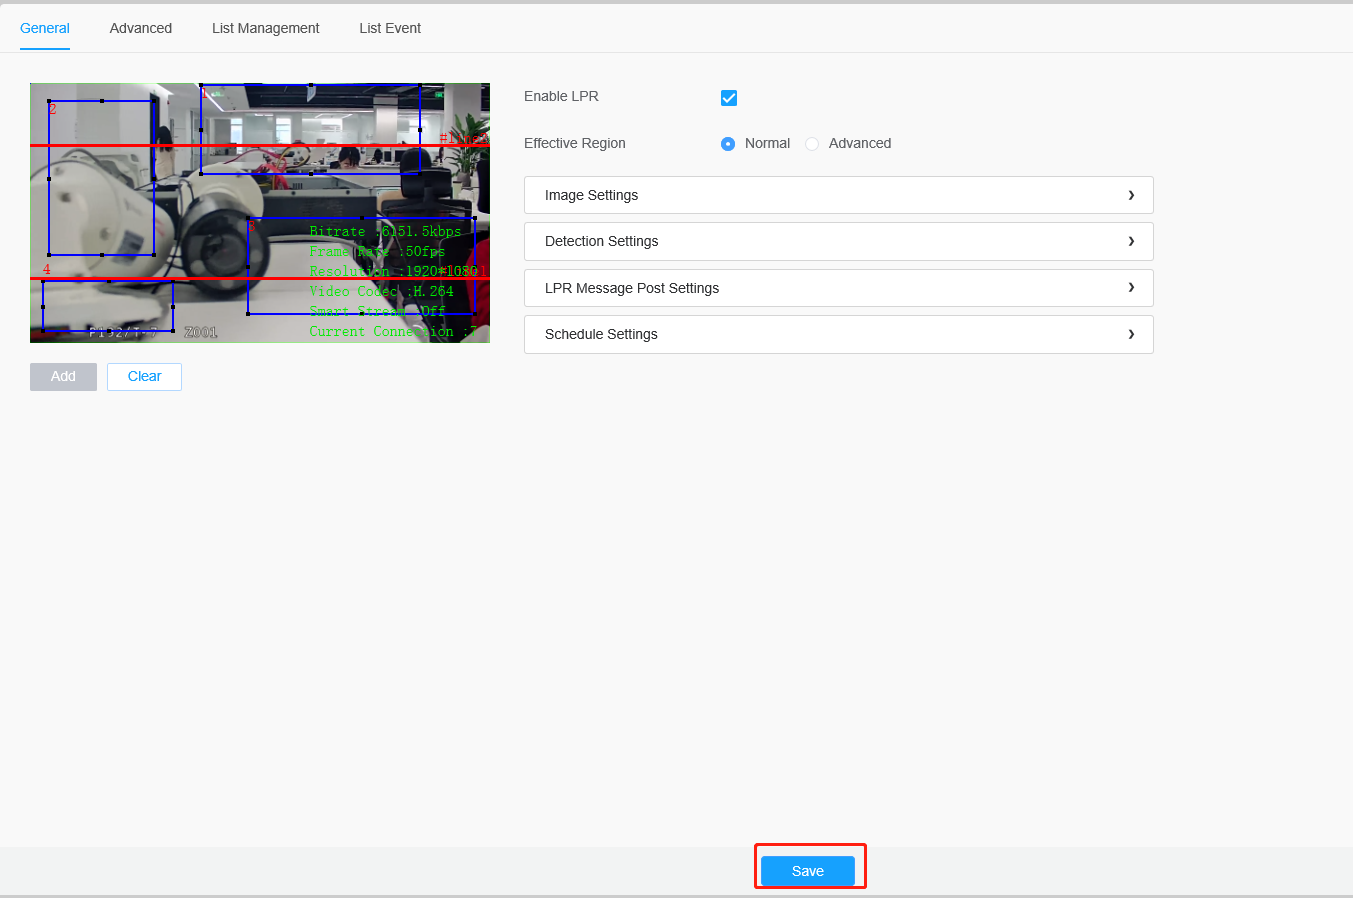
4.2Advanced
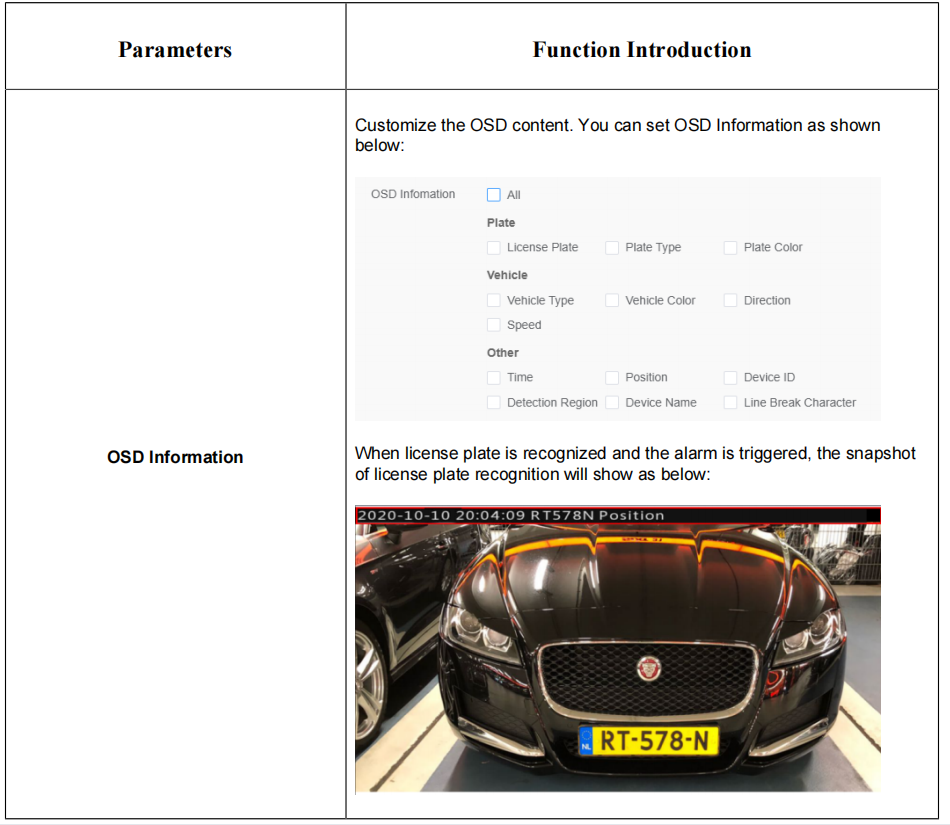
In the interface, you can set display information on snapshot of license plate recognition, and also customize the file name of snapshots which are uploaded via FTP or Email or stored on local LPR Picture File Path.
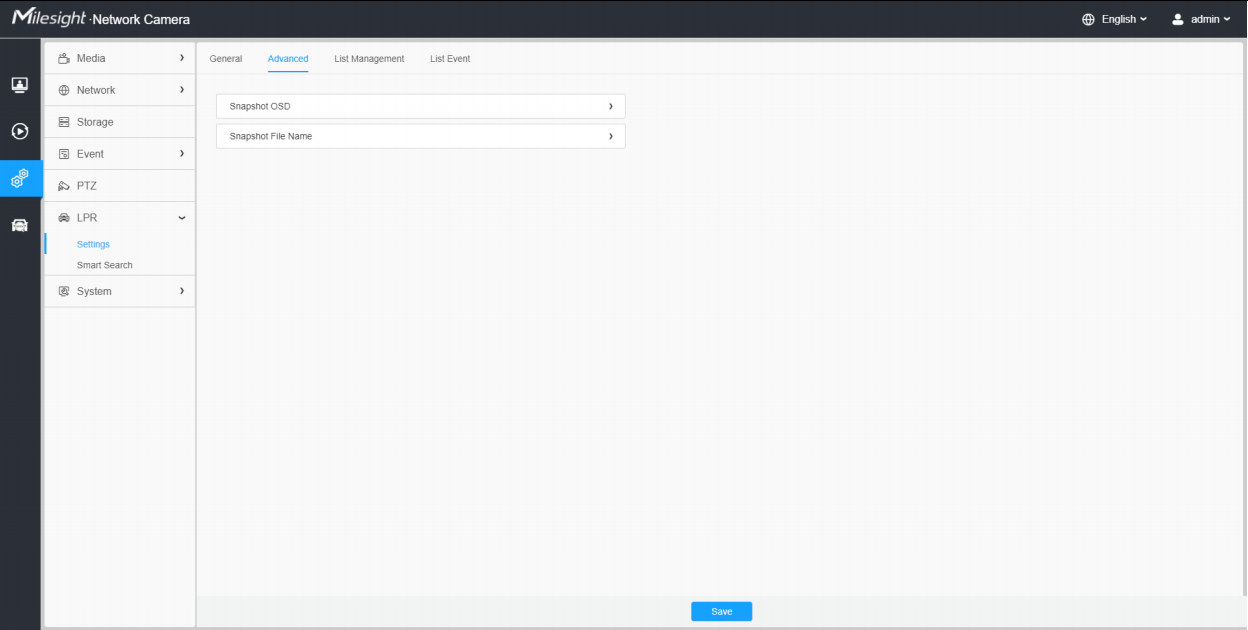
[Snapshot OSD]
Description of the buttons
[Snapshot File Name]
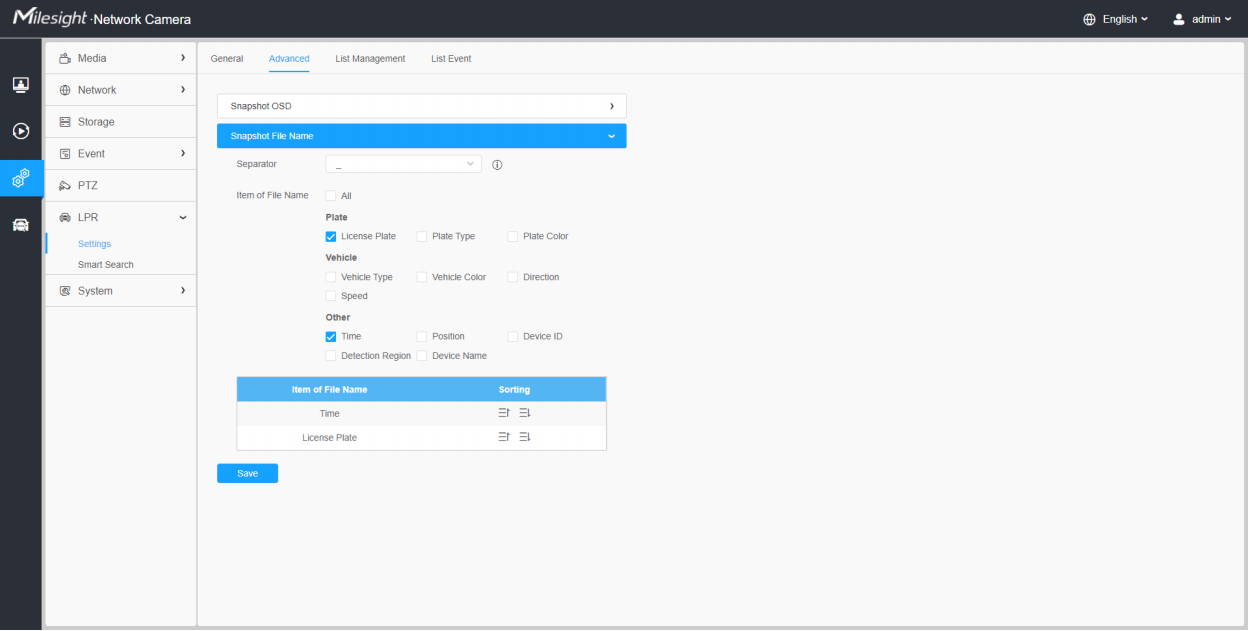
Description of the buttons
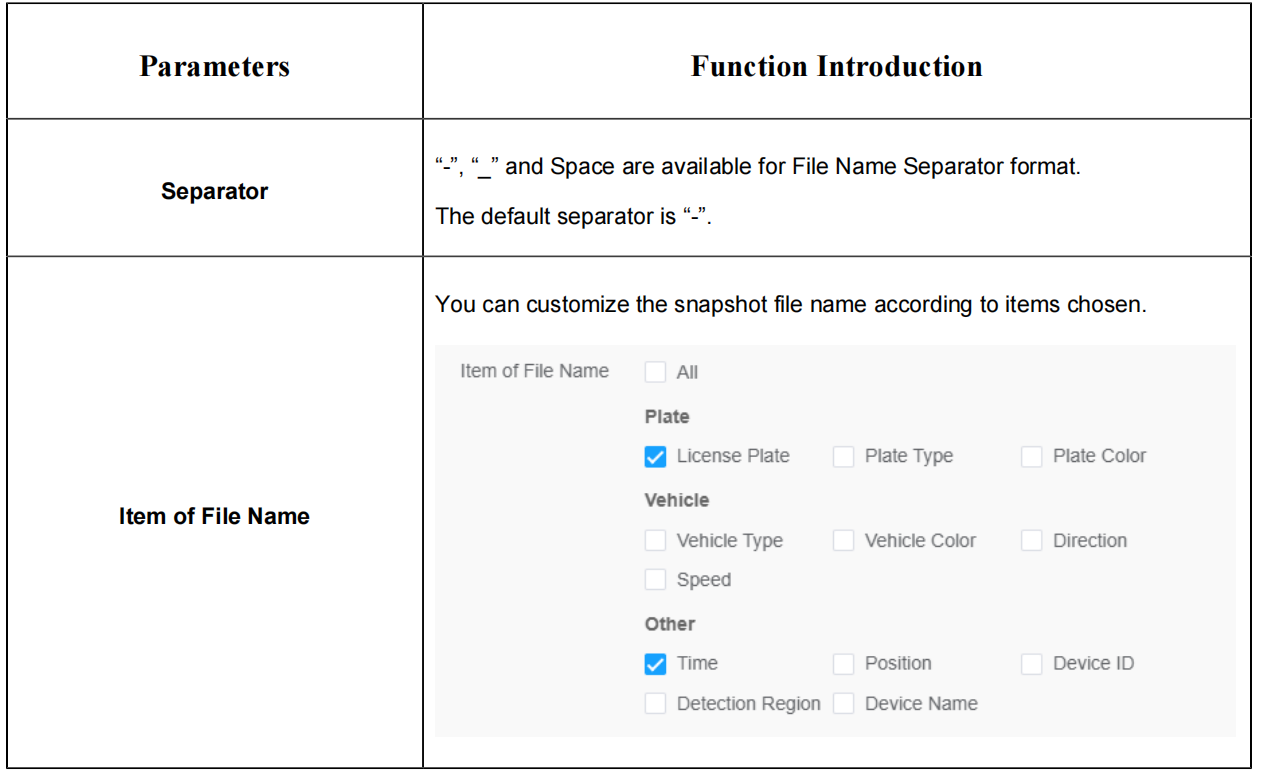
Each time when an item is checked, the list will add the item row, including the item name and sorting operation. You can click
|
|


button to sort these items, and choose separator to connect these items name. Also, the content of Position and Device ID items can be customized. When you check all items, the function interface will show as below:
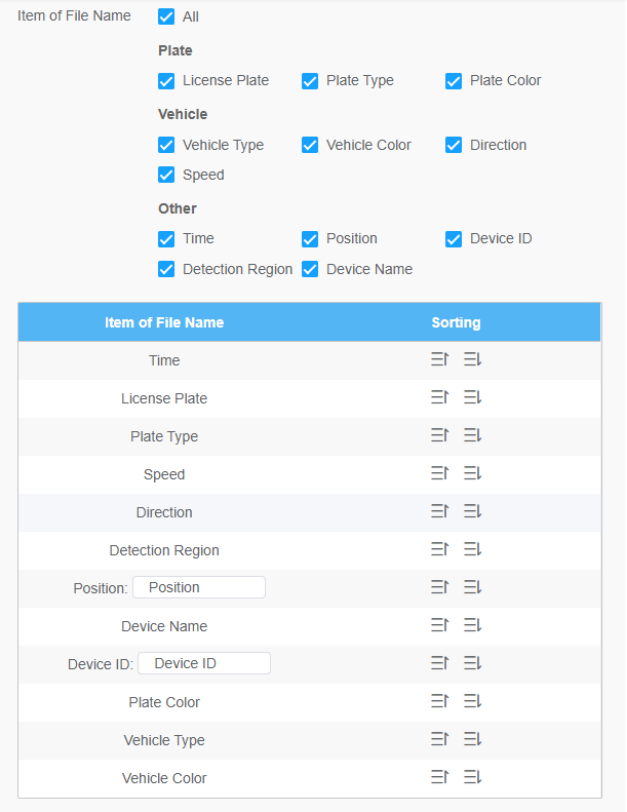
Note: You need to check at least one item. For example, you can choose items, separator and items sorting as below:
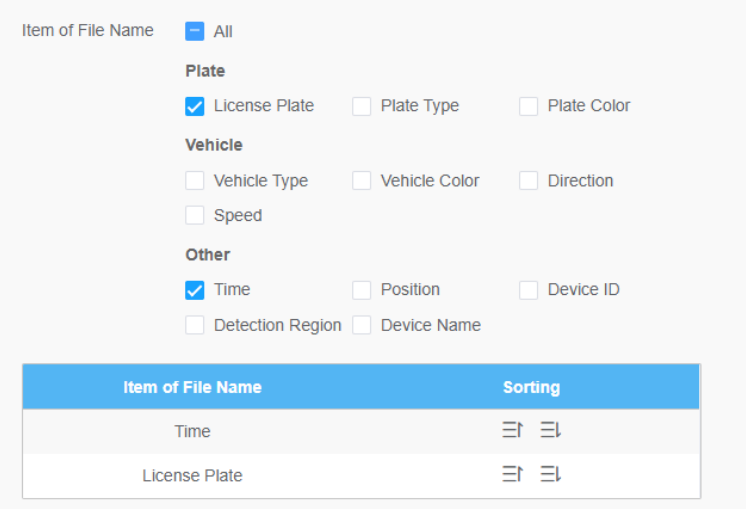
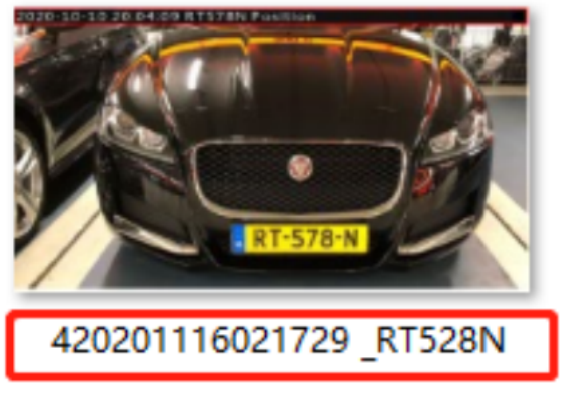
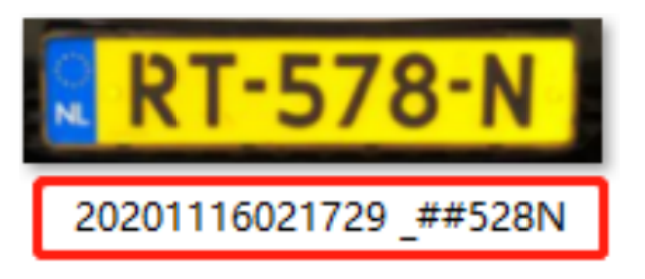
Once license plate is recognized, and the snapshot will be uploaded via FTP or Email or stored on your local LPR Picture File Path. Then, You can see the snapshot file name which you customize as shown below:
Full-snapshot Recognized successfully
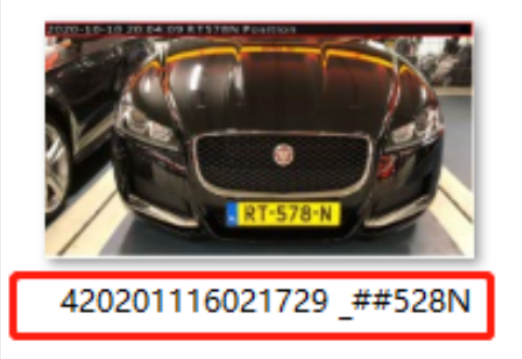
Full-snapshot Recognized failed
License plate snapshot Recognized successfully
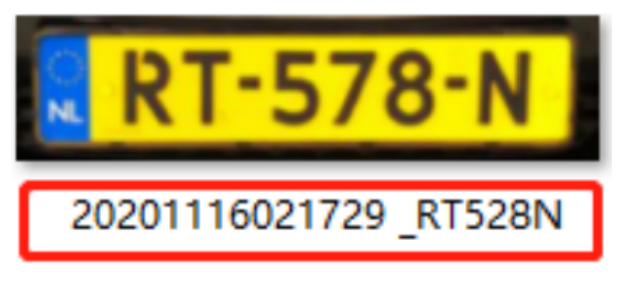
License plate snapshot Recognized failed
Note:
• If the item checked is not recognized successfully, then the item will be displayed with the specific symbol “#”.
• The file name of full-snapshot will be preceded by a number of 4.
4.3List Management
Add the license plates to this interface as Black, White type (Black/White List), and then you can set the alarm action for these license plates in the corresponding black list mode, white list mode or Visitor mode interface. When these license plates are detected, the camera will respond accordingly to your settings.
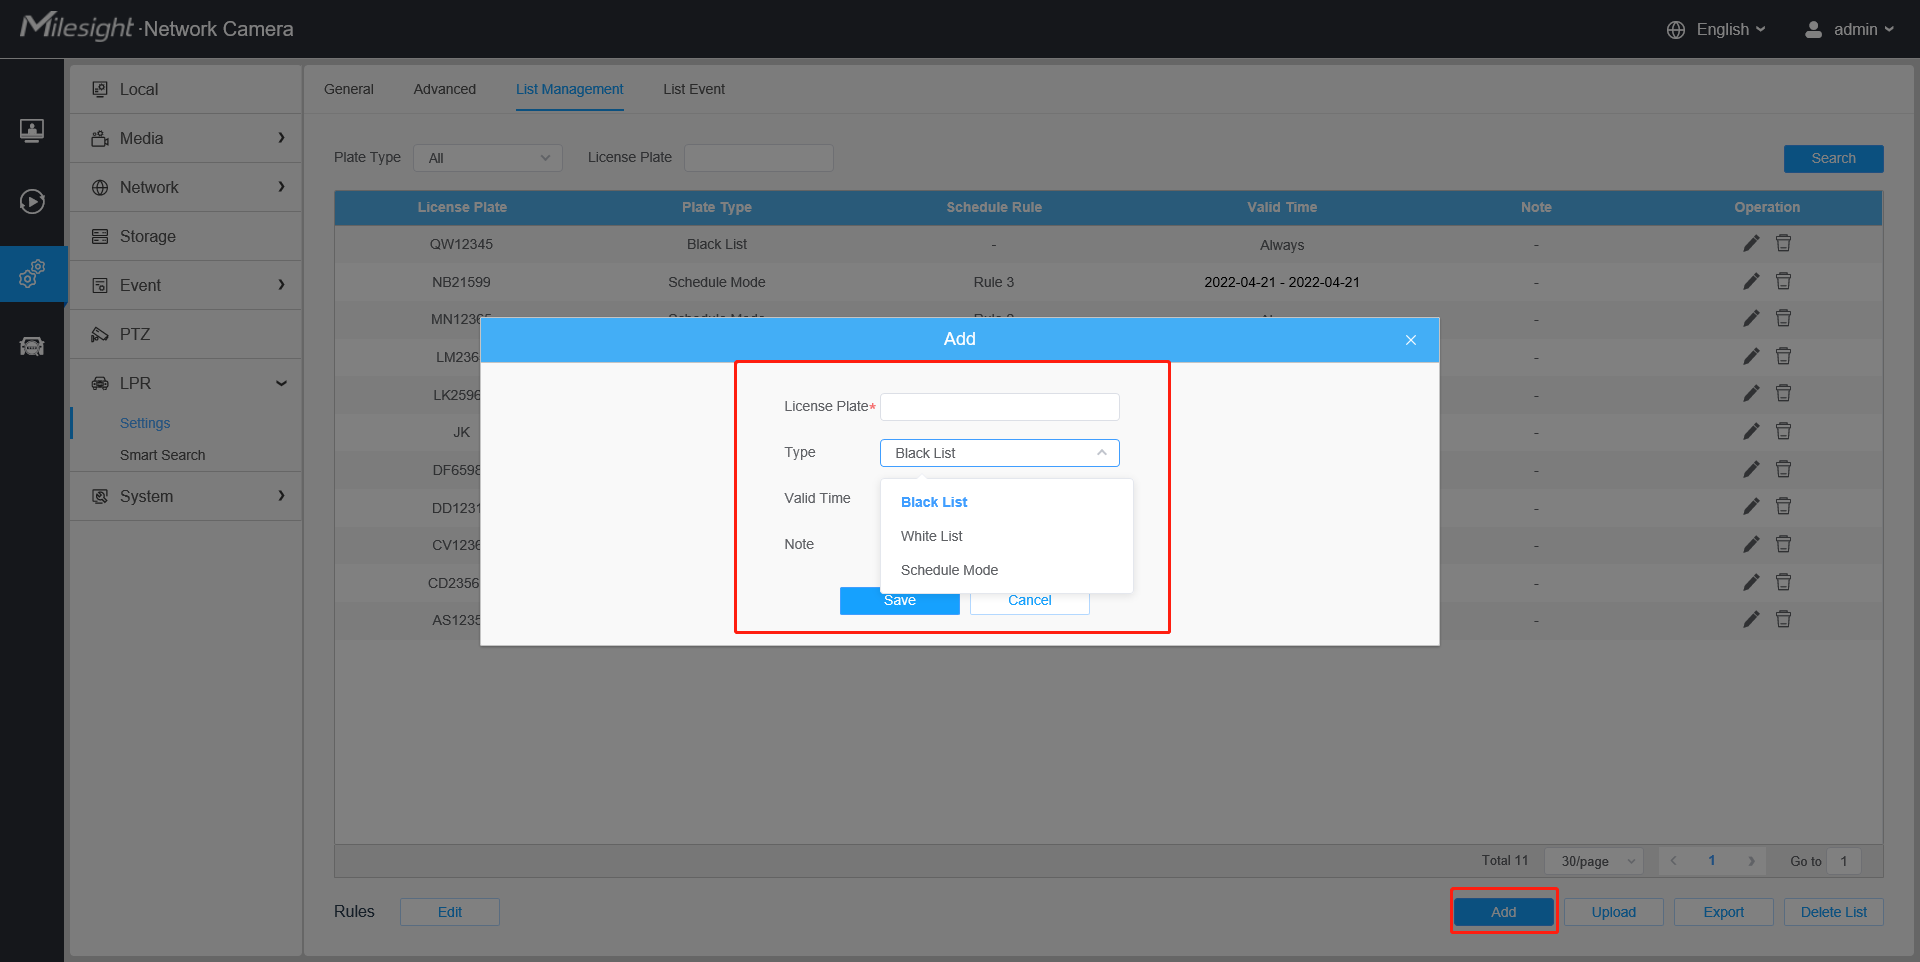
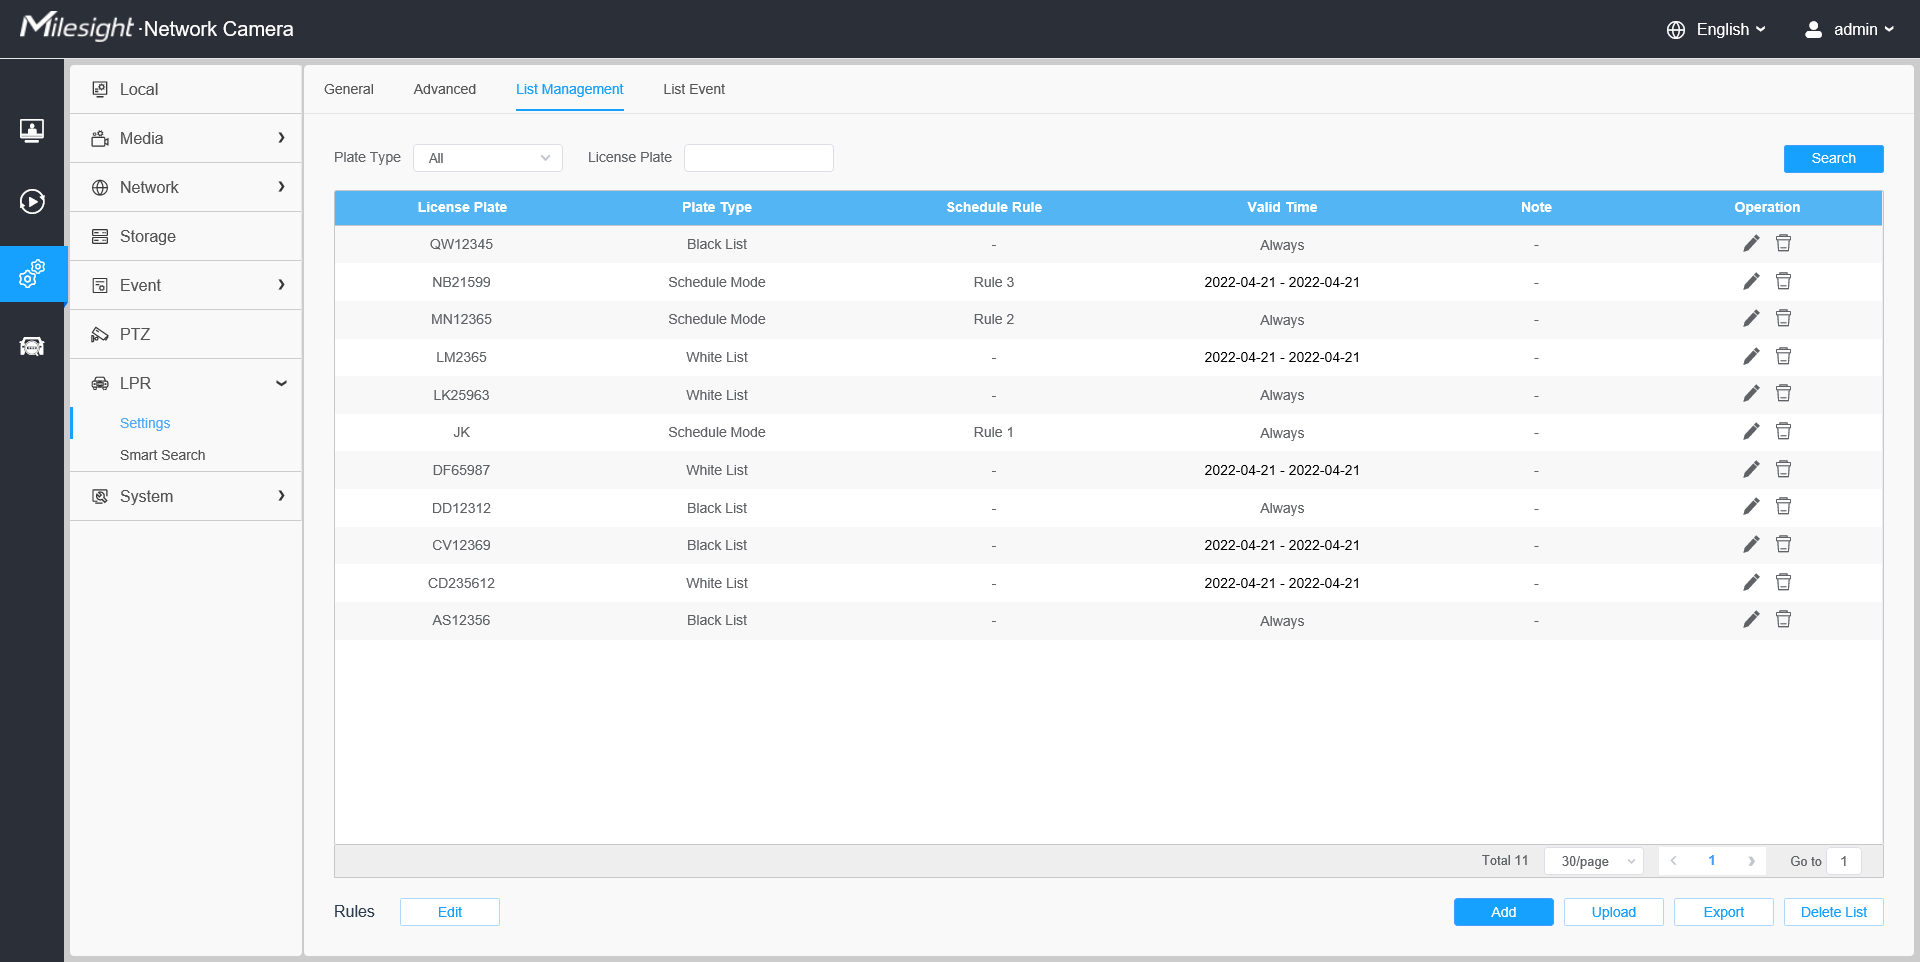
Step1: Click the “Add” button, select the Type as black or white, enter the license plate, the license plate will be added successfully.
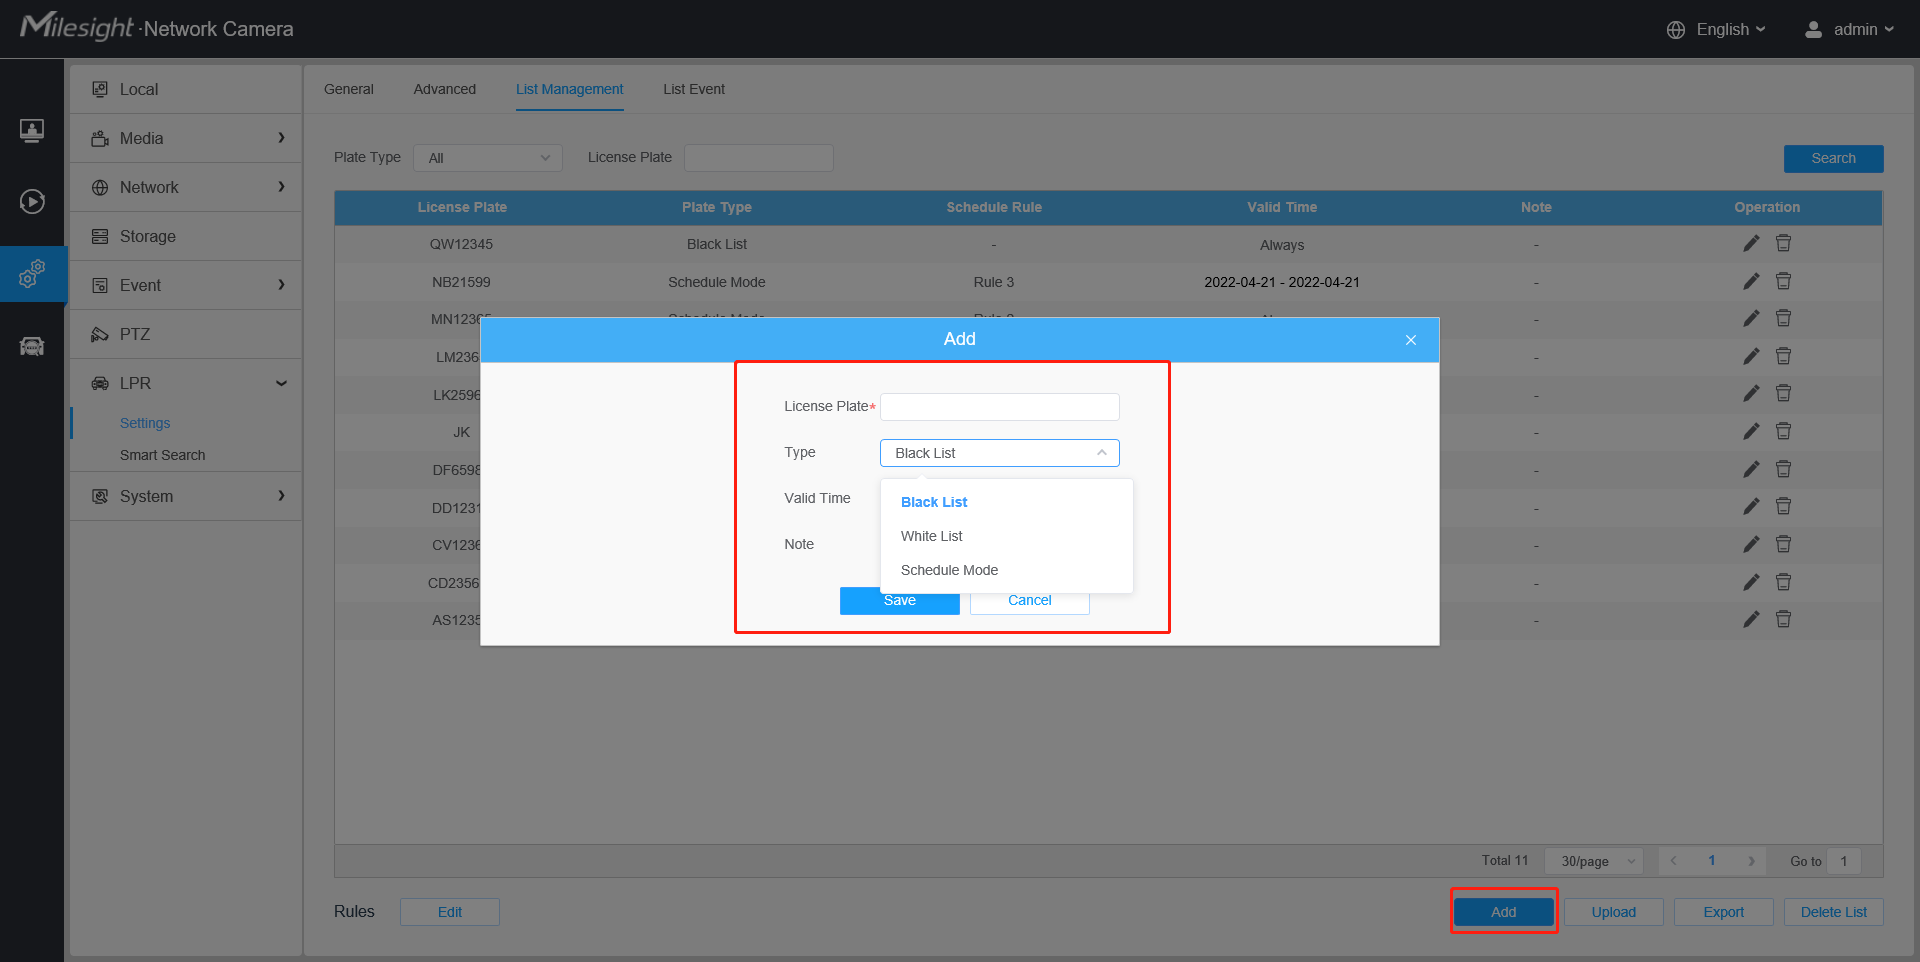
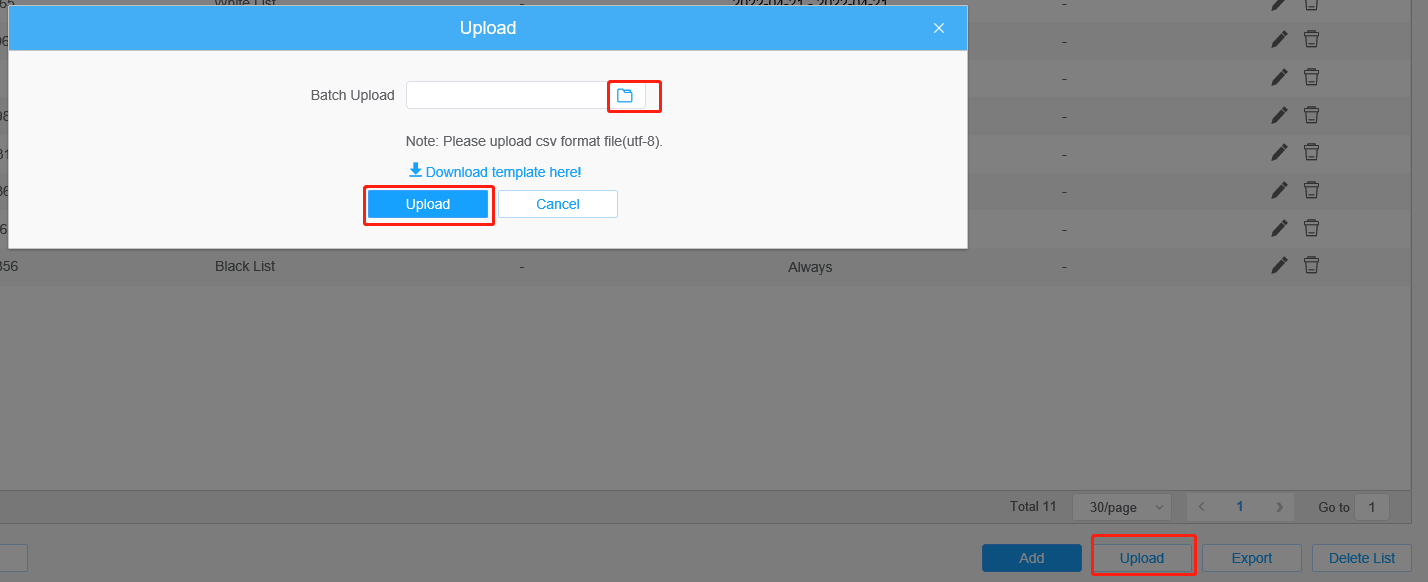
Step2: You can add a csv form with the license plate you want to add, click the "Browse" button to import the form to this interface, click the "Upload" button, the license plates will be added successfully.
4.4List Event
Step1: Select the List Type, Black list, White list or Visitor.
Step2: Schedule Settings. You can draw the schedule by clicking it.
Step3: Set alarm action.
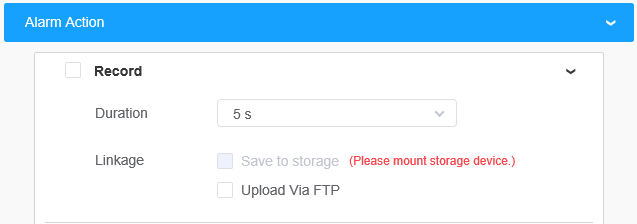
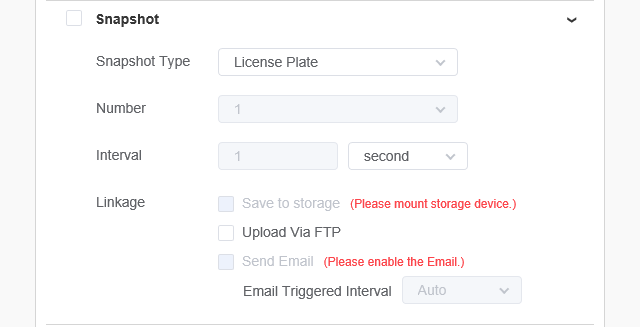
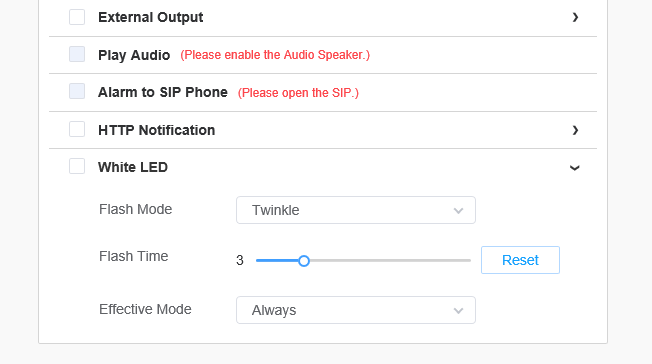
After that, when a license plate marked as “Black” is detected, the camera will respond accordingly to your settings if you select the Black List in List type;
when a license plate marked as “White” is detected, the camera will respond accordingly to your settings if you select the White List in List type;
when a license plate that is not marked as "Black" or "White" is detected, the camera will respond accordingly to your settings if you select the Visitor in List type.
4.5Smart Search
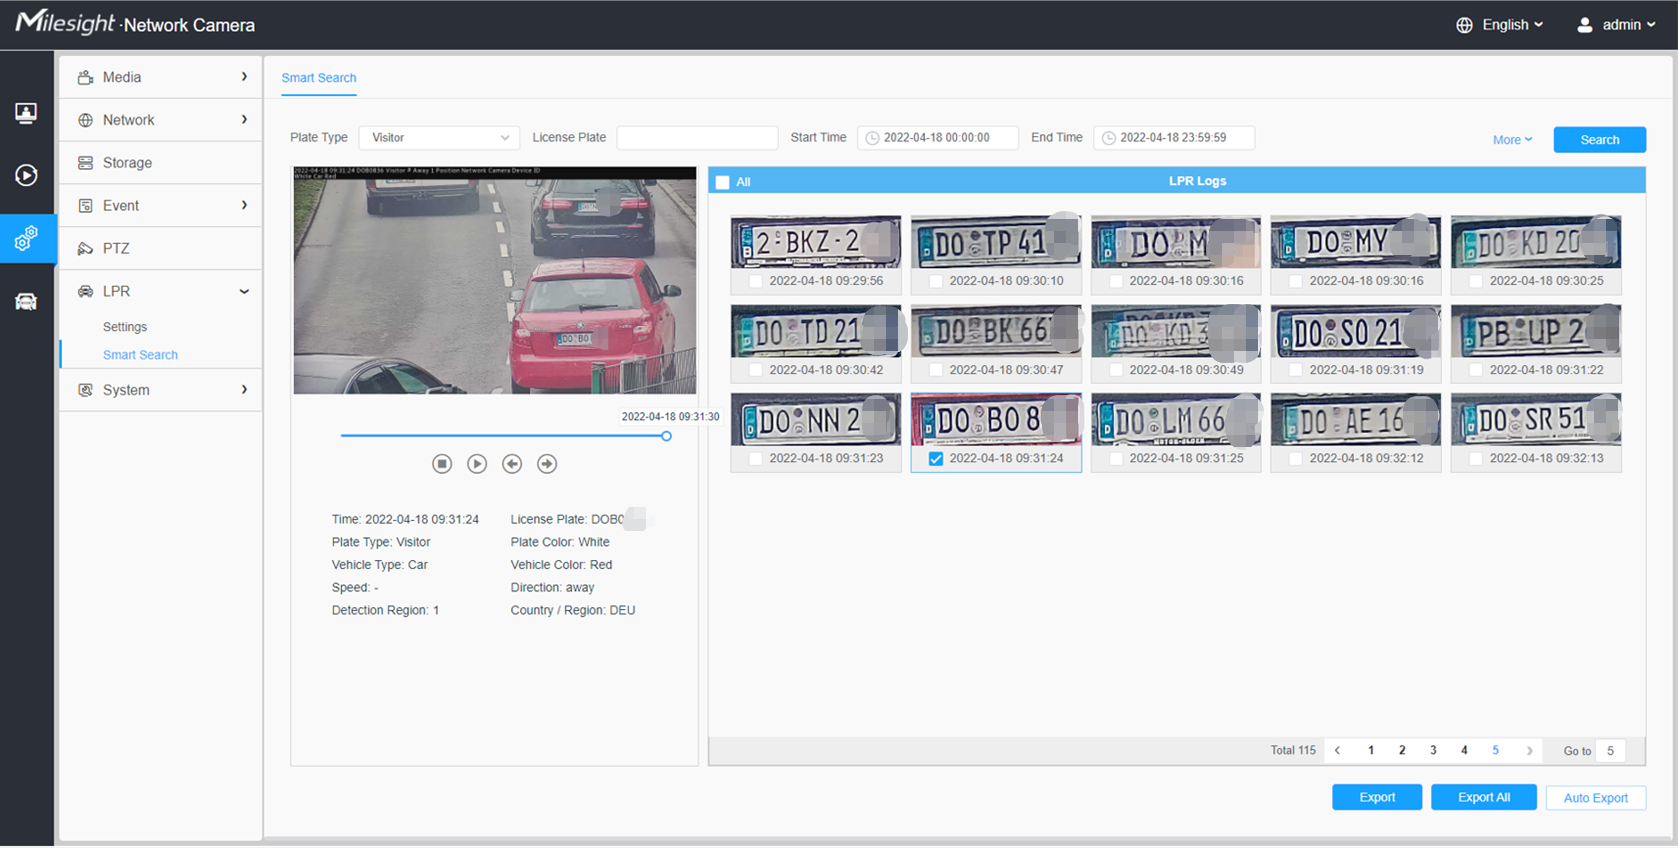
Step1: The detect results in real time will be displayed on the right side of Logs page, including detected time, live screenshot, and license plate.
Step2: Select Plate Type or directly enter the license plate number, select Start Time and End Time, click the “Search” button, the corresponding license plate will be displayed in the list below.
Note: Note:
• It supports displaying 4000 logs.
• Only when there is a SD Card or NAS has been set on the storage management , then the logs can be stored and showed on Smart Search page.
• For Plate Color/Vehicle Color Recognition and Vehicle Type Classification, please make sure your model is MS-xxxx-xPC.
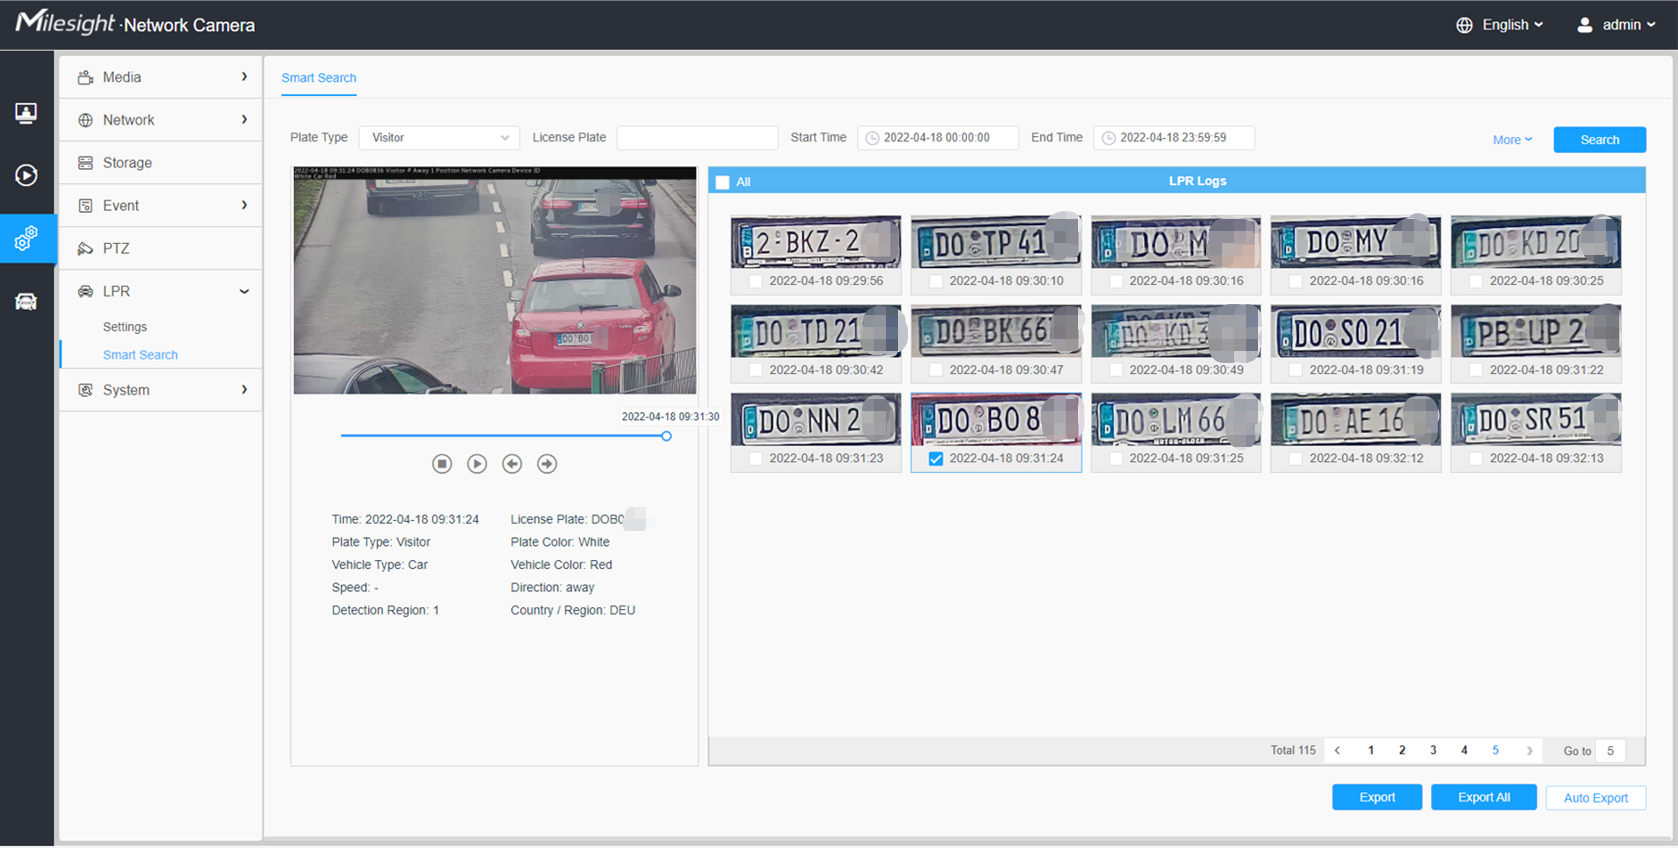
Step3: Click the license plate on the right of each log to display license plate details as shown below.
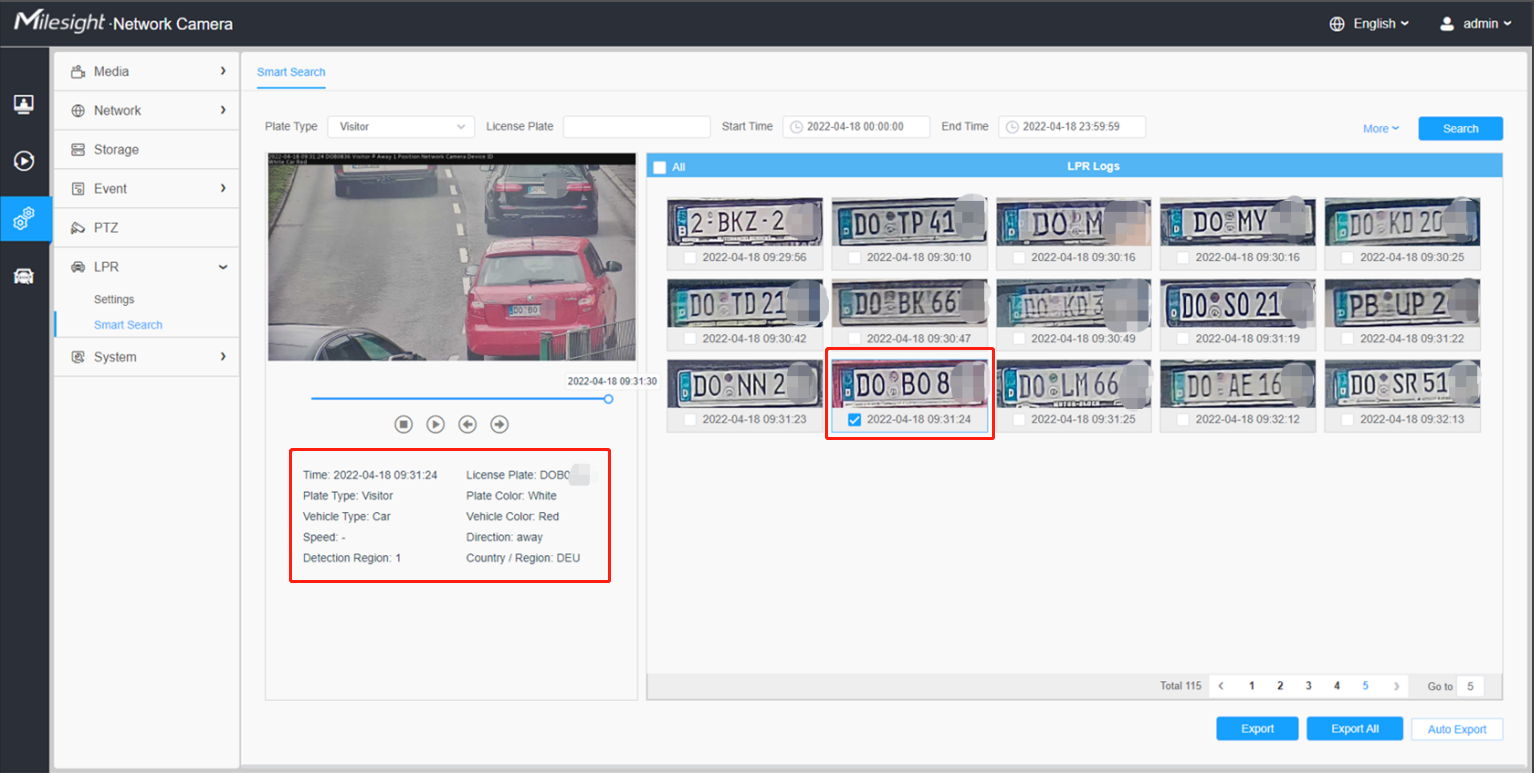
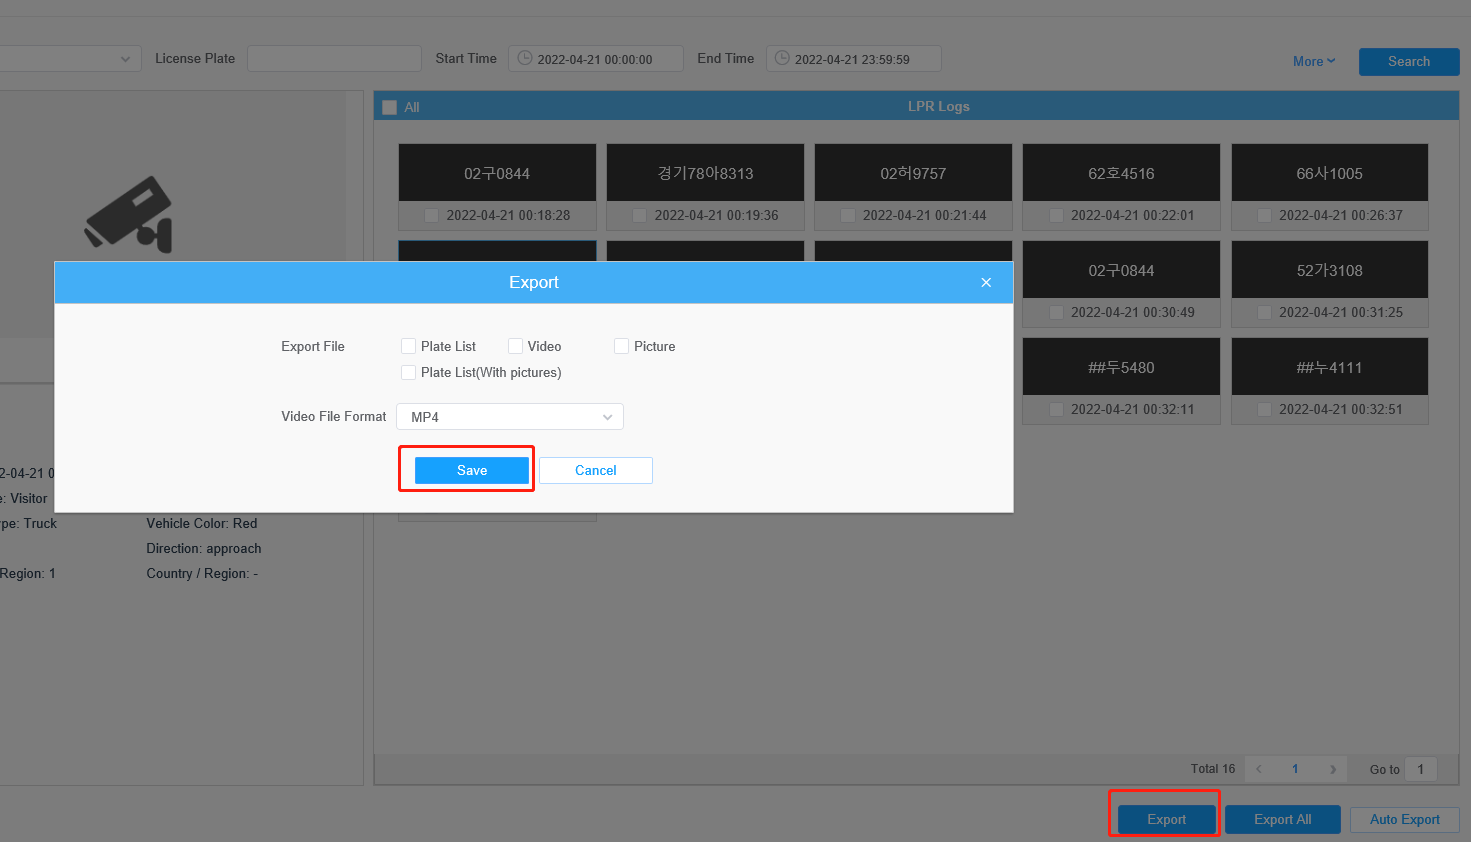
Step4: Click the "Export" button to export the license plate you selected to a csv form locally.
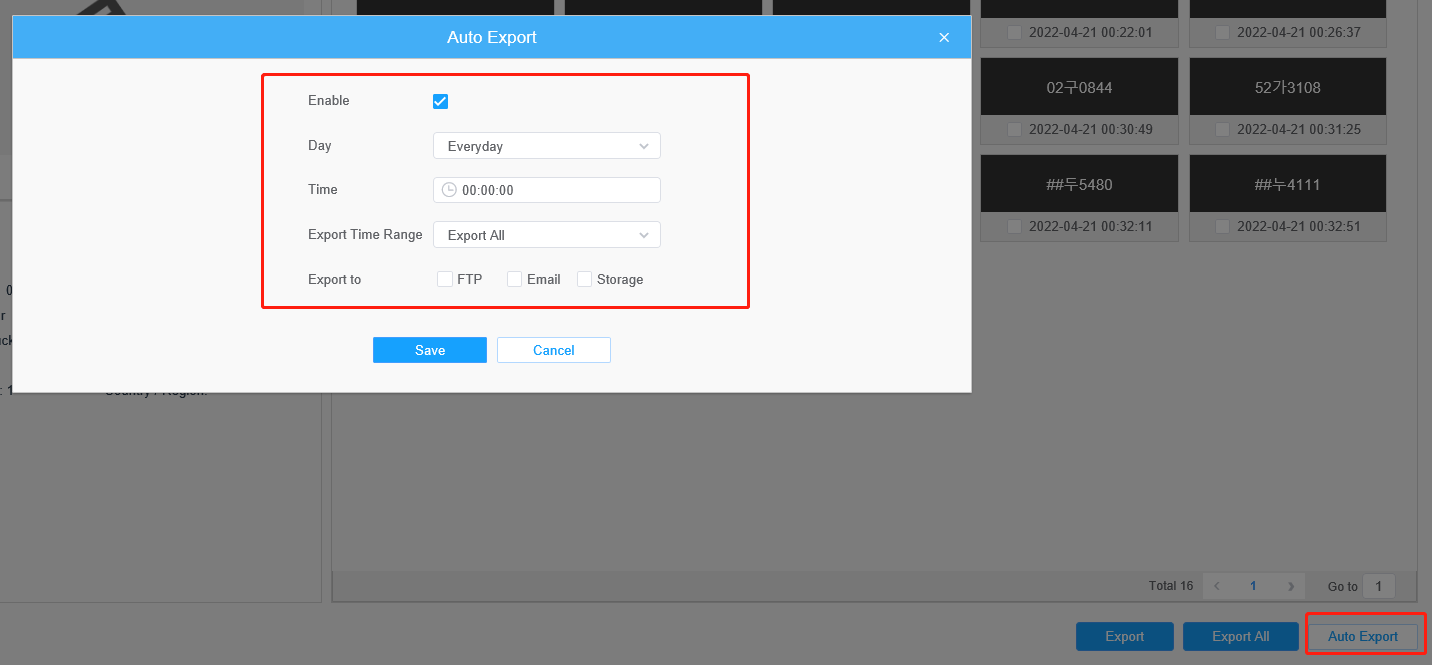
You can also click the "Auto Export" button to automatically export the log to FTP, SMTP or Storage.
Notes
How to use LPR function better under night condition
To increase the accuracy of license plate recognition under the night mode. In some special circumstances, you can't get clear license plate capture by adjusting WDR and HLC. Then we recommend that you can set the following options in advance.
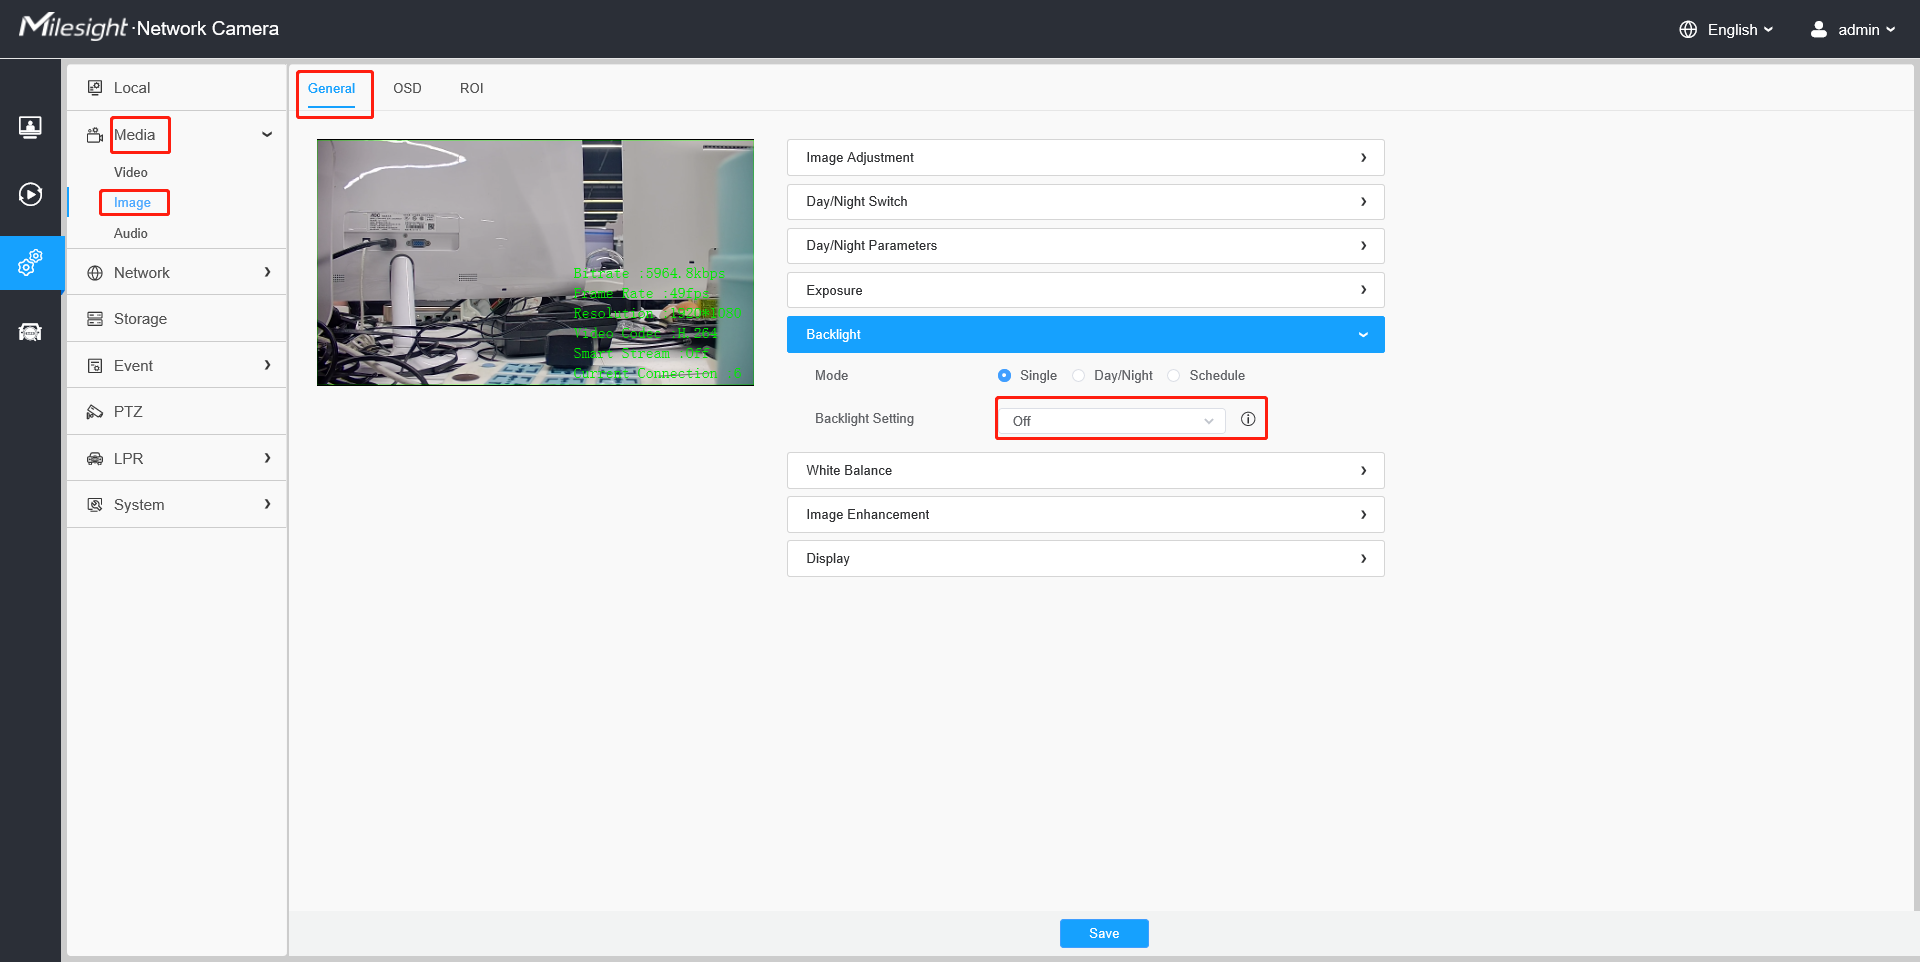
Step1: After log in the web, and go to “Media“→ “Image “→ “General“ interface.
Check the “Blacklight”, select “off” the Blacklight Setting, remember to save your settings by check the “Save” button, There will be shown in the blue box as below:
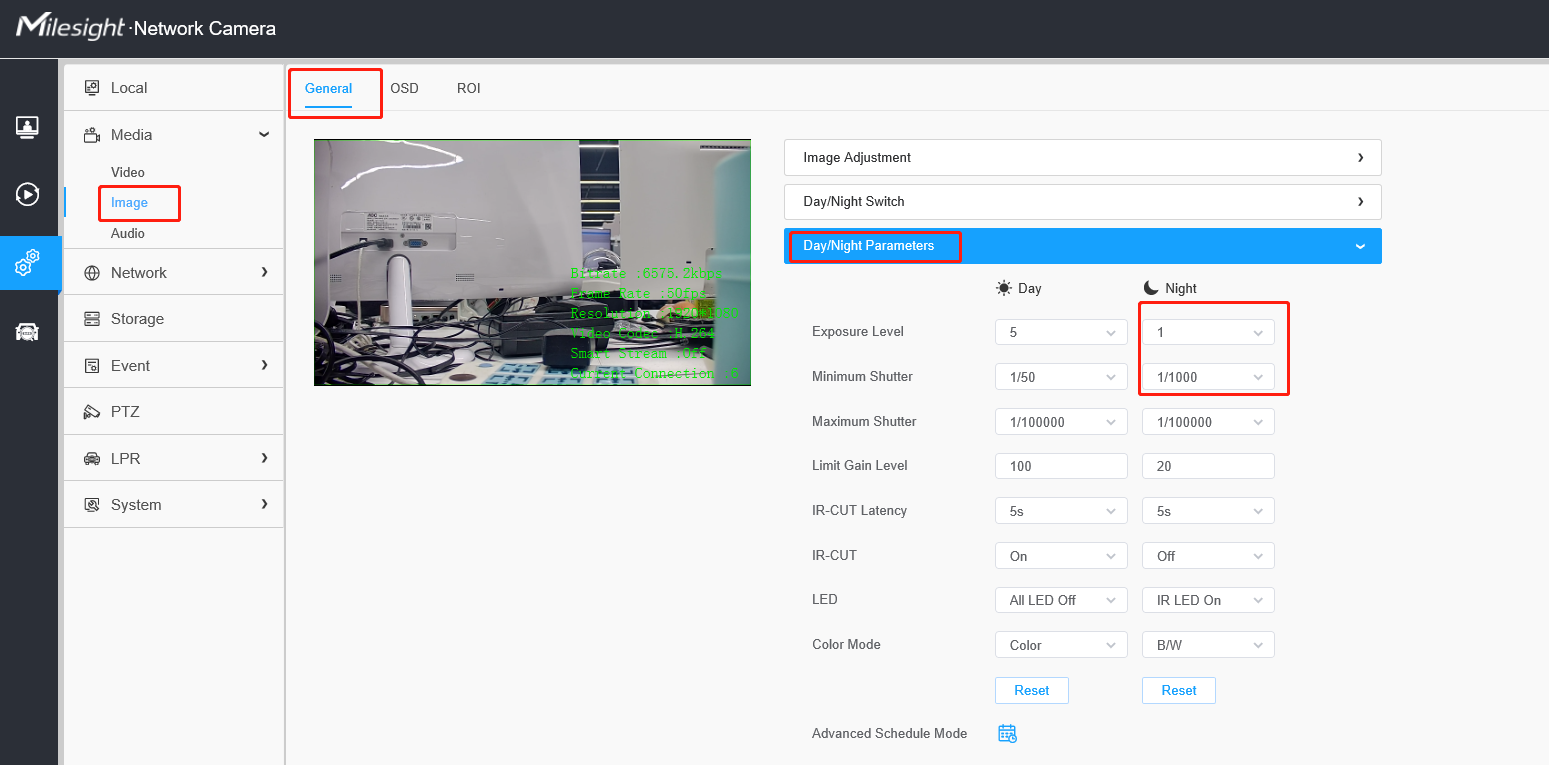
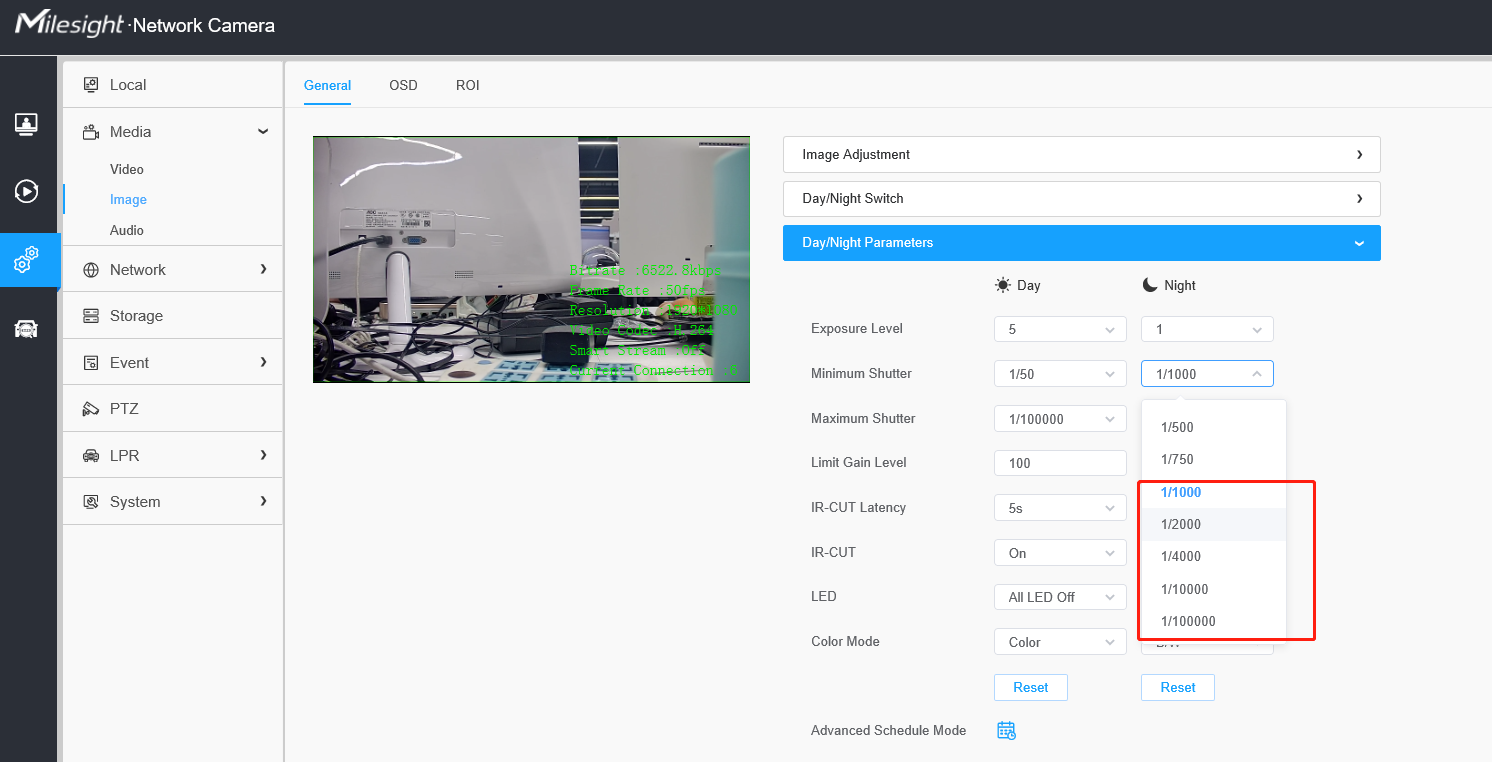
Step2: Set reasonable exposure time and brightness, go to “Media “→ “Image “→ “General“ →”Day/Night Parameters”interface. Then set the Exposure level to 1 and the Minimum Shutter to 1/1000 and keep other settings;
Then be sure to install the LPR cameras properly to capture the license plates with the correct image size, lighting conditions and camera angle.
Note: If you still can't get clear license plate capture according to the above settings, we suggest you to reduce the exposure time.
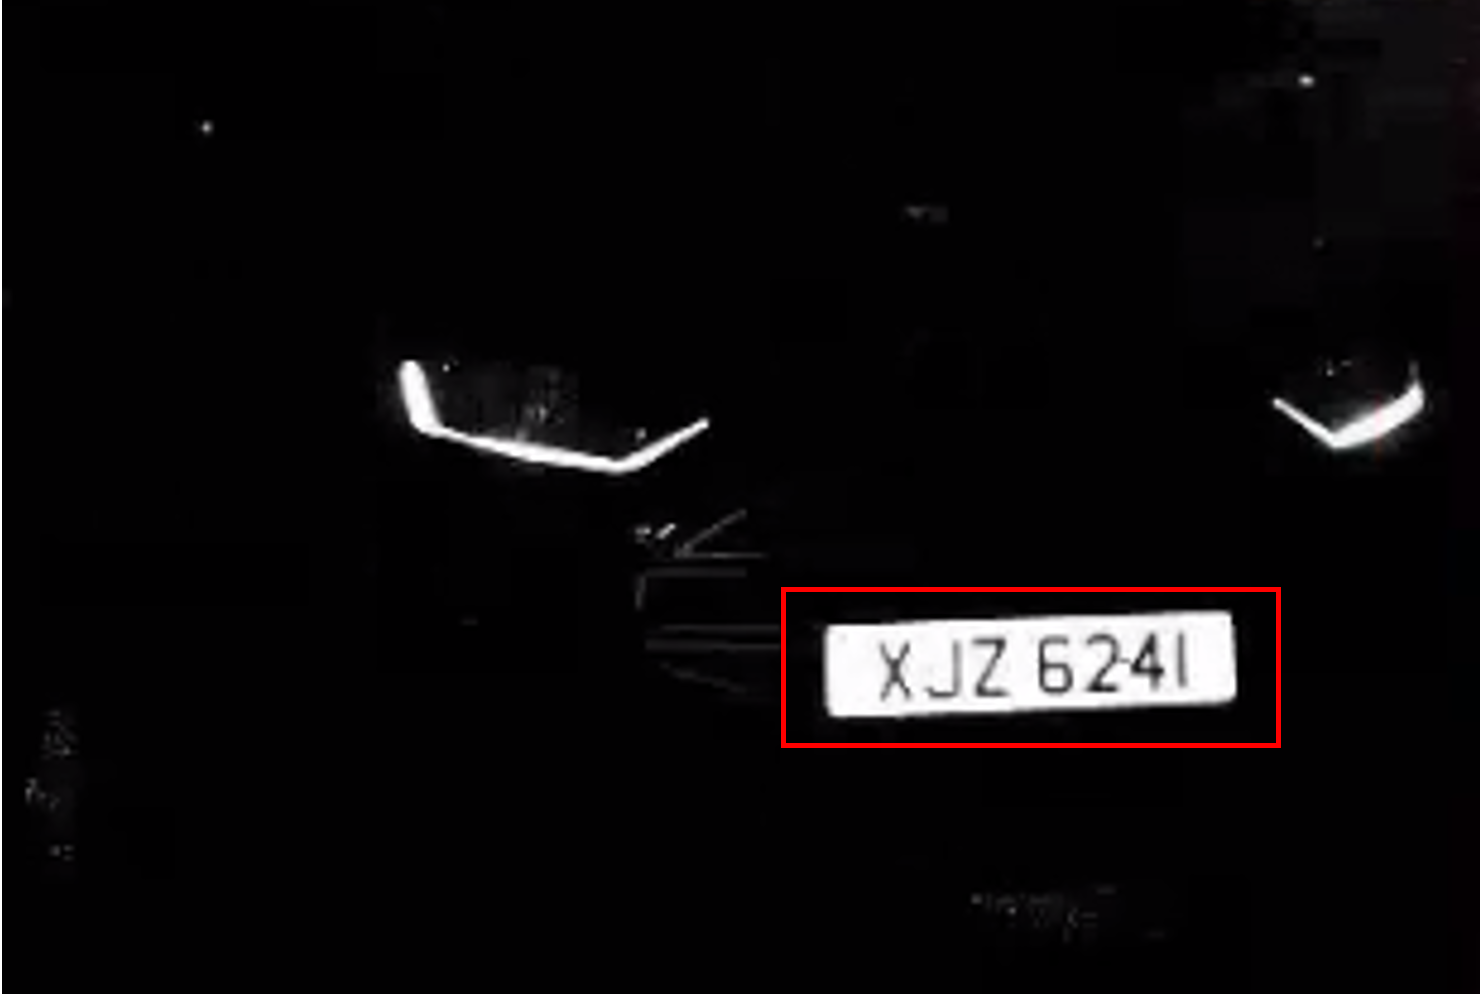
The license plate captures obtained under night conditions are shown below:
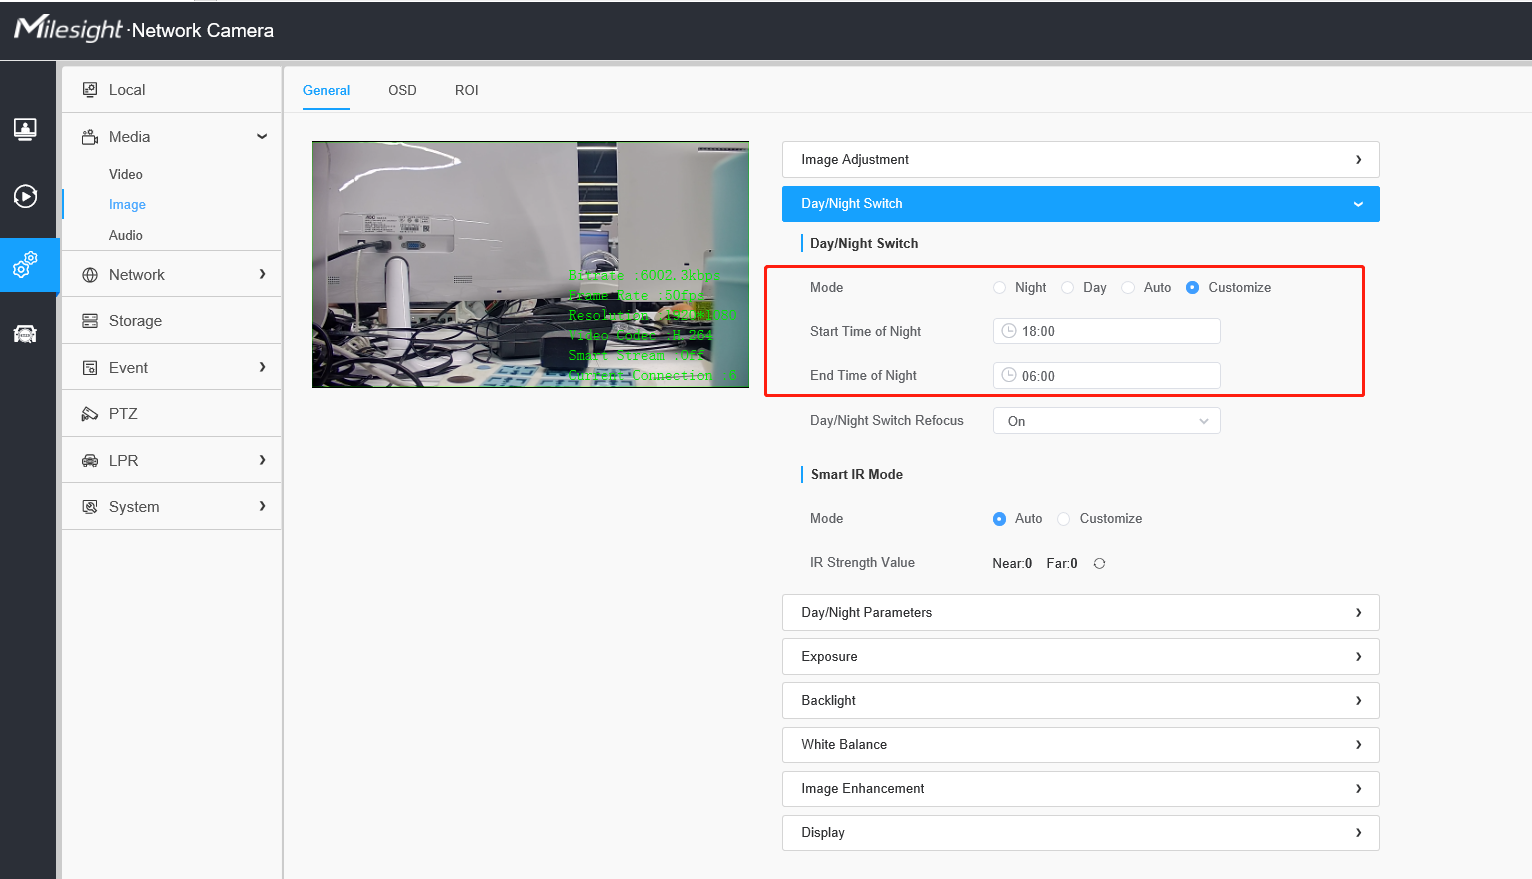
Note: If you have special requirements for the time of the Night Mode, we recommend that you customize the time of the Day/Night Mode Switch.
——————END——————