
1.Introduction
The Milesight plugin acquires the AI metadata stream from Milesight cameras, allowing for Smart Video Content Analysis (VCA), Face Detection and Automatic Number Plate Recognition (ANPR), subsequently dispatching each metadata entity as discrete objects to the Network Optix Witness VMS. In turn, these objects can be viewed, or searched, and alarms set for when they are detected.
This User Guide gives an overview of using the Network Optix VMS features for utilizing and analyzing this captured data.
For a more in-depth look at how the Network Optix VMS handles AI metadata, the end user is recommended to
consult the Network Optix website and its VMS and camera applications manuals.
If you need, please contact Milesight Team to get the download link of Milesight Plugin.
Note:
1. Make sure your Nx Witness version is above V5.1.XXX ,e.g., V5.1.4.38659 and V6.0.0.39503.
2. Make sure your operating system is Windows ( windows 10/11 ) or Linux ( Ubuntu 20.04/22.04 ).
3. Make sure your camera’s firmware version is 61.8.0.4-r6 or above / T_61.8.0.4-c11 or above.
4. Because NX Witness may come with an old Milesight plugin or you might have previously installed an old plugin, we recommend removing the old plugin if you want to use Milesight new plugin : Delete the “milesight_analytics_plugin.dll” in path C:\Program Files\Network Optix\Nx Witness\MediaServer\plugins
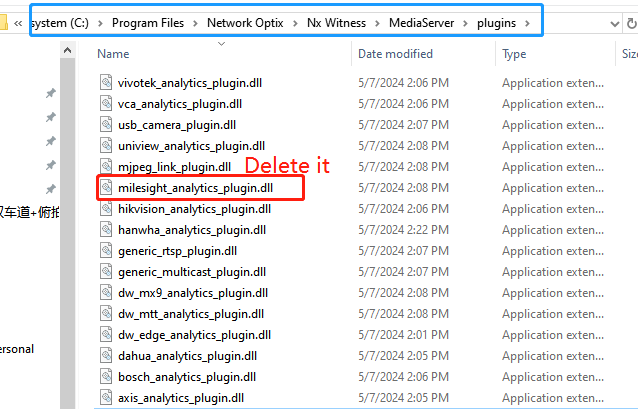
If you need to keep the old plugin, then it will coexist with the new plugin, please be careful to distinguish them:
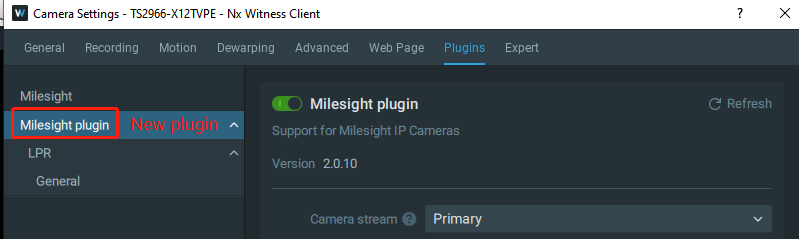
2.Plugin Load In
2.1 Windows Installation
Automatic Installation:
1.Unzip milesight_analytics_plugin.zip into a folder

2.Open the folder and run the “install.bat” as administrator.
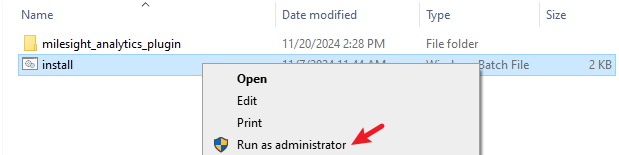
This program will install the plugin and restart the Network Optix server.
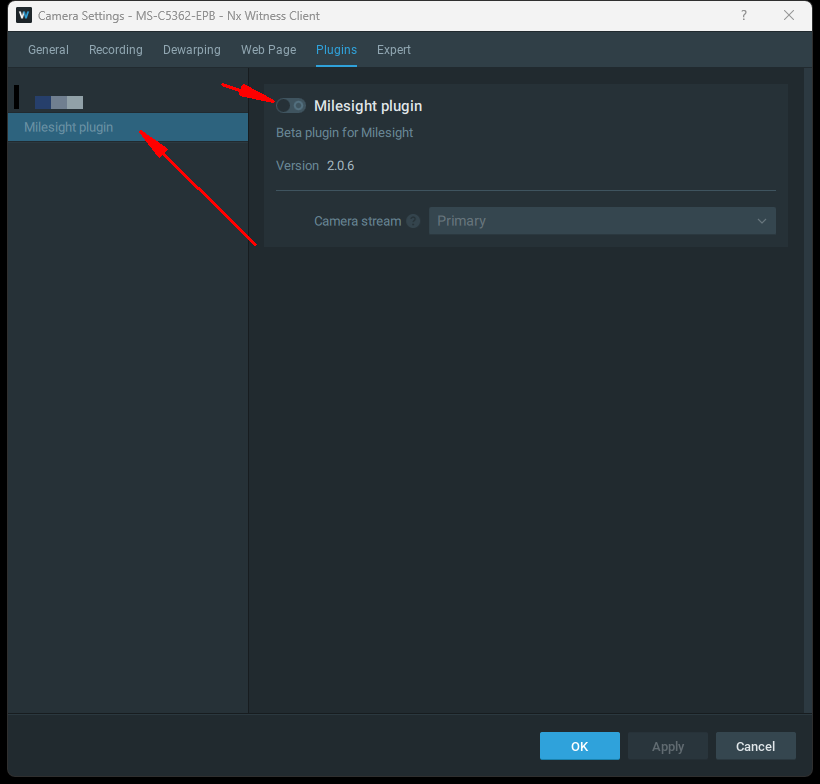
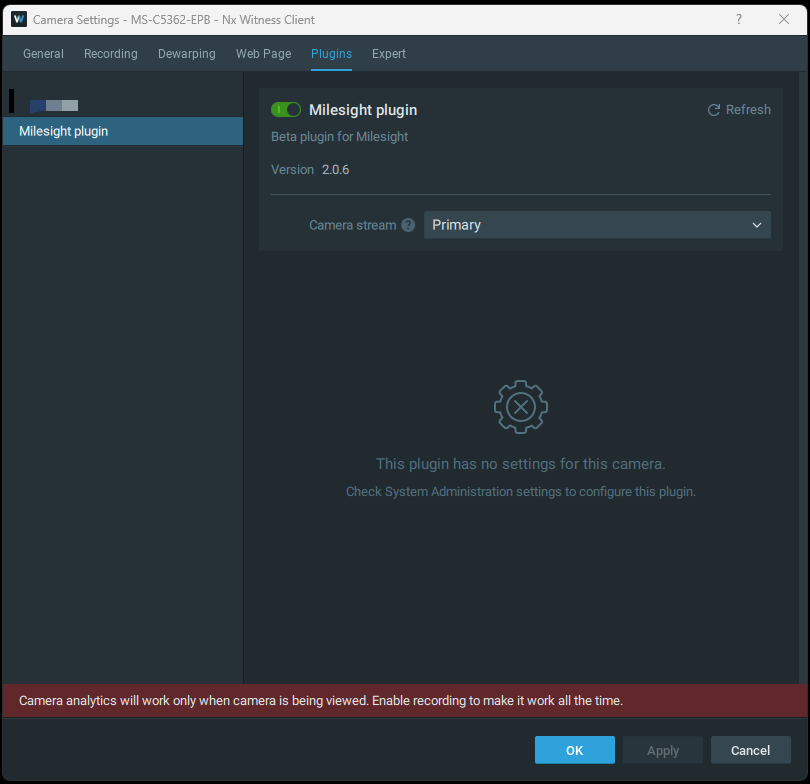
3.Running Network Optix and at camera settings, you will find the plugin, named as “ Milesight plugin ” at plugin tab. Please turn it on as by default it is off.
|
|
Manual Installation:
1. Unzip milesight_analytics_plugin.zip into a folder.

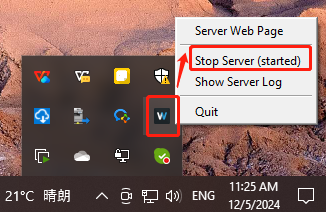
2. Ensure Nx Witness server is stopped.
Normally you can stop Nx Witness Server from taskbar.
3. But if you still cannot stop it or have some troubles, please:
Open up Windows Services configuration(Press win+R, and open services.msc):
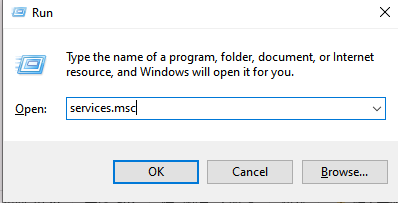
Find and stop Network Optix Media Server:
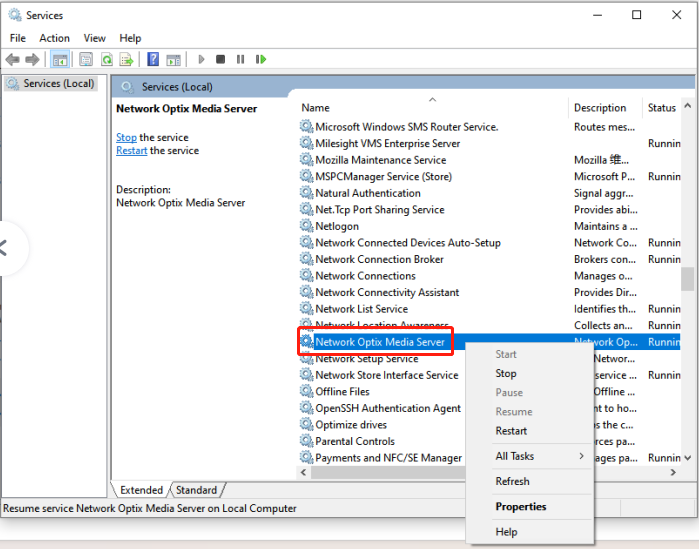
4. Copy the folder (NOTE: please include the folder itself, not just copying the files inside) to C:\Program Files\Network Optix\Nx Witness\MediaServer\plugins
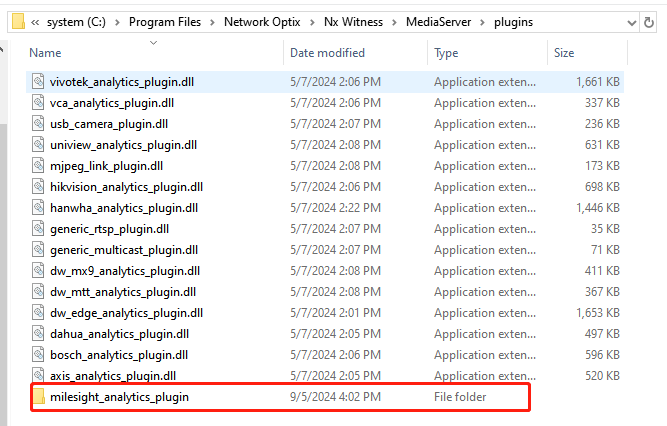
5. Start Nx Witness Server.
Same as the Stop Nx Witness Server. Normally you can start Nx Witness Server from taskbar. But if you still cannot start it or have some troubles, please open up Windows Services configuration(Press win+R, and open services.msc) and start it
Please refer to Automatic Installation for next steps to enable Milesight Plugin for camera.
2.2 Linux Installation
1.Unzip milesight_analytics_plugin.zip into a folder.
2.Open the current folder in a terminal.
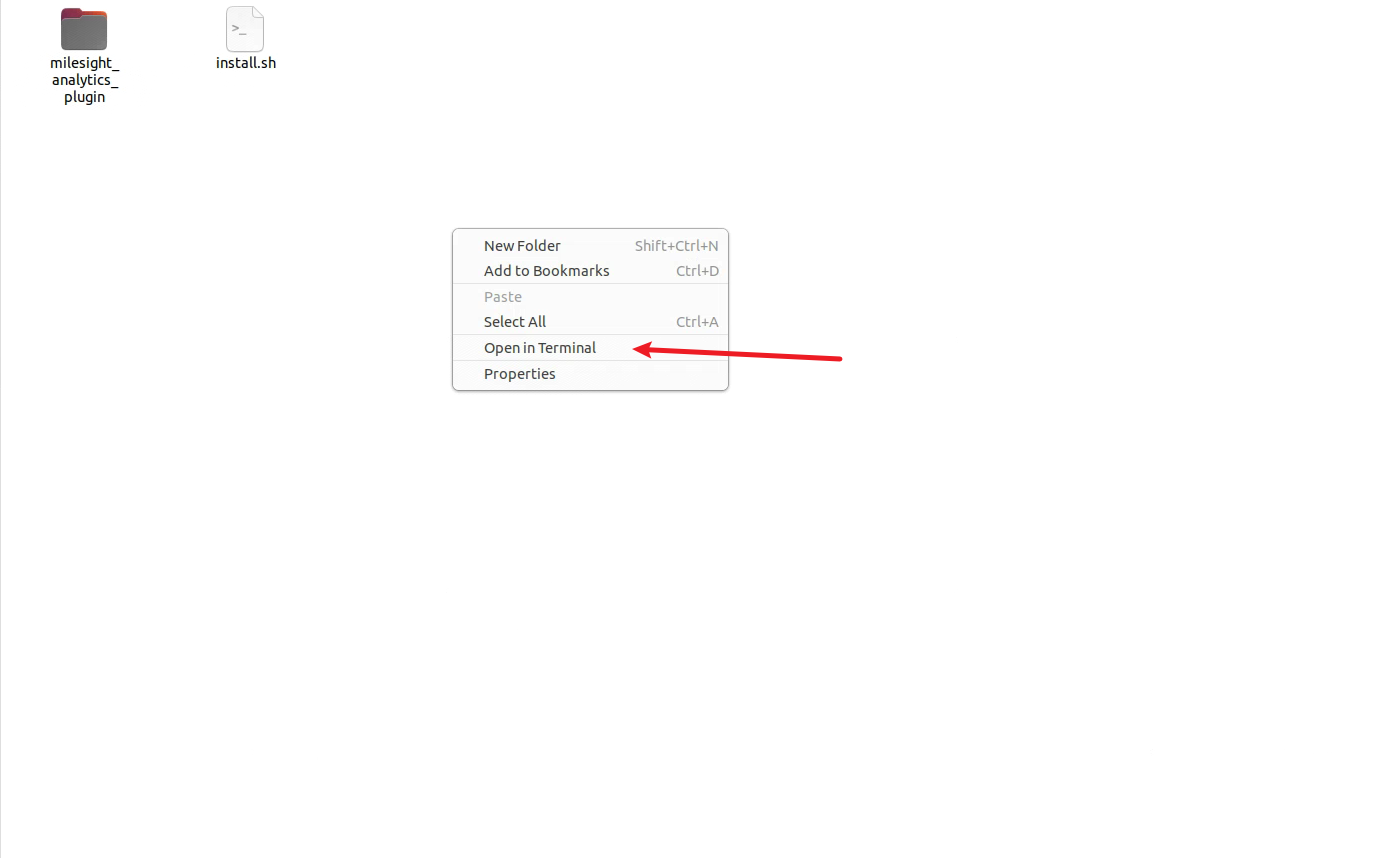
3.Enter the following commands:
sudo chmod 777 ./install.sh
sudo ./install.sh
And follow the prompts to operate.
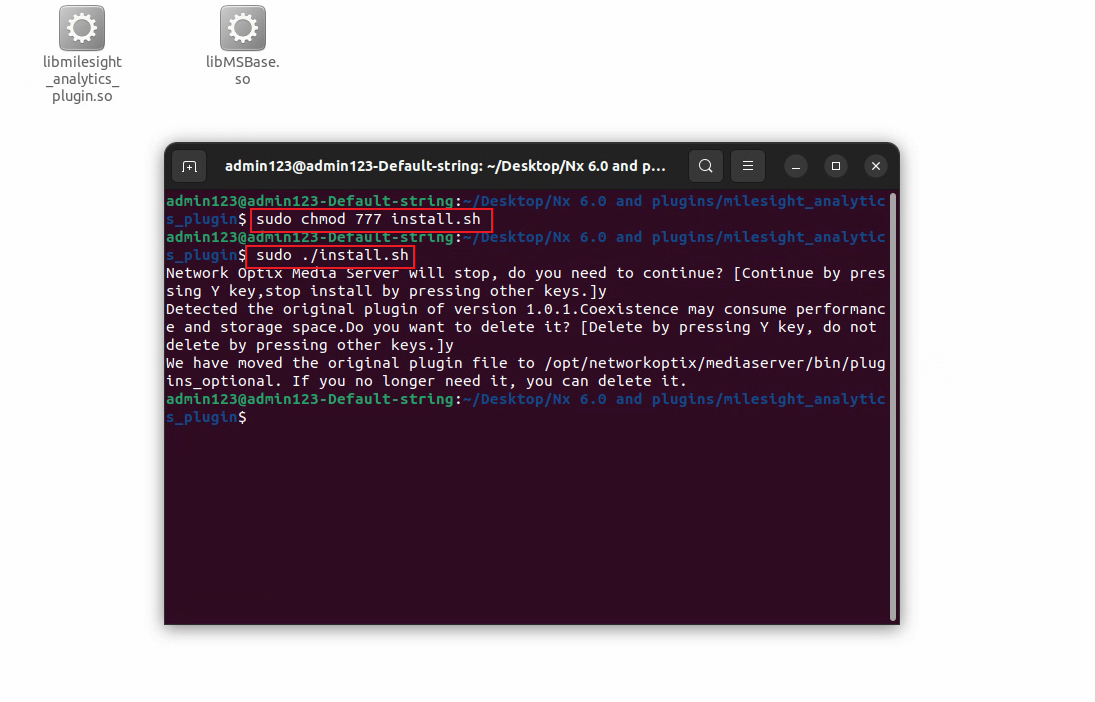
4.This program will install the plugin and restart the Network Optix server.
5.Please refer to Automatic Installation of Windows for next steps .
3.Camera Setup
Since the plugin mainly deals with metadata from camera, if it is an ANPR camera, please make sure the Metadata Transmission is enabled at Data Transmission Setting.
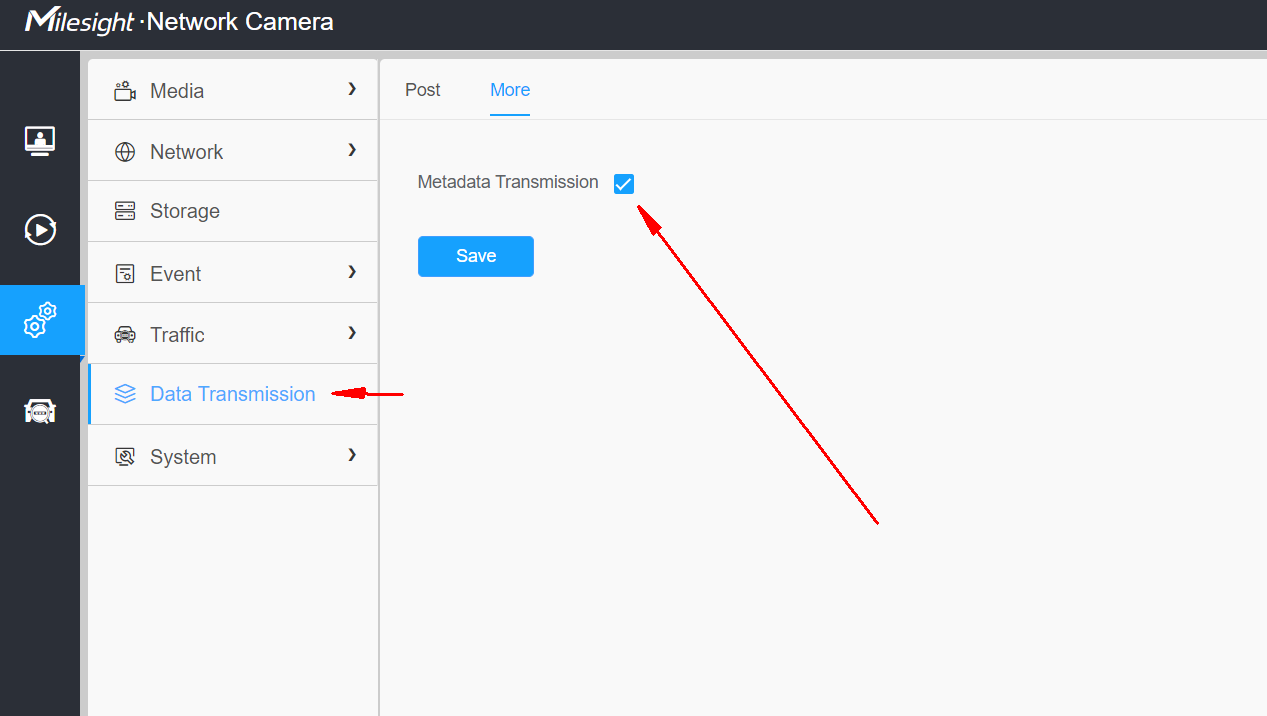
Note:If it is a Non-ANPR camera, you can skip this setting.
4.How to use new plugin
4.1 Camera Configuration
We support configuring basic parameters of event detection for camera.
|
|
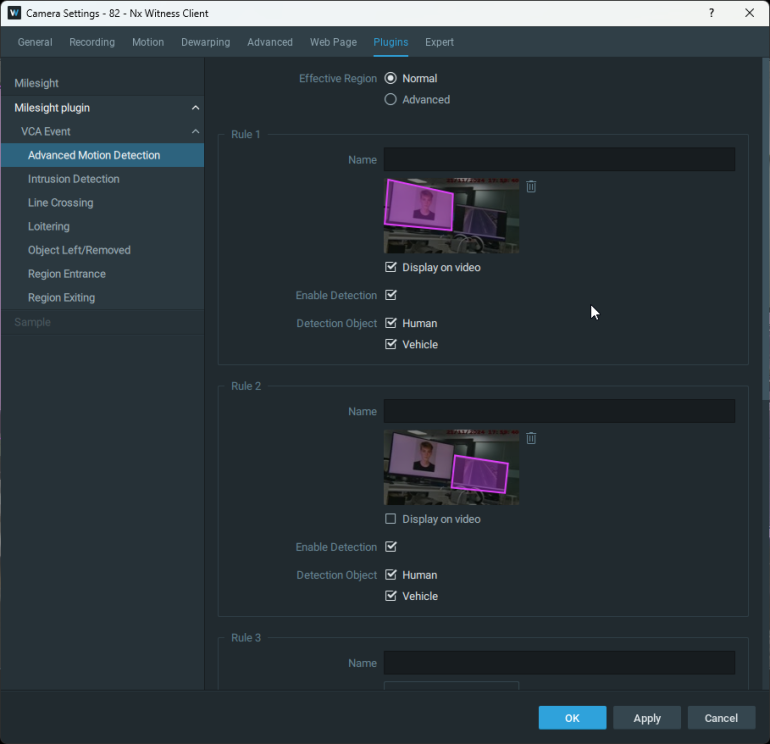
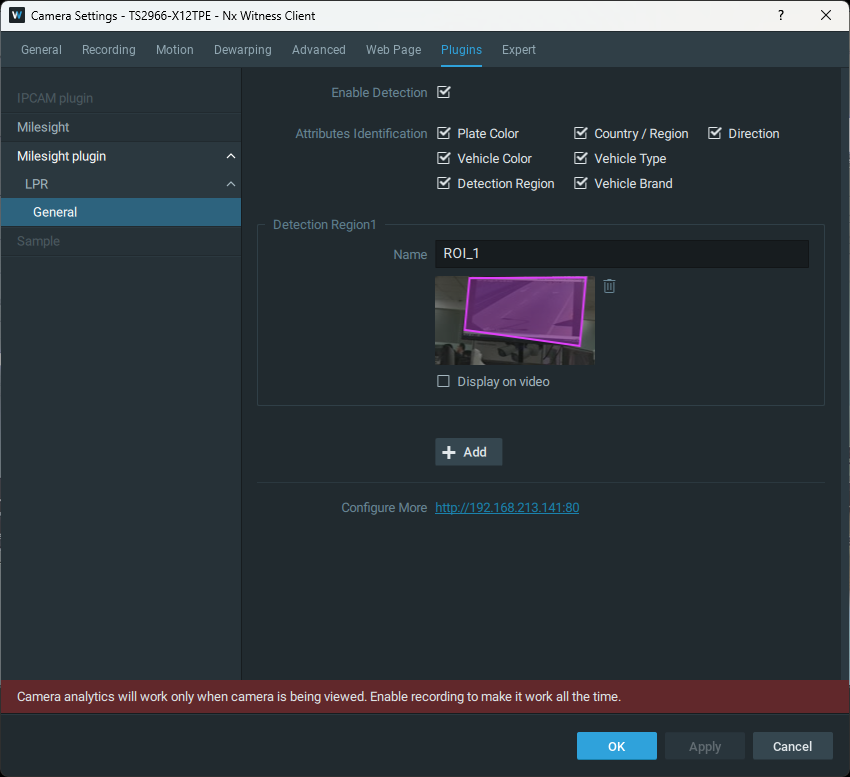
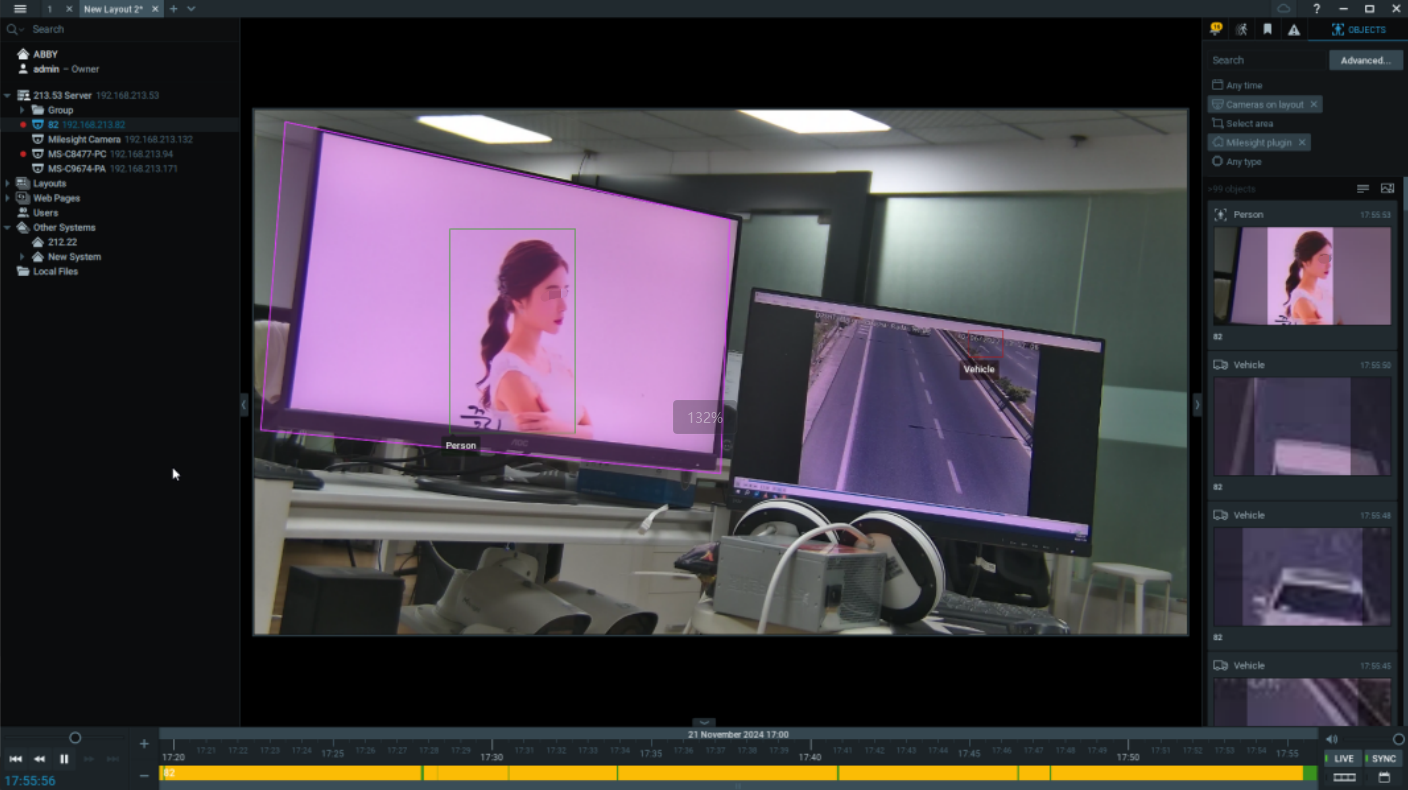
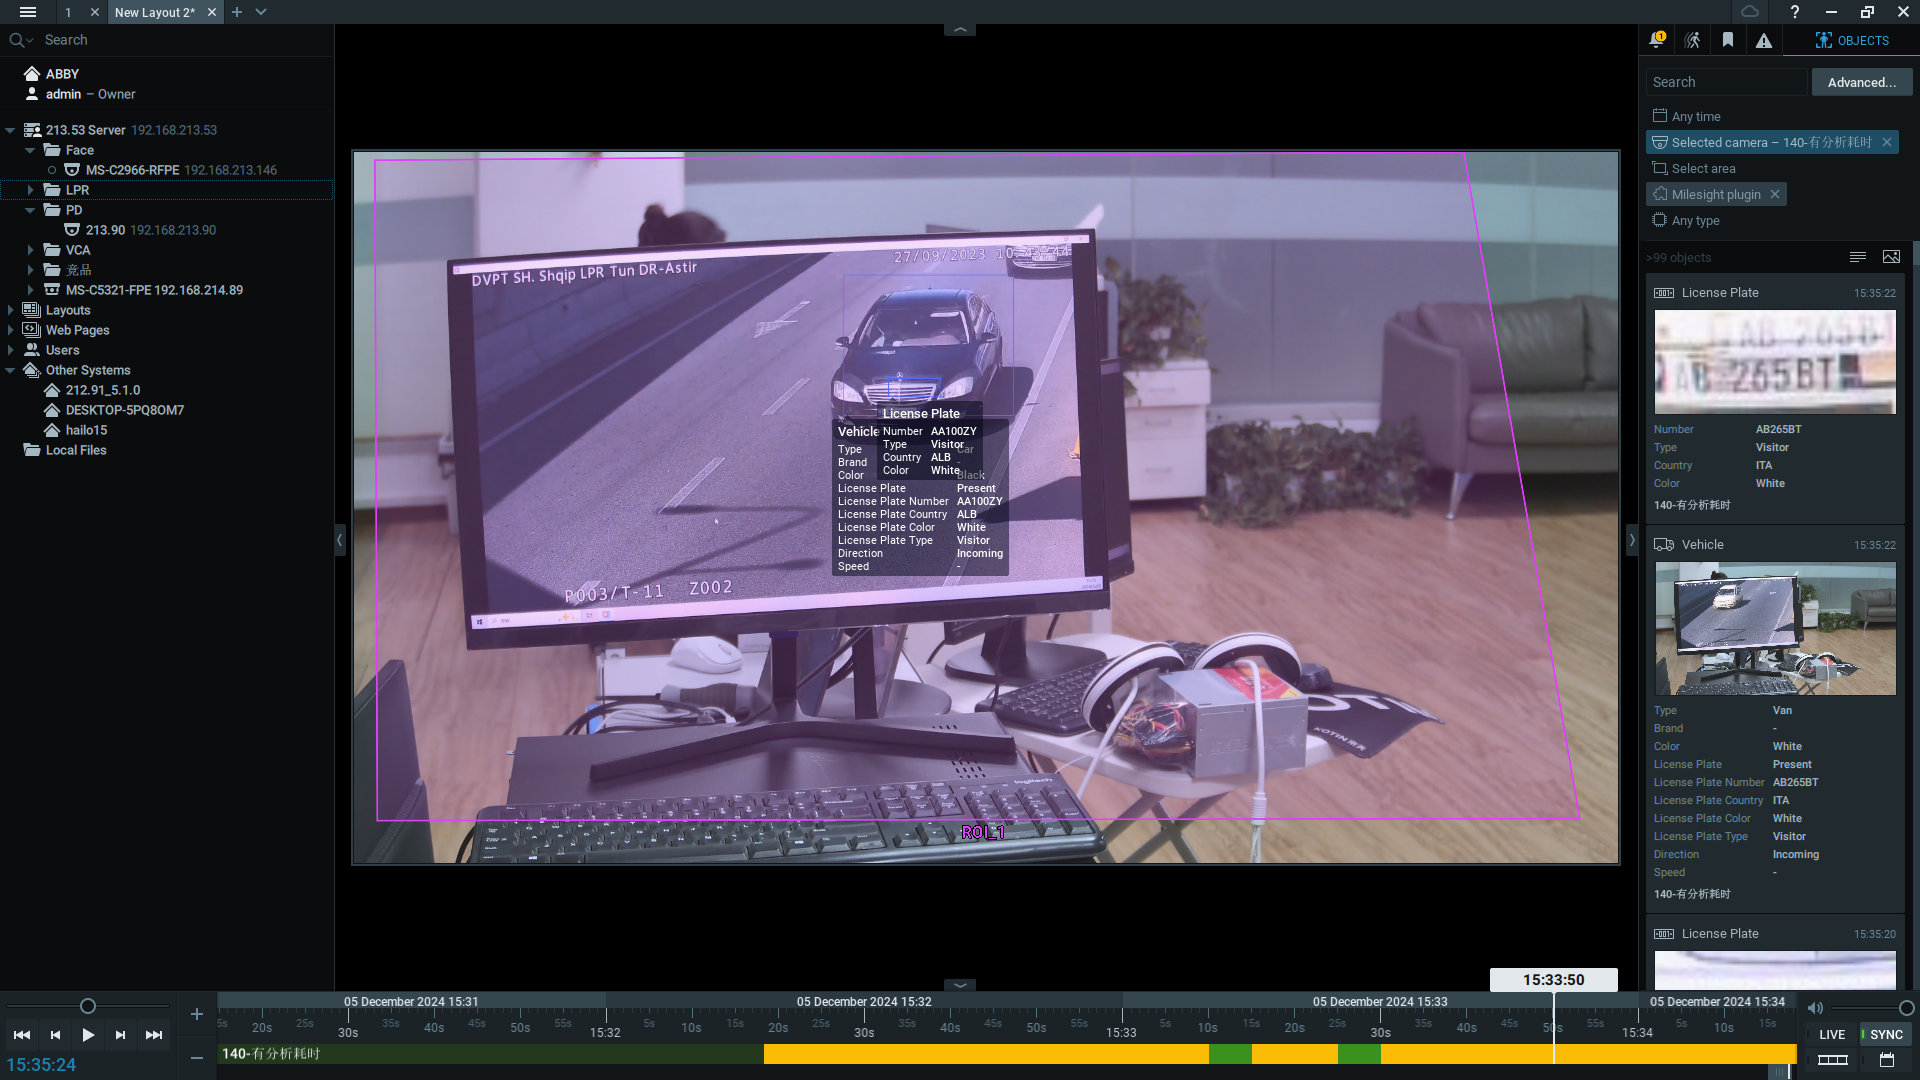
You could see target object tracking box and detection area on live view stream.
|
|

4.2 Manage Camera Analytics Event on Network Optix
1.For Non-ANPR Camera.
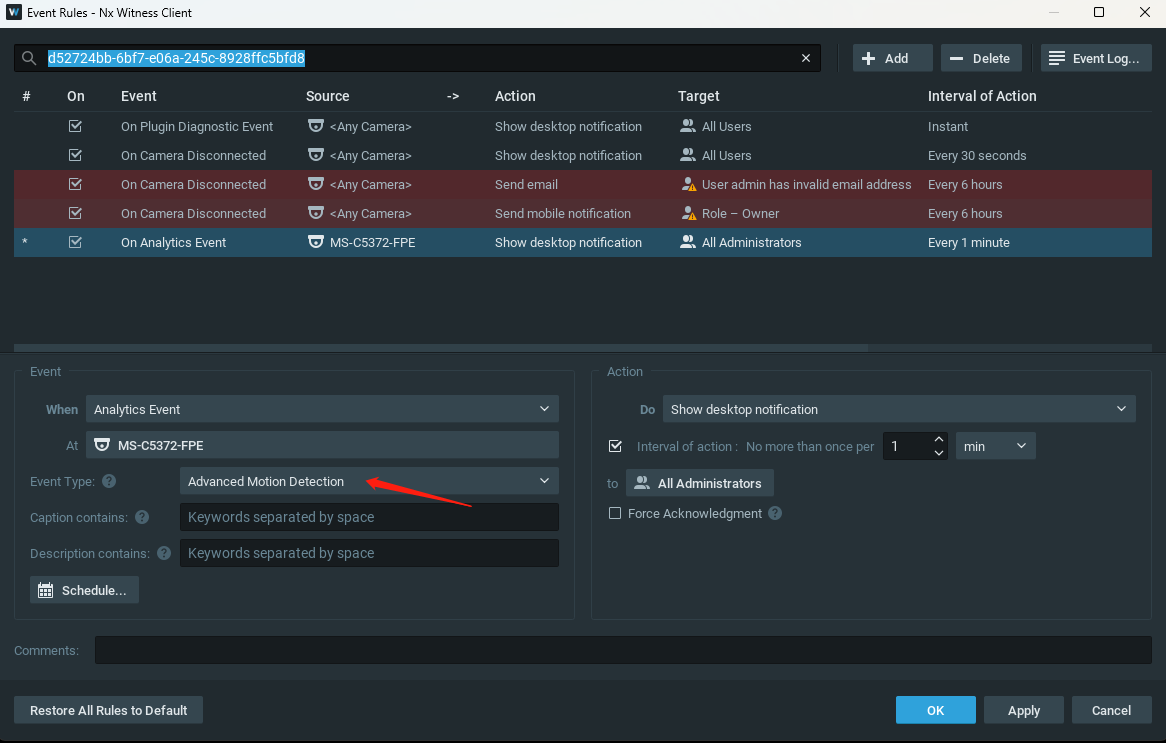
The types of events we support are Basic Motion Detection, Audio Alarm, External Input, Intrusion Detection, Region Entrance, Region Exiting, Advanced Motion Detection, Tamper Detection, Line Crossing, Loitering, Object Left, Object Removed, Object Counting Event, Regional Counting Event, Hard Hat Detection, Fire & Smoke Detection. Taking “ Advanced Motion Detection ” as an example below.
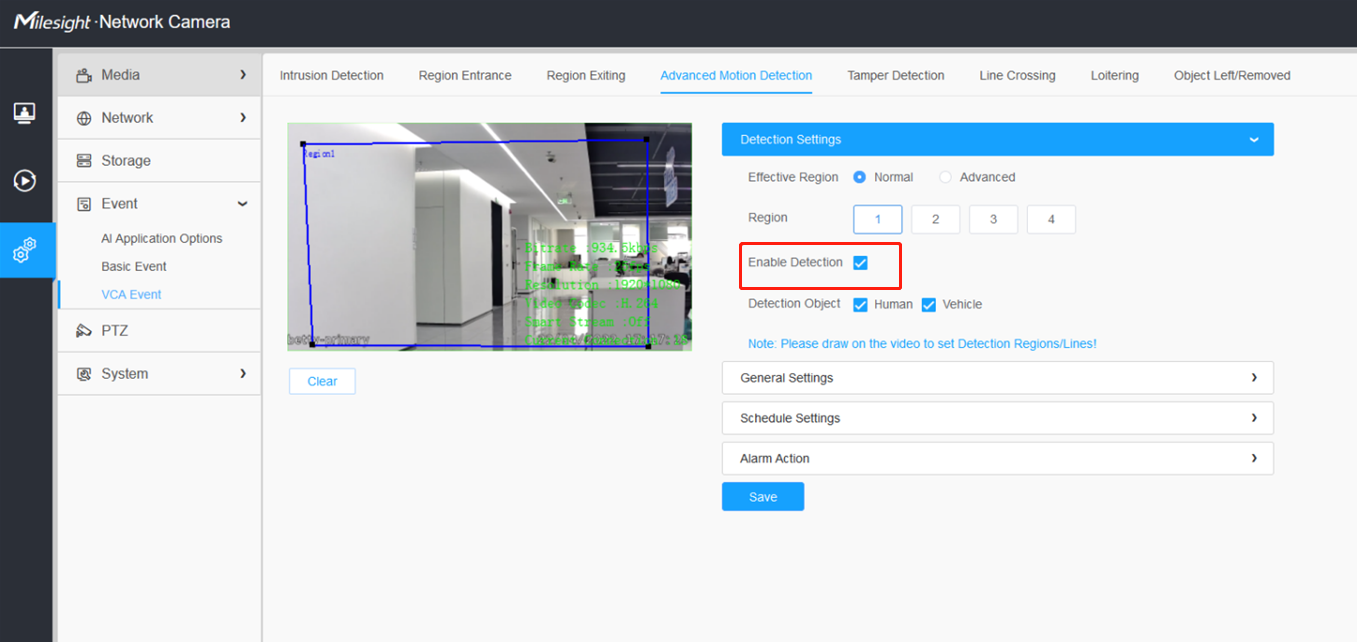
• Enable Analytics Event first on network camera. Accessing camera web interface and turn to Settings -> VCA Event -> Advanced Motion -> Detection.
• Make sure you enable the detection and have all other settings including detection region, time threshold, sensitivity, schedule and other parameters properly configured.
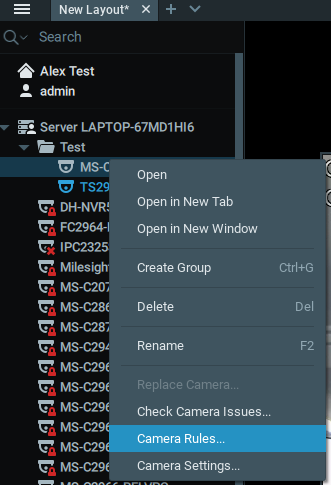
On Network Optix , go to Camera Rules setting,
- Choose “ Analytics Event ” as the event.
- In Event Type, choose “ Advanced Motion Detection ”
(New plugin will recognize this network camera and offer a selection of relevant VCA events)
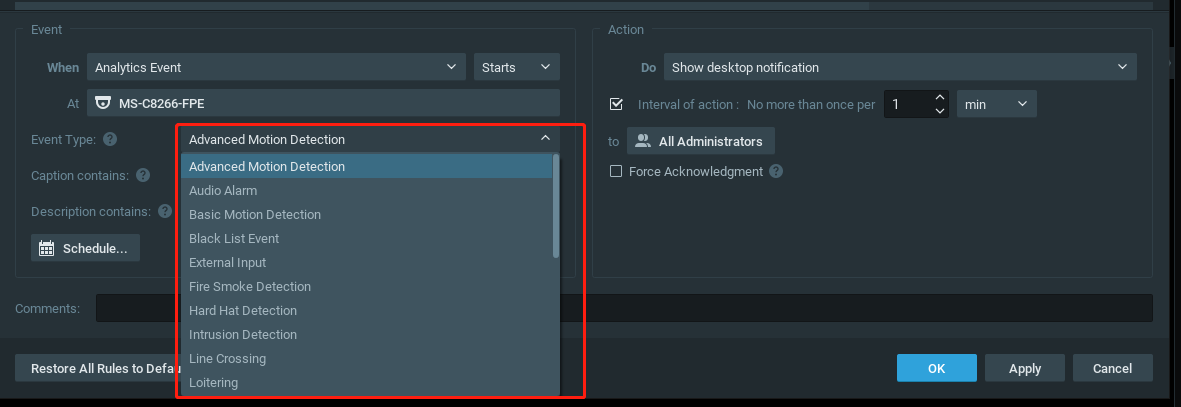
- Assign action to it, in below example, “ Show desktop notification ” is selected.
2.For ANPR Camera.
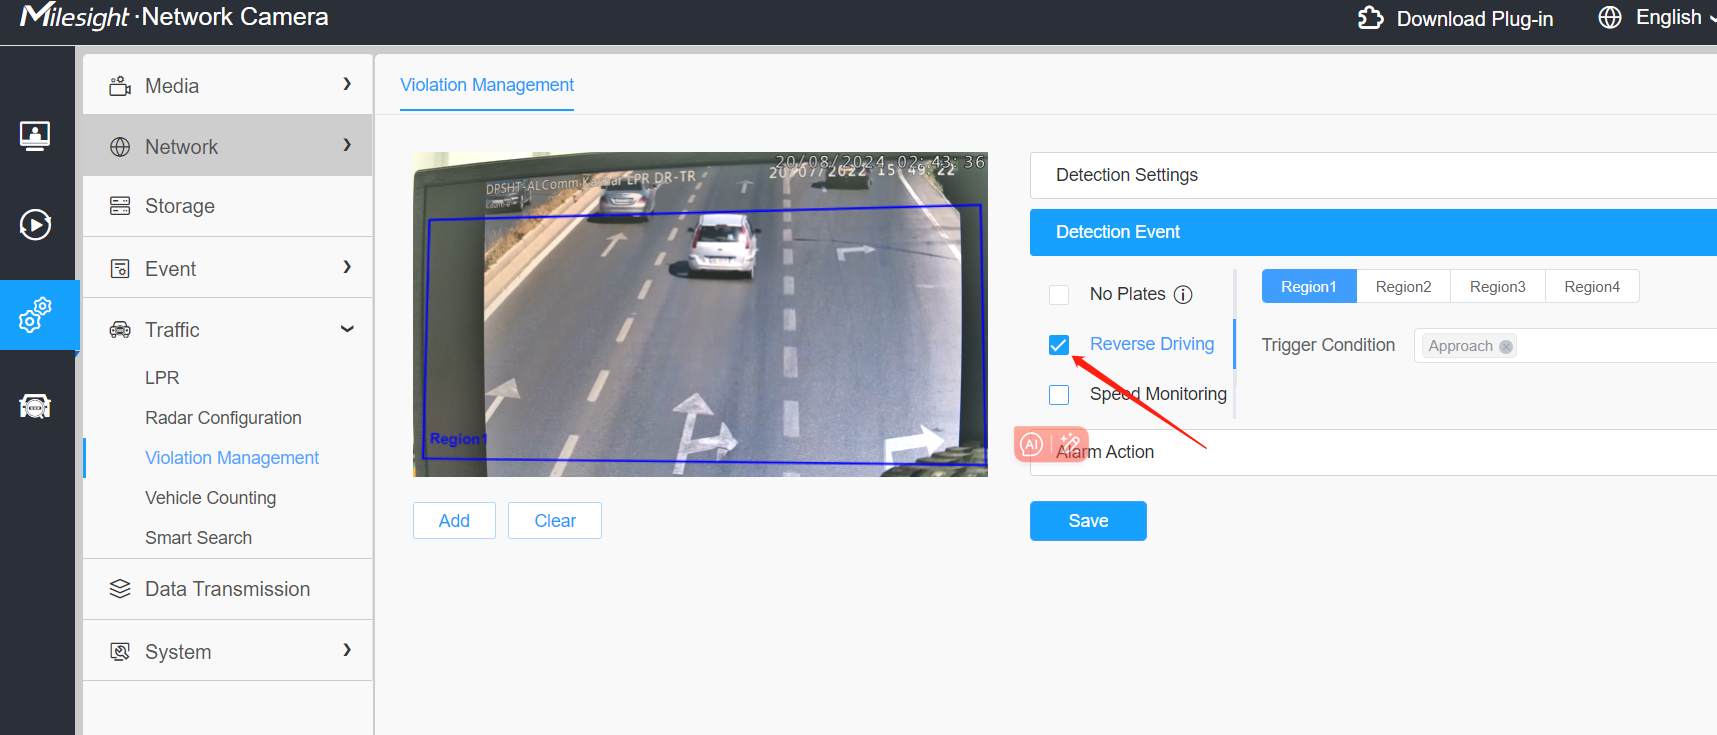
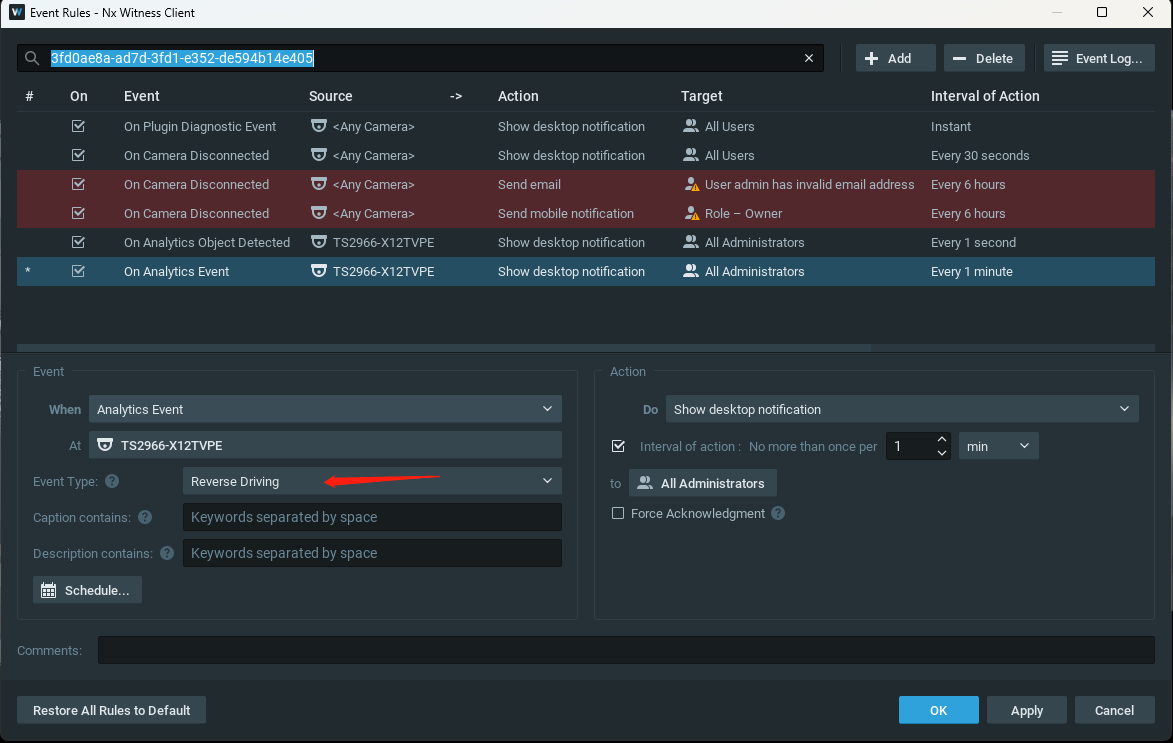
The types of events we support are Vehicle Attributes Event, Reverse Driving, Speed Monitoring Event ,Black List Event, White List Event, Visitor List Event, No Plates. Taking “ Reverse Driving ” as an example,which is on Road Traffic Series cameras.
• Enable Analytics Event on the ANPR camera. Accessing camera web interface and turn to Settings -> Traffic -> Violation Management -> Detection Event -> Reverse Driving.
• Make sure you enable the detection and have all other settings including detection region properly configured.
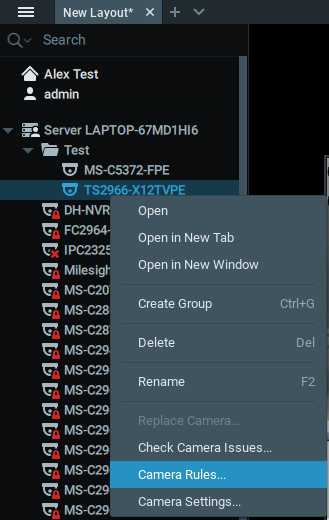
On Network Optix, go to Camera Rules setting,
- Choose “ Analytics Event ” as the event.
- In Event Type, choose “ Reverse Driving ”
(New plugin will recognize this ANPR camera, and put intelligent traffic related events for selection)
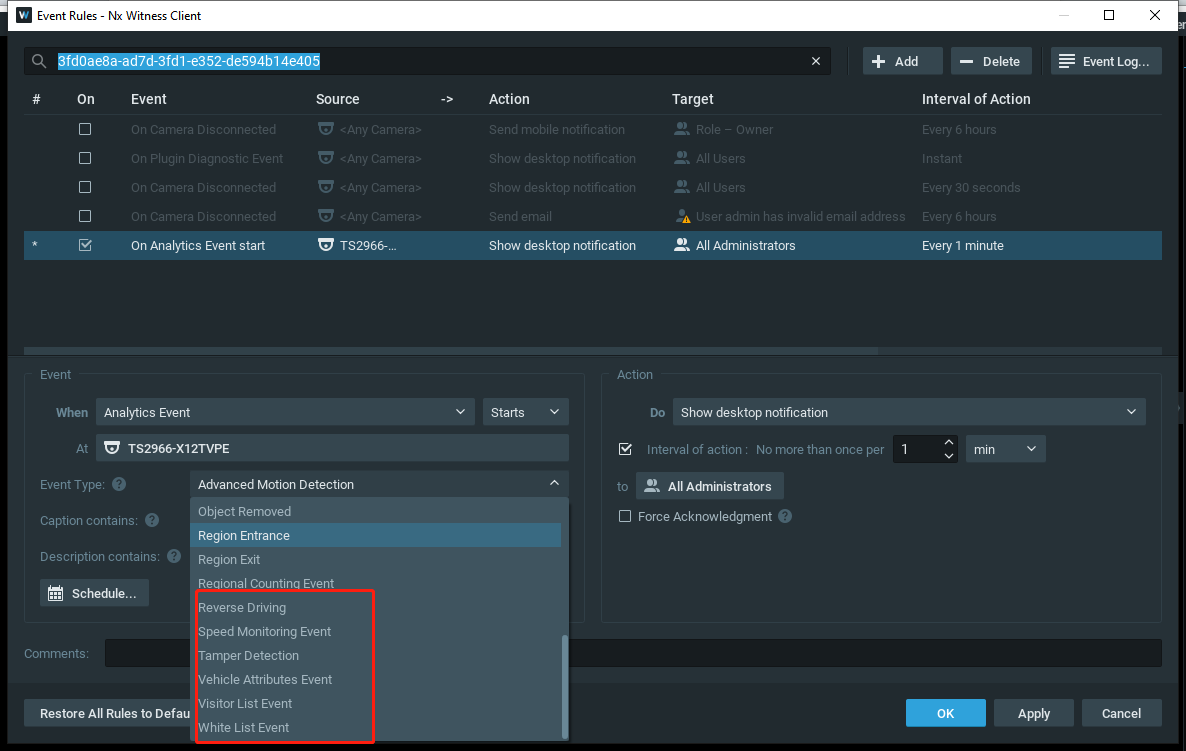
- Assign action to it, in below example, “ Show desktop notification ” is selected.
4.3 Analytics Object Detected
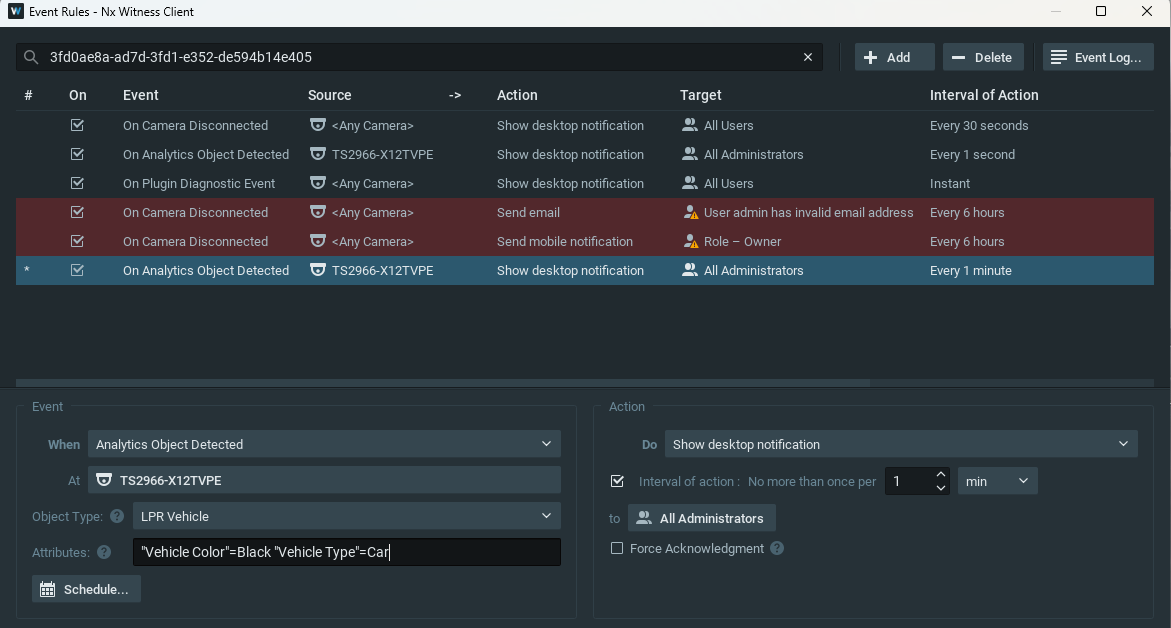
Network Optix supports to trigger an event if incoming object types or attributes it receives from camera hit a pre-configured rule, which is called “ Analytics Object Detected ”.
On Network Optix, you can go to Camera Rules and choose “ Analytics Object Detected ”.
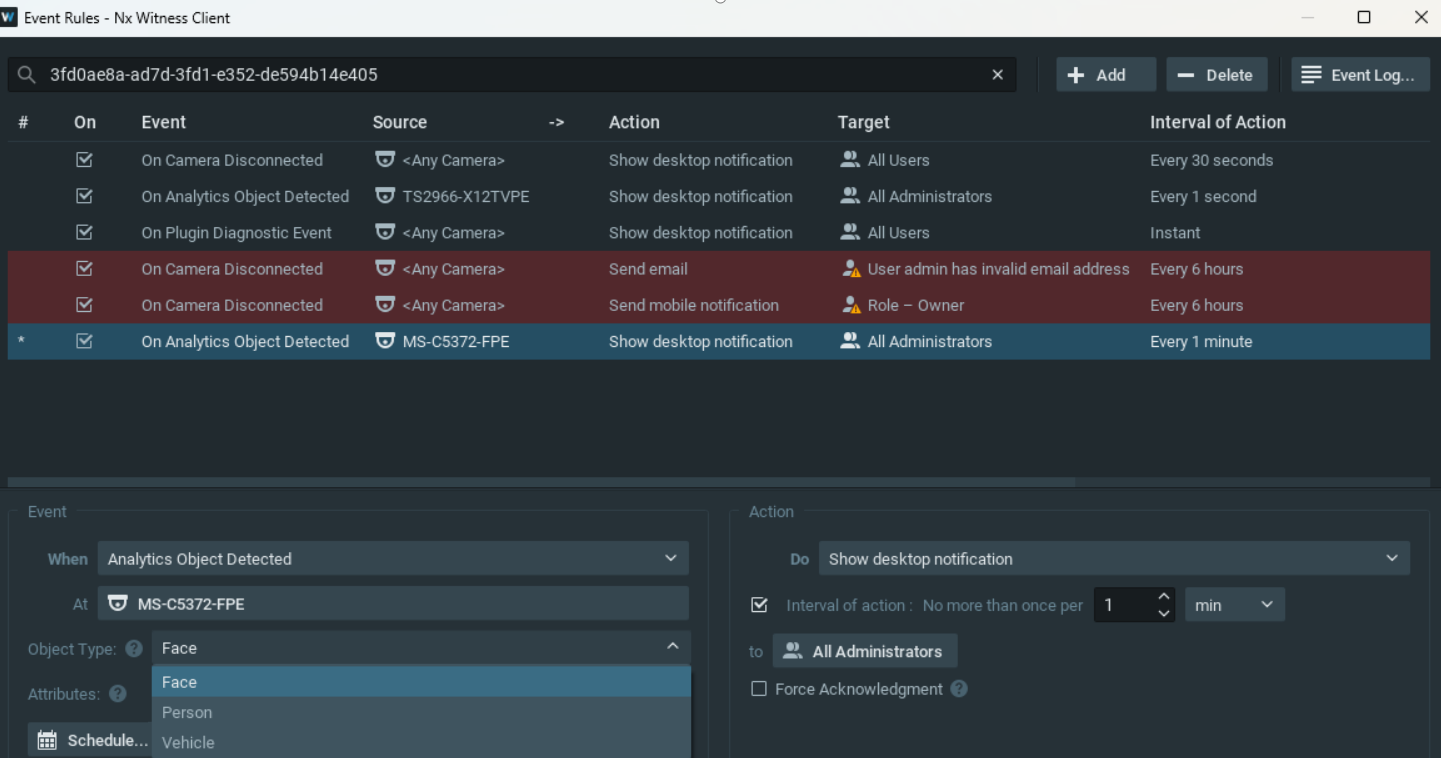
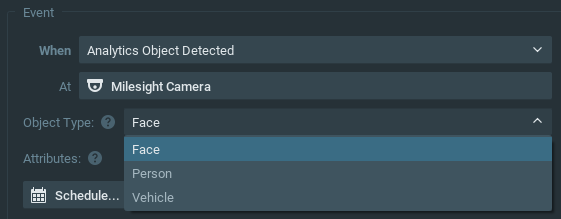
For Non-ANPR Camera, you can select target object as Face or Person or Vehicle.
For object with sub-attributes (as suggested in 3.4 Advanced Object Search), like Face, you can use the Attributes to add more rule condition.
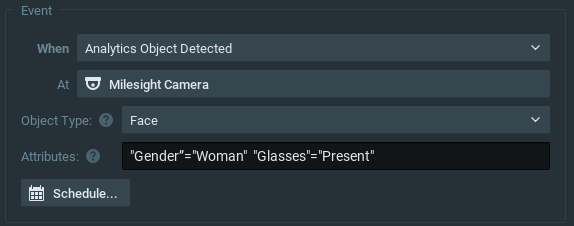
E.g, if you want to define the event when camera detects a Face of Female, you can input “Gender”=“Woman” (the quotation mark should be there).
Or if you would like to set dual condition such as : Female with glasses, you can input “Gender”=“Woman” “Glasses”=“Present” (the quotation mark should be there and there is a space between each value equation).
To know what values available (recognizable) under each attribute, you can refer to the filter under each attribute in 5. Metadata objects and attributes.
For ANPR Camera, you can follow the same process. To know what values available (recognizable) under each attribute, you can refer to the filter under each attribute in 5. Metadata objects and attributes.
4.4 Advanced Object Search
The new plugin receives and interprets metadata from the camera and save them to Network Optix server of object search. The object search can also show real-time detected object and relative information.
1.Non-ANPR Camera
The regular network camera is capable of analyzing 3 object type
1. Person
2. Vehicle
3. Face (only supported by some models).
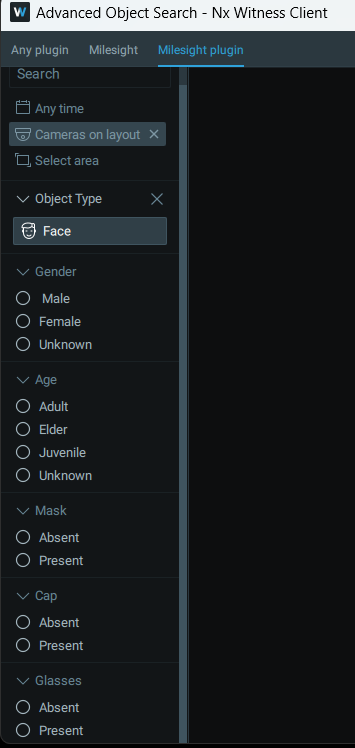
Under Face, there are attributes detectable including Gender/Age/Mask/Cap/Glasses.
You can see the target object tracking box on live view stream:
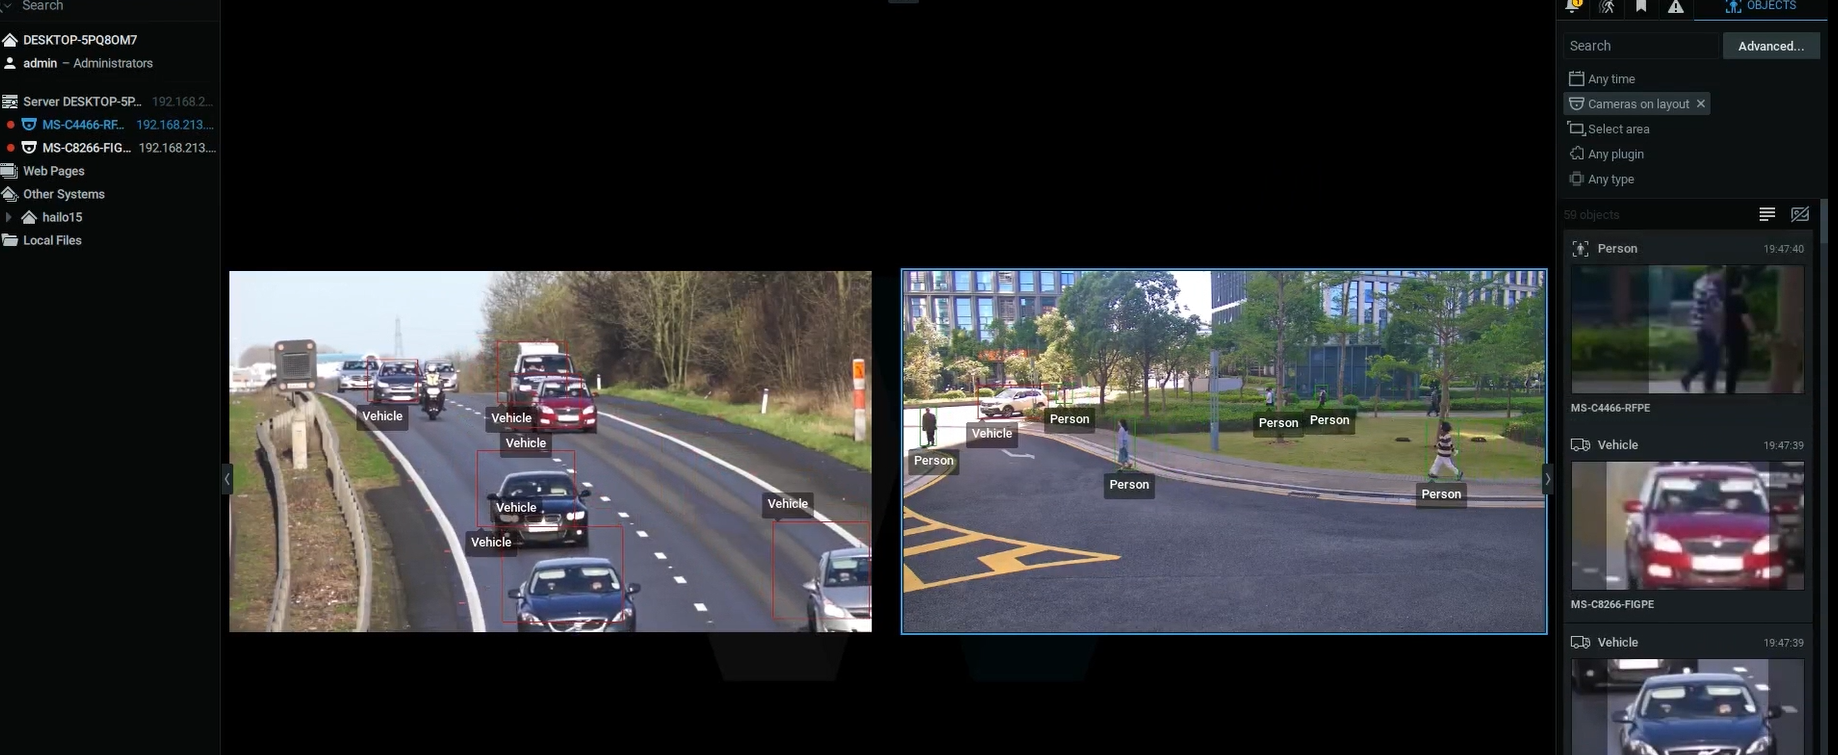
Person/Vehicle -- the target object will be marked with a box and the words "person" or "vehicle" will be displayed.
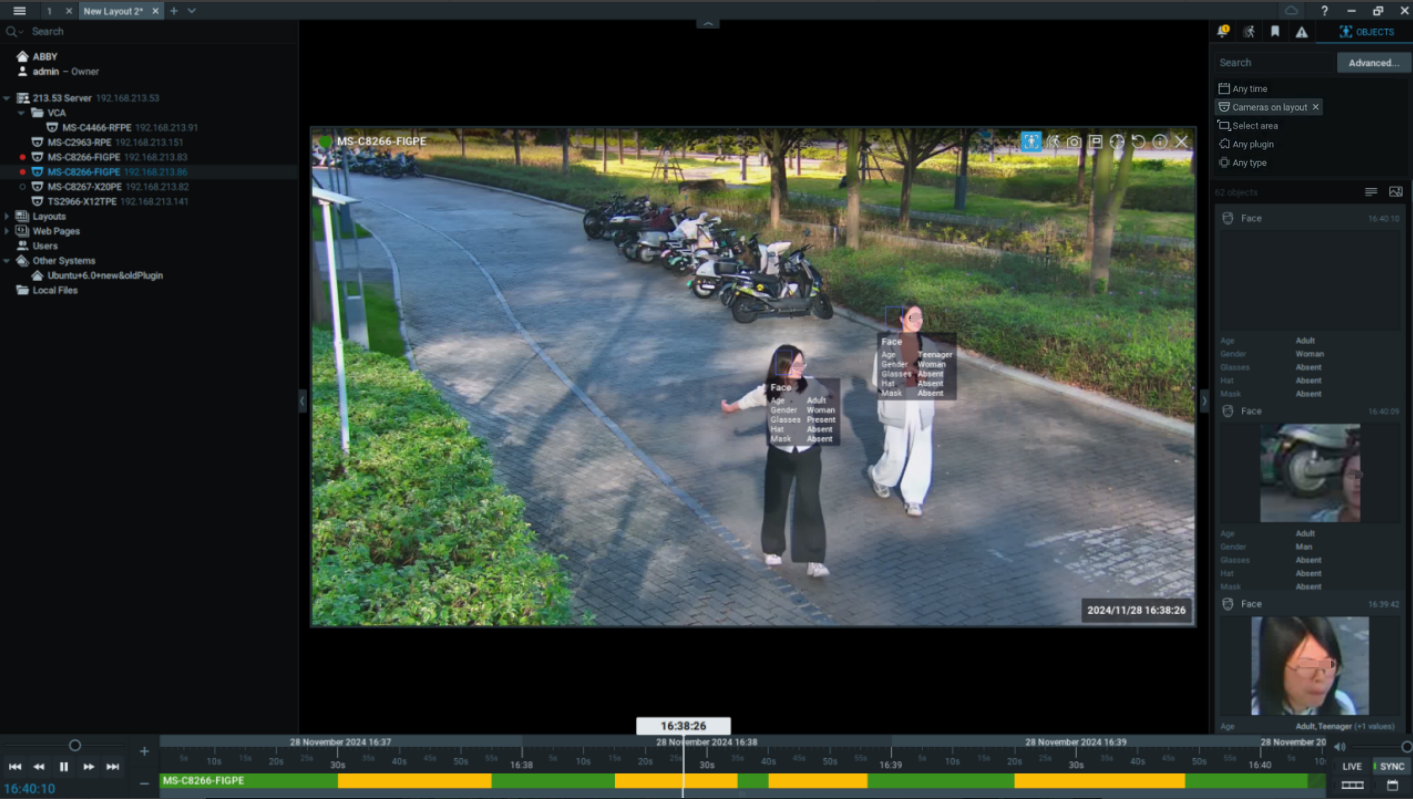
Face -- The target object will be marked with bounding box and each attribute will be displayed. (For supported display attribute, please refer to 5. Metadata objects and attributes )
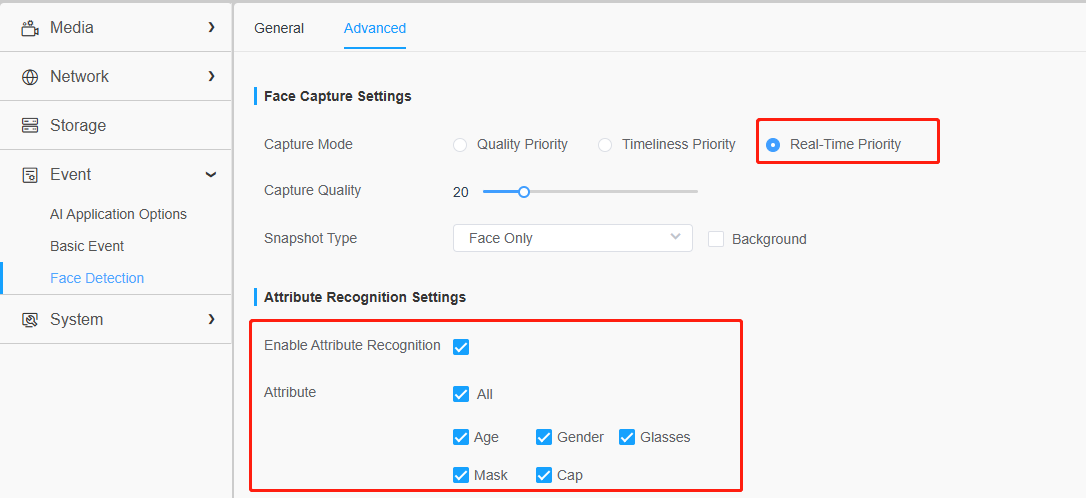
Note:
Please Enable Real-Time Priority and Enable Attribute Recognition on camera if you need to recognize face attributes.
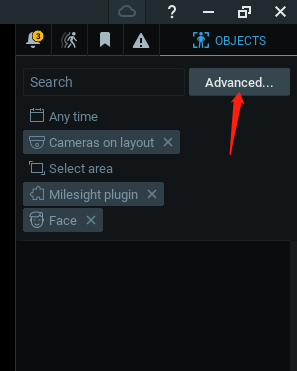
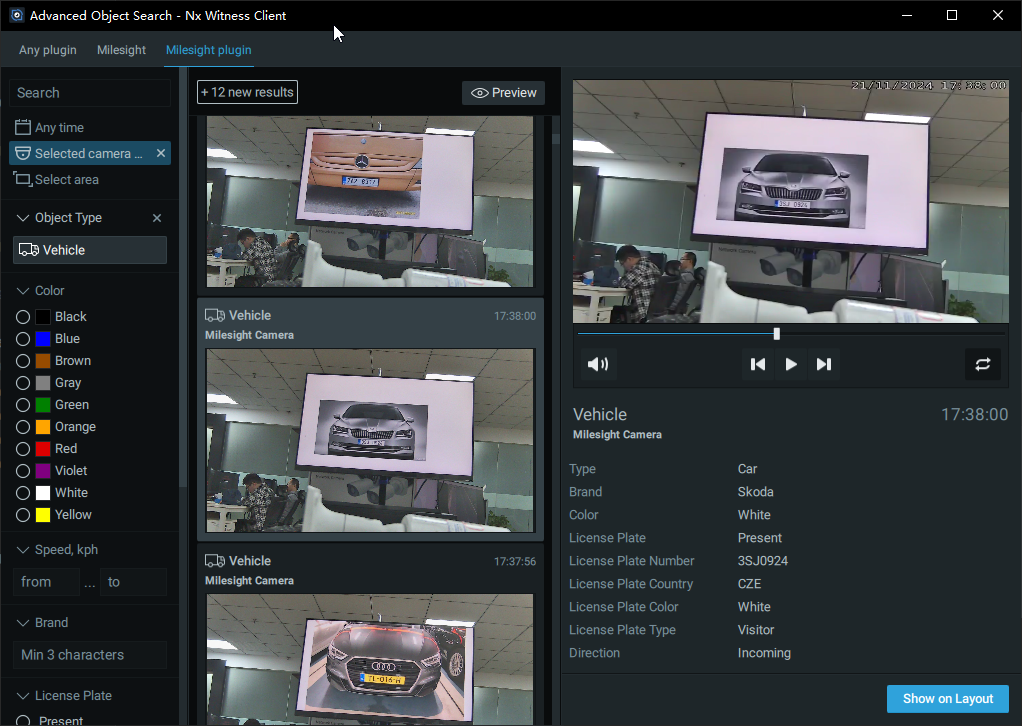
At the object panel, from top to the bottom at the option areas, you could select: time -> camera -> area -> plugin (select Milesight plugin) -> object attribute, and target object will pop up real time at the object panel.
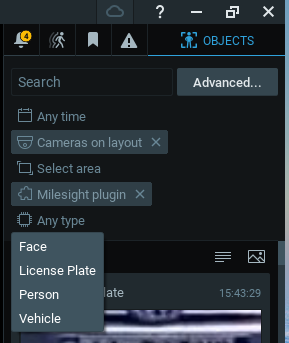
You can also click Advanced to go to data search through time:
|
|
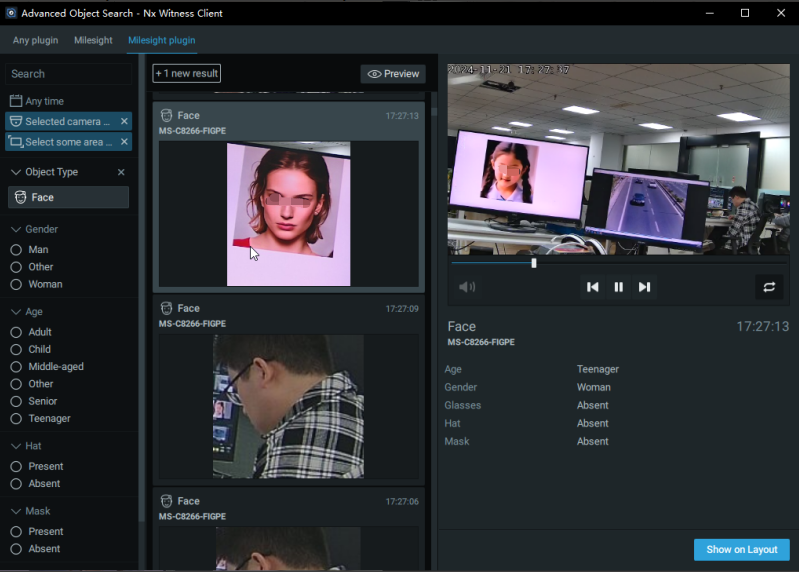
E.g. if you check “ Face ”, you could open up filter for refined search on the sub-attributes detectable.
You can also refer to the value available (recognizable) under each attribute. This can be used in 3.2 Analytics Object Detected if you would like to use certain attribute value as a condition to trigger object event.
2.ANPR Camera
ANPR camera is capable of analyzing 2 object type.
1. License Plate. under License Plate, there are attributes detectable including: License Plate Number/Country or Region/License Plate Color/License Plate Type (belong to black list or white list or visitor list).
2. LPR Vehicle. under LPR Vehicle, there are attributes detectable including: License Plate Number/Country or Region/License Plate Color/License Plate Type/Vehicle Color/Vehicle Type (bus or car or else)/Brand/Direction/Speed (supported in Road Traffic camera with radar)
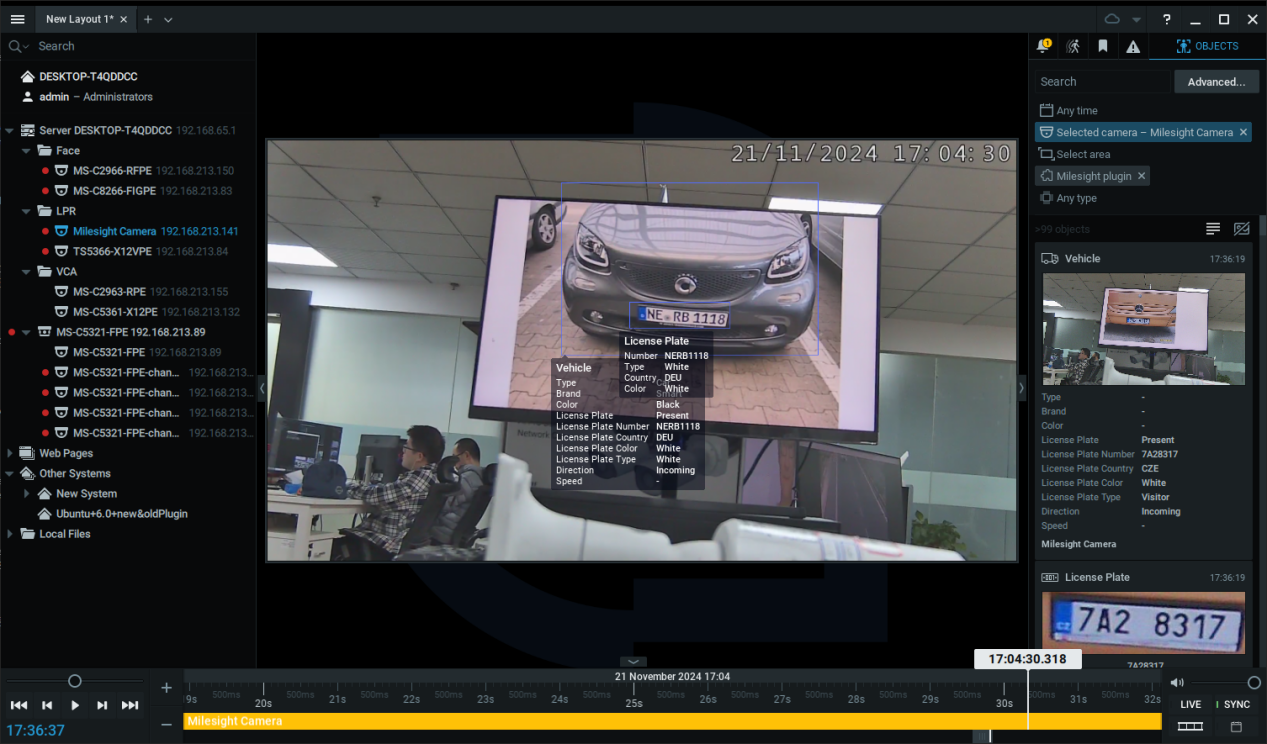
You could see the target object tracking box on live view stream:
The target object will be marked with bounding box and each attribute will be displayed. (For supported display attribute, please refer to 5. Metadata objects and attributes )
Note:
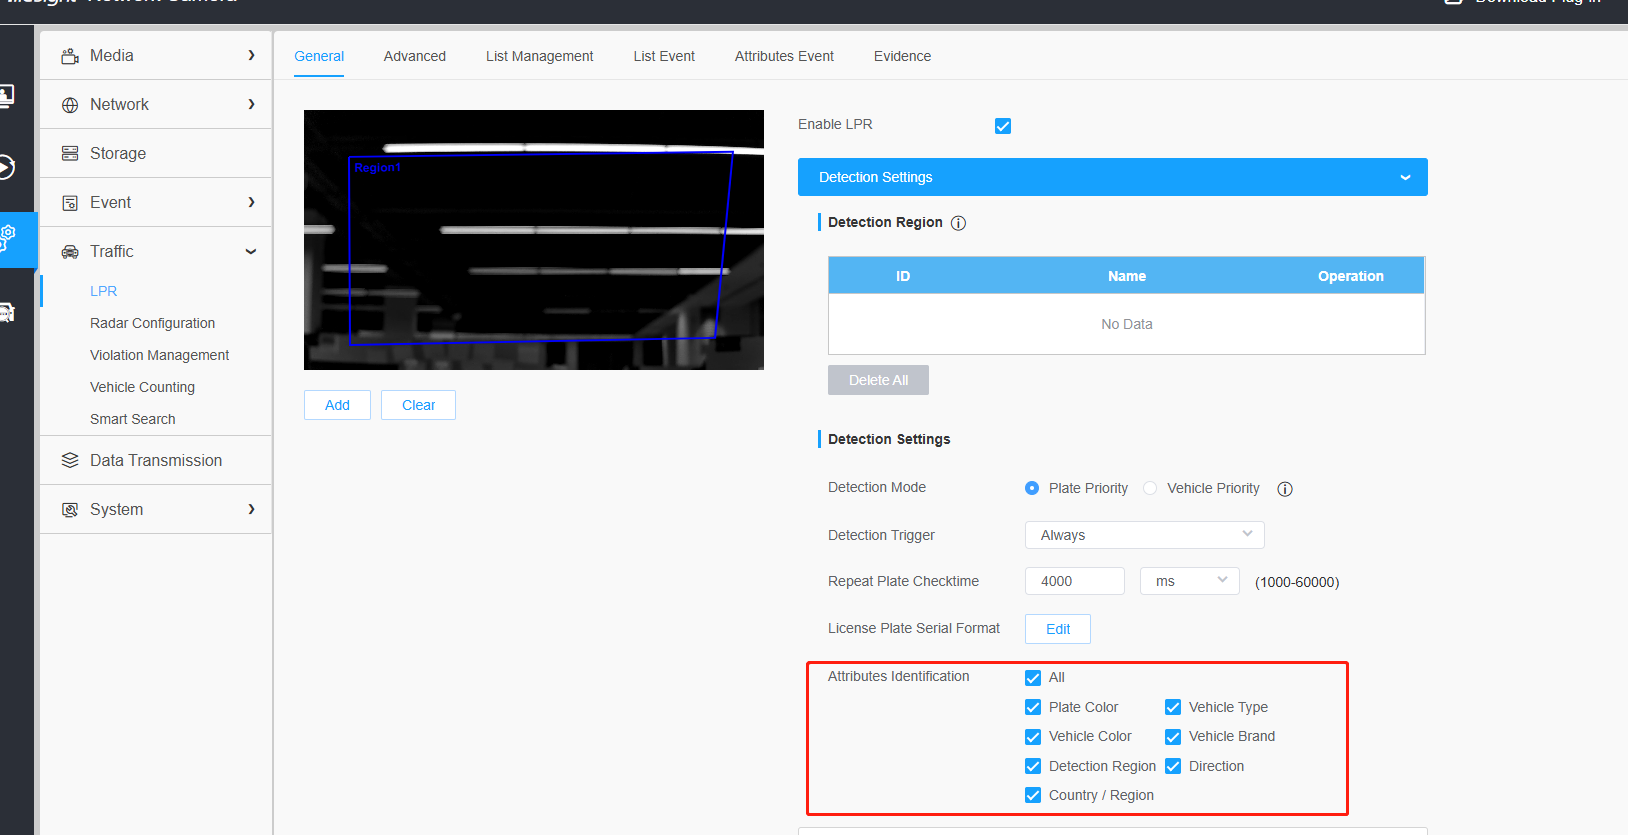
1.Please Click “ALL” in Attributes Identification on camera side if you need to get all the attributes:
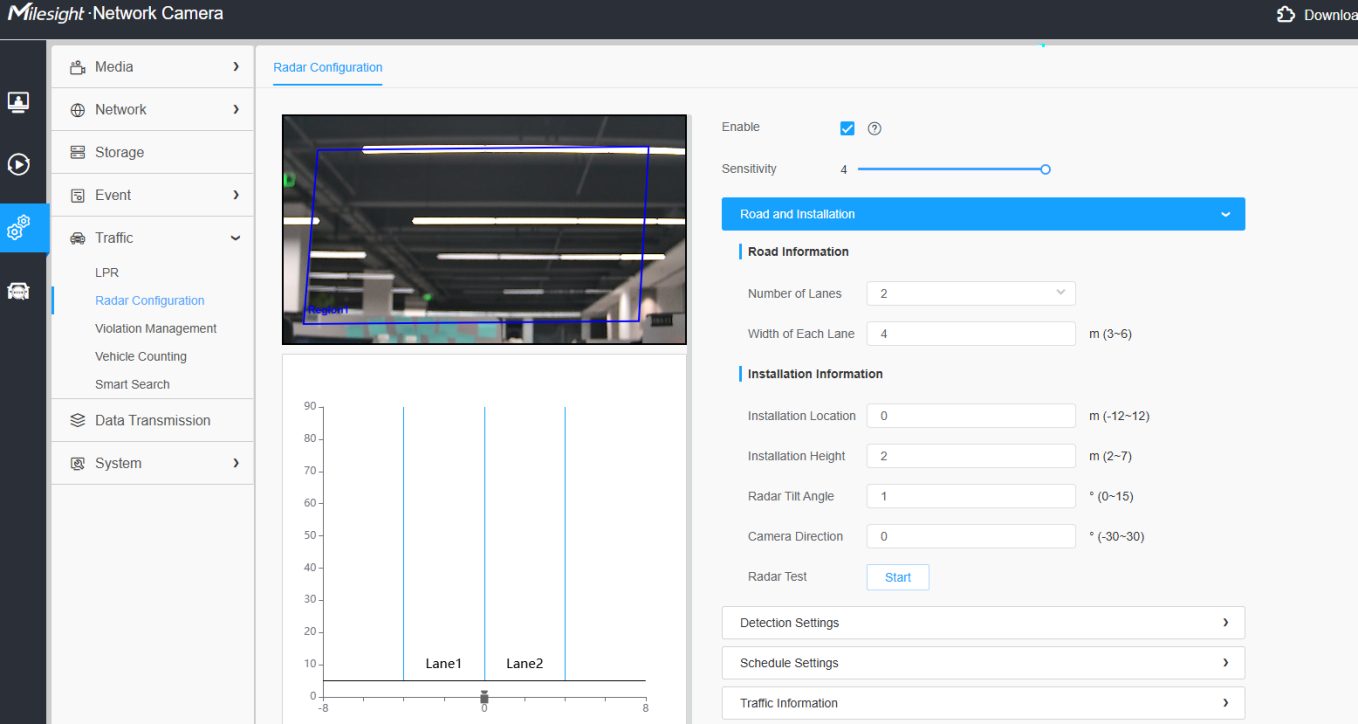
2.For Speed Attribute, please configure well in Radar Configuration on camera, you can refer to our trouble-shooting for more details :
Likewise, at the object panel, from top to the bottom at the option areas, you could select: time -> camera -> area -> plugin (select Milesight plugin) -> object attribute, and target object will pop up real time at the object panel.
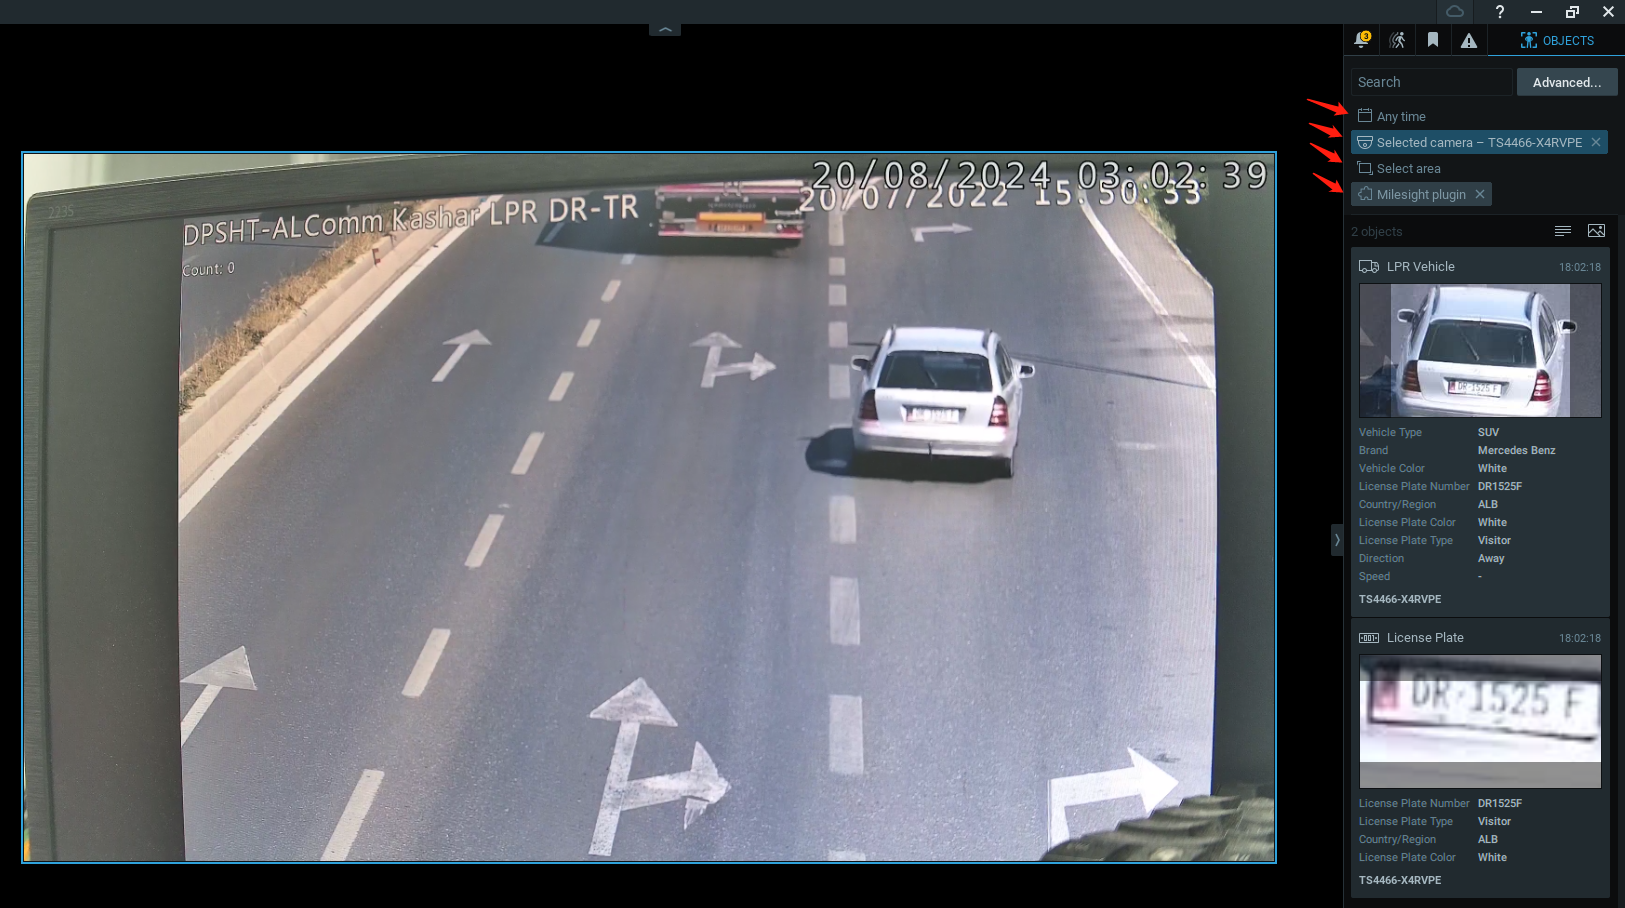
If you click to “ Advanced ”, you can see the refined search filter under each object type. You can also refer to the value available (recognizable) under each attribute. This can be used in 3.3 Analytics Object Detected if you would like to use certain attribute value as a condition to trigger object event.
5.Disable/Uninstall/Update Plugin
5.1 Disable the plugin
In the Network Optix desktop UI, users should follow these steps to detach the plugin from a Milesight camera:
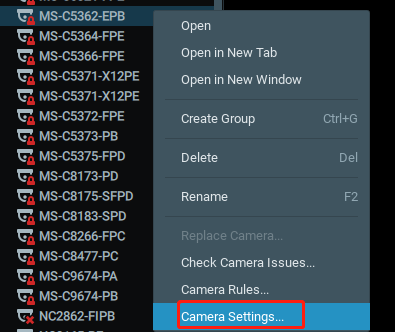
1.Select and right-click on the camera.
2.Choose "Camera Settings" from the options provided.
3.Click on the “Plugins” tab on the top menu.
4.Disable plugin at "Milesight Plugin" tab.
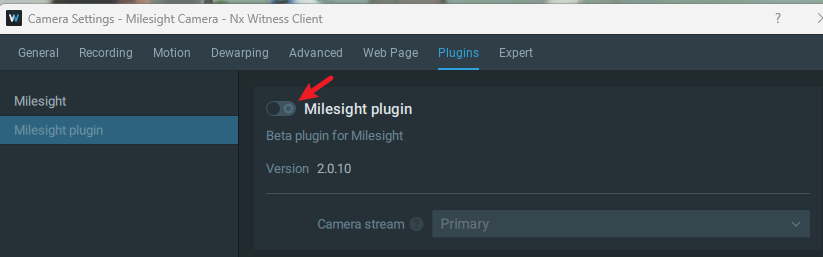
5.Then click on “Apply”. Metadata collection will be stopped.
5.2 Uninstall the plugin
Windows:
1.Stop Nx Witness Server from taskbar.
(Please refer to Manual Installation for details steps)
2. Remove the folder :
C:\Program Files\Network Optix\Nx Witness\MediaServer\plugins\milesight_analytics_plugin
3. Start Nx Witness Server from taskbar.
(Please refer to Manual Installation for details steps)
Linux:
use the below command to remove the plugin:
sudo rm -rf /opt/networkoptix/mediaserver/bin/plugins/milesight_analytics_plugin

5.3 Update the plugin
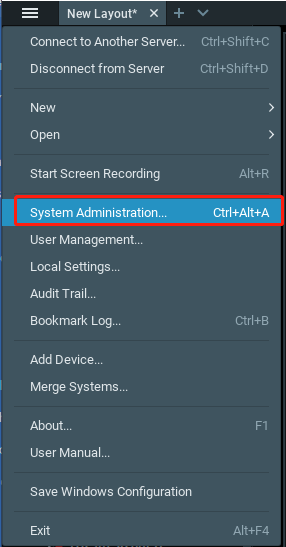
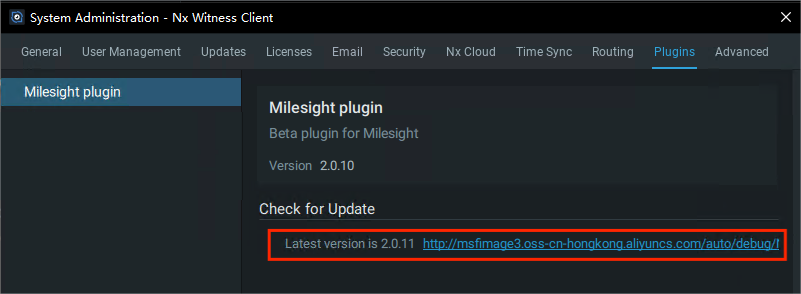
In the Network Optix desktop UI, users could go to “System Administration” -> “Plugins” to update plugin.
|
|
6.Metadata objects and attributes
Camera | Objects | Attributes | |
Non-ANPR camera | Model number starting with MS-C, without "L" in ending letters. E.g. MS-C5372-FPE | Person | |
Vehicle | |||
Face | Gender | ||
Age | |||
Mask | |||
Hat | |||
Glasses | |||
ANPR camera | Model number starting with MS-C, with "L" in ending letters. E.g. MS-C2972-RFLPE | Vehicle | Color |
Vehicle Type | |||
Brand | |||
Speed | |||
Model number starting with TS. E.g. TS4441-X36RPE | Direction | ||
License Plate | Number | ||
Color | |||
Country | |||
Plate Type |
If you have any questions related with the New Plugin of Nx Witness, please contact Milesight Support Team: support@milesight.com.
————— END —————