
Camera Firmware | 4x.7.0.77 or above | Update | 2021.3.30 |
Camera Firmware | 4x.8.0.1 or above | Update | 2022.4.20 |
1.Introduction
The Hypertext Transfer Protocol (HTTP) is designed to enable communications between clients and servers. A client sends an HTTP request to the server, and then the server returns a response to the client. The response contains status information about the request and may also contain the requested content. The two most common HTTP methods are GET and POST.
1.1What is GET Method
GET, the most common HTTP methods, is used to request data from a specified resource. Some notes on GET requests:
• GET requests can be cached
• The query string (name/value pairs) is sent in the URL of a GET request. So GET requests should never be used when you deal with sensitive data
• GET requests remain in the browser history
• GET requests can be bookmarked
• GET requests have length restrictions
• GET requests are only used to request data (not modify)
1.2 What is POST Method
POST is used to send data to a server to create/update a resource. Some notes on POST requests:
• The data sent to the server with POST is stored in the request body of the HTTP request:
• POST requests are never cached
• POST requests do not remain in the browser history
• POST requests cannot be bookmarked
• POST requests have no restrictions on data length
2.How to Set HTTP Notification
Enable HTTP Notification in Alarm Action before all settings.
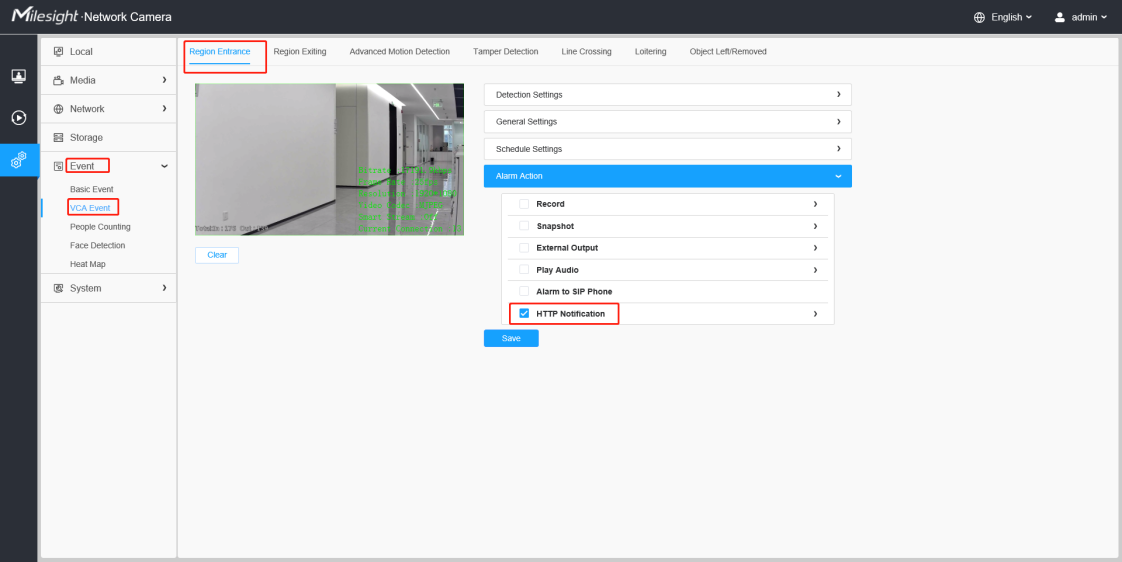
Note: HTTP POST Method is currently only available in VCA Event (including people counting), Face Detection Message and LPR Message, while Basic Event has GET Method alone. Before firmware version 4x.7.0.77, only LPR Message supported both POST and GET Method.
2.1 The Get Method
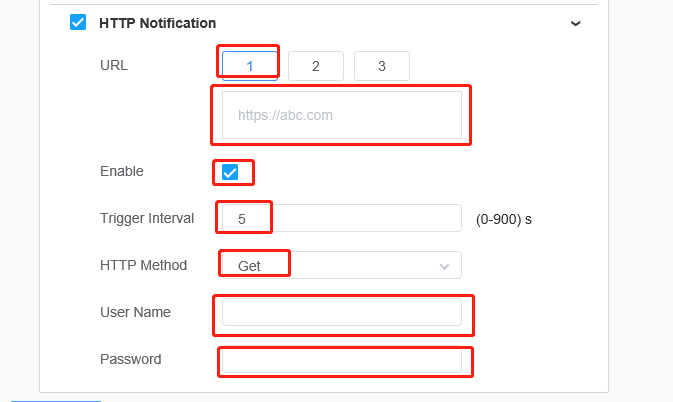
Step 1: Select Get in HTTP Method and choose one of the three URLs to enable.
Step 2: Set Trigger Interval from 0s to 900s. For example, 5s means that if the VCA Alarm is continuously triggered, the camera will communicate with the client by GET Method every 5s.
Step 3: Fill in URL, User Name and Password.
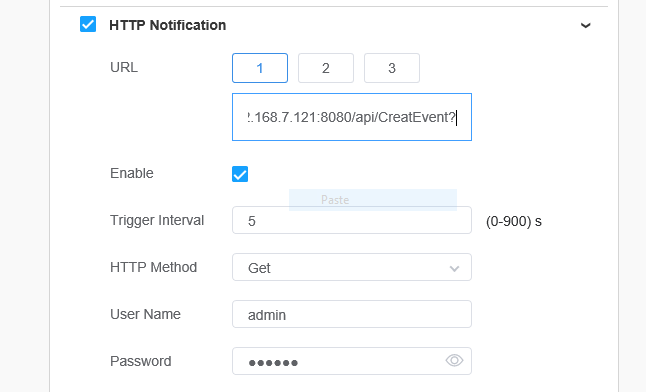
Take an example, the API URL from a VMS is like “http://192.168.7.121:8080/api/CreatEvent?” Fill in the specified URL in camera’s web UI (if the VMS requires the authentication, please also fill in) :
2.2 The POST Method
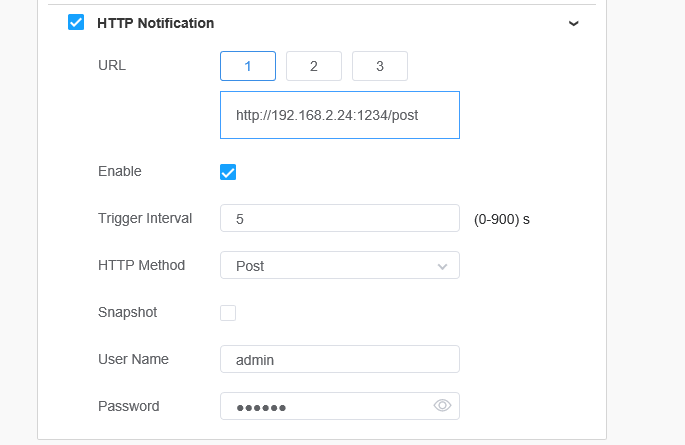
Step 1: Select Post in HTTP Method and choose one of the three URLs to enable.
Step 2: Set Trigger Interval from 0s to 900s. For example, 5s means that if the VCA Alarm is continuously triggered, the camera will communicate with the client by POST Method every 5s.
Step 3: Check Snapshot if you want to send the snapshot through POST method at the same time.
Step 4: Fill in URL, User Name and Password.
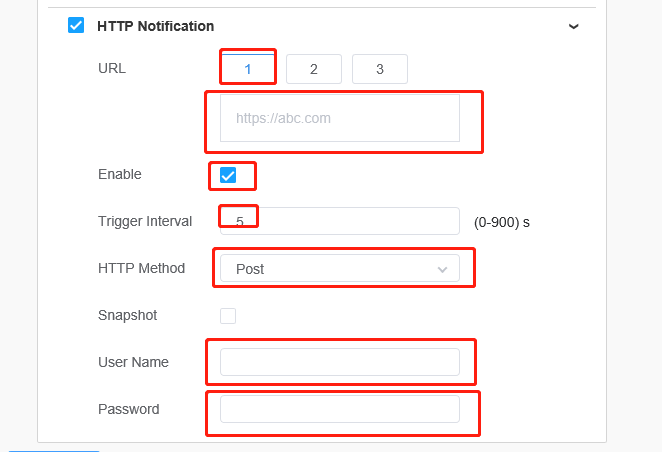
Take an example, the API URL from a VMS is like “http://192.168.2.24:1234/post”. Fill in the specified URL in camera’s web UI (if the VMS requires the authentication, please also fill in) :
Camera will post the information data in json format to the VMS or NVR in real time when it is triggered.
The content that will be sent is as follows:
POST /post HTTP/1.1
User-Agent: httpclient
Host: 192.168.2.24:1234
Content-Type: application/json
Content-Length: 108615
{
"event": "Region Entrance",
"device": "Network Camera",
"time": "2021-03-30 13:51:56",
"resolution_w": 1920,
"resolution_h": 1080,
"detection_region": 1,
"coordinate_x1": 0,
"coordinate_y1": 220,
"coordinate_x2": 1392,
"coordinate_y2": 1075,
"snapshot": "/9j/4AAQSkZJRgABAQAAAQABAAD/2wDFABALDA4MChAODQ4SERATGCgaGBY...(Image code)”
}
Example 1: VCA Event
POST /post HTTP/1.1
User-Agent: httpclient
Host: 192.168.2.24:1234
Content-Type: application/json
Content-Length: 44119
{
"time":"2021-03-30 14:26:05",
"number":1,
"face_data":[{
"id":10,
"blur":0,
"plate_image":"/9j/4AAQSkZJRgABAQAAAQA...(Image code)”
}
Example 2: Face Detection
POST /post HTTP/1.1
User-Agent: httpclient
Host: 192.168.7.30:7001
Content-Type: application/json
Content-Length: 378821
{
"event":"People Counting",
"device":"Network Camera",
"time":"2021-03-30 14:33:48",
"In":0,
"Out":1,
"Capacity":0,
"Sum":1,
"snapshot":"/9j/4AAQSkZJRgABAQA...(Image code)”
}
Example 3: People Counting
POST /post HTTP/1.1
User-Agent: httpclient
Host: 192.168.2.24:1234
Content-Type: application/json
Content-Length:46107
{
"device":"Network Camera",
"time":"2021-03-30 14:33:48",
"plate":"S8pK",
"type":"Visitor",
"speed":"-",
"direction":"-",
"direction_region":"-",
"region":"",
"direction":"-",
"resolution_width":"1280",
"resolution_height":"720",
"coordinate_x1":"473",
"coordinate_x1":"93",
"coordinate_x1":"676",
"coordinate_x1":"135",
"confidence":"0.70",
"plate_image":"/9j/4AAQSkZJRgABAQAAAQABAAD/2wDFABgaGBY...(Image code)",
"plate_image":"/9j/4AAQSkZJRgABAQAAAQABAAD/2wDFABgaGBY...(Image code)",
"full_image":"/9j/4AAQSkZJRgABAQAAAQABAAD/2wDFABgaGBY...(Image code)"
}
Example 4: LPR Message
3.Specific Example
Some professional VMS has API for HTTP GET Method. We take Nx Witness and Digifort as examples to show how HTTP Notification works.
3.1 Nx Witness
Step 1: Do all the preparations before testing, such as adding Milesight Camera in Nx Witness and enabling events that require HTTP Notification in the camera web page.
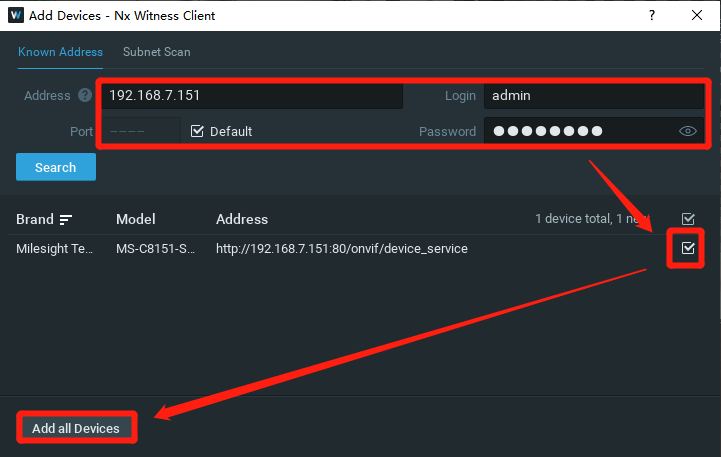
We take Region Entrance here as an example. Enable it on the web page of camera and configure more, such as setting Sensitivity, drawing detection region, scheduling enable time and so on.
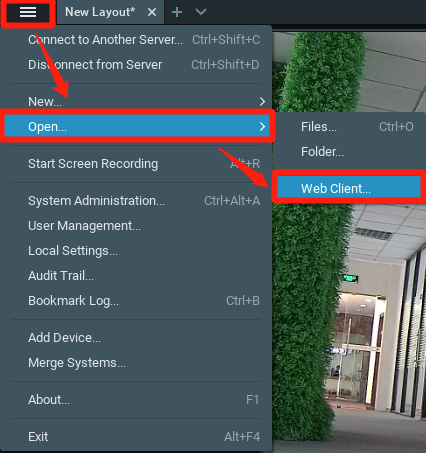
Step 2: Open Nx Witness Server Web Client, click the tag For Developers after logging into Web Client and then open API Testing Tools(new).
|
|
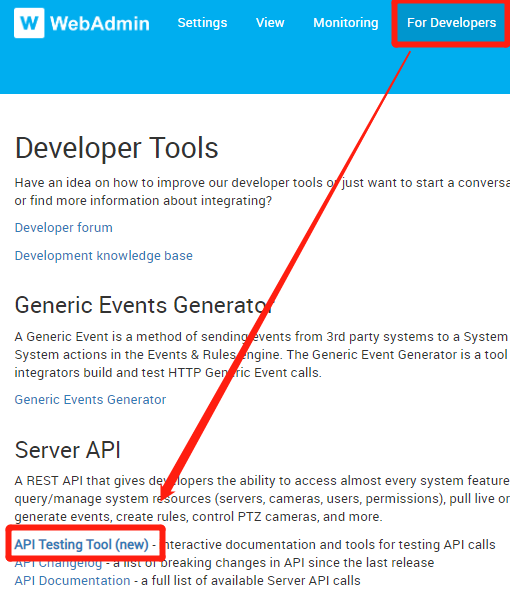
Search “CreateEvent” to quickly find the API we want.
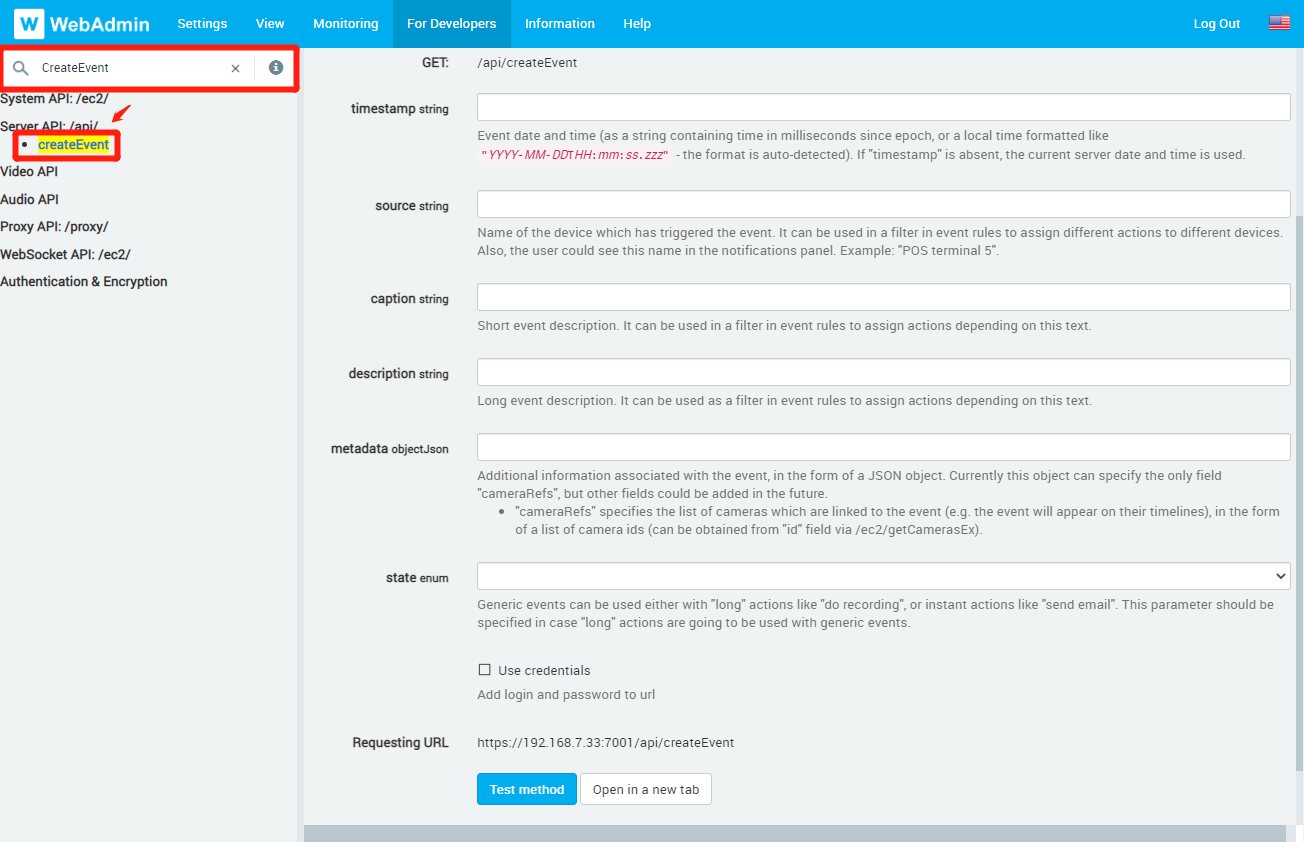
Step 3: The tool will automatically form Requesting URL after you fill in the content. We use three of these commonly used parameters. Fill in the information you want to send to Nx Witness when the Region Entrance is triggered.
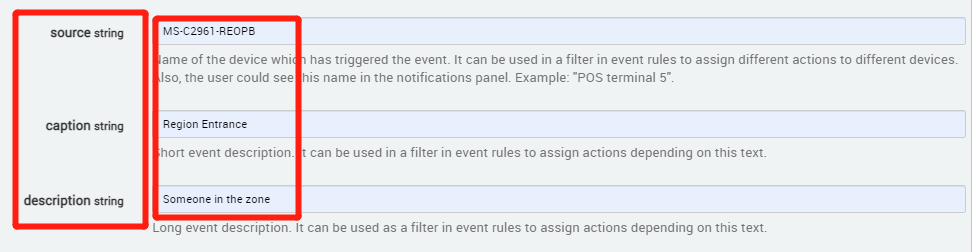

Copy the Requesting URL.
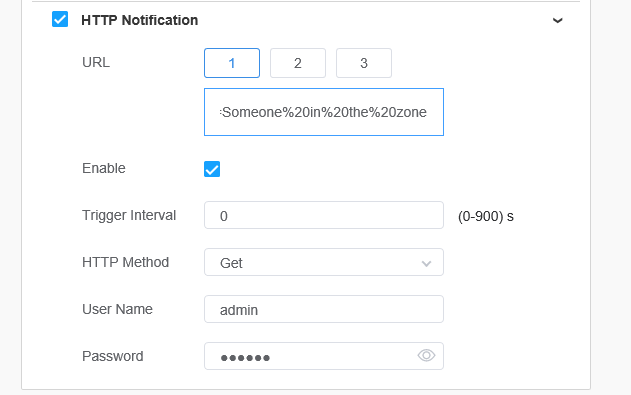
Step 4: Open web page of the camera. Enable HTTP Notification in Alarm Action. Select Get in HTTP Method and choose one of the three URLs to enable. Set Trigger Interval from 0s to 900s. Paste the URL you just copied from API test tool in Nx Witness Server Web Client.
Reform the URL:
https://login:password@192.168.7.33:7001/api/createEvent?source=MS-C2961-REOPB&caption=Region%20Entrance&description=Someone%20in%20the%20zone(Before)
http://192.168.7.33:7001/api/createEvent?source=MS-C2961-REOPB&caption=Region%20Entrance&description=Someone%20in%20the%20zone (Now)
Don’t forget to finish User Name and Password (Nx Witness Server’s User Name and Password) and click Save.
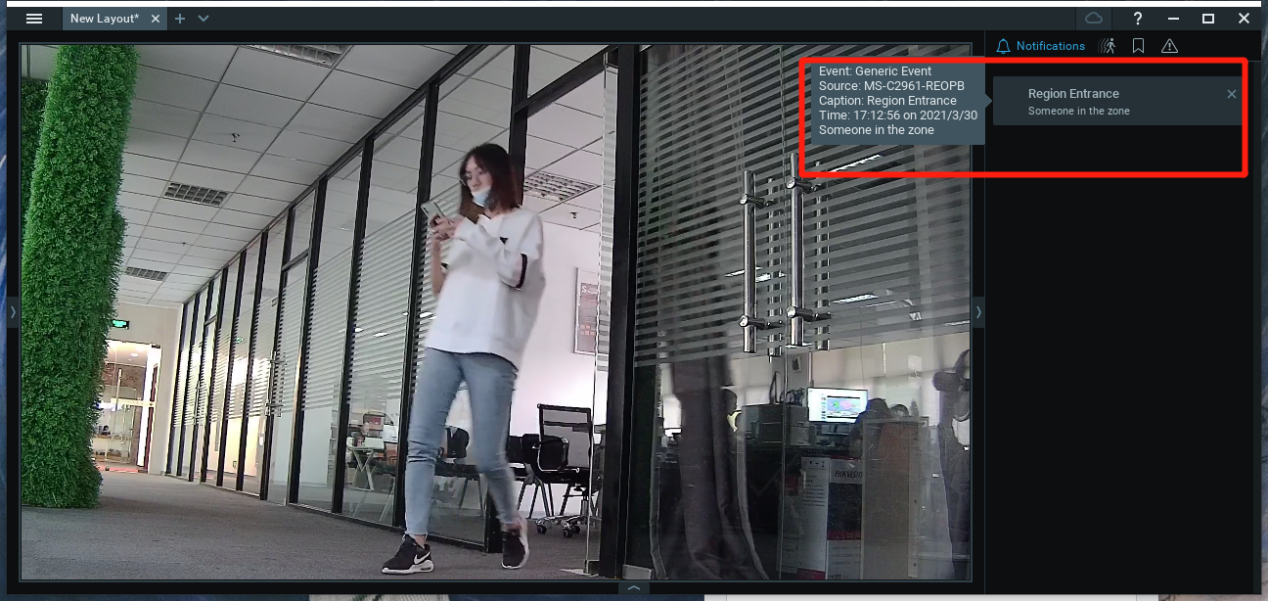
Result: Once Region Entrance is triggered, Nx Witness will show the Notification.
3.2 Digifort
Step 1: Do all the preparations before testing, such as adding Milesight Camera in Digifort and enabling events that require HTTP Notification in the camera web page.
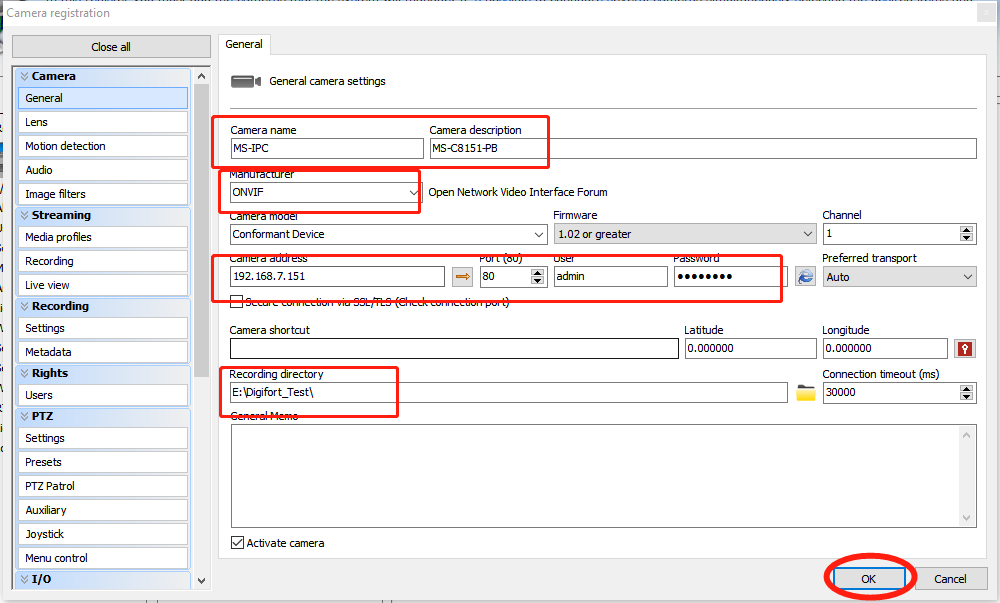
We take Motion Detection as an example. Enable it on the web page of camera and configure more, such as setting Sensitivity, drawing detection region, scheduling enable time and so on.
Step 2: Check the HTTP Notification as Alarm Action and complete the rest of the settings.
URL should be get from Digifort API document. And the Motion Detection API is:
http://[IP]:8601/Interface/Cameras/MotionDetection/Notify?Camera=CameraName
Note :
• [IP] refers to the PC's IP where the Digifort is installed.
• 8601 is the port for Motion signal in Digifort.
• Camera Name is the camera name you set in Digifort VMS, like the picture shown below.
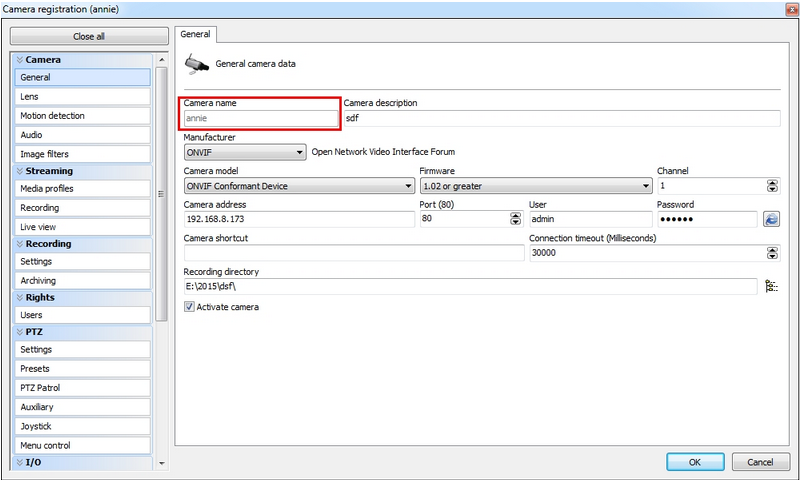
User Name: admin (the user name of your camera)
Password: (the password of your camera)
Step 3: Choose ‘use motion detection by external notification’.
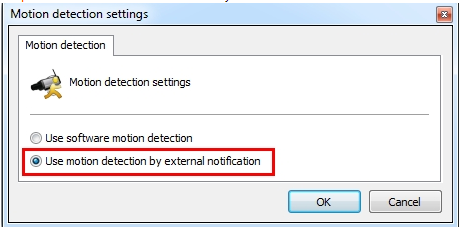
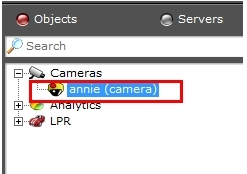
Result: If successful, you can see that the device icon turns yellow in the Surveillance when the camera is under Motion Detection Alarm.
——————END——————