
1.Introduction
For outdoor installations, correctly assemble and seal the RJ45 waterproof connector to help protect the network connection from water ingress. Complete the following procedure before the camera is put into service.
2. Identify the Connector Parts
Confirm that the Screw Nut, Rubber Ring, Screw Bolt and O-Ring are available. The shape of the supplied connector may vary slightly by camera model.
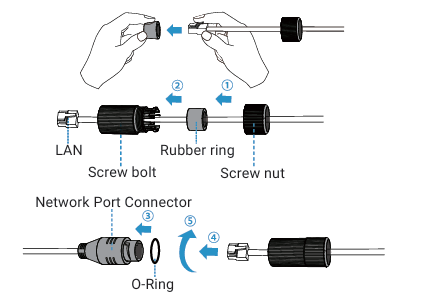
Figure 1. RJ45 waterproof connector assembly sequence
3. Assemble the Waterproof Connector
Step 1: Pass the network cable through the Screw Nut, Rubber Ring and Screw Bolt in sequence.
Step 2: Insert the Rubber Ring completely into the Screw Bolt.
Step 3: Connect the Screw Nut to the Screw Bolt and tighten them securely.
Step 4: Place the O-Ring onto the camera's Network Port Connector. Make sure it sits flat and is not twisted or missing.
Step 5: Connect the RJ45 plug to the Network Port Connector, then tighten the Screw Bolt and connector securely.
4. Apply the Final Outdoor Seal
• Tightly wrap all cable-out interfaces with suitable waterproof adhesive tape after the connector is assembled.
• Wrap from the cable side toward the connector with overlapping layers so that water cannot track along the cable into the joint.
• Position the connector so that it is not exposed to standing water, and use a junction box where required by the site installation.
Note: The camera's IP rating does not by itself protect an incorrectly assembled RJ45 joint. The connector, cable entry and any junction box must all be sealed correctly. |
5. Verify the Connection
• Confirm that the connector is fully tightened and that no sealing part is omitted.
• Check the network link and camera power before completing the installation.
• Inspect the seal again after cable positioning to ensure that twisting or pulling has not loosened the connector.
——————END——————