Thank you for purchasing the Milesight OpenVision Series product. This document provides an introduction on how to quickly get started with the Nx Embedded Camera. If you have any questions, please do not hesitate to contact our Milesight Support Team at support@milesight.com.
Introduction
· Embedded Nx Edge Server: The camera comes with an embedded Nx Edge server, supporting video streaming, storage, AI, and seamless integration with Nx. Nx recordings are stored on the camera's internal SD card. It supports DtC (Direct-to-Cloud) for direct cloud uploading. Additionally, it supports Nx Hive and Advanced Object Search.
· Nx Server Integration: The embedded Nx server only supports the addition of this specific camera.
· Video Quality: Supports 5MP resolution at 30FPS, with 8Mbps for both main and sub streams storage.
· Stream Forwarding: Capable of forwarding streams at up to 30Mbps.
· Storage Capacity: Supports up to 1TB micro SD card storage.
This section describes how to quickly get started and use your Nx Embedded Camera. If you want to learn more about how the Network Optix VMS operates, we recommend referring to the Network Optix website and their VMS and camera application manuals. Below is a brief operational procedure, for detailed instructions please refer to the detailed descriptions below.

Note:
1. We recommend using Nx Witness Client version V6.0.1.
2. Make sure your operating system is Windows ( Windows 10/11 ).
1. Camera Set Up
Step 1: Insert SD Card.
Note: We strongly recommend using an SD card with a rating of no less than A2. The following are some recommended SD card models:
No. | Brand | Model |
1 | Kingston | 512GB CANVAS Go! Plus A2 U3 |
2 | Kingston | 1TB CANVAS Go! Plus A2 U3 |
3 | Lexar | 512GB SILVER Plus A2 U3 V30 |
4 | Lexar | 1TB SILVER Plus A2 U3 V30 |
5 | Samsung | 512GB PRO Plus A2 U3 V30 |
6 | Samsung | 1TB PRO Plus A2 U3 V30 |
7 | Samsung | 512GB Pro Ultimate A2 U3 V30 |
Step 2: Activate the Camera.
Please activate the camera and set the password according to the manual. For detailed instructions, refer to the manual:
https://www.milesight.com/support/download/document-center/ipc-series/ndaa/en/user-manual/assigning-an-ip-address.html
Step 3: Access Camera Web Page.


Navigate to Settings - Storage - Storage Management. Please ensure that you insert and format the SD card. After enabling VMS Edge, the status will change to 'VMS Edge Running', indicating that the Nx Server is enabled.
Note: By default, 10% of the SD card space in the Nx server is reserved.
2. Nx Witness Set Up
Step 1: Activate Server(First Time Only).
- Initialize Nx Witness.
- Set custom username and password.

Step 2: Log in to Nx Witness Client.
Note:
1. We recommend using Nx Witness Client version V6.0.1.
2. For instructions on how to initialize and log in to the Nx Witness Client, please refer to the Nx Witness manual:
https://resources.vmsproxy.com/nx_6.0_help/logging_in_to_a_system.html
3. Connect to the server
Step 1: Connect to Server.
- Enter camera IP
- Port: 7001


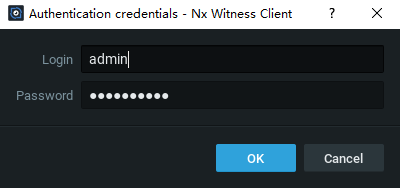
Step 2: Connect the Camera.
- Right-click the camera in the left panel.
- Click Camera Settings.
- Click Edit Credentials.
- Enter username and password.
- Click OK.


4. Enter Nx License
System Administration -> License: Enter the Nx License. For first-time use, you can activate a free license.


5. Enable the Milesight plugin
Right-click on the camera, select Camera Settings -> Plugins -> Milesight plugin, and then click to enable the Milesight plugin.

6. Enable VMS Edge Configuration Optimize
Next, enable VMS Edge Configuration Optimize. Enter the NX Server username and password, then click Optimize. If the status displays "VMS Edge configuration was optimized," the optimization was successful.
Note: This step primarily optimizes SD card storage for optimal performance. Please ensure it is enabled, as failure to do so may result in storage errors.
7. Manage Camera Analytics Event
The supported event types include Basic Motion Detection, Audio Alarm, External Input, Intrusion Detection, Region Entrance, Region Exiting, Advanced Motion Detection, Tamper Detection, Line Crossing, Loitering, Object Left, and Object Removed. Below is an example using “ Advanced Motion Detection ”:
Step 1: In the Camera Web
- Enable the Event: First, enable the event on the network camera. Access the camera's web interface and navigate to Settings -> VCA Event -> Advanced Motion Detection.
- Configure Settings: Ensure that the detection is enabled and all relevant settings, including detection region, time threshold, sensitivity, schedule, and other parameters, are properly configured.

Step 2: On Nx Witness Client
- Go to Camera Rules setting.

- Choose “ Analytics Event ” as the event.
- In Event Type, choose “ Advanced Motion Detection ” 
- Assign action to it, in below example, “ Show desktop notification ” is selected.

————— END —————