1.Introduction of AIoT Camera
Milesight AIoT Pro Bullet Plus Network Camera is our newest member of the 5G Series. Offering IoT technology, AI deep learning, compact structure and more, Milesight AIoT Pro Bullet Plus Network Camera builds a whole new world by combining high-tech with high-performance. IoT is an advanced function which allows to get information of any things need to be monitored, connected and interacted in real-time via various technologies and devices, like sensor and RFID to smartly realize perceiving, recognizing and managing things.
This article will introduce the basic configuration of AIoT Camera, so that you can quickly learn to use our AIoT Camera.
Note: For more information about how to configure 5G, please refer to Milesight-Troubleshooting-5G AI Camera

2.How to Set IoT
1) Device Settings
① Radios Settings
Step 1: After logging into the web, go to “Settings“→ “IoT“→ “Settings“. Check the checkbox “Enable IoT”, and IoT function will be enabled.

Step 2: Check the checkbox to enable Milesight IoT Cloud management so that you can have a central management for devices.

Step 3: Configure Radios Settings.
Currently our IoT camera supports three IoT frequency bands of 915M (The corresponding channel plan is US915/AU915/KR920/AS923/AS923-2), 868M (The corresponding channel plan is IN865/EU868/
RU864) and 470M (The corresponding channel plan is CN470). Before buying the camera, you need to contact our sales to choose the frequency band that is supported in your country.
For example, here I choose the IoT camera with the frequency bands of 868M or reference document regional parameters for LoRaWAN, and it will show that the current channel plan is EU868 on the camera’s web.
Note: Usually you can directly use the default settings without configuring Radio Settings. If you need to customize some radio settings, you can make further settings as shown below.
Please refer to the meaning of the options as follows:


Note: The configurations here should be the same with those in End Device.
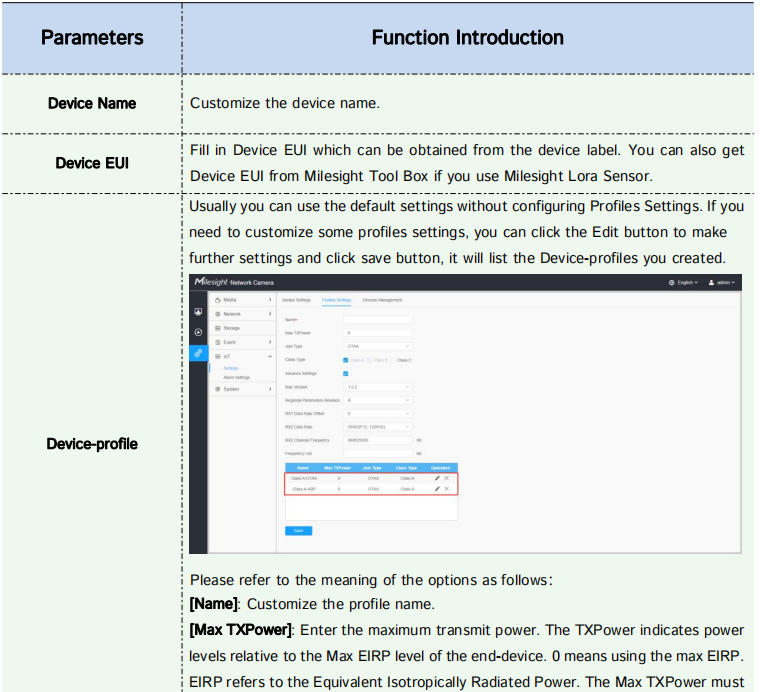
② Devices Management
Step 4: Add and manage End Devices.

Please refer to the meaning of the options as follows:


Note:
1. Device Name and Device EUI cannot be repeated.
2. Device EUI, Application Key, Device Address, Network Session Key and Application Session Key should be consistent with the configuration of End Device.
3. Uplink Frame-counter and Downlink Frame-counter can be reset only in ABP mode.
Step 4: Sensor Settings. You can enter sensor configuration page by clicking  . After the configuration is finished, you can click
 to save your configuration or click
  to cancel your configuration.


Please refer to the meaning of the options as follows:


Note:
1. The channel ID and Sign should be consistent with those in End Device.
2. Decimal Place is set according to the properties of the sensor. For example, you need to set this value to 1 to get the correct temperature when using the Milesight temperature sensor.
Step 5: You can click  to modify the configuration in End Device Management.

Step 6: You can click  to delete the device you added.

2) Alarm Setting

Step 1: Select the alarm rule that you want to set and you can configure four kinds of rules.
Step 2: Check the checkbox to enable Alarm Rules.

① Thresholds Settings
Step 3: Click to select the sensor to alarm and set threshold for the selected sensor.
When the data reaches the critical value, the alarms will be triggered. Both upper and lower thresholds are configurable. You can also only configure upper or lower threshold.

② Schedule Settings
Step 5: Set the alarm schedule for IoT.

Please refer to the meaning of the options as follows:

Step 6: Set Alarm Action.

Please refer to the meaning of the options as follows:

3.Compatibility with Milesight back-end
After completing the basic settings of AIoT camera, you can access the camera through the Milesight back-end.
For Milesight CMS, it supports adding AIoT camera via P2P, and then the parameter of IoT can be configured.
Step 1: After logging into the Milesight CMS, go to “Management“→ “Devices“→ “Add Devide Manually“, and you can add AIoT Camera by Mac Address when selecting P2P connection type.

Step 2: Go to “Devices Config“ → “AIoT Camera“ → “IoT“ , You can set the IoT settings on CMS as shown below.


For M-sight Pro APP, it supports adding AIoT camera via P2P.
Step 1: After logging into the M-Sight Pro, go to “Device Manager“→ “Add Camera“, and you can add AIoT Camera by Mac Address when selecting P2P protocol. Or you can connect the AIoT Camera by P2P QR Code.

Note: The P2P QR Code of AIoT Camera is activated by default on camera Web.

For Milesight IoT Cloud, it supports adding AIoT Camera to Milesight IoT Cloud as a gateway, and then manages the sensor data on the cloud centrally.

Interface of AIoT Camera

Interface of Milesight IoT Cloud
Appendix 1
According to different regions, the default value and configurable range of the Center Frequency of Radio 0 are different, as follows:


Appendix 2
According to different regions, the default value and configurable range of the Center Frequency of Radio 1 are different, as follows:

------------------------ END ------------------------