How to Set VMS Enterprise Paging & Layouts & Tour Plans & Instant Playback
Print
Modified on: Fri, 4 Nov, 2022 at 5:40 PM
Chapter I Introduction
Live View is mainly used for viewing real-time video. The interface is mainly made up of left Resource Panel, center Viewing Panel and right Function Panel.
The left Resource Panel displays all servers and cameras in the VMS system. The center Viewing Panel supports up to 64 individual live camera streams on a single page. The right Function Panel has four tabs, including Notifications, ANPR Preview, PTZ Control and Tour List.
Here we focus on the Paging, Layouts, Tour Plans and Instant Playback function in the Live View interface.
1.1 Paging
Live View supports paging function. A single page can play up to 64 channels. Users can select the number of channels to play on a single page according to their needs.
1.2 Layouts
Both Live View and Playback support layouts. Layouts can be customized, so you can save the currently playing channels and their locations, which helps you watch and manage Live View and Playback more efficiently. In addition, users of Administrator or Owner role can share all layouts within the system with Operator or Viewer or the customized roles, so that users in Operator or Viewer or the customized roles can use the layouts and access the devices in the layouts.
1.3 Tour Plans
Live View supports Tour Plans, including Camera Tour Plans and Layout Tour Plans. All channels currently playing or the layouts will automatically switch Live View window by using the function, which makes it easy for users to view the live view by auto-switching.
1.4 Instant Playback
Live View supports Instant Playback function for the channel with video recording. Users can quickly view the video file in the last 5 minutes. In addition, when Instant Playback is enabled, it supports integrated window functions, including Digital Zoom, Fisheye Setting, Snapshot, Recording and so on.
Chapter II Operations
2.1 Paging
2.1.1 How to Set Paging?
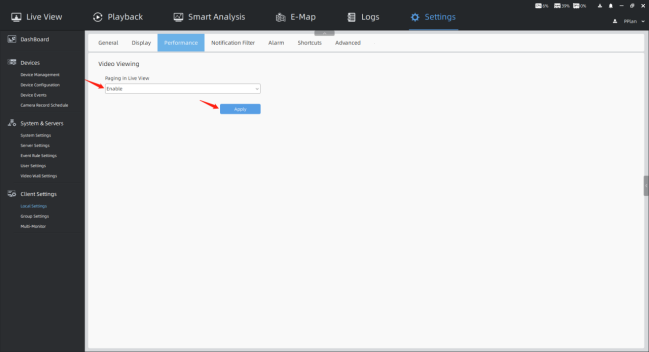
Step 1: Enable “Paging in Live View” in the Settings -> Client Settings -> Local Settings -> Performance interface, and then click [Apply] button.
Step 2: Then the icon  will be displayed in the upper left corner of the center Viewing Panel, and click it to pop up the page controller.
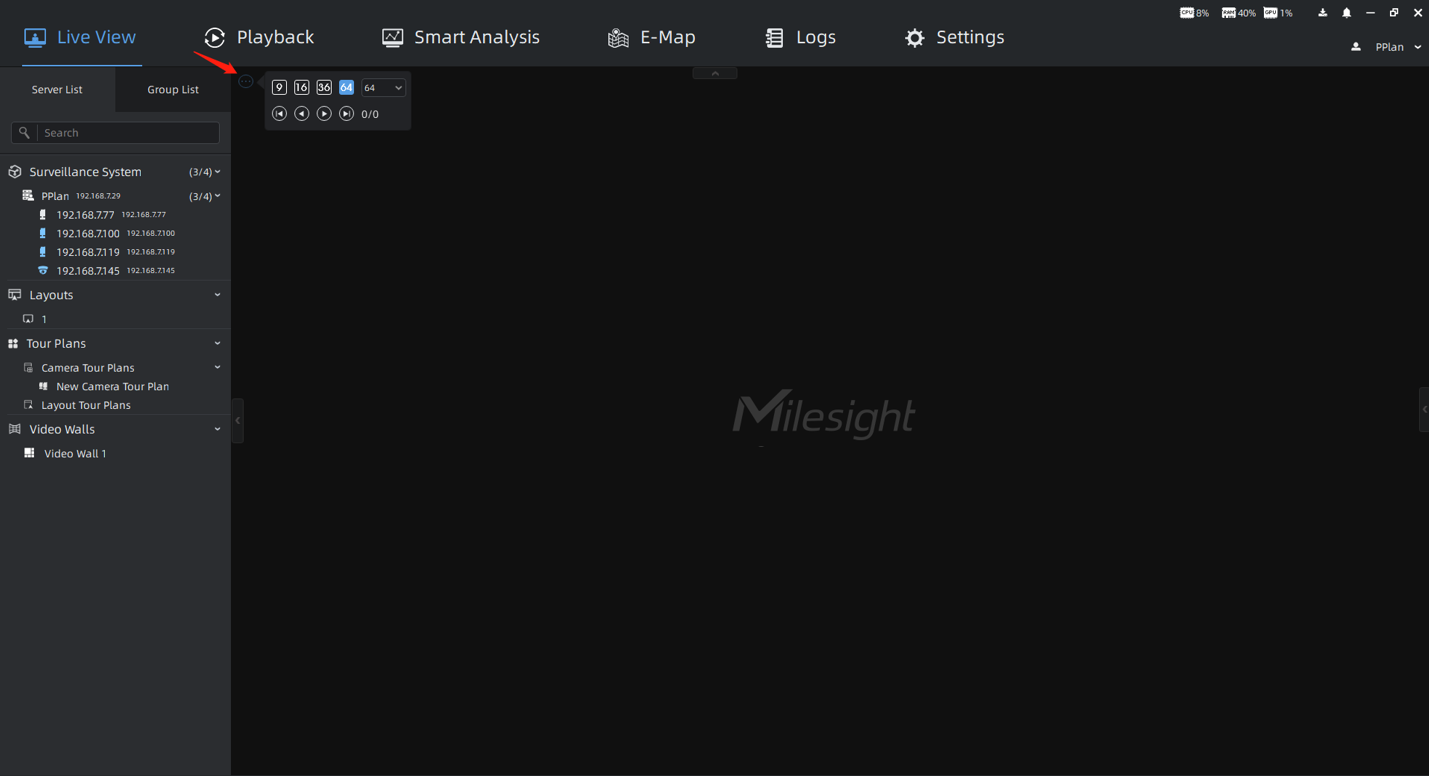
Step 3: In the page controller you can set the number of channels to play on a single page, and you can click to jump to the first page/last page/previous page/next page.

2.2 Layouts
2.2.1 How to Set Customized Layout?
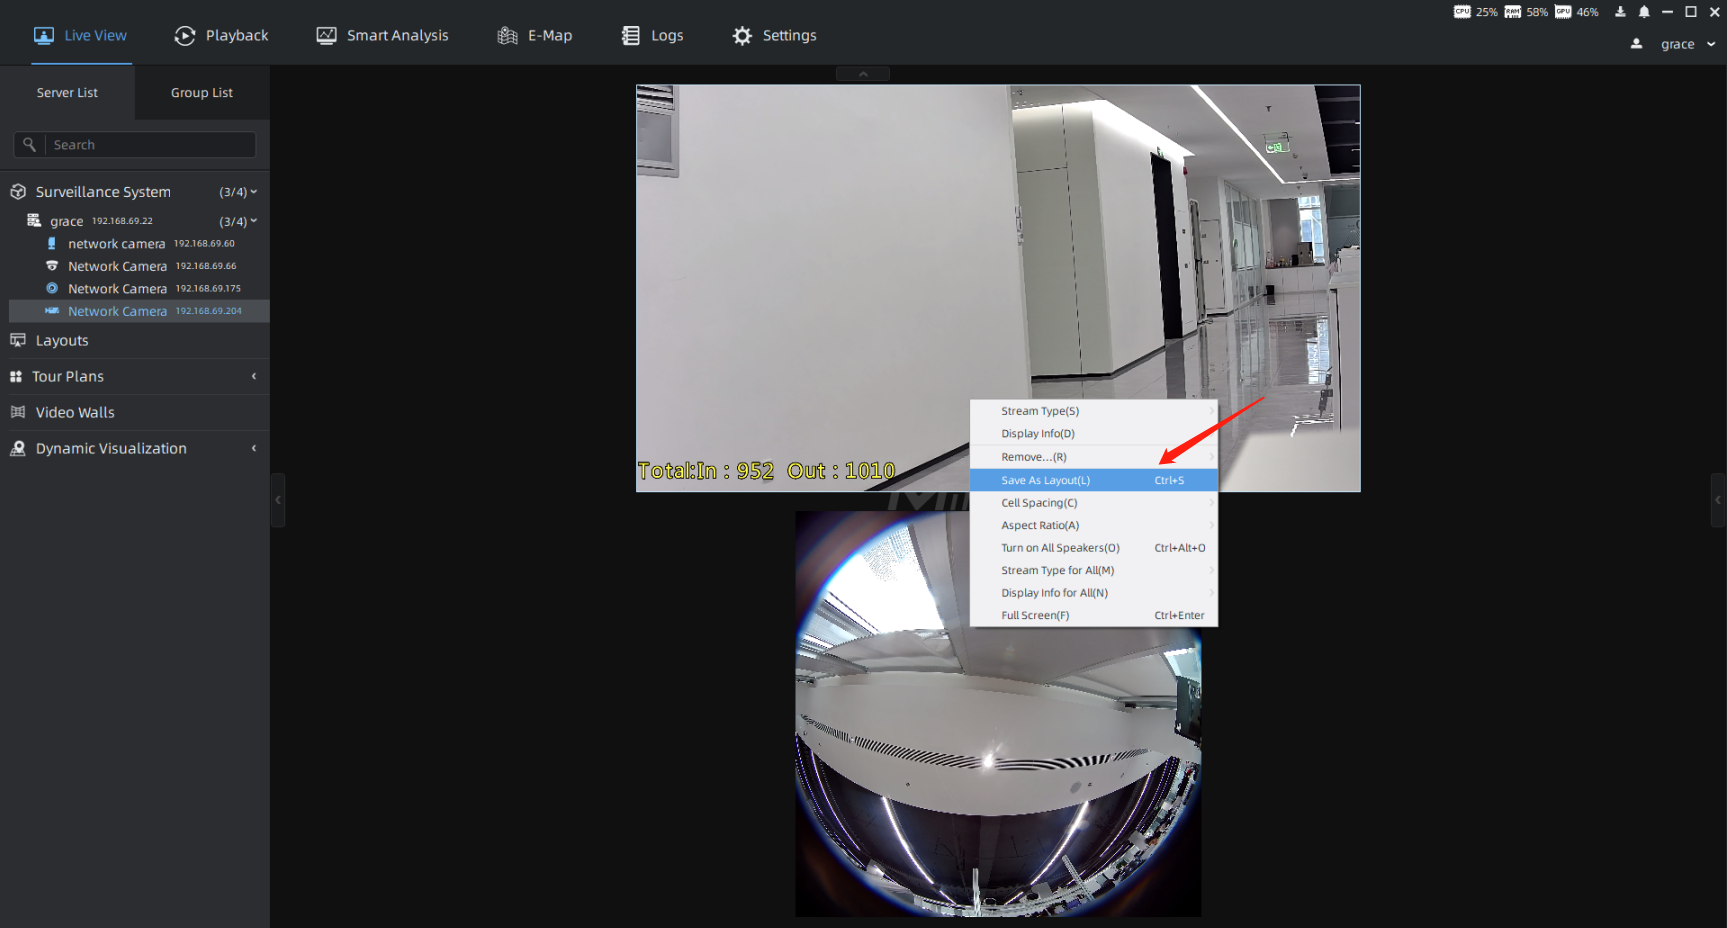
Step 1: First, determine the channels and their locations you're interested in, then right-click the camera live view window in the Live View interface to pop up a menu. And select [Save As Layout] option to save the layout.
Step 2: You can name the new layout, and click [Save] button to save it. Then the layout will be displayed under the Layouts module in the left Resource Panel.

Step 3: Right-click the corresponding layout and select [Play] option to preview the camera in the layout. You can also directly double-click the corresponding layout for quick viewing.
Note:
The operation of setting layout in the Playback interface is the same as that in the Live View interface.
2.2.2 How to Share Customized Layout?
Step 1: In the Settings -> System & Servers -> User Settings -> Role Management interface, users of Administrator or Owner role can select the corresponding role to share the layout.
Step 2: Then check the layout you want to share on the Layouts page, and then click [Apply] button, the layout icon  will change to
 . In this way, all users under the corresponding role can use the layout and have access to the devices in the layout.
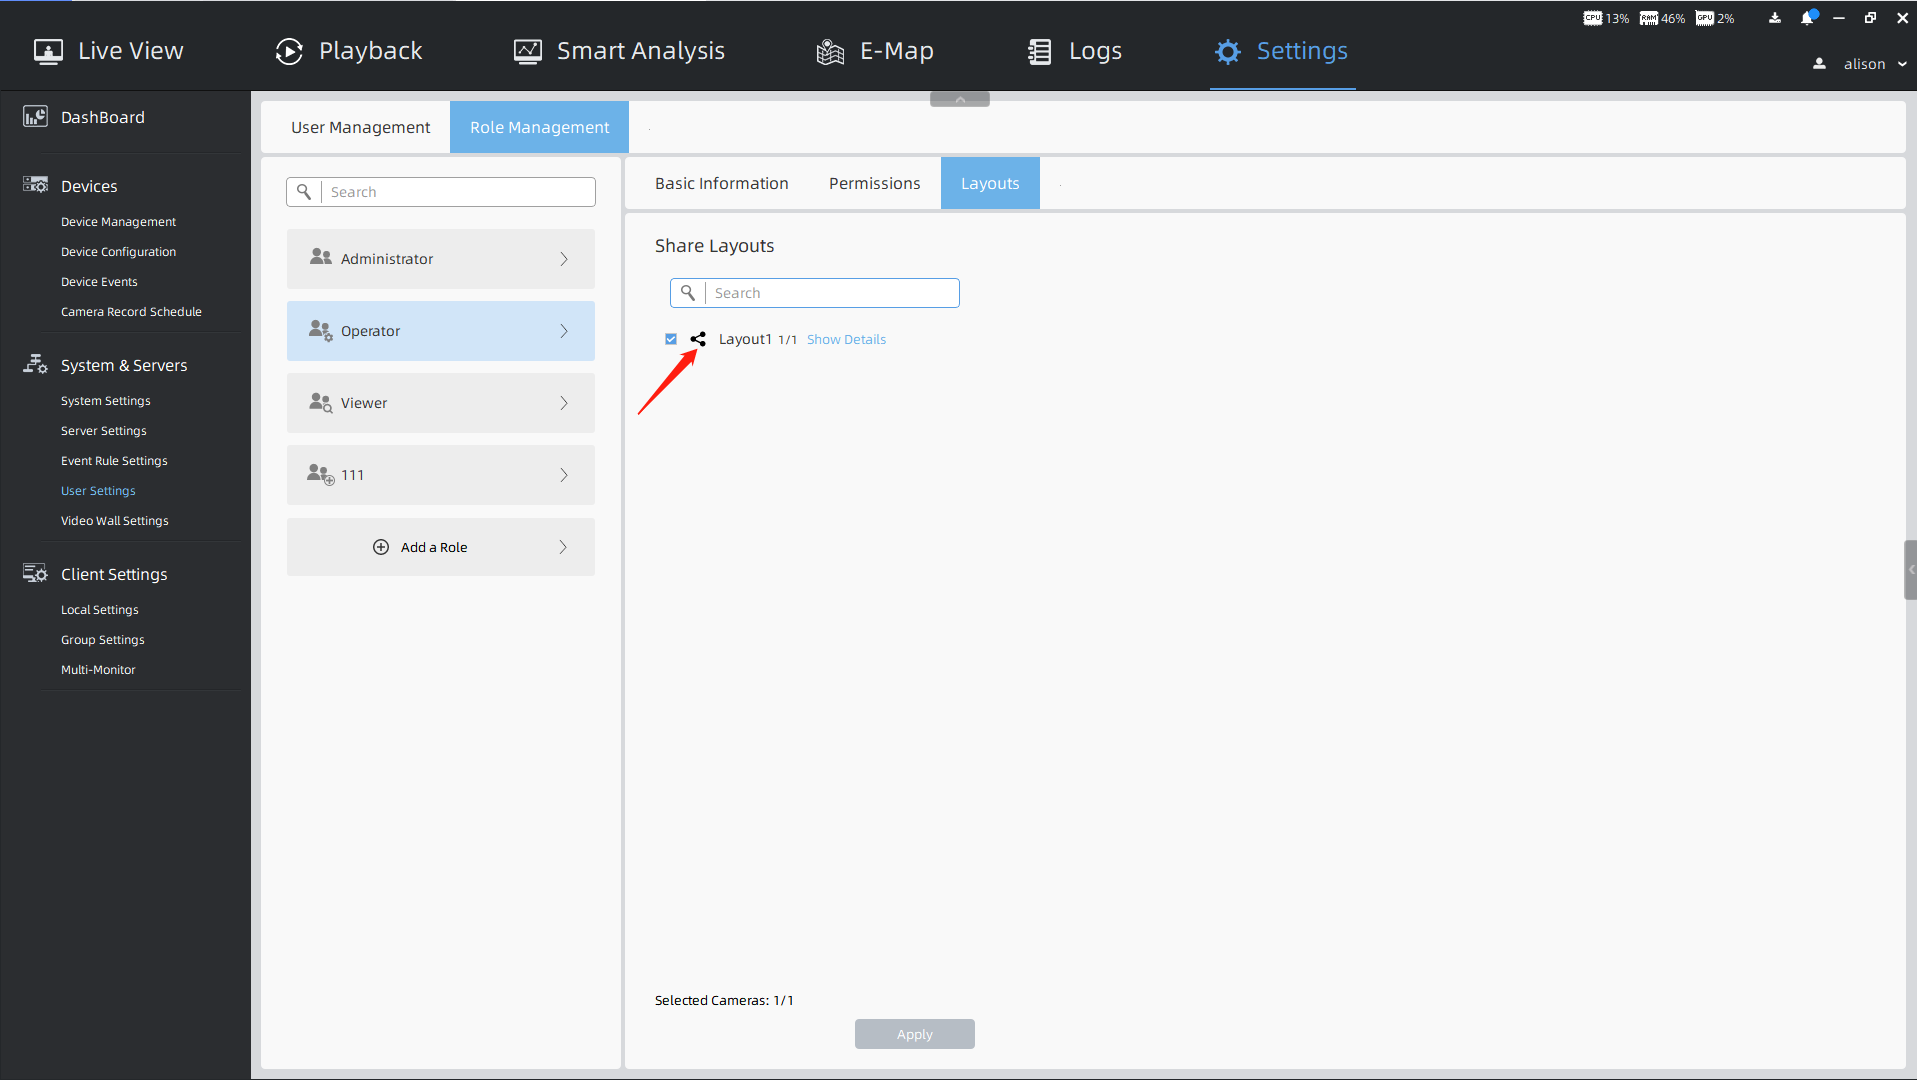
Step 3: You can click [Show Details] button to check devices in the layout. Hover your mouse over the channel to see the thumbnail and related information.

2.3 Tour Plans
The operations of Camera Tour and Layout Tour are similar. Here we take the operations of Camera Tour as an example.
2.3.1 How to Start and Configure Tour?
Step 1: There are three ways to start Camera Tour.
Method 1: Determine the channels you're interested in, and right-click the camera live view window in the Live View interface to pop up a menu. And select [Start Tour] option to configure tour.

Method 2: Multiple cameras in the list can be selected by holding down [Ctrl] key on the keyboard, then right-click on the list to pop up a menu. And select [Start Tour] option to configure tour.

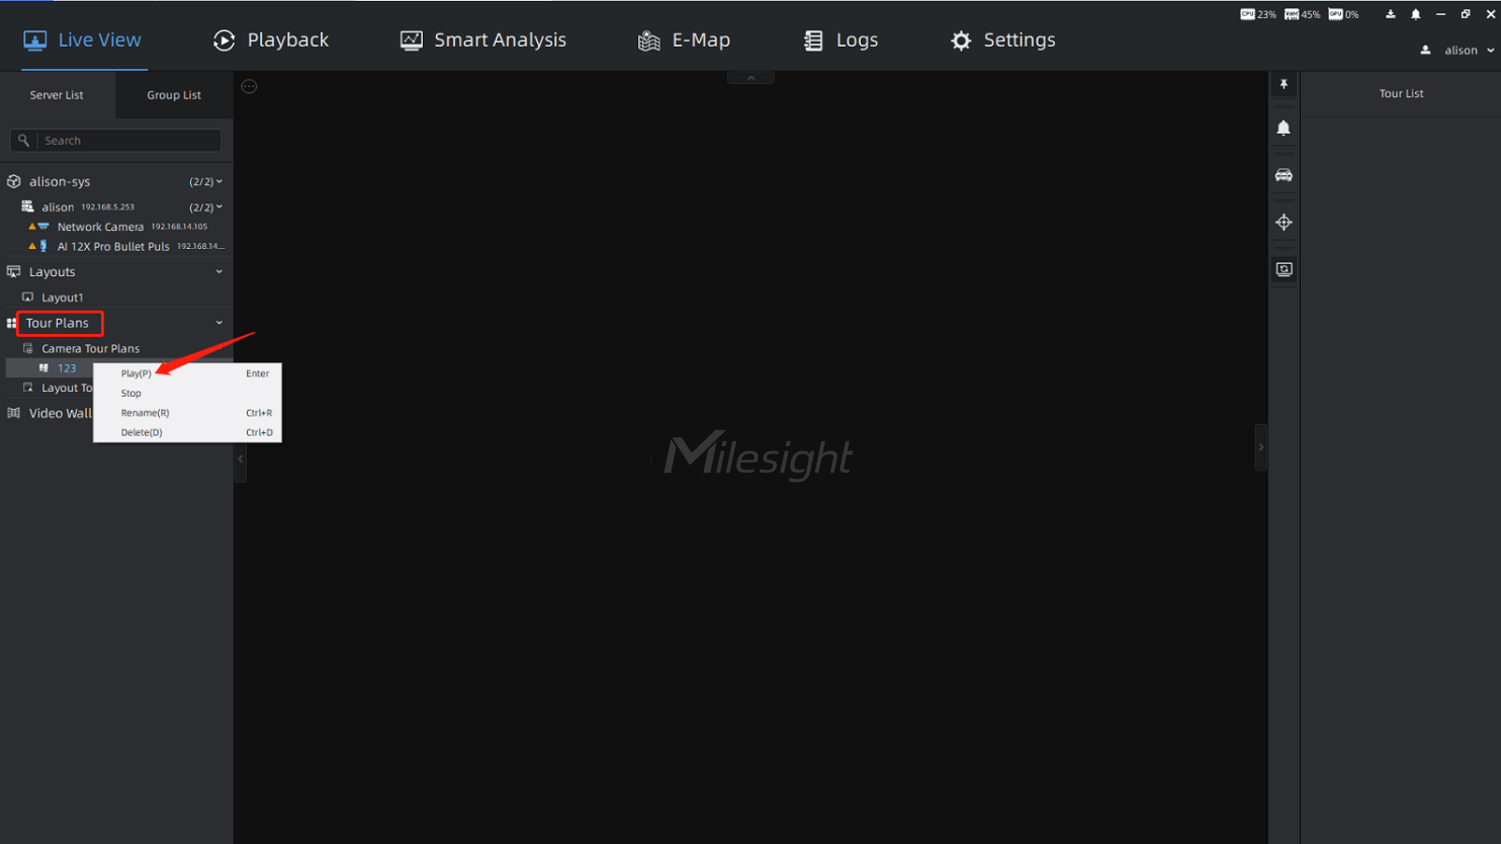
Method 3: If you already have a saved tour plan, you can right-click the corresponding tour under the Tour Plans module in the left Resource Panel, and select [Play] option to start tour. You can also directly double-click the corresponding tour to start tour quickly.
Step 2: After starting tour, you will enter the Tour Config interface. Then you can edit the name, the number of channels per play and tour interval. And click [Play] or [Save and Play] button to enter the real-time Tour interface. The saved tour will be displayed under the Tour Plans module in the left Resource Panel.

Step 3: Click the Tour List icon  , and all channels added to the tour will be displayed in the right panel. The icon
  indicates that the channel is currently playing.

Step 4: After clicking the icon  to pause the tour, you can modify the tour name, the number of channels per play, tour interval. You can also drag the camera from the left Resource Panel to the Tour List to add it. And click the icon
  to delete it by moving the mouse over the corresponding channel in the list. After the operation is completed, then click the icon
  to save the current configuration. You can click the icon
  to stop the tour.
2.4 Instant Playback
2.4.1 How to Enable Instant Playback?
Step 1: For the channel with video recording in the last 5 minutes, you can click the Instant Playback icon  on the top toolbar of video window to view the video.
(Instant Playback is supported for multiple channels at the same time.)

Step 2: When Instant Playback is enabled, it supports the following integrated window functions. And you can use the corresponding function as needed.
① The top toolbar functions of video window:
Turn on Speaker, Start Talking, Enable Digital Zoom, Snapshot, Start Recording, Fisheye Setting, Close.
② The right - click menu function of video window:
Stream Type, Display Info, Add Tag for Selected Cameras or All Cameras in Layout, Full Screen Current View or Current Layout, Start Tour, and so on.
③ The bottom toolbar functions of video window:
Play, Pause, Play in Playback, Control playback progress through timeline.

Note:
Only when the continuous recording schedule is set, Instant Playback can support adding tag.
-END-
Did you find it helpful?
Yes
No
Send feedback Sorry we couldn't be helpful. Help us improve this article with your feedback.