How to Use Record and Playback in VMS Enterprise
Print
Modified on: Fri, 4 Nov, 2022 at 6:11 PM
1. Introduction
For a VMS software, Live View, Record and Playback must be the three most important functions. Milesight VMS Enterprise has powerful video recording and playback, which are the critical parts of the forensic process. This document will introduce how to configure and use these two functions in order to solve some doubts and problems in use.
2. Disk Settings
Ensure that one or more of the server's disks are enabled and have space left before configuring record. In addition to local disks, NAS external storage is also supported.
Select Settings→System&Servers→Server Settings→Storage Management and enable one or more disks to save record. It is recommended that the hard disk is used for storing recordings only. Move the mouse to the capacity bar to display more capacity information of the disk.

3. Continuous Recording
3.1 Enable Continuous Record
Step1 Select Settings→Devices→Camera Record Schedule→Schedule;
Step2 Click Server List or Group List to show devices from different servers or groups. Click one camera to configure this channel’s record.

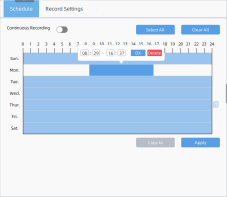
Step3 By default, the time bars in the schedule have been all selected. Click Select All or Clear All to quickly choose or clear all times. When the time bar is blank, you can select a time period by crossing over it. Click one time period and then you can modify its specific time. Click  to copy one day's schedule to others'.
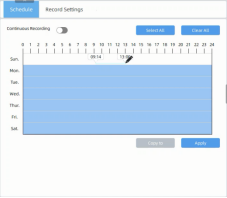

Step4 Enable Continuous Recording  and do not forget to Click Apply to save.
3.2 Continuous Record Settings
Step1 Select Settings→Devices→Camera Record Schedule→Record Settings;
Step2 Click Server List or Group List to show devices from different servers or groups. Click one camera to configure this channel's record.

Step3 Configure specific settings of the camera after continuous recording is enabled.
Table1 Description of the settings
Parameters | Function Introduction |
Record Stream | Set record stream as primary, secondary or both of them |
Record Contain | Select whether the record includes audio or not |
Pre Record Duration | Set the duration of pre-recording from 1s to 10s |
Post Record Duration | Set the duration of post-recording from 10s to 60s |
Archive Minimum Retention Time | Set minimum time for recording to expire: Auto(delete the oldest recordings based on the disk capacity); Preset times; Custom time from 1 to 365 days |
Archive Maximum Retention Time | Set maximum time for the recording to expire: Auto(delete the oldest recordings based on the disk capacity); Preset times; Custom time from 1 to 365 days |
ANR | Set whether to enable ANR which needs a SD card inserted in Milesight camera added via MSSP |
3.3 Copy Record Schedule and Settings
Both Schedule and Record Settings support copy one channel's to others'. We take Record Settings as an example.
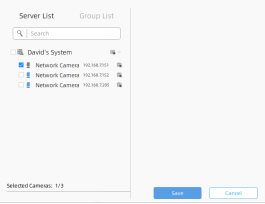
Step1 Click Copy to and then check the cameras you want to copy the configuration to.
Step2 You can also see all cameras from different Servers or Groups by selecting Server List or Group List.
Step3 Click Save and you will find the checked cameras' configuration is the same as the first one.

4. Event Record
Event Record of VMS Enterprise is based on Event Rules. So you need to set it in Event Rule Settings interface.
Step1 Select Settings→System&Servers→Event Rule Settings and click Add to set a new rule;
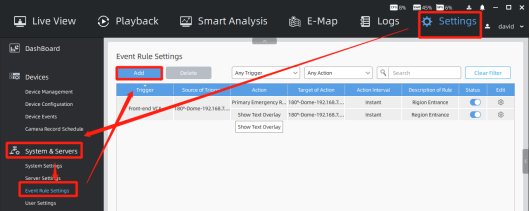
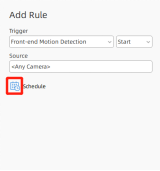
Step2 Select the event which you want to trigger the recording. We take Region Entrance in Front-end VCA as an example. Then click <Any Camera> and all cameras will show up in Server List or Group List. Check one or more cameras as the source and click save.


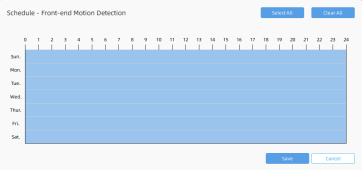
Step3 Click  to bring up the window of schedule. The way to configure it is just the same as it in Continuous Recording. Don't forget to click Save.
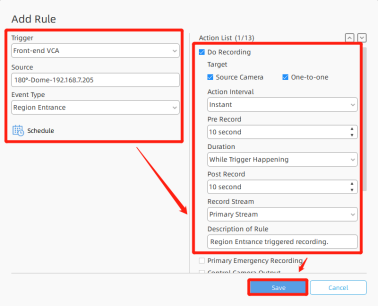
Step4 Check Do Recording or Primary Emergency Recording in Action List. Primary Emergency Recording is based on recording schedule, which should be configured first at Camera Recording Schedule. Trigger primary stream recording when event occurs.


Table2 Description of the settings
Parameters | Function Introduction | Do Recording | Primary Emergency Recording |
Target | Set which camera to record: Source Camera(One-to-one means that event from a particular camera triggers recordings of not all source cameras but only this camera when there are more than one source cameras); Custom selected cameras | √ | √ |
Action Interval | Set time interval between two Actions: Instant; 5s; 10s; Custom time from 1 to 3600s | √ | √ |
Pre Record | Set the duration of pre-recording from 0s to 10s | √ | × |
Duration | Set the duration of whole action: While Trigger Happening; Custom time from 1 to 3600s | √ | √ |
Post Record | Set the duration of post-recording from 0s to 120s | √ | × |
Record Stream | Set record stream as primary or secondary stream | √ | × |
Description of Rule | A brief description as needed for easily finding this rule | √ | √ |
Step5 Configure the event record rule as needed and click Save.
Step6 Click Apply to save the rule changes.
Take the following figure as an example, when Panoramic Dome Camera detects Region Entrance, it will trigger recording its video. Don't forget to click Apply in Event Rule Settings interface.
Note: All front-end triggers should be enabled on Milesight camera side first. You can configure it in Device Events module.
5. Basic Playback

Click Playback on the top. And then the playback interface will show up. Choose and double click a channel from Server List or Group List to replay your recordings. The icon  means this channel has recordings to play.
(1) Toolbar on the top
Move your mouse to the video, and then the toolbar will show on the top.
Click  to turn on Speaker, and you can adjust the volume of the speaker from 1~100. This item is available only for cameras which support built-in mic or Audio I/O.
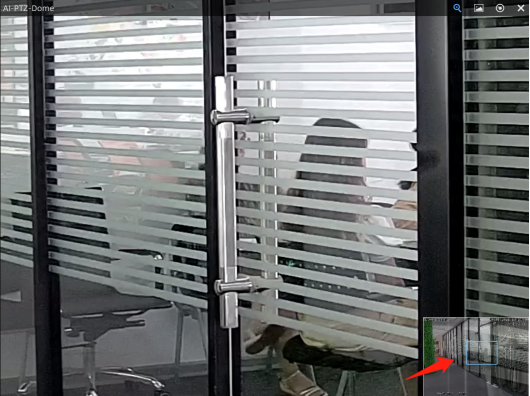
Click  to enable digital zoom. A thumbnail of the enlarged position is displayed in the lower right corner. Mouse dragging and wheel scrolling to move and zoom in/out.
Click  to take a snapshot. The blue text will lead you to the snapshot storage path.

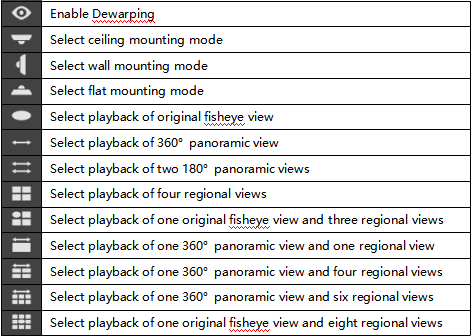
Click  to open the Fisheye toolbox. Here are a list for each icon of Fisheye toolbox.
Click  to close this channel’s playback.
(2) Right-Click Menu
Right click the video and the menu will show up.
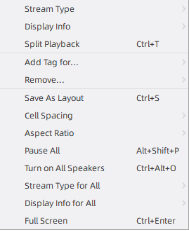
The meanings of the items on the right-click menu can be referred to the table below:
Item | Description |
Stream Type | Auto, Primary and Secondary supported. Auto means the playback video will automatically switch stream according to computer performance. |
Display Info | Choose to display stream information at Left or Right, or customize the position of info. You can also hide the stream information. |
Split Playback | Divide the video files into several channels during specified time period. Users can watch playback videos of different time periods simultaneously. |
Add Tag for | Add tag for the selected cameras or all cameras in the playback panel. |
Remove | Choose Selected Views or All Views in Layout to remove the camera playback. |
Save As Layout | Click it to save the current layout to Layouts list. |
Cell Spacing | Set the cell spacing size among the live view windows in the layout. There are four options available, including None, Small, Normal and Large. |
Aspect Ratio | Choose 1:1, 4:3, 16:9, 3:4 and 9:16 to show the window aspect ratio. |
Pause/Resume all | Pause/Resume all playback in the current layout. |
Turn on/Mute All Speakers | Enable or disable the speakers of all cameras in the current layout. |
Stream Type for All | Set stream type for all cameras in the current layout. |
Display Info for All | Set to display stream information of all channels in the current layout. |
Full Screen | You can choose Layout to display all cameras in the layout to full screen. Click again the Exit Full Screen to restore the normal window. |
Right click on a position in the layout where there is no video and the menu will change into:
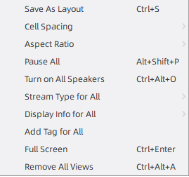
There are two more items:
Add Tag for All | Add tag for all cameras in the playback panel. |
Remove All Views | Remove all cameras' playback from this layout. |
(3) Playback Toolbar

Select a certain channel in the current layout and click  to show the calendar. The blue date and time both indicate availability of recordings. Click the date and time you want to locate to.

Click to lock recording file, and you can set locked time duration and notes.


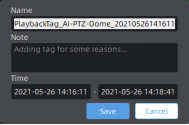
Click  to add tags for selected channels, and you can set tag name, note and time duration.

Click  to show Archive Management which can be used to check and retrieve tag and lock files.


Click  to switch to Asynchronous Playing or Synchronous Playing.
Asynchronous Playing: The timeline only represents the recording of selected channel.

Synchronous Playing: Playback all channels in the current layout synchronously. The thick timeline bar represents recordings of currently selected camera, while the thin bar represents recordings of all channels in the current layout.

Click  /
/ to play previous or next event video.
Click /
/ to play previous or next frame of the recording.
Click /
/ to adjust the playback speed to 1/32, 1/16, 1/8, 1/4, 1/2, 1X, 2X, 4X, 8X, 16X or 32X.
Click /
/ /
/ to rewind, play or pause the video.
Click to move the current playback time to the center of timeline bar. The short white vertical line which represents the position of the current playback moment will move to the centre of the time bar.
Drag to zoom in/out timeline bar. Or you can just scroll the mouse wheel on timeline bar to do so.
(4) Right-Click Timeline Bar
Right-Click the timeline bar and hold down to drag to move the time bar sideways.
Right-Click the timeline bar, the menu will show up as follows. If there has been a part of video selected and it contains locked video and tags, right-click menu will have more items.


The meanings of the items on the right-click menu can be referred to the table below:
Item | Description |
Start Selection/End Selection | Select start/end time of period on the timeline. |
Clear Selection | Clear selection on the timeline. |
Zoom to Selection | Extend the selected period to whole timeline. |
Add Tag | Add tag for the selected period. |
Lock File | Lock the selected period. |
Split Playback | |
Export Video | Export the selected period. |
Unlock File | Unlock the locked video file. |
Edit Tag | Edit tag which you set. |
Export Tag | Export tag which you set. |
Play Tag Video | Play videos with tag you set. |
Delete Tag | Delete tag which you set. |
Show Thumbnails | Show thumbnail of the corresponding time. Users can also resize the thumbnail timeline as needed. |
Show Tags | After setting the tags, you can choose the option to show the tag on the timeline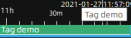 |
Show Locks | After setting the lock files, you can choose the option to show the lock file on the timeline |
(5) Tags for Playback
Click the Hide/Show bottom to pop-up right side menu and click the tag icon to show Tags for Playback.
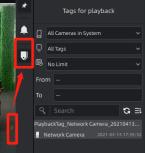
Select which channels to search tags from.

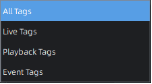
Select which types of tags to search.
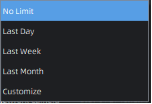
Select the time duration for searching tags
Search keyword of tags' names and notes. Refresh the tag list and chose how to sort the tag list (Tag Start Time, Tag Name, Camera Name and Create Time).

Double click the tag you want, and the video of the corresponding channel then jumps to the time of the tag and flashes the window.

6. Event and Split Playback
(1) Event Playback
If the channel is configured with rule-triggered recording, the timeline bar of Playback will have different colors representing different events.

Click Show Event Mask to check event type to be shown on the timeline, the timeline will show different colors according to selected event type as below:

Click the  button to enter Event Mask Colors Setting interface, it supports customizing different colors for different events according to the user’s requirement.
Click Event Only to exclude continuous recording.

(2) Split Playback
Split Playback allows you to divide a period time of recording into several parts when watching playback, so that users can watch videos of different time simultaneously.
Split Playback setting steps are as below:
Step1: Right click the playback window of a channel and click Split Playback, or right-click the selected time period on the timeline and choose Split Playback, and a window will pop up.

Time Period setting
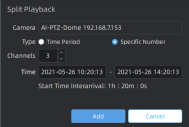
Specific Number setting
Step2: Check a type to split the video file. If you choose the Time Period, and set Time Interval and Start/End Time, then the channels will be split automatically by VMS system as above. If you choose the Specific Number, and set channel number and Start/End Time, then Time Interval will be calculated and split automatically by VMS system as above.
Step3: After setting, click , and the selected video will be split to new channels to replay asynchronously on the playback layout as shown below:

——————END——————
Did you find it helpful?
Yes
No
Send feedback Sorry we couldn't be helpful. Help us improve this article with your feedback.