I. What is ANPR

ANPR(Automatic Number Plate Recognition) is a technology that uses optical character recognition on images to read vehicle registration plates. For Milesight, the ANPR algorithm is embedded in cameras, which allows the cameras to recognize, capture and upload license plate images all alone and intelligently.

II. Why Milesight ANPR Solution
ØQuick Capture & Accurate Recognition
lAccurate License Plate Identification Under all kinds of conditions
lHigh-reliability License Plate Recognition with more than 95% high performance accuracy
1. Up to 4 Detection Regions
2. AI-based Vehicle Attributes Recognition
3. Vehicle Speed/Direction Recognition
4. License Plate Serial Format
ØIntelligent Analysis & Efficient Management
lWhite and Black List Management
lA Stand-alone ANPR Solution
lList Scheduling Management
lLPR Smart Search
lFully Integrated with Milesight NVR/CMS/VMS Enterprise
l3rd Integration: CGI/APIs
ØAdaptable to Most Operation Requirements
lMax recognition speed 120 km/h
lOver 80 countries and regions
lVarious options
lRoad Traffic Series
Intelligent Traffic|ANPR Security Camera (milesight.com)
lEntrance & Exit Series
Intelligent Traffic|ANPR Security Camera (milesight.com)
Notes
Installation Angle Considerations
To increase the accuracy of license plate recognition, install the LPR cameras properly to capture the license plates with the correct image size, lighting conditions and installation angle. The following highlights are the precautions of installation angle:
A. Installing the camera in front of the vehicle (Recommended):
The captured image should be filled with a full width of the vehicle.
B. Installing the camera slightly to the side:
To avoid capturing unnecessary contents in the image, the camera should be installed in a higher position(Vertical angle is less than 30°; Horizontal angle is no more than 30°; Tile angle is less than 5°) to capture the front part of the vehicle. The Youtube video in the link below has actual installation suggestions for LPR Camera, which can be used as a reference.https://youtu.be/u88gNAdrJnM

III.Countries/Regions that support ANPR
Backed up by strong R&D strength and accumulated expertise in LPR applications, Milesight Intelligent Traffic solution can be well applied to broad regions and countries worldwide. We've now covered a wide range of areas including:


IV. How to set ANPR with Milesight Network Cameras
The following introduction is based on the latest version of LPR T_61.8.0.4;
Before setting it up, you can update your device to the latest version.
You can download the latest firmware in the link below:
http://www.milesight.com/support/download
1. General
Step1: Go to “Traffic” -> “LPR”,after log in the web.
Check the “Enable LPR” checkbox, and you can draw the screen to select the interested areas. There will be shown in the blue box below.

[Country / Region]: Select a country within the appropriate region.
[LPR Image Mode]: In order to recognize the attributes of vehicles
and license plates in different environments, [LPR Image Mode] can be enabled, a special exposure mechanism for license plate recognition that can effectively suppress the exposure of car lights at night for night license plate recognition.
Achieve the best effect of LPR night recognition by adjusting different parameter levels.When LPR picture mode is enabled, backlight, exposure and day/night switching parameters will be set to special values.Minimum shutter for each level: 1- 1/250, 2- 1/500, 3- 1/750, 4- 1/1000, 5- 1/2000.
The picture below shows the night recognition effect after turning on the LPR Image Mode.

Note:
For PE platforms (devices with the model suffix PE), [LPR Image Mode] is enabled by default and does not require configuration, so there is no Image Settings option under General.

Step2: Detection Region
[Set LPR Detection Region]: You can set up to 4 ROI areas by drawing the
screen. It is recommended to draw the ROI detection area at the center of the screen to ensure the recognition of the vehicle after it fully enters the screen and the integrity of the vehicle screenshot. 

Notes
l The optimal license plates width for recognition is within 100-200 pixels.
l In order to obtain better performance,the lens can be properly zoomed in
so that the vehicle is in the center of the camera's field of view to ensure
clear recognition of the license plate. 
Step3: Detection Settings
[Detection Mode]: If you choose the “Plate Priority”, the camera will first capture the license plate information of the vehicle entering the screen.If you select the “Vehicle Priority”, the camera will first locate the target vehicle and then recognize the license plate to avoid some false detection.
Note:
1. Vehicle priority mode can identify vehicles without license plates.
2. Vehicle priority: Adopt the "vehicle priority" vehicle identification method, mainly based on the appearance characteristics of the vehicle for automatic identification, such as model, body color, vehicle logo, etc., this method can be applied to many different types of vehicles;
3. License plate priority: The vehicle identification method of "license plate priority" is adopted, and the automatic identification is mainly based on the license plate information on the vehicle, so the accuracy of license plate recognition is high.
[Detection Trigger]: If you choose “Always”, camera will always detect the license plate. If you choose “Alarm input”, camera will only detect the license plates when Alarm Input is being triggered.
Alarm Input trigger can be used in entrance & exit management for gate control, parking lot management and other scenarios. The Alarm input interface of the LPR is usually connected to the Ground loop coil. When a vehicle passes by, the Ground loop coil will be triggered and transmit a signal to the Alarm input interface of the LPR Camera, thereby triggering the IPC to recognize the license plate information.
[Repeat Plate Checktime]: Set the time interval for repeatedly reading license plates to effectively avoid duplicate identification of parking vehicles.

[License Plate Serial Format]: License Plate Serial Format function supports formulating identification rules and can automatically do further processing, filter license plates in non-compliant formats to achieve more intelligent and accurate license plate recognition.
Through the License Plate Serial Format, you can set special rules to filter out the corresponding license plates, and only the license plates that meet the rules will be automatically displayed and displayed on the real-time view interface.
For example, we can set the number of license plate characters to 7 characters, and the format is "A*****". When we enable "Filter number of characters", only license plates that match the 7 characters of the license plate and start with a letter will be pushed and displayed.


Note: PE platform models support 30 license plate rules.(For PC platform devices, 10 are supported).
[Attributes Identification]: Check Plate Color, Vehicle Type, Vehicle Color, Vehicle Brand, Detection Region, Direction, Country, Region or All to enable Attributes Identification, it will display the corresponding information on the logs interface.
Step4: Schedule settings
Set the effective time of license plate recognition.

Step5: LPR Message Post Settings
For PC platform, Check the checkbox to enable LPR Message Post. It will push information to some third-party devices or software that are compatible with ours. Information can be transmitted by RTSP, TCP, HTTP.

For PE platform, this function has been separated into a separate module named Data Transmission. At the same time, MQTT and Metadata are added to the data push type.

Note:
1. If you need to add LPR Camera to Milesight NVR/CMS/VMS Enterprise, you must select the TCP type to transmit data to the back-end software and enable Original mode in Data Settings.
2. If you add LPR Camera to MS NVR/CMS/VMS Enterprise through mapping, then TCP ports also need to be mapped.
3. If your LPR Camera’s firmware version is later than 61.8.0.3-r10 and model suffix has -E, you can enable Automatic Retransmission which allows for automatic re-upload of LPR data during network reconnection after disconnection. The resumed data include regular LPR and Traffic events, ensuring the integrity of device data and meeting data security requirements.

SD card insertion is necessary for this feature to work
More information about LPR Message Post, please refer to Milesight-Troubleshooting-Integration between LPR Camera and NVR(VMS).
Step6: Don’t forget to click “Save” after finishing all settings.
2. Advanced
In the interface, you can set display information on snapshot of license plate recognition and also customize the file name of snapshots which are uploaded via FTP or Email or stored on local LPR Picture File Path.

[Snapshot OSD]:Set the screenshot OSD options.
Each time when an item is checked, the list will add the item row, including the item name and sorting operation. You can click and button to sort these items and choose separator to connect these items name. Also, the content of Position and Device lD items can be customized. When you check all items,the function interface will show as below.

[Snapshot File Name]:Screenshot file name configuration.
Once license plate is recognized, and the snapshot will be uploaded via FTP or Email or stored on your local LPR Picture File Path. Then, You can see the snapshot file name which you customize as shown below:

3. List Management

Add the license plates to this interface as Black or White type (Black/White List), and then you can set the alarm action for these license plates in the corresponding Black list mode or White list mode interface. When these license plates are detected, the camera will respond to your settings accordingly


[Add License Plate]: click the “Add” button,select the license plate type as black or white, enter the license plate number, after selecting the valid time of the license plate and entering the remark information, the license plate number will be added successfully.
[Batch Upload]: You can add a .csv file of the license plates you want to add, click the “Browse” button to import the form to this interface, click the “Upload” button, the license plates will be added successfully.
Notes
l You can firstly download the template as a reference in this interface.
l It allows to add 20000 license plates to Black and White List.(Only supported in firmware T_45.8.0.3-r8 or above & T_61.8.0.3-r12 or above)

[List Search]: Select Plate Type or directly enter the license plate number, click the “Search” button, the corresponding license plate will be displayed in the list as below.
[Export List]: Click the “Export List” button to export the license plates in the current list as a csv file locally.
[Delete List]: Click the “Delete List” button to delete all the license plates in the current list.
4. List Event
Step1: Select the List Type, Black list, White list or Visitor. PE platform adds direction detection.
Step2: Schedule Settings. You can draw the schedule by clicking “Edit” button.

Step3: Set Alarm settings.

Table 1 Description of the buttons
Parameters | Function Introduction |
Record Video Sections | Six different periods are available(5, 10, 15, 20, 25, 30 sec) |
Pre-record | Reserve the record time before alarm, 0~10 sec |
Snapshot Type | The type of Snapshot, License Plate, Full Snapshot or All. |
Snapshot | The number of snapshot, 1~5 |
Snapshot Interval | It cannot be edited unless you choose more than 1 to Snapshot |
ExternalOutput Action Time | Duration of an alarm. It cannot be edited unless you enable the External Output on the Alarm Action firstly. |
AudioAction Settings |
Set the audio schedule to trigger different audio files for different alarm actions. Note: The audio files you can upload in “Audio File Manager” interface. |
PlayAudio Interval | Auto/ 10 seconds/ 30 seconds/ 1 minute/ 5 minutes/ 10 minutes are available. |

After that, when a license plate marked as“Black”,“White”,“Visitor”is detected, the camera will respond accordingly to your settings.
5. No Plates Event
When enabled, LPR switches to vehicle priority mode.

[Detection Region]:Up to 4 ROI area detection can be selected.
[Schedule Settings]:You can draw the schedule by clicking “Edit” button.
[Alarm Action]:Set the relevant no-license plate event alarm action.
Note:
1. For details, refer to List Event alarm action.
2. For PE platforms, this feature has been moved to Violation Management
6. Evidence
The Evidence function is often used at traffic intersections or parking lot entrances. With this feature, LPR cameras can be linked with other cameras to take full-view snapshots to help substantiate violations. For example, when a vehicle is driving on an illegal lane, the LPR camera will only take pictures of the license plate or vehicle, but the evidence camera can take background photos so that we can know whether it is illegal or not.

Add an evidence camera to trigger the capture. Whenever the license plate recognition is triggered, the evidence camera can be used to capture scenes from different perspectives.
[Evidence Camera]:Enter the username, password, Address of the evidence camera to add the evidence camera.
Note:
①.Up to 2 evidence cameras can be added.
②.Evidence camera captures primary stream picture by default.
③.For the Address, input evidence camera IP directly for Milesight camera, and snapshot URL is supported for third-party camera.
7. Violation Management
Step1: Detection Region
The configuration here is the same as the "Detection Region" under "General".

Step2: Detection Event
No Plates:
The PE platform's no license plate event has been moved here.

Reverse Driving:
[Region]: Different rules can be set for each detection area.

[Trigger Condition]: Contains two parameters: "Approach" and "Away".
Speed Monitoring
[Region]: Different rules can be set for each detection area.
[Rule]: For a single detection area, you can configure up to 3 rules. For each rule, you can select the vehicle type, maximum speed and minimum speed.
Step3: Set Alarm Actions

8. Vehicle Counting
When enabled, LPR switches to vehicle priority mode

Step1: Counting Information
[show information]: When enabled, vehicle statistics will be displayed on the live view, as shown below:
[Count Type]: Can count vehicles by type and size


[Reset]: You can choose to use manual zeroing data or automatic zeroing. The time frequency of automatic zeroing can be configured
Step2: set Schedule Settings

Step3: Message Post Settings
Vehicle counting data can be pushed. You can choose instant push and custom push. The frequency of custom push can be configured to push at a specified time every day or every hour.
9. Professional LPR Live View Interface
Milesight LPR camera supports professional LPR Live View interface. You can see the real-time license plate recognition results.
The PE platform adds Vehicle Counting and Violation Management interfaces
Note:


① Upgrade your device to corresponded firmware version.
Camera: V45.8.0.3-LPR_XX or above.
Firmware download link: Firmware Download|The Latest Innovation|Milesight
② If there is no SD card or NAS as the storage space, the snapshots of license plate will be temporarily stored locally on the PC, cleared after logging out, and do not support Smart Search which will be introduced in the next part.

③ If a Evidence camera is added, after the license plate information is recognized, click  button to view the vehicle identification information and the pictures captured by the Evidence camera.The second picture is the picture captured by the evidence camera.
10. Smart Search
Step1: Select Plate Type or directly enter the license plate number.
Step2: Select the corresponding recognition attribute, as well as the start time and end time, and click the "Search" button to realize the license plate search that meets all conditions. The corresponding license plate or the license plate containing the search keywords will be displayed in the log, and the complete video and license plate will be displayed on the left side of the interface.
Step3: If there is an evidence camera added, then after searching out the relevant license plate information.
Click the button in the red box in the picture to see the picture captured by the evidence camera.
There are two methods to backup LPR logs.
① Backup license plates you want.
Step1: Tick license plates you want to backup and click “Backup” button ;
Step2: Select the export file type, video stream type and video file format, then click “Export” button.
② Backup all.
Step1: Click “Export All” button;
Step2: Select the export file type, video stream type and video file format, then click “Export” button.
You can also click the "Auto Export" button to automatically export the logs to FTP, SMTP or Storage.
Note:
① Insert available SD card or add NAS to camera as storage. Otherwise, you can’t check the LPR recording and snapshots.
② Upgrade your device to corresponded firmware version.
Camera: VXX.8.0.3-LPR_XX or above.Firmware download link:
http://www.milesight.com/support/download#firmware]
V. How to set ANPR with Milesight NVR
1. Preparation
Here are some notes you should notice before using ANPR function.
① Insert available HDD or add NAS to NVR as storage. (Otherwise, you can’t check the recording and logs.)
② Upgrade your device to corresponded firmware version.
Camera: VXX.8.0.3-LPR_XX or above.
NVR: V7X.9.0.7-r7 or above.
Firmware download link: Firmware Download|The Latest Innovation|Milesight
③ Ensure your device support LPR/ANPR function.
Model of NVR:
l MS-N1009-UT / MS-N1009-UNT/MS-N1009-UPT
l MS-N7016-UH /MS-N7032-UH (16 ANPR Channels)
l MS-N8032-UH / MS-N8064-UH (16 ANPR Channels)
l MS-N7016-UPH / MS-N7032-UPH/ MS-N7048-UPH (16 ANPR Channels)
l MS-N7048-PG / MS-N7032-G / MS-N7016-G/ MS-N7016-PG(16 ANPR Channels)
l MS-N8032-G / MS-N8064-G (16 ANPR Channels)
Name of LPR Camera:
l Road Traffic Series
Intelligent Traffic|ANPR Security Camera (milesight.com)
④ Ensure that NVR can get license plate information. Please set TCP as Post Type which is the default mode.
For PC platform, it can be set in Camera web page -> Traffic” -> “LPR” -> “LPR Messsage Post Settings”
For PE platform, You can find it under Data Transmission and under Data
Setting select Original Mode

2. Settings
Step1: Go to “Smart Analysis” -> “Analysis Settings” -> “ANPR”, select a channel and enable ANPR function.
[License]: A license will be automatically assigned to each device.
[License Status]: This column is used to display the status of the license, “Valid” or “Invalid”.
[Country/region]: The current region and country selection will be automatically synchronized.
[LPR Image Mode]: Achieve the best effect of LPR night recognition by adjusting different parameter levels.
Step2: Set ANPR function effective time. You can draw the schedule by clicking “Edit” button. Draw the schedule and then click “OK” or “Apply” after finishing setting. 
Step3: Set Detection Settings.
Detection parameters includeRepeat Plate Checktime, License Plate Format and Attributes identification.
[Detection Trigger]: Always and Alarm Input are available. It will only detect when alarm input is triggered if you select Alarm Input.

[Repeat Plate Checktime]: The same license plate information won’t be received on NVR within the time you set.
[License Plate Format]: Formulate identification rules and automatically filter wrong license plate information to achieve more intelligent and accurate license plate recognition.
[Attributes Identification]: Select Region Direction, ROI_ID, Plate Color, Vehicle Type,Vehicle Color, Country/Region, Vehicle Brand or All to enable Attributes Identification,it will display the corresponding information on the logs interface.
Step4: Set the detected ROI region which can be up to 4 regions. License plate will only be detected in the ROI regions.
3. List Management
Make a license plate list for your own NVR ANPR system.
Upload license plates and set them with different license type here. 10000 License plates can be added at most.
Kindly note that the list is exclusive for NVR, working with all LPR cameras you add. It won’t synchronize with the list on camera side.
There are two methods to add license plates:
① Add one by one.
Step1: Click Add button .
Step2: Input the license plate and select license type.
Step3: Click OK and then the license plate will be added into the list.
② Batch upload by importing template.
Step1: Click Download Template button  , select USB device folder and click OK to download Template.
Step2: Input all license type and license plate number as Template shows.
Step3: Click Import button  , select the file and click OK to add all license plates into list.

4. Black/White/Visitor List Mode
We provide you three modes for better event management.
Black List Mode: Manage event for license plates in black list.
White List Mode: Manage event for license plates in white list
Visitor Mode: Manage event for those license plates do not have license type. 
Steps for settings:
Step1: Enable Black List Mode/White List Mode/Visitor Mode as your demand.
Step2: Set effective time for the mode to work.
Step3: Set actions you need including Audible Warning, Email Linkage, Event Popup, PTZ Action, Alarm Output and Trigger Channels Record.

Note:
Do not forget to enable these modes, set effective time and record action for corresponded mode, so that you can get real-time video when license plate is detected (Effective time and record action is enabled by default.). You can refer to How to check ANPR record part for detailed record settings.
5. Professional LPR Live View Interface
At the beginning, you need to switch the preview mode to ANPR mode.
There are two methods to enter live view ANPR Mode:
① Right click the mouse and select ANPR Mode as preview mode.

② Select ANPR Mode on live view bottom tool bar.

After entering ANPR mode, the real-time license plate information will be shown on the left of the interface once it get detected.

License plate information includes Plate Snapshot, Channel Name, License Plate Number, Detected Time and Plate Type.
Two License types:
 ---- License plate from Black List
 ---- License plate form White List
No License plates type will be shown if the license plate does not exist in Black/White list.
However, you can right click the license plate information to quick add it to Black/White list or delete it from Black/White list.

Besides, you can click the license plate information to check the latest X seconds (10s~20s) video.
Note:
l X = 10 + Pre Record Time
You can set Pre Record Time in Storage -> Video Record -> Record Settings interface.
l Make sure that HDD is available on NVR and correct record settings is made, so that you can check the record on live view. Please refer to How to check ANPR record part for detailed record settings.
l Make sure that NVR can get the license plate information. Please set TCP as Post Type which is the default mode. It can be set in Camera web page -> Traffic” -> “LPR” -> “LPR Messsage Post Settings”.
6. Set/Check ANPR Record
Before checking recording files, please make sure that you have proceed correct settings to make record action work.
① Set Recording
Step1: Set Smart Analysis as Record Type in Storage -> Video Record -> Record Schedule interface.
Step2: Enable Black List Mode / White List Mode / Visitor Mode as your demand.
Step3: Set Effective time and Trigger Channels Record action of your selected mode (Full effective time and trigger channel record are set by default).
Then NVR will record when license plate is detected.
Note:
Generally, record action is triggered by event. If you just enable ANPR function without enabling Black List/White List/Visitor modes nor setting record action, it means you just enable the function while record action is not set.
Then no record will be triggered. So it is necessary to do all above three steps if you want to trigger record action.
② Check recording
Ø In Playback
Step1: Entering Playback -> Event Playback -> Smart Analysis interface.

Step2: Input corresponded information and click search button  to search.
Step3: Click record to play the video searched out .

Ø In Live View
Click the license plate information to check the latest X seconds (10s~20s) video.

Note:
l X = 10 + Pre Record Time
You can set Pre Record Time in Storage -> Video Record -> Record Settings interface.
l Make sure that HDD is available on NVR and correct record settings is made so that you can check the record on live view interface. Please refer to How to check ANPR record part to check if record action is correctly set.
7. Check/Backup ANPR Logs
① Check ANPR logs

Step1: Search on Smart Analysis -> ANPR interface.
Step2: Input corresponded information and click search button  to search.
Then you will get a whole ANPR logs list.
License plate snapshot will be shown on the logs list while the complete image video and license plate information will be shown on the left of the interface.

Step3: Click to play the video.
② Backup ANPR logs
Two methods are available after searching ANPR logs out .
Ø Backup license plates you want.
Step1: Tick license plates you want to backup and click backup button  .
.
Step2: Select the export file type, video stream type and video file format, then click export button
Ø Backup all.
Step1: Click backup all  button.
Step2: Select the export file type, video stream type and video file format, then click export button.
Then you will get corresponded file as selected export file type.
VI. How to set ANPR with Milesight CMS
1. Preparation
(1)Refer to the NVR section
(2)Upgrade your CMS to corresponded version.
CMS: V2.4.0.7 or above
Download link: Surveillance Software Download |Milesight
(3)Ensure that NVR can get license plate information. Please set TCP as Post Type which is the default mode.
Please refer to How to set ANPR with Milesight NVR preparation (4)
2. Settings
Step1: Add Camera to CMS.
Note: For devices added in P2P mode, specific IPC firmware versions and CMS versions are required to support ANPR configuration. You can obtain the firmware from the following links:
Step2: Go to “Device Config” , select a NVR and the channel, then enable ANPR function.

[License]: A license will be automatically assigned to each device.
[License Status]: This column is used to display the status of the license, “Valid” or “Invalid”.

[Set LPR Detection Region]: You can set up to 4 ROI areas by drawing the screen. License plate will only be detected in the ROI regions.
Step3: Set detection Settings:

[Detection Trigger]: Always and Alarm Input are available. It will only detect when alarm input is triggered if you select Alarm Input.
[Repeat Plate Checktime]: The same license plate information won’t be received on NVR within the time you set.
[Feature Identification]: Check Direction,Detection Region or All to enable Feature Identification, it will display the corresponding information on the logs interface.
3. List Management
Make a license plate list for your own NVR ANPR system.
Upload license plates and set them with different license type here. 10000 plates can be added at most.
Kindly note that the list is exclusive for NVR, working with all LPR cameras you added. It won’t synchronize with the list on camera side.
There are two methods to add license plates:
① Add one by one.
Step1: Click Add button  .
.
Step2: Input the license plate and select license type.
Step3: Click OK and then the license plate will be added into the list.
② Batch adding by importing template.
Step1: Click Download Template, select folder and click OK to download Template.
Step2: Input all license type and license plate number as Template shows.
Step3: Click Import button  , select the file and click OK to add all license plates into list.
4. Black/White/Visitor List Mode
We provide you three modes for better event management, which is based on two license types.
Black List Mode: Manage event for license plates in black list.
White List Mode: Manage event for license plates in white list
Visitor Mode: Manage event for those license plates do not have license type.
Steps for settings:
Step1: Enable Black List Mode/White List Mode/Visitor Mode as your demand.
Step2: Set effective time which means Mode works during that.
Step3: Set action including Audible Warning, Email Linkage, PTZ Action, Alarm Output.
5. Set ANPR Record
Step1: Set Smart Analysis as Record Type in Device -> Select NVR -> Record Schedule interface.
Step2: Enable Black List Mode / White List Mode / Visitor Mode as your demand.
Step3: Set Effective time and Trigger Channels Record action of your selected mode(Full effective time and trigger channel record are set by default). 
Then NVR will record when license plate is detected .
Note:
Generally, record action is triggered by event. If you just enable ANPR function without enabling Black List/White List/Visitor modes nor setting record action, that means you just enable the function while record action is not set. Then no record will be triggered. So it is necessary to do all above three steps if you want to trigger record action.
6.Check/Backup ANPR Logs
① Check ANPR logs

Step1: Search on Smart Analysis interface.
Step2: Input corresponded information and click search button  to search.
Then you will get a whole ANPR logs list.
License plate snapshot will be shown on the logs list while the complete image video and license plate information will be shown on the left of the interface.
Step3: Click  to play the video.
② Backup ANPR logs
Two methods are available after searching ANPR logs out .
Ø Backup license plates you want.
Step1: Tick license plates you want to backup and click backup button  .
.
Step2: Select the Export File Path, File Type, Video stream type and Video file format, then click export button.
Ø Backup all.
Step1: Click backup all button.
Step2: Select the export file type, video stream type and video file format, then click export button.
Then you will get corresponded file as selected export file type.
VII. How to set ANPR with Milesight VMS Enterprise
The following functions and pages are based on the latest version of VMS Enterprise (1.7.0.0)
1.Preparation
Here are some notes you should notice before using ANPR function.
①.Upgrade your VMS Enterprise to corresponded version.
VMS Enterprise: V1.3.0.0 or above
②.Only the LPR cameras added by MSSP protocol support ANPR function for VMS Enterprise.(The V1.7.0.0 version can support ANPR back-end algorithm, making it possible to use ANPR solutions whether it is an LPR camera or not.)
③.Make sure that VMS Enterprise can get the license plate information. Please set TCP as Post Type which is the default mode. Refer to How to set ANPR with Milesight NVR preparation (4)
2.ANPR Setting
Smart analysis mainly focuses on back-end ANPR Settings (supporting Non-LPR cameras). ANPR Settings for LPR cameras can be set on the Setting-Device Configuration page.
①ANPR back-end Settings
The additional license and the Analytics Server are required to use this feature.

Step1: Select a camera in the devices list tree, then click  button to enable Detection.
Step2: Select Country/Region
Step3: Set Detection Region
You can set up to 4 ROI areas by drawing the screen. If you choose Normal Mode, it supports configuring the LPR detection regions for the current area.
Note:
l The optimal interval of Milesight LPR cameras to recognize the license plates width is within 100-200 PX.
l In order to obtain better performance,the lens can be properly zoomed in
so that the vehicle is in the center of the camera's field of view to ensure
clear recognition of the license plate.
Step4: Schedule Setting.You can draw the schedule by clicking  button.and then click
  button after finishing the settings.
Step5: Set Detection Settings and Snapshot OSD
Detection Settings
Snapshot Settings
② LPR Camera Setting
Here the configuration of the camera web side will be automatically obtained. If the camera web side is not configured, you can configure it in the interface of VMS. After the configuration is completed, it will be synchronized to the camera web side.
Step1: Select a camera in the devices list tree, then click  button to enable Detection.
Step2: Select Country/Region and Process Resolution.
Step3:Image Settings.
Step4:Set Detection Region.
You can set up to 4 ROI areas by drawing the screen. If you choose Normal Mode, it supports configuring the LPR detection regions for the current area.


Step5: Schedule Setting.You can draw the schedule by clicking  button and then click
 button after finishing the settings.
Step6: Detection Settings.
[Detection Trigger]: If you choose “Always”, camera will always detect the license plates. If you choose “Alarm Input”, camera will only detect the license plates during Alarm Input is being triggered.
[Repeat Plate Checktime]: Set the time interval for repeatedly reading the license plates to effectively avoid duplicate identification of parking vehicles.
Notes
l The optimal interval of Milesight LPR cameras to recognize the license plates width is within 100-200 PX.
l In order to obtain better performance,the lens can be properly zoomed in
so that the vehicle is in the center of the camera's field of view to ensure clear recognition of the license plate.
Step7: Snapshot OSD
Step8: LPR Message Post Settings.
[Enable LPR Message Post]: Click  button to enable LPR Message Post. It will push information to some third-party devices or software that are compatible with ours.
[Post Type]: Information can be pushed by RTSP, TCP or HTTP.
Note:Only when it is set to TCP mode, VMS can receive the data identified by LPR Camera.
[Camera LPR Port]: This option is available for TCP Post type.
[HTTP Method]: There are two HTTP push methods: Post and Get.
[Snapshot Type]: Three kinds of snapshot can be chosen: All, License Plate and Full Snapshot. When you choose All, License Plate Snapshot and Full Snapshot will be pushed.
Note: This option is available just for Post HTTP Method.
[HTTP Notification URL]: The camera can use the API URL to send LPR information to other devices when the license plate is recognized. The API URL format is defined by the HTTP Server.
[User Name]: User name for HTTP Server.
[Password]: Password for HTTP Server.
Step9: Click  button to apply all settings.
3. ANPR Preview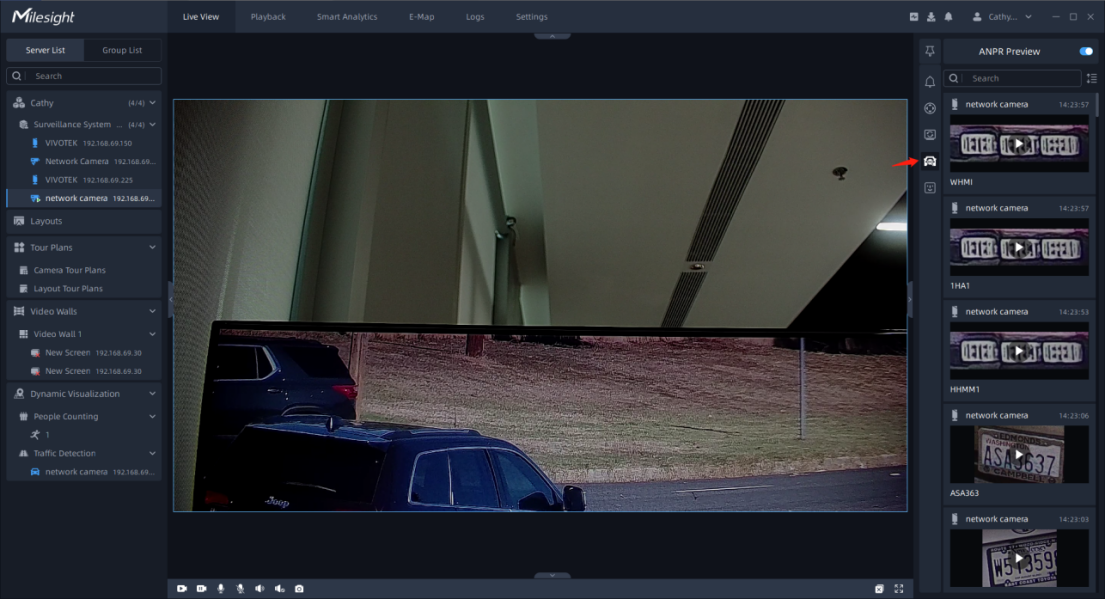
After enabling Detection in the ANPR Settings -> Detection Setting interface, you can click  button in the right Function Panel, and the real-time license plate information will be shown on the right of the interface once it is detected.
The license plate information includes Plate Snapshot, Device Name, IP, License Plate Number, Detected Time and Plate Type.
Two License types:
 ---- License plate from Black List
 ---- License plate from White List
No License plate type will be shown if the license plate does not exist in Black/White list.
You can right click on the ANPR notification push window to pop up a menu, and choose to add the license plate to White or Black List in the VMS system. If the license plate has already existed in the White or Black List of VMS system, then you can choose to change its type or delete the license plate from White or Black List.
Besides, you can click the license plate information to check the 20s video. (20s = the pre 10s + the post 10s of the license plate event)
Note:
Make sure that correct record schedule settings is made or the ANPR event rules are set to trigger recording, so that you can check the record in the ANPR Preview Panel.
4. ANPR Management
Add the license plates as Black/White List as needed in the interface, and the license plates without the set types are the visitors. After enabling license plate recognition, VMS Enterprise will automatically receive the recognition result sent by the Milesight cameras and compare it with the black and white list added in VMS Enterprise.
1) License Plate Group
①Add license Plates
You can choose either of the below two ways to add the license plates.
a.Add license plates one by one
Step1:click  button to pop up a Add Plate window, then input the license plate and select the license plate type as black or white list, and click
  button.
Step2: Repeat the Step1 to add other license plates manually.
b.Batch import license plates
Step1: Click  button to pop up a Import Plates window. The imported file must be filled in according to the specified format. You can click
  button to download the template.
Step2:After filling in, click  button to import the plates file, then click
  button.
After successful import, you can click  button to modify the corresponding license plate and plate type.
Note:
l The format of the imported license plates file must be csv.
l The CSV file must be saved in UTF-8 encoding format.
l A license plate can’t be repeatedly added to the plate list.
l Maximum quantity of license plates added in the list is 10000.
②Search License Plates
You can select the plate types including Group Type (Black List and White List), Plate Type, Status or directly enter the license plate number, and click the “Search” button, then the corresponding license plates will be displayed in the list below.
Note: The text searched is a case-insensitive contiguous string.
③Export license plates
You can click button to export the license plates in the current list to a csv form locally. If you filter the license plate list, only the filtered list will be exported.
④Delete license plates
Click  button to delete all the license plates in the current list. If you filter the license plate list, only the filtered list will be deleted. You can also click button to delete the corresponding license plate.
2) License Plate Library
You can select the plate types including Group Type (Black List and White List), or directly enter the license plate number, and click the “Search” button, then the corresponding license plates will be displayed in the list below.
Note: The text searched is a case-insensitive contiguous string.
5. Set/Check ANPR Record
①. Add ANPR Event Rules
Event&Alarm -> Event Configuration -> Event Rules, click  button.
②. Set related events and alarm trigger actions.
Step1: Select the Trigger type as: Smart Analysis Event;
Step2: Select the event type as: ANPR Event;

Step3:Select the camera that needs to set related events;
Step4: Set up event scheduling;
Step5: Set the alarm trigger action.
Alarm actions include recording, APP/HTTP notification, sending email, recording log, previewing screen changes, and IoT Sensor control, etc.
Step6: Set the alarm settings.
Enable the trigger alarm, select the relevant user after selecting the ANPR alarm priority and action interval.
③. Search for ANPR related videos.
Select the corresponding LPR Camera on the playback interface, click  button, and select the ANPR event;
Then the replay interface will only display videos related to ANPR events.
6. ANPR Result Search
When the Black List/White List is enabled and the corresponding schedule is set, and the storage disk is enabled, you can view the corresponding detection results in the ANPR Search interface.
Note:With the addition of the back-end algorithm, both the ANPR Preview and ANPR Result Search interfaces can receive license plate related information from both the front-end and back-end ANPR algorithms. If it is back-end algorithm recognition, then the AI icon will be added next to the license plate number in the picture, and the Analytics Mode in the Details will be displayed as VMS Analytics, while the opposite is Camera Analytics.

Step1: For license plate information screening, you can choose start time, end time, license plate, Group name, plate type, Analytics Mode, camera, vehicle characteristics, vehicle color, vehicle type, license plate color, Direction, speed and other filter conditions.
Step2: click button. Then the related license plate information will be displayed as below.
Click  button to show Thumbnail Mode.
Click  button to switch to List Mode.
Step3: Click on the thumbnail photo in Thumbnail Mode or license plate row in List Mode under the searched results, then the license plate details will be shown as below. If there is a recording video about the license plate recognition, then you can click  button to play the video or click
  button to play the video in the playback interface.
Note:
Make sure that correct record schedule settings is made or the ANPR event rules are set to trigger recording, so that you can check the record in the ANPR Search interface.
Step4: You can click  button to backup the ANPR files you want to a local folder.
Step5: After setting the backup file destination, type and format, click  button to start the file backup. You can click
  button to check task backup situation as below.
Step6: Add to License Plate Library
Click on the thumbnail photo in Thumbnail Mode or license plate row in List Mode under the searched results,then click  button,Enter the group name and click
  button,the selected license plate can then be added to the license plate library.
6.Picture Storage
On this page, you can enable or disable ANPR picture storage, and set the minimum/maximum ANPR picture storage time.
Note:
Auto: The ANPR pictures will be overwritten when storage space is insufficient.
Customize: Customize the storage time according to the requirements.
7.Traffic Report
On this page, you can view the traffic data report detected by LPR within a certain period of time.After entering the corresponding time and selecting the camera, click  button to generate a traffic report.
Click  button to pop up the Export window as shown below, and you can choose File Format to export the report to local.

-END-